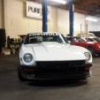
rayaapp2 Posted May 7, 2013 Share Posted May 7, 2013 So back in Dec of 2012 I was hit on the hwy. While traveling North bound @ 50mph an 04 Sienna traveling at 70mph hydro planned across 3 lanes to hit me sending me and and Bob traveling in reverse @ 50mph for 400 yards before coming to a stop on the shoulder. Ive been involved with this car since I was in high school. The PO sold it to me so it would be in good hands. Having promised I would continue to drive the car Im repairing Bob(named after the PO) So I procured a donor car. Its a 73 so it has the extra mounts for the 73 bumpers, but its perfectly straight up front. I was going to replace the clip entirely, but the battery tray in Bob is good and the donor car has some rust there. Luckily all the damage on Bob was on the drivers side and the passenger side was only damaged in front of the strut tower. So I plan on leaving the passenger side strut in place and removing the drivers side back to the bulkhead. Bob need some attention at the frame rails and the rear rocker corners as well so I will also be addressing those spots in the near future with Bad Dog Z full frame rails and Tabco rear rocker panels. I have been saving parts of for this car for over a decade! Hard to believe that but its true. I would buy the parts and send them to the PO. I bought a hyperflex kit in 2002 for the car and the PO never got around to doing it or having me do it. So thats another thing I will finally be installing as well. I have a lot of parts like that laying around and now is the time I suppose. The car has a moon roof and it leaks if its not perfectly shut. I have a good donor roof, but its the only 240Z I have with a sun-roof that works albeit finicky. So I may not go as far as to replace the roof. Its nice to have that thing sometimes when it works. Here is where I am at: Donor 73 My Drivetrain, and I pulled the turbo rims off, I kind of like the bronze Rotas on the orange. You can see how bad the front was twisted. The driverside frame rail is bent up slightly and Im going to have to address that to get the new clip on. My next step is to take measurements off the donor car and then put it under the knife next. The passenger side inner frame will be cut under the lip of the strut tower when its done and the seem will be hidden behind that. I will stitch weld the whole bay up when its done and you shouldnt see anything. I plan on using the frame rails from the old bent clip and making inserts that weld inside the current frame rails to guide the new clip into place. Quote Link to comment Share on other sites More sharing options...
rayaapp2 Posted May 8, 2013 Author Share Posted May 8, 2013 Quote Link to comment Share on other sites More sharing options...
Domzs Posted May 8, 2013 Share Posted May 8, 2013 Looking good so far . Stay dry , hope the weather is nicer there than TX . Quote Link to comment Share on other sites More sharing options...
yellowoctupus Posted May 8, 2013 Share Posted May 8, 2013 Great progress Ray. Are you planning on making some sort of jig to keep things square when you go to tack it together? I wouldn't imagine lining it up spot weld to spot weld would be good enough, and you'd need a really flat floor to get it to be a trusted line up datum. Any ideas? I like how your lift has a big label that says "LIFT" on it. Just in case you couldn't figure it out on your own. Quote Link to comment Share on other sites More sharing options...
rayaapp2 Posted May 8, 2013 Author Share Posted May 8, 2013 I only have to worry about the driver side being straight. I took lots of measurements and marked everything. I also made a jig to hold the upper strut towers and cross member in place. It should be close enough to get it aligned but not perfect. I plan on blasting the whole front end before it gets painted fully welded up, but the weather isnt great here either(but its not raining). Quote Link to comment Share on other sites More sharing options...
seattlejester Posted May 8, 2013 Share Posted May 8, 2013 Wow doing work! Keep it up man, glad your ok. Quote Link to comment Share on other sites More sharing options...
Leon Posted May 8, 2013 Share Posted May 8, 2013 Nice work Ray, you sure are ambitious! Quote Link to comment Share on other sites More sharing options...
rayaapp2 Posted May 9, 2013 Author Share Posted May 9, 2013 Nice work Ray, you sure are ambitious! By ambitious you mean I want another at least 20 years of driving out of this car, then yes! lol I spent the better part of today utilizing a steam washer. 3 gal of diesel later the orange car, my 570Z, the diesel maxima, the s13, and all the misc motors I have around all got cleaned! The undersides have been stripped of the grease! Ill get some pictures tomorrow. The L28 for the orange car looks great now. I realized today that Im going to have to paint everything. The suspension, cross members, everything. Oh well. Its gonna look good when its done. Perhaps one of my spawn will take a liking to the car in 20years and I can pass the madness to them. Quote Link to comment Share on other sites More sharing options...
Leon Posted May 9, 2013 Share Posted May 9, 2013 Nice man, by ambitious I mean you're getting big jobs done quick. I love that you're bringing the orange car back to life, can't wait to see it! BTW, damn Ray, you have quite the "collection". Quote Link to comment Share on other sites More sharing options...
240zip Posted May 10, 2013 Share Posted May 10, 2013 Your situation looks similar to a fix we did. like you we elected to remove the old bent metal. We found a straight, rust free front clip then we welded and make the front area stronger than stock. it does require some welding skills Quote Link to comment Share on other sites More sharing options...
rayaapp2 Posted May 10, 2013 Author Share Posted May 10, 2013 Quote Link to comment Share on other sites More sharing options...
R3VO 3VOM Posted May 16, 2013 Share Posted May 16, 2013 I'd take that big letter valve cover. haha. Looking good from what you started with! Quote Link to comment Share on other sites More sharing options...
duragg Posted November 19, 2013 Share Posted November 19, 2013 How did you verify things like the hoot attach area is spot on? I guess in reality there adjustment range built in. Quote Link to comment Share on other sites More sharing options...
240zip Posted November 22, 2013 Share Posted November 22, 2013 we used a frame jig. Quote Link to comment Share on other sites More sharing options...
Tony D Posted November 24, 2013 Share Posted November 24, 2013 (edited) Your situation looks similar to a fix we did. like you we elected to remove the old bent metal. Looks like you flanged the connection point so it could be accomplished with a double lap weld instead of a butt weld. I did a 76 in similar fashion...and due to beer wasn't sure on my measurements so at the last second also decided to flange the connection point as "it's a 76, who cares if it's been clipped?" There was some measurement error on my part...it was good to have a double flange to work with! I would probably butt-weld today, and take a lot more time on it. Cross measuring and being careful keeps things aligned. I literally bolted the hood back on and closed it...making tack welds top and bottom after the sections were aligned for smooth opening and closing. When the fenders went back on gaps were fine! We did not have a frame jig. But we did have four cases of good old 12.5% Red Horse and all weekend at the Torii Auto Hobby Shop to get it done! Edited November 24, 2013 by Tony D Quote Link to comment Share on other sites More sharing options...
z-ya Posted December 6, 2013 Share Posted December 6, 2013 (edited) Your situation looks similar to a fix we did. like you we elected to remove the old bent metal. collins240z 084.jpg We found a straight, rust free front clip collins240z 116.jpg then we welded and make the front area stronger than stock. photo 018.jpg it does require some welding skills fred240z 007.jpg I am doing exactly the same job to my turbo car. It has been hit 3 times in the front, and has an aftermarket radiator support that was brazed in. So I have a nice front end that is straight. I was planning on using the line where the strut tower is spot welded as a guide. It will also provide more material to make welding easier. I will also have a backing plate to prevent blow through. I am having inserts for the frame rails made to assist in alignment. After the new front end is welded on, I will take it to the frame shop for tweaking if needed. I'll take some pics and post them. Edited December 6, 2013 by z-ya Quote Link to comment Share on other sites More sharing options...
The Kid Posted December 8, 2013 Share Posted December 8, 2013 Great post, was wondering if you have pics of how your fitment of the frame rail was done? Did you butt weld it or what ? I am in the same boat working on deciding which way to go either new aftermarket frame rails or find a front donor? I understand how your stiched the inner fender in under the strut tower but looking for pics of how you fitted the frame rail of the donor to the your car. Thanks Newtonhubcap Quote Link to comment Share on other sites More sharing options...
heavy85 Posted December 8, 2013 Share Posted December 8, 2013 I've seen a couple here and know several non Z's where they cut the front clip off just in front of the strut towers off like in 240zip's picture and replaced with tubing in the name of saving weight. Anyone know how much the clip in front of the strut towers weight to understand if there is much potential savings there? Quote Link to comment Share on other sites More sharing options...
tube80z Posted December 10, 2013 Share Posted December 10, 2013 I've seen a couple here and know several non Z's where they cut the front clip off just in front of the strut towers off like in 240zip's picture and replaced with tubing in the name of saving weight. Anyone know how much the clip in front of the strut towers weight to understand if there is much potential savings there? It depends on how you replace it but I'd guess somewhere in the 20 to 40 pound range unless you get really creative. This is assuming a 240. On a 280 you can probably double that number if you don't replace any of the bumper reinforcements. Not something I'd probably do outside of an all out race car. Cary Quote Link to comment Share on other sites More sharing options...
z-ya Posted December 11, 2013 Share Posted December 11, 2013 I have the front clip cut and ready to weld up on my car. It is not very heavy. I don't think you could save all that much weight. I am having U shaped inserts bent up to slid into the frame rails to align them and also give more material to make welding easier. Quote Link to comment Share on other sites More sharing options...
Recommended Posts
Join the conversation
You can post now and register later. If you have an account, sign in now to post with your account.