-
Member Statistics
32499
Total Members2093
Most Online
All Activity
- Today
-
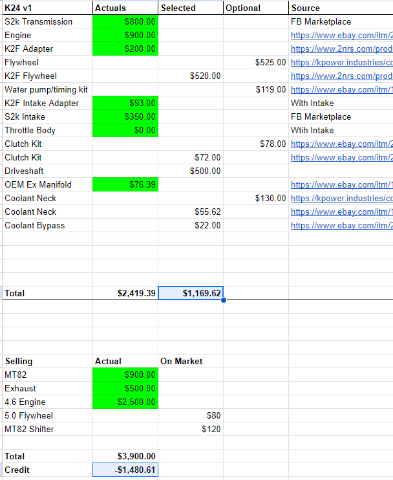
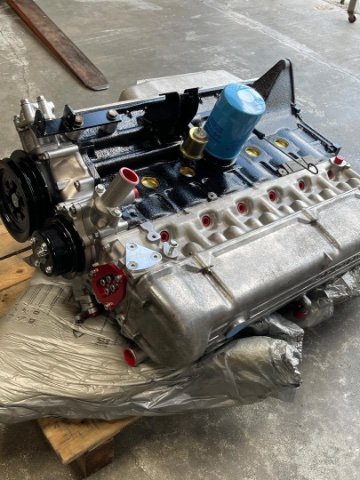
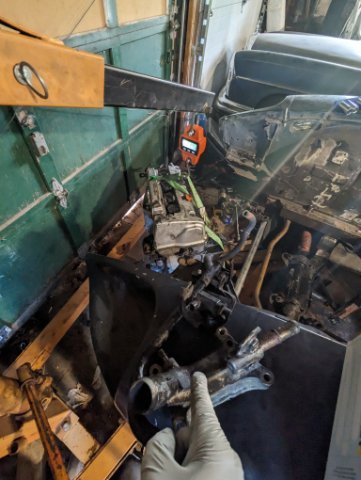
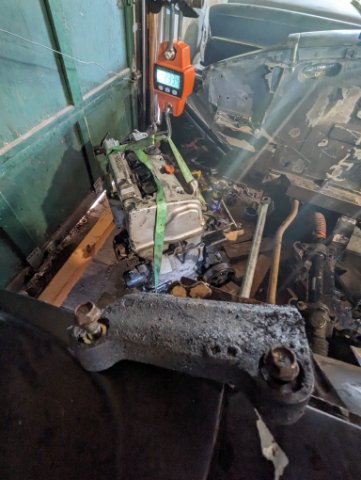
This is fantastic information. I also need to get some dowels but I have that information assuming it's correct: Dowel Pins 4x 15.25mm (Length) x 12.70mm (Diameter) And yeah, I ordered the upper coolant housing version that had the fill neck. I don't have a hood latch, so I wasn't worried about colliding there. As far as mounts, my factory perches are already cut off anyway. And I also already have metal materials and bushings from the Ford swap attempt that I plan to reuse. Luckily mounting is a small piece of the time pie, so it's not a huge expenditure. I wasn't sure yet on a swivel neck housing for the t-stat, and I wasn't sure I liked the idea of tossing parts at something when the OEM parts might work. And yeah, I'm definitely keeping the internal tstat bypass. I'm aware of how bad that would be to entirely eliminate for the pump life, though my research suggests it's probably better to cap off my heater line (since I won't be running a heater) versus routing that in as a second internal bypass. I'm also not adverse to hammering/cutting the transmission tunnel. I already have the reinforcement box that the stock ears are welded to. I'm also not adverse to having the oil pan a touch under the stock L series location, as the stock L series pan actually sits ABOVE the bottom of the floor pan and the lowest point of the radiator from factory. I don't plan to drag the oil pan, but I do plan to eventually build a belly pan and expect to run my engine as low as I can realistically get to that pan. Sounds like your clutch setup will be pretty trick and I'm sure it'll be wonderful. I'm rolling the dice, and going with the ebay xtd option. It might be crap. We'll see. In other news, some goodies have arrived: The MAP sensor on the TB was damaged in shipping, but not a huge deal since I wasn't planning on using it anyway. Intake came with K2F intake adapter and hardware and all looks to be in good shape. Now to just get my two stuck flex plate bolts out (it's been fun). Then I can get manifolds attached and lay the engine in for initial look of how things will lay out. Then onto transmission fitting and planning out the engine mounts.

- Yesterday
-

240z SCCA vintage race car, restoration
tube80z replied to AydinZ71's topic in S30 Series - 240z, 260z, 280z
Aydin, I didn't mean the adjuster was electronically controlled. Just that with pressure sensors, if you found a sweet spot for brake balance wet or dry you could easily get back to it. Push pedal for 1000 PSI total pressure front to 700 and rear to 300 for a 70/30 split as an example. Easier than needing a helper use a torque wrench on a front or rear wheel to set balance. On the electronic side you could have a channel to send info to a stepper or servo motor connected to the adjuster cable and do fun things like preset pressure by corner or based on weight transfer (light vs, heavy braking). And you could implement the old 90s technology of pendulum brake bias. BMW and Mercedes had systems that used a hanging weight to adjust side to side balance on the front to help with inside wheel lockup. I think if you search groups on FB for E36 Bimmers and the 190 Mercedes they have pictures or video of them working. -
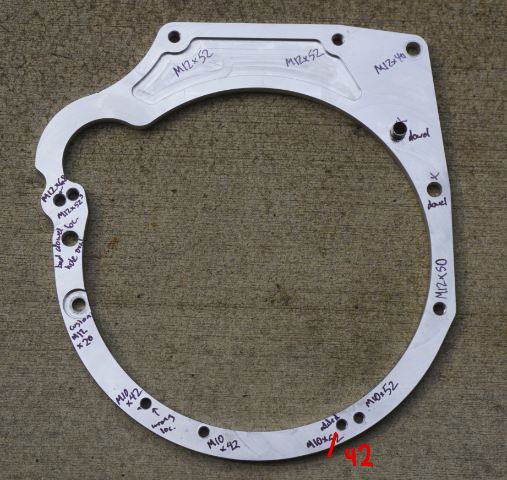
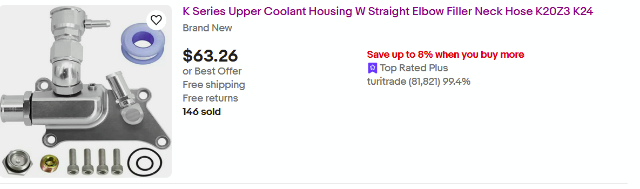
I saw your other post about k24 weights and responded there before seeing if you had a build thread...anyway. I'm *nearly done* with this swap. I have a spreadsheet of everything I've used on my swap down to single bolts. Once I get the car running I'll have a huge write up with that spreadsheet, links to videos/posts I found helpful, full documentation of component weights(Honda vs Datsun). If you have any specific questions I'm happy to help. I'm also going to be selling mounts and while they won't contribute to meeting your $4k goal, it would save you a lot of time. My swap was done in Solidworks from 3d scans in an attempt to minimize body modifications. I did need to notch the trans tunnel reinforcement to clear the shift linkage tube on the s2k trans and the hood latch bracket so I can remove the valve cover. Otherwise the engine is in the ideal location with the oil pan at the same level as the L series pan, just enough room to remove the water housing, and the shifter is in almost the exact OEM location. I welded the top of the Z shifter to the S2k lower portion and used the OEM rubber shift boot/seal ring. I considered the same transmissions, but ended up with the S2k trans as well. I thought it might be a bit cheaper since the adapter flywheels for the BMW, BRZ, and CD transmissions are spendy, but the S2k clutch kits are quite expensive. I paid 750 for the trans with shifter, 525 for the clutchmasters flywheel, 240 for the adapter, 360 for an ACT disc, 155 for a OEM Honda TOB, 150 for a OEM pressure plate, and 160 for the missing clutch slave, slave boot, fluid, misc little parts. Since your K2F adapter didn't come with bolts, here's a pic with notes. I ended up sanding most of the 52/42 length bolts to 51mm. They started out as 55-60mm bolts, but the adapter plate is so thin I wanted the extra 1.5-2 threads vs 50/40mm bolts. The 68mm bolt also holds the starter and 7mm of thread engagement with a 65mm M12 bolt is questionable. This was a PLM adapter, I would not recommend buying anything from them. It was missing one bolt hole(5oclock) and another(7oclock) was off ~2mm. I was able to open up the lower trans brace with a die grinder. I bought most of my hardware from Bel-Metric Edit: looking at your spread sheet. The OEM coolant inlet fits, don't buy one of those swivel neck turds. The factory thermostat has a bypass so coolant continues to circulate in the engine while it is closed. Those swivel neck versions don't have that unless you buy the $200+ version from Ktuned(?). I bought one of the ebay upper outlet housings without the additional bleed neck. The bleed neck won't fit with my current setup, but for only a few $ more I'd go that route. I'm concerned bleeding the coolant system is going to be difficult. I'll know in a few days... I also bored out the outlet. The ID on these cheap ORB fittings is tiny, I think it was 24mm. OD is 32mm and I bored mine to 29mm.
-
Edit: Derp, didn't realize this is an engine weights thread. Nice to see another K swap Z coming. I'll have a huge write up in 2ish weeks once mine is running. I'm also obsessing over weight and have been cataloging absolutely everything which will be put in a spreadsheet and shared along with a list of every part I used. PS, that last pic is the AC compressor bracket. PS pump is on top above the tensioner.
-
Ungabunga joined the community
- Last week
-
Yet another LS 260z swap :)
christianmoller replied to christianmoller's topic in Gen III & IV Chevy V8Z Tech Board
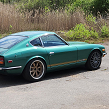
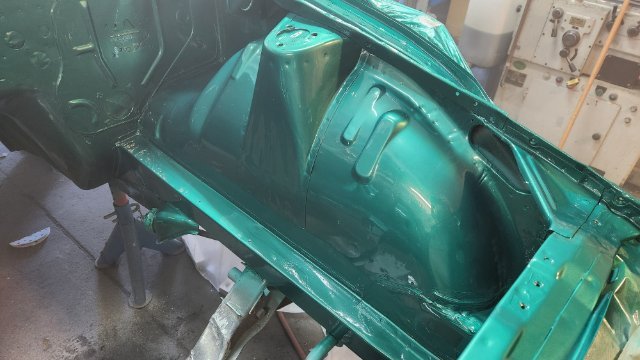
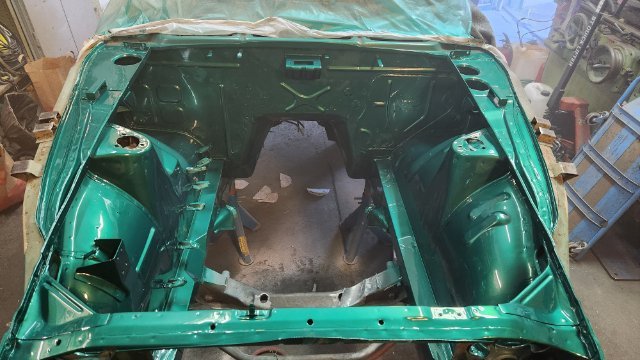
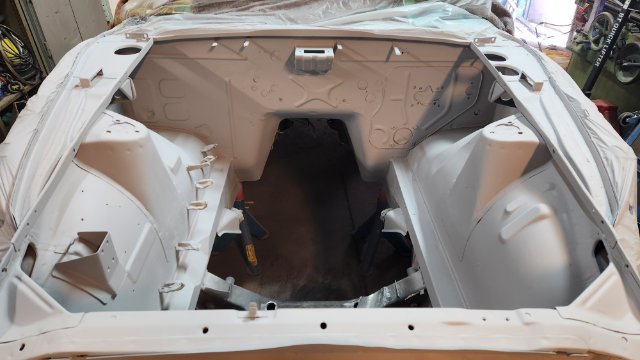
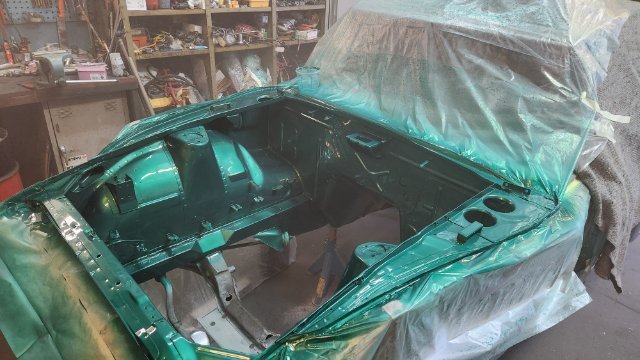
hello 🍻, Now the engine bay is emerald green again😀. After three layers of filler and some more sanding it was time for the green paint, three layers plus four of clear coat. Time to finish the headers and start making a flywheel for the Sachs clutch
-
 dawaca joined the community
 -

Passenger Side Turbo, NA Headers, W/ pics
Brad-ManQ45 replied to Flak280z's topic in Nissan L6 Forum
I think I would go with a stock square port exhaust manifold that you match the ports to gasket with and go from there after ceramic coating it. If you want to go for max power equal length headers are ok, but I've seen tests on turbo cars and using cast exhaust manifold weren't much of a liability and provided better low end. -
 HouseZ joined the community
 -
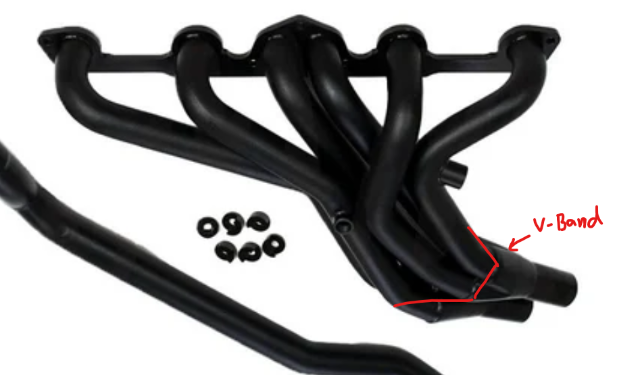
Like I suspected, it is the exhaust not being completely closed causing boost issues. I reseated and clamped everything, and I can make around 3psi. Yes Brad, v-bands would be ideal. The issue is, there's no space to put v-bands how I have the exhaust now. I want the piece that runs under the oil to be completely removable, for removability and space reasons, just in case. I'm going to start looking for another set of cheap headers to chop up and combine to add a v-band, see picture for what I'm trying to do. On another note, I have a piece of "welders felt" between my turbo mount and the fender. It's not very thick, and does not seem like it would do much, but it is working pretty well to absorb and dissipate the heat. I can touch directly on the other side of the fender right after a 15 minute drive without it severely burning me. It's warm, but not burning. I'm going to throw a second piece between and pick up some ceramic washers like other suggested.
-
https://i.imgur.com/lmqt4nR.jpeg oh dear, every other year i have to swap stock control arms for MOT. this time i fck it up, threaded nut went loose inside body from that bolt, anyone had to cut open body from inside to weld nut back in? and oil leak is still present
-
I am resurrecting this thread. Attached is the picture of the '73 240z in May 2013. Today after maybe 60k miles, the car still looks the same engine is pulling harder than ever, but we need a new Transmission and Rear end. After consulting with my son, I believe we are going to go the Subaru R180 LSD route for the rear end. For the transmission, we are planning to go to the CD009 or the 240SX FS5W71C depending on what we can find.
-
Still Available everyone!
-
 jojo187 joined the community
 -
How to know where a part number came from?
jojo187 replied to alexideways's topic in Miscellaneous Tech
Hi there 👋 I need some help does the ecu part # 23710 13V00 Compatible with a rb25det Neo The series 2 Solid lifters with the Coil packs? -

240z SCCA vintage race car, restoration
AydinZ71 replied to AydinZ71's topic in S30 Series - 240z, 260z, 280z
@calZ I saw them on the Big Willow schedule and was curious who they were. I will look into them, thanks. Season is over anyhoooo. Back in the 90's at either track already, and I don't have the right gear for that weather. Prob be back at the track in Nov. Should have the 3.1L installed in a month or so.
-
Passenger Side Turbo, NA Headers, W/ pics
Brad-ManQ45 replied to Flak280z's topic in Nissan L6 Forum
Take it to a muffler shop and have them install two v-band clamps... -

240z SCCA vintage race car, restoration
calZ replied to AydinZ71's topic in S30 Series - 240z, 260z, 280z
Lucky Dog would probably be a good organization for your car. Much more fun/$ than SCCA or the like anyway. -
Also just for openness, this is my current budget states. Intake an exhaust manifolds are en route. A had a lofty soft goal of doing the swap for $4k or less. Still unlikely. But not impossible.
-
Most likely thing to be leaking is the wastegate if it is a cheapo one. Next thing would be to check the blow off valve, normally they are springed at 6psi by default. Depending on what kind of muffling your doing, you should be able to hear the turbo spooling up and screaming.
-
240z SCCA vintage race car, restoration
AydinZ71 replied to AydinZ71's topic in S30 Series - 240z, 260z, 280z
73057652018__80411D85-1163-4DF2-A035-34420335C36B.mov
-
240z SCCA vintage race car, restoration
AydinZ71 replied to AydinZ71's topic in S30 Series - 240z, 260z, 280z
Hi all! Sorry for being MIA past two months. I changed jobs, traveled overseas, and general parenting obligations. @JMortensen I tried it for the first time at my local race equip shop! Need to get a copy on my PC with the Logitech wheel. Not as fancy as the setup they have at the shop, but all I’m trying to do is learn the track. Great recommendation. @clarkspeed appreciate all the feedback as always! @tube80z electronic brake bias didn’t even occur to me, but in hindsight it sounds spot on. Can use transducers with feedback to set-up pre-determined increments. Brilliant. Way beyond my skill or budget but i enjoy learning about the possibilities. updates: - work on air dam is almost complete. Widened to account for the additional track, stiffened, and injected PU foam In to the cavity created to stiffen and dampen. Almost ready for paint. - added AL cladding between the air dam and the rad support to eliminate air blow-by past the rad. Made a significant different in cooling. Will eventually add a wiper on the upper rad support to block air from going over, between the rad and the hood. - added a small electric 12” rad fan to manage overheating at idle. - PIAA lightweight motorcycle headlights installed. -fixed my camber issue in the rear. Moved-out the shock adjustment nob a little more than an inch to gain-back 4 degrees of camber. Rear now sitting at -3 deg. Still need to correct the front, although it’s not nearly as bad. Next up: swapping-in the race engine (3.1L). Looking forward to ditching the SU’s for some Haltech. Unlikely I will find a wheel-to-wheel class I can race with EFI on an L-series, but I’m simply tired of having everything smell like gas (including my hands, clothes, and even my living room).
-
Spent some of my lunch break today in the garage. Front engine mount (now front, RWD orientation): 2.8 lbs Driver's side engine mount bracket: 2 lbs Cylinder head rear coolant bypass (plus a solenoid I likely need to put back on at some point): 2.9 lbs Power Steering Pump bracket: 1.1 lbs (boy did I think that was going to be heavier since it looked like a chunk of iron)
-
Not too much to report at the moment. I’ve been battling electrical problems from the leftover stock harness, slowly replacing things. Did the ZCarDepot alternator upgrade because my stock wiring stopped charging due to corrosion. I can’t seem to make more than 1-2.5psi of boost. I’m going to retighten all of my intercooler piping and make sure my wastegate is working correctly. currently running an ebay special, 8 psi spring, no boost controller. I’m assuming it’s my pre turbo exhaust piping that’s leaking. I made the piping that runs under the oil pan removable, so there’s just exhaust band clamps connecting the two ends. It’s probably leaking around those, but I’m surprised I’m not making a little more. Attached is some test drives after rewriting my charge circuit, I love the way these cars sound. IMG_7704.mov IMG_7703.mov
-
Has anyone replaced their clutch master and the stock washer bottle wouldn't fit back in? What bottle did you end up using?
-
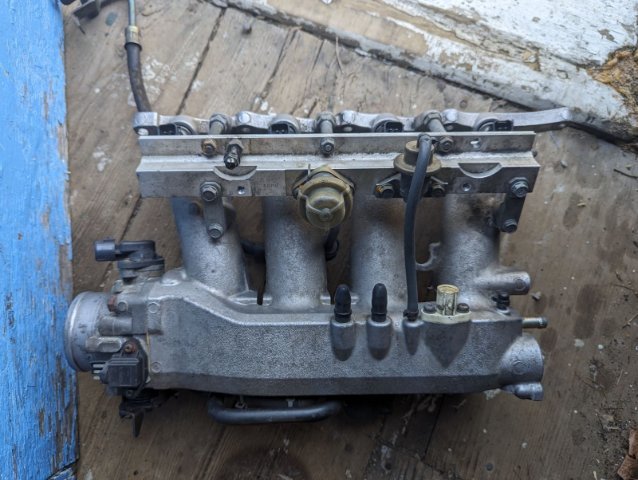
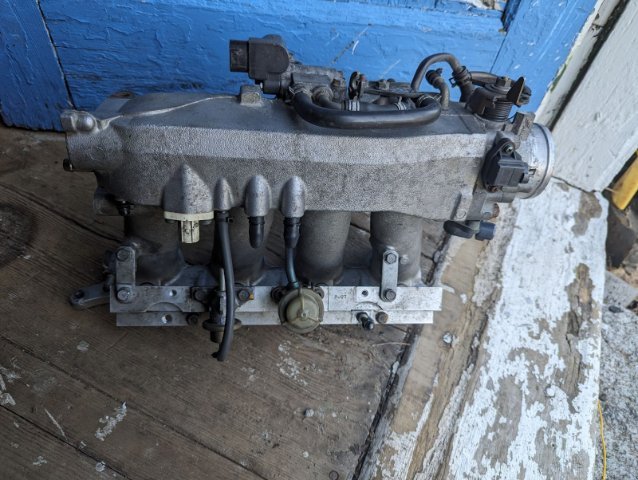
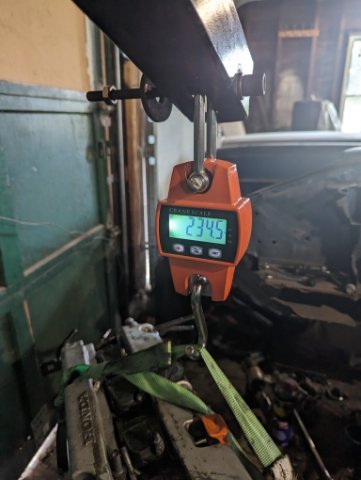
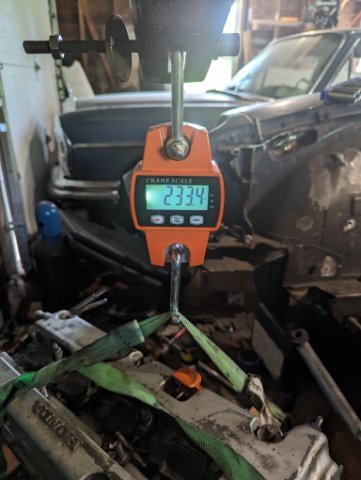
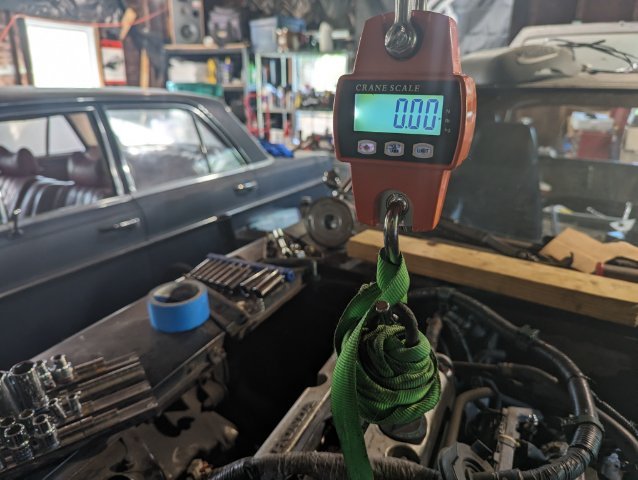
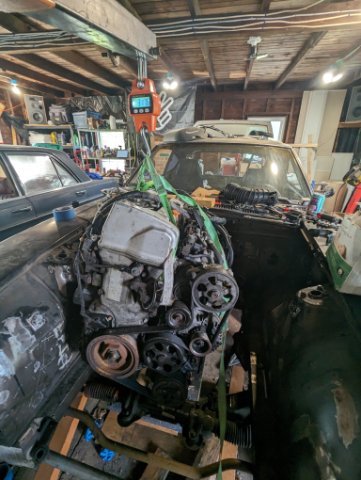
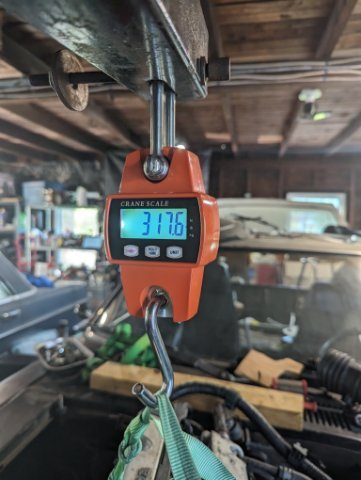
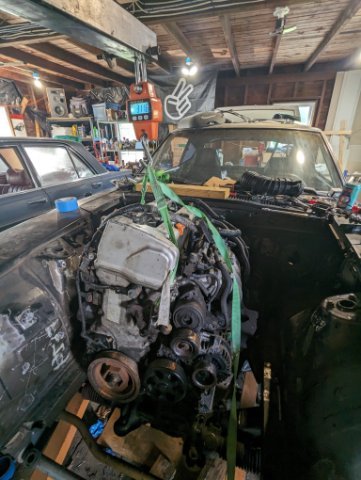
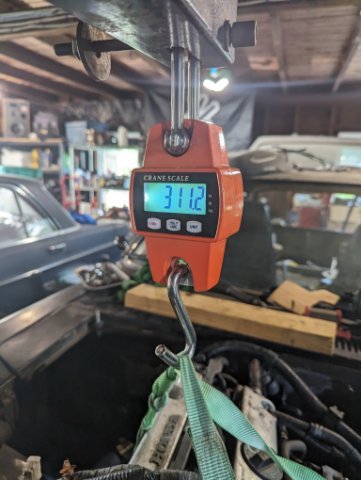
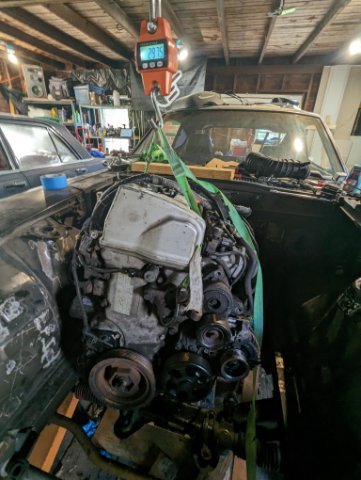
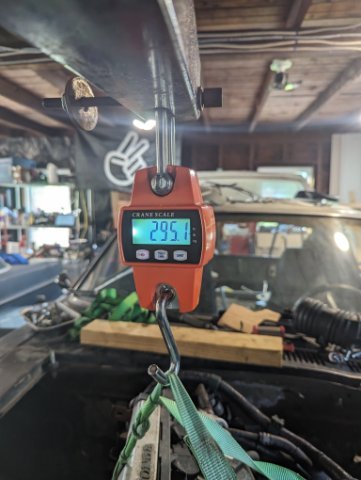
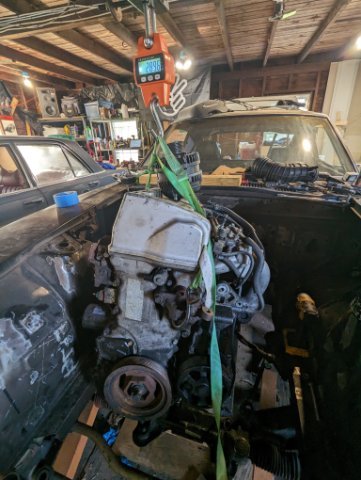
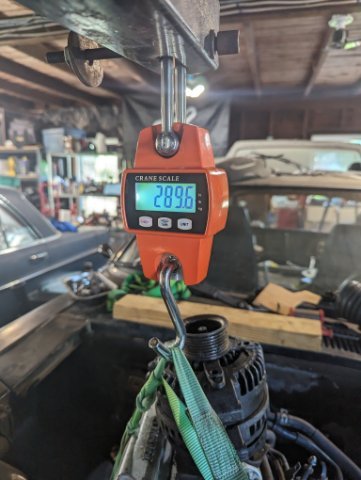
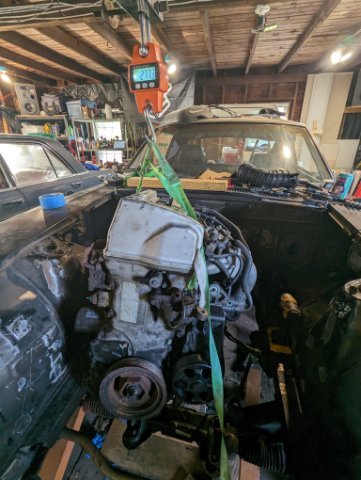
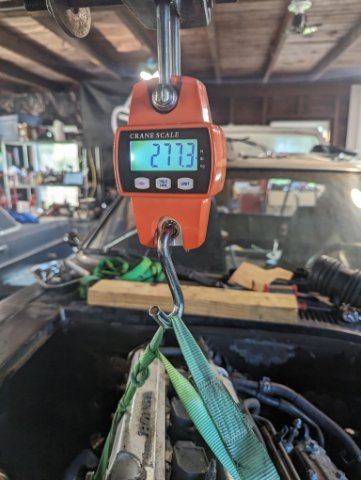
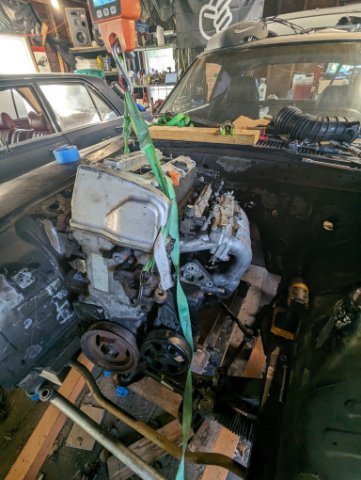
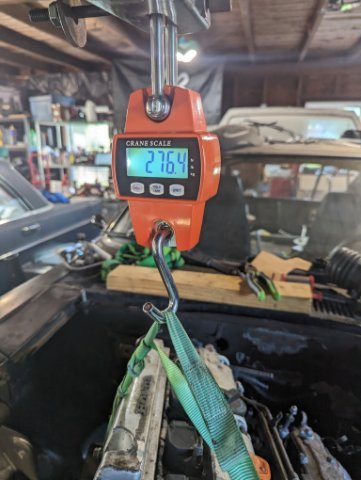
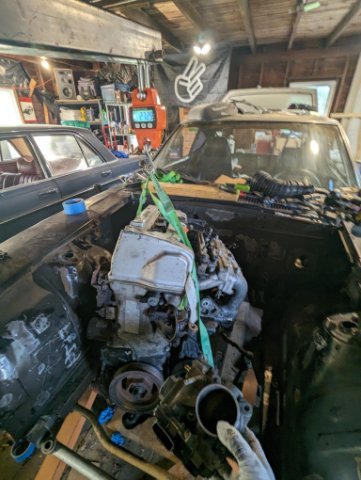
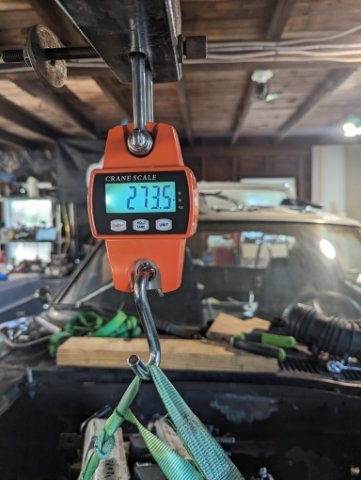
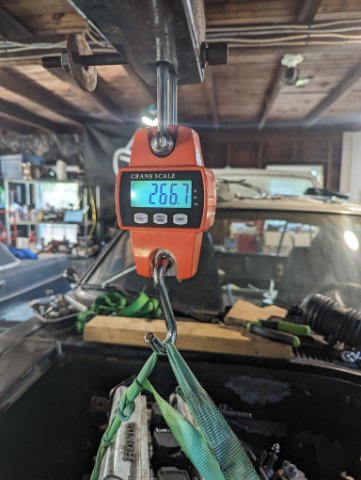
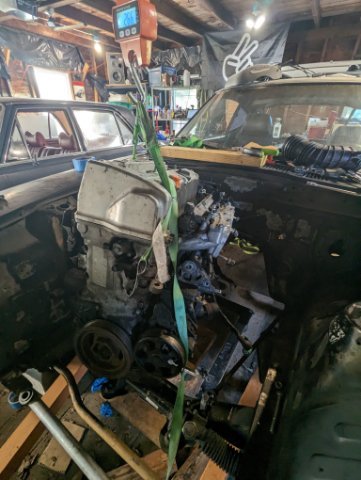
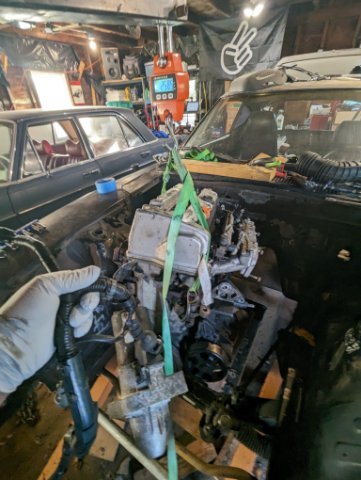
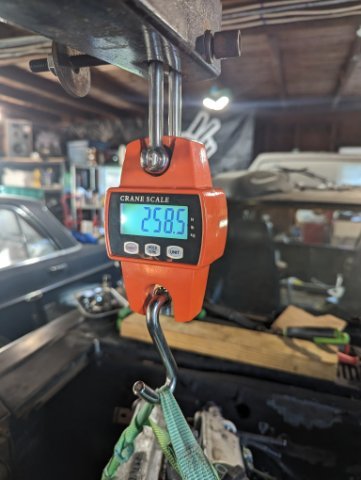
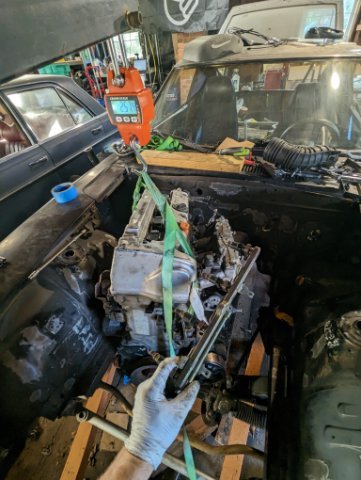
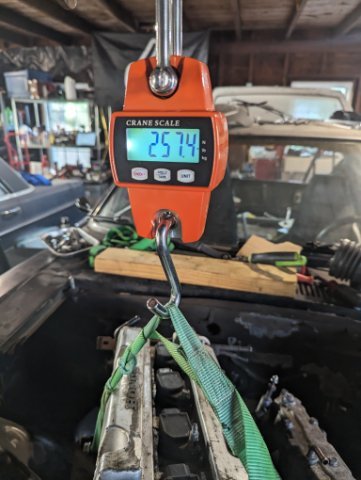
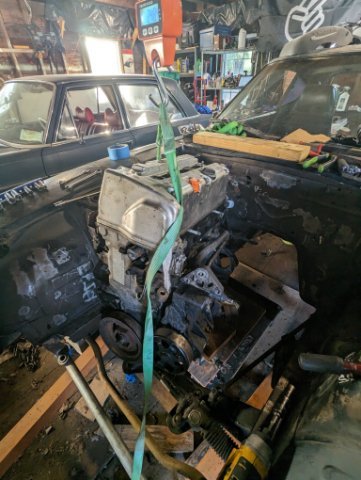
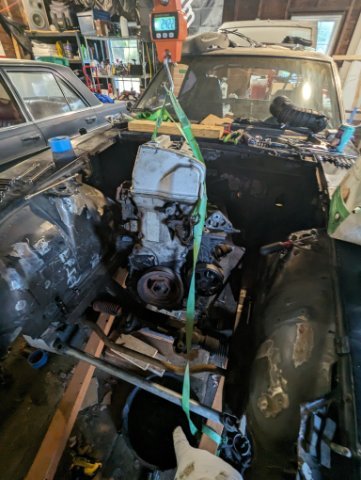
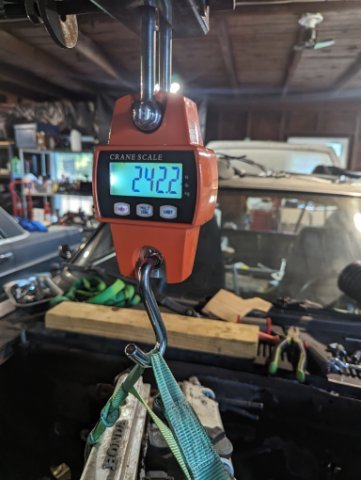
Since the reply button/box is MIA in the general engine/trans weight thread, I figured I'd just start a new topic and let an admin move the post if they wanted. I recently picked up a K24A2. It's an early TSX engine with a RBB-2 head, not the later TSX K24A2. I picked up crane scale that's (in my opinion) accurate enough for what we're working with. It has a limit of 660lbs and is supposed to be accurate +/- 0.1%. I started with the engine as delivered and pulled off parts at a time cataloging the weights as I went. My "linkage" weight was 0.31lbs, but I still tared it out. The engine as it sits in our starting point has known to be REMOVED: exhaust manifold, up pipe post throttle to air box, exhaust side engine mount (is there one?) The engine as it sits in our start point still HAS: Flex plate (auto trans car), AC/PS, Alt, Water Pump, intake manifold, DBW Throttle, Wiring Harness, Starter, and Oil (yes, came wet). It didn't gush any coolant, but considering it had oil I'm sure it would probably leak some coolant if I tipped it on an engine stand. First for removal was the power steering pump (and belt): That puts the PS pump at 6.4 lbs Next was the AC Compressor: That puts the AC compressor at a chunky 13.7 lbs Next was the tensioner: Puts the tensioner at 2.4 lbs Next was the wiring harness: Puts the wiring at 5.5lbs Next up was the alternator: Puts the alternator at 12.3 lbs Next up was a bunch of rubber hoses (vacuum and coolant) that were basically just in the way. Figured I'd include them as a step as to not throw off the weight of the next part: Puts us around 0.9lbs in hoses Next up was the DBW throttle (bolts were put back onto the intake manifold, this is just the dbw throttle): Puts us at 2.9lbs for the throttle body Next up was the "upper" intake (which I find ironic since it's physically lower) manifold half: Puts us a 6.8lbs for the upper intake manifold Next up is the starter (and some wiring attached that goes from the alternator and starter to the main fuse/relay section of the chassis wiring I guess): Puts us at 8.2 lbs for starter and wiring Next up is fuel rail and injectors: Puts us at 1.1 lbs for injectors and wiring (one tip stayed in the manifold, sorry. probably not much weight there) Next up was the lower intake manifold: Puts us at 9lbs for the lower intake manifold Next up is the oil still in the pan: Puts us at 6.2 lbs of oil I removed, which equates to around 3.4 quarts, so since these are generally around a 5-5.5 quart engine you could add another 5lbs to the initial wet weight to make it more accurate for a full wet weight. So what's still on the engine: Flex Plate Front engine mount Intake side engine Mount There's a bracket for the PS I haven't removed Water Pump Thermostat Housing Rear head coolant block Various Sensors/Solenoids (VTEC, VTC and more for example) Coils Spark Plugs Balancer A few random brackets There's probably another 5lbs of stuff from above that has yet to come off that is unlikely to go back on, though not everything that's going back on I can guarantee will be lighter than the OEM parts that came off. As such I'll likely weight again once it's ready to run. And thus there you go. What does a K24 weight? Somewhere between 240 and 320 based upon what the hell you're talking about.
-
Posting in the definitive engine weights thread shortly....
-
 Wansja joined the community
 -
DIY Stage III Shift Kit Installation for S30 and S130 Jatco Autos
Wansja replied to RB30X's topic in Drivetrain
Looking for a kit for a rx5 turbo wansja@gmail.com - Earlier
-
height is equal of L6 genuine fits well under the hood because my engine is lowered with dry sump, same for the OHC No inspection , the block is L28, that's all


-
Who's Online 2 Members, 0 Anonymous, 152 Guests (See full list)