-
Member Statistics
33054
Total Members2523
Most Online
All Activity
- Yesterday
-

Twin cam head for the L6 from Derek at Datsunworks
Derek replied to Derek's topic in Nissan L6 Forum
Meh, he's a paid supporter of the site. I figured I'll give him his moneys worth -

Twin cam head for the L6 from Derek at Datsunworks
Ben280 replied to Derek's topic in Nissan L6 Forum
I for one, appreciate that the one active thread on this website is a handful of folks coming to defend Derek, and somebody with an ax to grind. -

Twin cam head for the L6 from Derek at Datsunworks
NewZed replied to Derek's topic in Nissan L6 Forum
You guys went for the troll's bait. Tiny tiny win for zboi. -
Twin cam head for the L6 from Derek at Datsunworks
Ben280 replied to Derek's topic in Nissan L6 Forum
FWIW, when I spoke with Bluemoon Performance (importers in SoCal for the PAMS head) in 2022 they quoted $8-10k for the head with no cam towers or other parts. Do with that what you will, I would expect the PAMS twin cam head to decently expensive. -

Twin cam head for the L6 from Derek at Datsunworks
madkaw replied to Derek's topic in Nissan L6 Forum
You should really just post on FB because they love trolls and useless posting there -
Twin cam head for the L6 from Derek at Datsunworks
Derek replied to Derek's topic in Nissan L6 Forum
I have two heads in stock as I type this so the head can actually be purchased. I can't help that you can't afford it. That's a feature not a bug. For the very beginning my goal was to provide the components so that talented engine builders could make the decisions on the types of components they wanted to use. Based on what I've seen and taking the pricing of the relatively simple L6 head as the baseline I highly doubt it. I'm not really sure what I did to put a burr under your saddle but you remind me of the guy that starts a fight in the line to get into the club because he can't afford the cover charge. Just get out of line and go somewhere else. -
My tuner has me setup with speed density and a separate idle table. All in all it does fine but the reality is until I build my stroker I have way too much induction for the displacement.
-
Don't worry PAMS is already testing a real DOHC head on cars and you will actually be able to buy it. I expect prices to be better and unlike this head it will install without a headache and an engineering team.
- Last week
-

Fast Floridian's 240Z Track Build
FastFloridian replied to FastFloridian's topic in S30 Series - 240z, 260z, 280z
Car had a cage already when I bought it. I’ve got a front strut brace that also ties into the firewall (apex), and braces on the inside of the fenders I’ll be welding on soon (apex also). Debating whether I need to beef up the frame rail or not since I’ve got the cage. Below is a pic when I bought it last year that shows the cage a little.
-
What’s funny is that just cruising around is all I’ve got done as far as a tune . I’ve got a Z friend Yanni Maltabes that use to post here I believe . He swears he can help me tune purely alpha N and it will as good as MAP . I’ve also come to the realization that I can no longer be lazy about learning Megalog viewer and analyzer . Maybe also got lucky that these FAJS ITBS seemed to be very solid right out the box . Solid idle and good enough to drive and tune . I also know my engine very well so I will know when I have it right . Who knows if I will stay the course forever or try my diesel intake later . Are you running the ITB or Alpha N ? Yanni tells me he can run every table strictly from TPS - which seems daunting . When I started reading about scatter plots and needing data logs from MAP runs to utilize ITB mode in MS is when I decided to go strictly TPS . I will have MAP in the background
-
Twin cam head for the L6 from Derek at Datsunworks
madkaw replied to Derek's topic in Nissan L6 Forum
I’ve been making an effort to get back to the forums . I usually post a link to here when people ask about stuff that’s been documented here for decades . My last job as an over the road locomotive engineer gave me lots of time in hotels to document . Now I’m retired and busier than ever - but use that as an excuse to not post . The forums saved me money and time and I’d like to pay it forward ! Now I’m the local Z guru which has made some cool connections and projects . I wish there was a better marketplace than FB - but it’s probably the best thing about FB- lol -
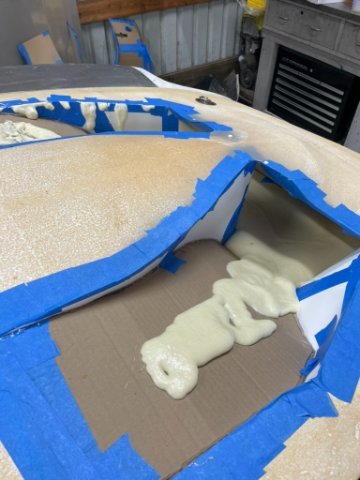
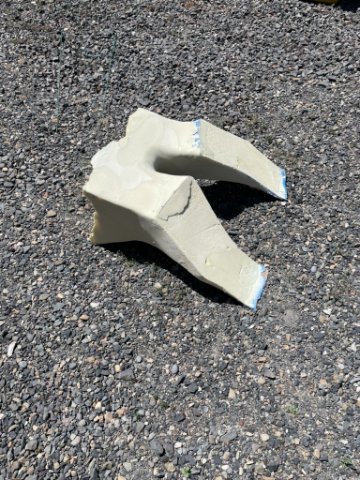
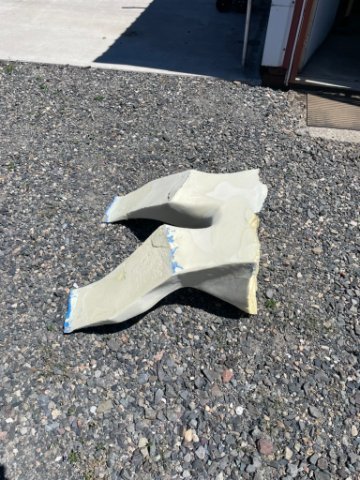
Also working on getting the radiator extractor wrapped up. This part has been a LONG time coming, and after a lot of pausing since I wanted to do it with carbon fiber, I've cheaped out and will just make it out of fiberglass and waft black paint towards it. This was a pretty fun thing to build, and figure I can get y'all up to speed! First tho, everybody in the way-back machine to March 2024. First thing to do was figure out how to make the shape. I started by cutting two huge holes in the hood, and start taping cardboard and paper to connect the three shapes. The challenge with this method is that I've firmly attached the hood to the car with tape, and because the shape is mostly paper, there was no good way to remove it to do anything with it! I decided here that expanding foam was going to be necessary to keep the shape and give me something to work with. I managed to squeeze a trash bag around the radiator, and bought some 2 part expanding foam from Amazon and started pouring. This process took SOOO MUCH FOAM! So much foam. I had to re-order 3 times to fill the shape out. Two things to note for folks thinking about doing this: This foam expands quite a bit requiring a pretty rigid form, and it gets HOT. The foam expands as part of an exothermic reaction, and will get up to about 180*. This gets worse if you pour a lot of foam on top of other foam, so you really want to let it cure and do it's thing before you layer it up. Once the thing was full, I trimmed the outlet and then took the hood off and realized the Big Chungus (tm) that I had created. Realized here that I forgot we need to make space for the air filter. Also, realizing that all the cardboard and other crap I used to make the shape is now glued forever to the foam. The drivers side channel is also quite a bit bigger than the passenger side, as the passenger side dodges a number of cooling tubes. Some shaping is clearly needed. Luckily because this is 2 part foam (never NEVER use Great Stuff foam for this), it was easily shaped with saws, grinders and other tools, was sandable and fillable with bondo. Ended up with a good shape! Last thing to do was fill in the area where the radiator sat so the fiberglass has a mounting flange. I then wrapped the whole thing in metal tape to promote reasonable release and it promptly sat in the shop for a year. I started fiberglassing it up this week, and have the bottom of the shape glassed in. My plan is to use plastic and more metal tape to create this piece in 2 parts, rather than trying to break, dissolve and generally remove the foam by disastrous methods. It's looking pretty alright, hoping to get the rest of it glassed up today!
-
Got into the fiberglass over the weekend to start popping out the last few parts I need to get this thing "finished". First up is the 3d printed splitter transition piece. I think in a modern car this would be a lip, or airdam, but we all know the area it's filling! I knew I didn't want to encapsulate the PLA core, since this is just a wind diverter, so I taped down a bunch of plastic sign board to the bench, and then used hot-glue and foil tape to attach the piece to the boards. Polyester resin doesn't like to attach to foil tape, or corrugated plastic sign board, so I was pretty sure I could pop this piece off when I was done. A little bit of fiberglassing later, and we had the piece ready to go! Side note; People who are able to take in progress photos of fiberglassing are wild, and have a huge budget for gloves. Once the glass cured (which took a long time, I'm using a resin that i'm not super used to, under catalyzed to extend the working time), I was able to mark my trim lines, and then pop the part off! Super satisfying de-molding the part like that. For a Positive to Positive process, I couldn't be happier. I do think I'd like to try printing a mold, rather than a buck like this, it might make the finishing process just a little nicer. Needs to be sanded, some filling bondo applied and then primer and paint. This piece will then get a little rubber lip along the top, and likely be "speed taped" to the splitter. The front of the car is already low, if this were attached forever, I'd be in trouble!
-
Twin cam head for the L6 from Derek at Datsunworks
Ben280 replied to Derek's topic in Nissan L6 Forum
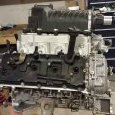
My inability to get involved with FB groups has lead me to instagram for a long time, but I think I'm heading back here for a bit. Generally better discourse and certainly better information. In line with the thread, I really wish I was #23! When I blew up my Rebello back in 2022 and made the call to go LS, a small part of my brain wishes I had done more math to see what the LS would actually cost to swap in, vs Dereks head. I think it would have been pretty close at the end of the day, and a whole heap of fun. Thanks for doing what you did, do, and continue to do @Derek!! -
Twin cam head for the L6 from Derek at Datsunworks
1969honda replied to Derek's topic in Nissan L6 Forum
I refuse to join FB groups for that exact reason. If you really want to learn, do some research, enroll in a community college course, apply yourself. Instead it seems a large majority are expecting everything to be handed to them and then arguing about the information/experience shared. -
I feel like Megasquirt and ITBs on my car is like a game of whack a mole. Getting it to work under hard pulls isn't an issue but getting it to be tame in normal driving scenarios can be daunting.
-
Twin cam head for the L6 from Derek at Datsunworks
Derek replied to Derek's topic in Nissan L6 Forum
I commented on a post about scammer groups and said that if we were still on forums there would be better control of this. Since there are 9 bazillion S30 groups it hardly got seen and the one comment was "forums are too cumbersome" I go there because that's where the customers are but I'll be dammed if I'm going to answer stuff that I know for a fact has been documented in detail on one of the three forums. The answer to every question I see should be "google it" -
Twin cam head for the L6 from Derek at Datsunworks
madkaw replied to Derek's topic in Nissan L6 Forum
It’s been a while since I’ve read on this thread. I wish I was # 23 ! Wish the thread did see more action as well as the site . I’m so tired of the FB shit -
Pac_Man hasn't been online in 8 years
-
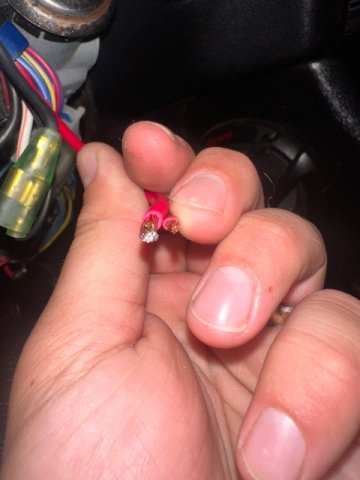
 Hi there, I am running the Holly Retrobrights on my 1978 280z. Currently I have lowbeams and high beams at the same time, but if I switch to just low beams, I have nothing. I also do not have running lights at the headlights, just high beam. So here I am trying to construct your creation! I am running into a few issues. The Red 12v wire from the top switch seems to be 10 gauge wire with matching 10 gauge bullet connectors. How did you get these two to connect with the connectors for the 14 gauge wire connectors?
 -
 aiden280zx changed their profile photo
 -

Twin cam head for the L6 from Derek at Datsunworks
Brad-ManQ45 replied to Derek's topic in Nissan L6 Forum
I for one appreciate what Derek has accomplished, and if I had the bucks would buy it, but I really can't see it ever becoming a commodity at commodity pricing. But then, I have an automatic that doesn't like high rpm and am limited by that to 4-500 HP with a turbo - and my stock head works for that. -
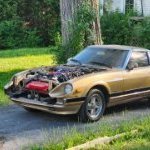
No idea on the owner but wow! I would have grabbed that hatch for the history in it alone. Rare to see these in a junkyard these days as well, very cool.
-
That worked...the images posted that time no problem.
-
Skyloc joined the community
-
How did the project end up turning out? I’ve got an 86 that I’d like to do this with… just a dream at the moment.


-
Who's Online 0 Members, 0 Anonymous, 342 Guests (See full list)
- There are no registered users currently online