-
Member Statistics
33050
Total Members2523
Most Online
All Activity
- Yesterday
-
Thanks. Glad to see someone running something that wide. Car looks fun, good luck at your next event.
-
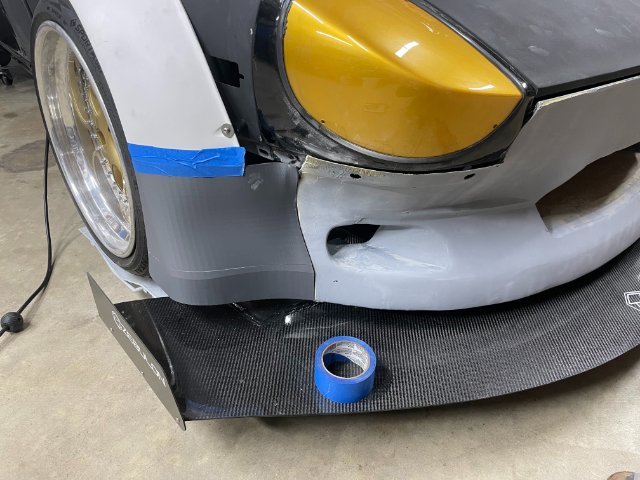
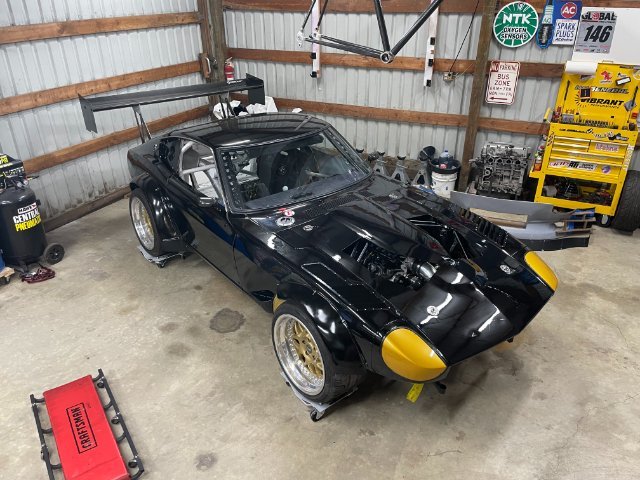
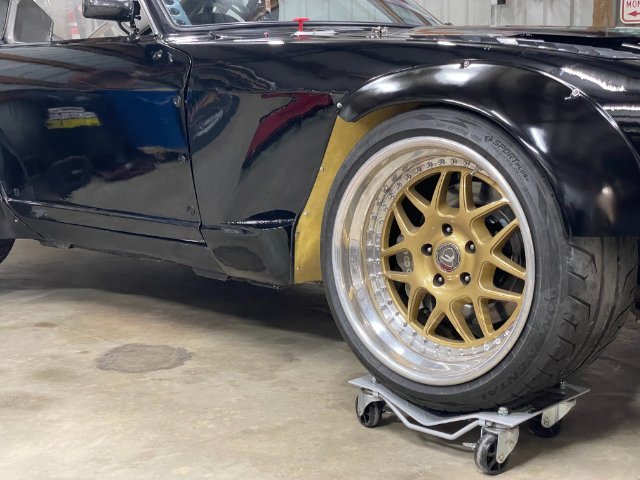
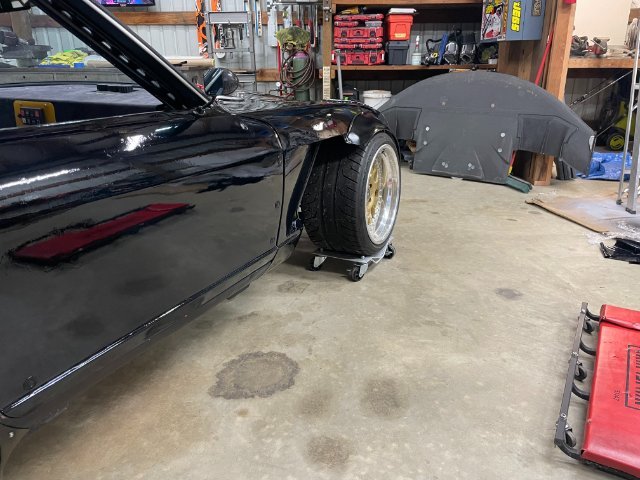
315/30r18 rear and 295/30r18 front. I think the rear wing is 72" wide with a 13" chord length. I wanted the wing to match the rear track width which is quite a bit wider than factory. Got the airdam painted and mounted this weekend, and finalized the splitter wire mounting positions. I have to fiberglass up the blending piece, but that should be pretty speedy once I get material. A couple photos of the mounting/airdam fixed on: I have a radiator to hood duct/extractor that i'll throw glass up while I'm at it in the next few days.

-
Looks good. What width tires are you running and what’s the width of your wing? I’m a long ways from my build being complete, but those are two things I haven’t decided on yet.
-
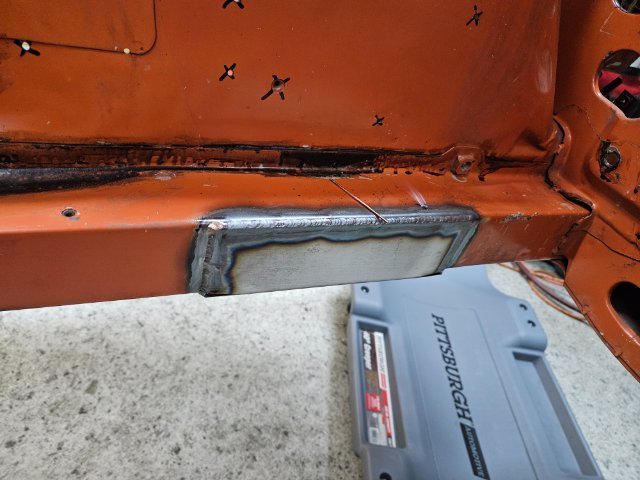
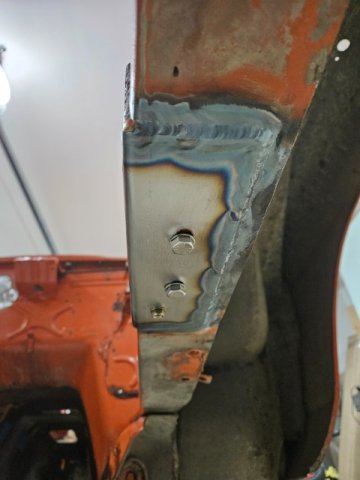
The actual ZCD L brackets themselves were not consistently bent. The widest gap I measured was almost 1/4" which I suppose can be filled in with weld, but is absolutely unacceptable for my standards. There's definitely a spectrum of skill and expectations when it comes to metalwork. My buddy had floors and rockers put into his 60s mustang by a mobile welder...sure it had new metal but the fit and welding was terrible. I took the time and massaged the metal to 0 gaps all around on both rails before welding. I shouldn't be surprised at this point tbh, even the door hinge kit from ZCD was garbage. I ended up having custom bushings machined after zinc coating for perfect door actuation. With that said I probably won't learn my lesson and will order more stuff from them to fix in the future 😂.
- Last week
-
This distance?
-
I imagine you will be saying Sayonara to the body for at least a year. Quicker than that you must have an "in" with the body and paint hop. Here's to hoping you get it back as soon as possible.
-
On mine, I also used the Z car Depot ones, I had a mobile welder install them.....basically he did what he could with them.....it seems the bend radius is not tight enough and so when welding you have to weld up that "gap? or relief cut, being thick gauge metal, it wouldn't be fun to beat it down flush.
-
Odd re quest. I am trying to get a measurement that I need to move forward in my differential build. I need a measurement from the Diff seal to the outer edge of the flange that bolts to the halfshafts. Anyone here running an R200 long nose that can measure that?/ Pretty Please?? I need to know how far out the stub axle sticks out so I can decide which CV axles I can use. Thanks In advance
-
The car is headed off to the bodyshop on Mon so I figured I'd do some final welding and chassis prep to save some labor. What was supposed to be a couple hrs turned into several mostly due to the poorly fitting front sway bar reinforcement plates from ZCarDepot but nothing a bunch of relief cuts, hammer, and brake time couldn't fix. If there's a next time I'll bend the reinforcement plates consistently myself as that may have saved me hours having properly bent brackets from the start. I haven't actually seen any pictures of how others did theirs, so I'll post these up for reference. I have done quite a bit of overhead mig, but never overhead tig and on my back so not my best work but it's under the car 😅
-

My Z car log....small jobs done and fun things
A to Z replied to A to Z's topic in S30 Series - 240z, 260z, 280z
05-02-2025. I got my shift knob with button. I got it from Speed Dawg Shift Knobs. Top notch shop. Shipped it very fast, well packaged and I even got a military discount. If you need a shift knob check this guy out! I got it installed, and all wired in to my Snow Performance Stage 1 Water/Methanol injection kit. I also got my Vacuum Block from Amazon, and got it all hooked up, so the vacuum needed for my Boost Gauge and J&S Safeguard is more professional. I also added a pic where you can see my passenger well is all cleaned up. Good day!
-

TR's 260z L28 Build Thread
TrumpetRhapsody replied to TrumpetRhapsody's topic in S30 Series - 240z, 260z, 280z
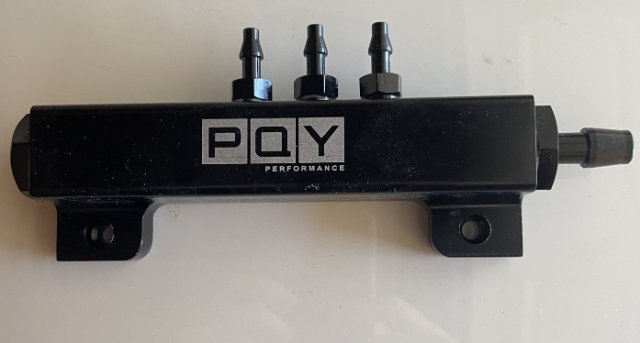
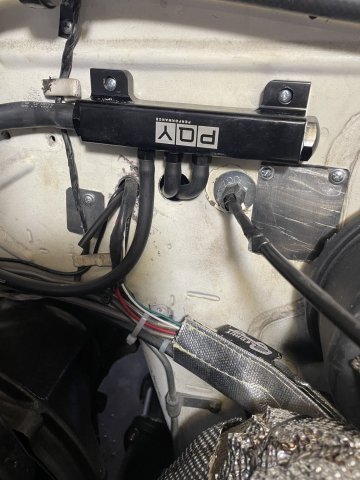
Since the last post I swapped in the 800cc injectors and ProTunerz fuel rail, but haven't gotten to re-doing the front lines yet. My idle PW is almost identical, and they seem to actually run smoother. Over time I had developed yet another exhaust leak, so I decided to have a flex coupler welded in and upgrade to a real muffler while I was at it. I'm also going to try the oblong locking exhaust nuts this time, to see if I can stop blowing out the gasket when the stock ones work loose. While the manifolds were off I swapped to my soft wastegate spring, since the hard spring was pushing a minimum of 14-16 which was a bit spicy at part throttle. The new spring wasn't giving me more than 12psi at max dutycycle, so after trying the reversed wg routing and getting a minimum of 18psi, I upgraded to a 4-port MAC boost solenoid. Now I'm able to hold from 6-18psi easily, and at only 60% duty I should have room to push past 20psi once on E85. I also wrapped my downpipe, because why not. Next up I need to fabricate some sort of air box and cold air feed, to stop sucking in hot engine bay air during the summer. Eventually I'll get around to wiring in MS3, new seats, roll bar. The list never ends.
-
 MONZTER changed their profile photo
 -
Tim1972 joined the community
-
 LeeZard joined the community
 -
so here is my cooler setup, previously 19row core was bypass oil cooler, now it is circulating coolant on citroen diesel sandwich heat exchanger, stack oil temp meter controls coolant pump and fan. lets see how it performs
-
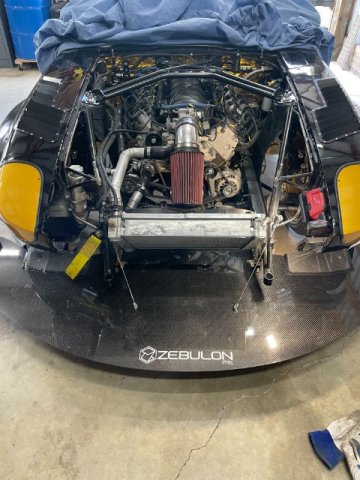
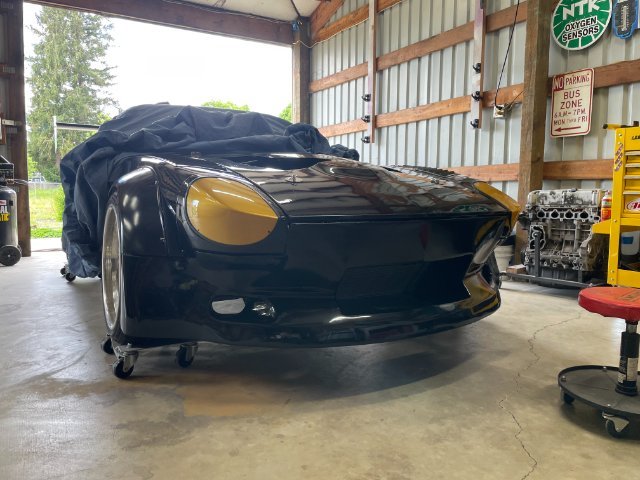
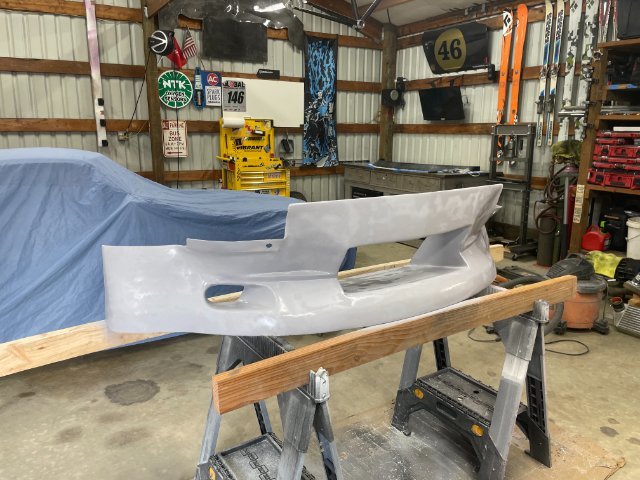
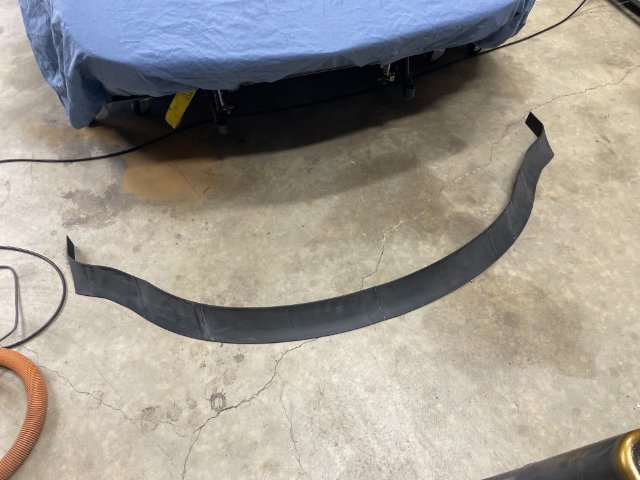
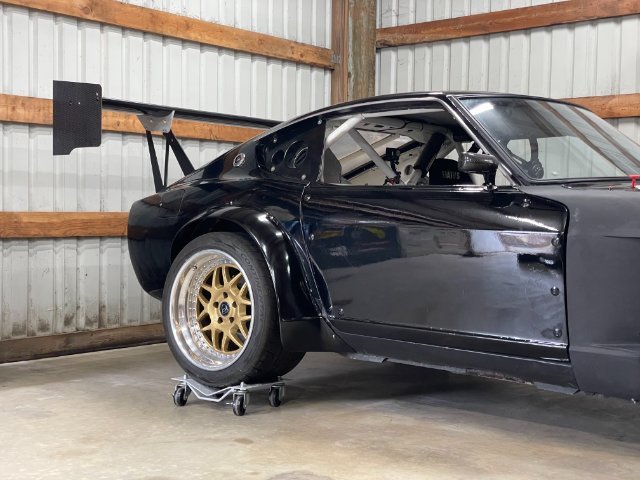
Well, winter was quiet! Spent most of the winter skiing, rather than being cold in the shop, but spring has sprung and we have some exciting progress on the car. Since the car is in good mechanical shape, the big to-do's have been cosmetic. Mainly the air dam! It's such a cobbled together thing that I knew I had to make some improvements. To that end, I bought a 3d printer, whipped out my iphone and got to designing some new end areas. I'm keeping the same spirit of the airdam as before, but symmetrical sides (just flipped this piece and printed again) meant that I can be confident in the tolerances that I'm working with on both sides of the car! Pretty impressed how well this lined up fresh off the printer, and from a medium quality iphone photogrammetry scan of the front end. I opted to use the PLA as a core for the fiberglass layup, we'll see how that does long term. People have issues with PLA as a finished surface as the "glass transition" temperature is pretty low, and normal temps for sunny car parts will result in significant softening. I think inside 5 layers of fiberglass it should be just fine. (Glassed, sanded down and filler primer. It's easily the nicest part of the airdam at this point!) There is a pretty good gap between the bottom of the air dam and the splitter, so I printed up another whole piece that I will use to pull a direct positive part from. I don't want this to be super heavy duty, so I'm not going to encase the PLA core. (printed and glued) This piece had some scaling issues, even though I modeled it from the same references as the airdam pieces. Oh well! Final bit was that I really needed to make the car all one color again, and install some of the fun stuff I had made up before the winter. I had aspirations of painting the car, but when that plan met with the reality of budget, I opted to go back and vinyl wrap the front end again. The hood might get a re-do, but otherwise I'm rather happy with how it all turned out! Hoping to have the car mostly back together this weekend, and then aiming for an auto-x event at the end of June to shake out the cobwebs from car and driver!
-
The topic has come up before. Might be something in the attached link. There are probably others. Compare the holes in the head with the holes in the block, and to the holes in the gasket. You might find that the different gaskets will flow the same amounts.
-
I got my Datsun Z Car Series Oil Sending Unit Relocation / Remote Block done! I have only one for sale now, but more are on order. I am pretty proud of this design. Three outlet remote oil sending unit block. Metal 3D printed out of aluminum to look stock and mimics the 240z, 260z and 280z brake proportioning block design. Block has 3 outlets, all are 1/8 NPT. Comes with a custom length -3AN hose and one 1/8 NPT -3AN fitting and either a 1/8 BSPT or 1/8 NPT for the engine block side of the hose. Stock sending unit on a 240z is BSPT, this will require a NPT sending unit like this. [https://zcardepot.com/products/oil-pressure-gauge-sender-240z-260z-280z-70-77?variant=32184292737137](https://zcardepot.com/products/oil-pressure-gauge-sender-240z-260z-280z-70-77?variant=32184292737137) No sending units come with this order. Pictures of sending units are just for reference. Link: https://www.m2racing.com/shop/p/datsun-z-car-series-oil-sending-unit-relocation-remote-block
-
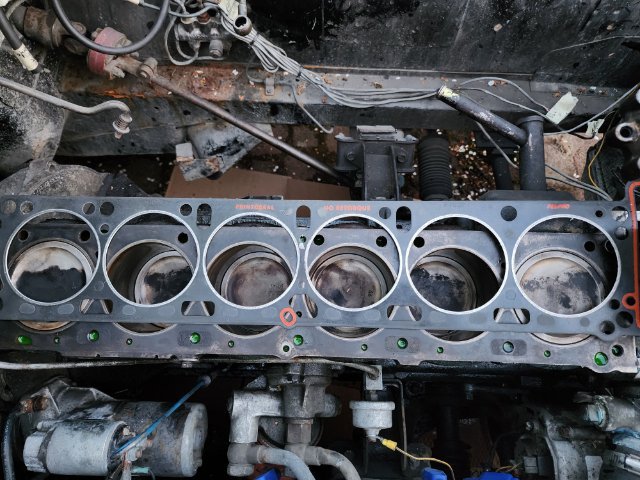
Hey all, I pulled my L28ET cylinder head to extract a broken head bolt and had an OEM head gasket ready. But when I pulled the old one, both made by fel-pro, I noticed it didn't have the same cooling channels as the OEM. It's been in there for at least 10 years and I haven't had any overheating issues. Anyone know what's up with this and if one is superior? Thanks (and yes I searched first)
-
Drove around yesterday with heat shield on . The tune is pretty rough and and sometimes the car wanted to die from starvation -scary . I used timing to lower idle after reading about a trick to deal with hit idle . Might have to call on Richard to help me remotely . Lots of rain right now so driving time is scarce .
-
 Greetings all, I am working on my 1983 Datsun 280ZX turbo (bought it new)! I mounted my Proturnez 3" down pipe to the new Garrett 3071 turbo and the pipe is about 1/8" from touching the steering heat shield on jacks. I feel confident that it will hit the heat shield while driving. Has anyone had this experience with their Z? Any thoughts on why this might happen or how to gains some space? Many thanks, Mark
 -
Yet another LS 260z swap :)
christianmoller replied to christianmoller's topic in Gen III & IV Chevy V8Z Tech Board
Crazy Scandinavians🤣. My intension was to have 65mm in profile height but then it starts to "eat" on ground clearance so i got the idea from my old Mercedes C43 were most reinforcement were on the inside , probably to get a flat underside. /Christian -
my acc belt runs like this, that blue part gets very hard flappery sound, diesel runs like it runs, my alternator is pretty light but it doesnt have clutch wheel. i could add another pulley to oil pump mount
-
im happy how it went so far, i got 5-10mm more room flattening stock radiator wall, without doing that mandrel wound not slide in. i tried to check how tooth belt runs, it seems to walk engine direction, hard to say how strong it pulls there and how long belt lasts. if i plan to do euro tour again this car i would need lots of tools. intake manifold has to come off. stock oil filter was top of engine it drained in couple days and oil pressure took always couple of seconds, now oil filter is down low close to oil pan level and hoses comes up i think that is best thing gained here. weight savings around 10kg now but goes down when i know if oil gets too hot
-
Last night I was disassembling the cooler packaging and snapped a quick picture of the frontend. It's interesting how the sheetmetal of the s30/s31 changed over time. On the later s30s a lip at the top of the core support was added (missing the seal in this pic), as an improvement to further force air through the coolers. On some builds I've seen this lip cut out for intercooler or other mounting. The lower support was also changed for the impact bumper, which also affects the valence mounting for the 73 year.
- Earlier
-
I always like seeing your updates on this. It's such a unique project. Please keep posting them.
-
Ah, I didn't realize they had built-in cable location options on the throttle body. That's convenient. I'm glad it worked out for you.
-
cleaned radiator cores and straightened all the fins. when installing drive mandrel with thin protecting cardboard theres 0mm space to slide it to its place


.jpg.196687cbbc10601f19beb7d7d158337b.jpg)
.jpg.a83ea2aecb39645f3032c7054981e0a9.jpg)
.jpg.5edf1f185591b77dda8d2be033453d58.jpg)
.jpg.9924b03cd2b0735a43453d090ad7812d.jpg)


-
Who's Online 0 Members, 0 Anonymous, 356 Guests (See full list)
- There are no registered users currently online