madkaw
-
Posts
2366 -
Joined
-
Last visited
-
Days Won
27
Content Type
Profiles
Forums
Blogs
Events
Gallery
Downloads
Store
Everything posted by madkaw
-
As the topic says, I need a oil cooler line(upper line) that rins from the oil filter to the cooler-mine is leaking. Thanks Steve
-
I started a thread just on this issue of Zeds Findings Floors. I even e-mailed Charlie. The floors are made to deep up front and thus don't line up with the frame rail. So your choices are tacking it higher on the rocker or leaving it alone and not having a perfect level floor. It's a shame because it would be nice to use the outer flange of the floor as your starting point, but it isn't made properly. It is doable, but a lot of work for not so cheap panels. My solution of a not perfect floor should be masked by the carpet and is hardly noticable from the outside.

-

The Rota RB-R (seeking advice)
madkaw replied to lorenzo's topic in Brakes, Wheels, Suspension and Chassis
Lip size is the same on the 8.5 and the 9 and the 9.5. (99% sure of that) 8.5 will fit up front with 235/45 17's, but it is tight on the strut/tire clearance(100% sure of that) The color is strictly subjective By the way-those are 245/45-17 all the way around. Somewhere I posted a thread on the fitment of these 8.5 4+ offset on my car!
-
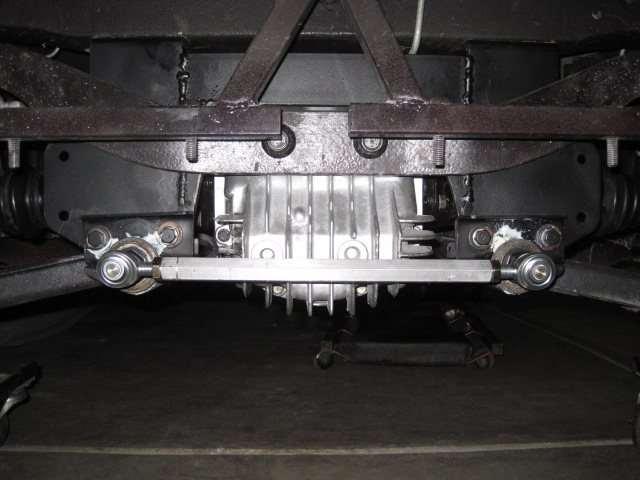
Rear Cross Differential Brace for CLSD finned cover (R-200)
madkaw replied to 73240z's topic in Drivetrain
Search in suspension forum ----poor mans toe adjuster- or something like that. There are quite a few ideas there to use, Probbaly something you can fab up if you have a welder.
-
Where you should buy your hard lines
madkaw replied to z2go's topic in Brakes, Wheels, Suspension and Chassis
I just bought the kit on ebay. The fittings were correct and the lines were very maliable. -
Okay, I'll admit that I like the old format better, but I'm not the type that adjusts quickly or easily-but I LOVE this site and thankyou for keeping it alive-sincerely. Now, why can't I see how to post a classified ad in the parts for sale. My profile still shows me as a supporter(albeit-- it was a long time ago), so what am I missing. I don't get the "start a new topic button" thanks Steve
-
I tried to PM you , but can't get that to work. Glad to hear you nailed down the issue, I thought it might be that valve. I have one off of my car that looks brand new that I will sell for 25$ plus shipping. You can e-mail me sfinnerty@indy.rr.com if you need it.
-
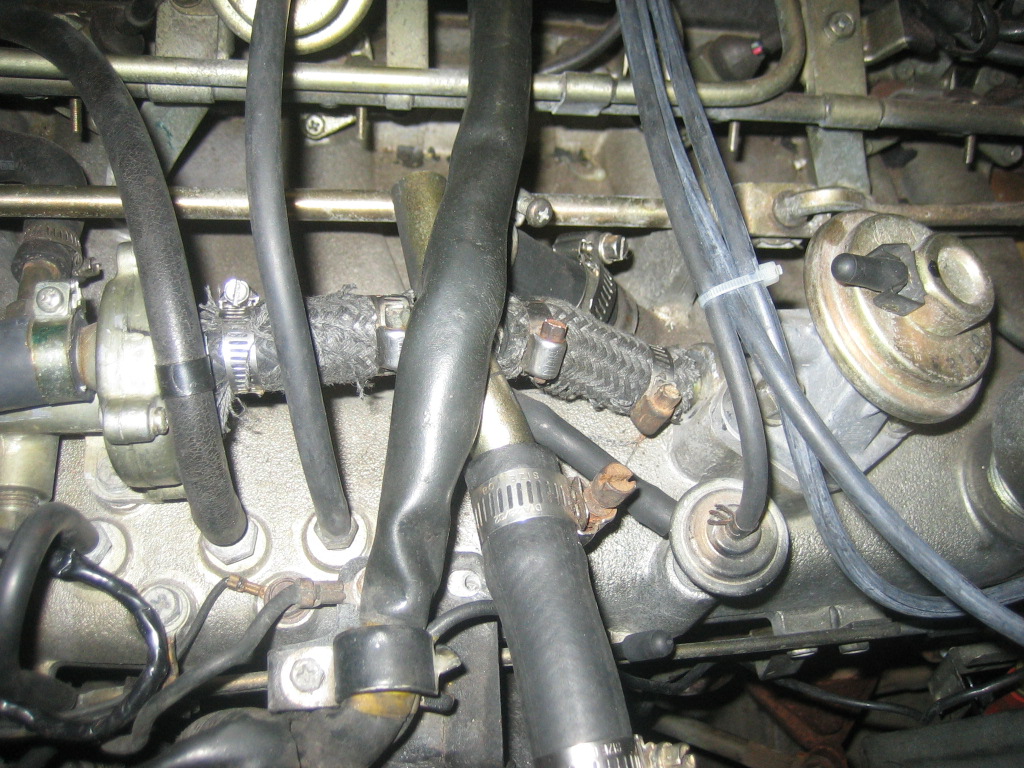
What I would suggest would be to disconnect the octopus(see pic) on top of the intake and cap all vacuum lines and see how she runs. Between the AAC and the vacuum port valve behind it you have some large internal vacuum leak possibilities. This would eliminate the whole VCM system and you could truoble shoot from there. Don't forget the EGR too. I don't run any of these items, but I don't have inspections to worry about. The biggest issue that I have is a slight surge at idle and that's seldom.
-
I would take the vcm and all the components out of the system and see how it runs. Soundslike the AAC valve is stuck open so you have an internal vacuum leak. I don't run any of those components and my car idles fine. It would probably idle good when cold, but it sounds like something is stuck open to atmospheric air
-
How much time do you spend on hybridZ daily?
madkaw replied to tightywhitey185's topic in Non Tech Board
Well when I started my resto-mod I thought I spent a lot of time on here, then as I come too a close on my project I realized that I didn't nearly spend enough ,or I would have done things differently in the first place. I spend a lot of time when I am laying over in the hotels, but at home I am catching up on lost time from being gone, so it's a quick glance at the recent posts. -
e-mailed you!
-
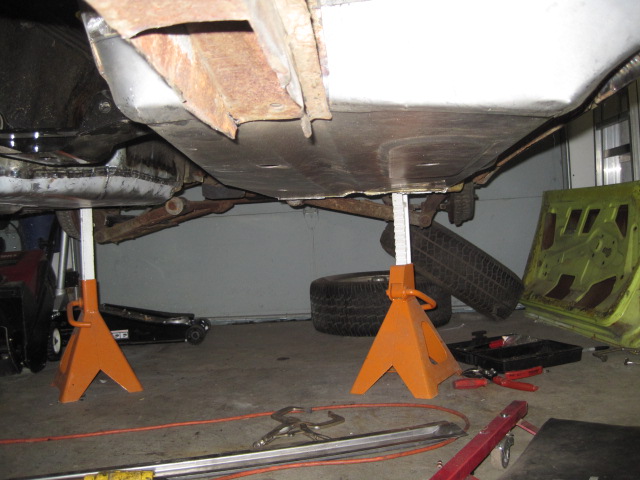
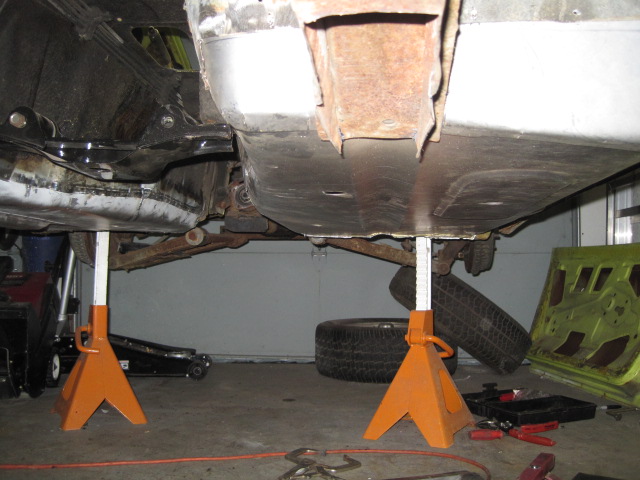
Frame rails are solid-no apparent damage anywhere. Drivetrain is removed but tranny brace installed and tight. Car is solidly jacked on a level concrete floor. This car is pretty solid all around with no prior collision work apparent. Both floor pans fit in the same manor, so difference side to side.
-
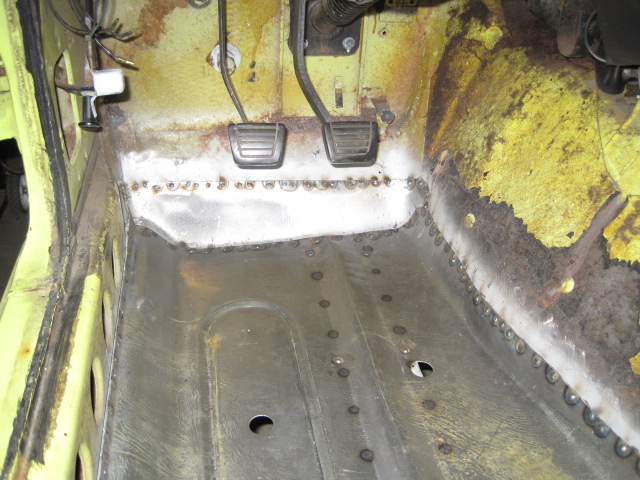
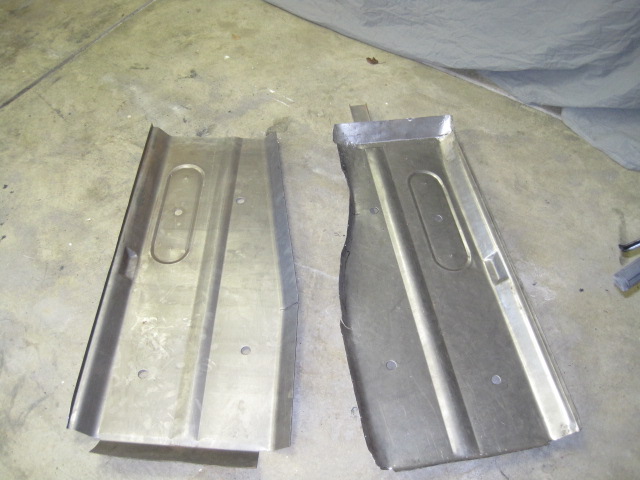
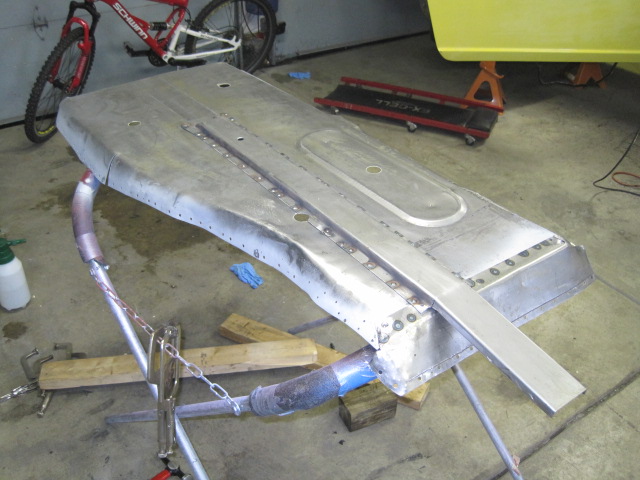
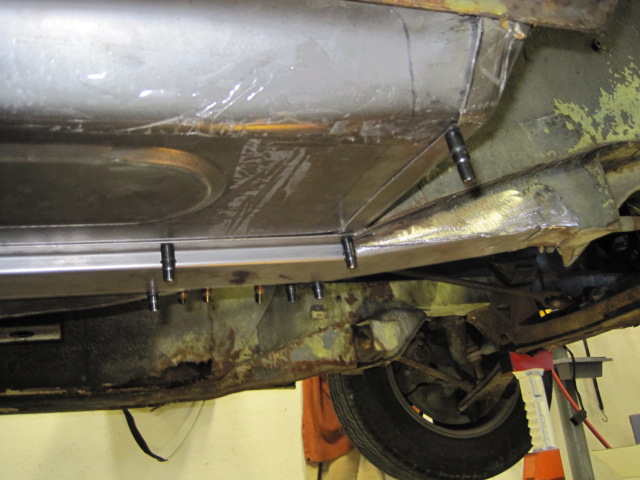
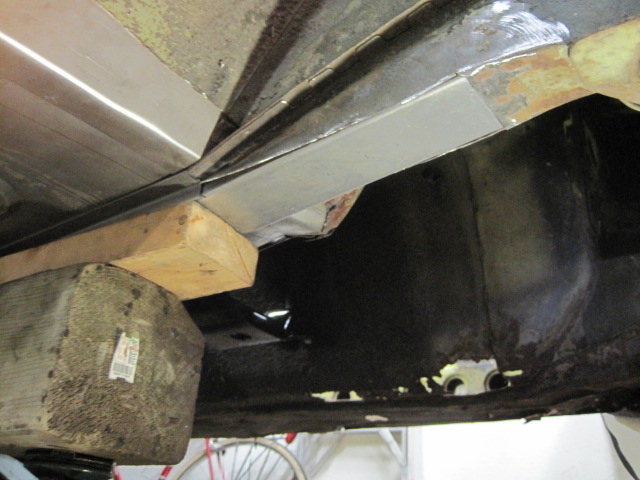
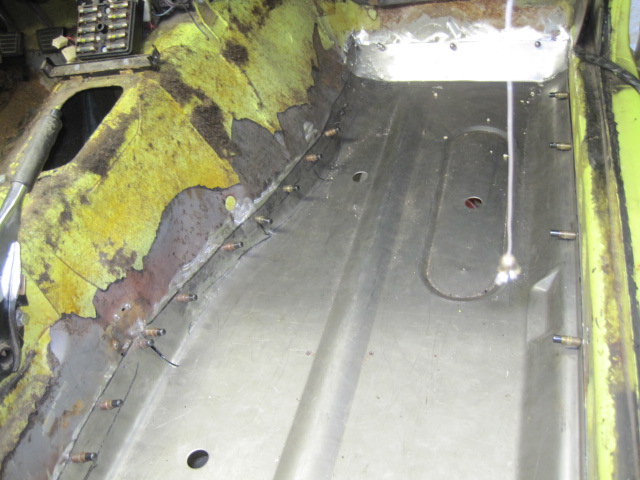
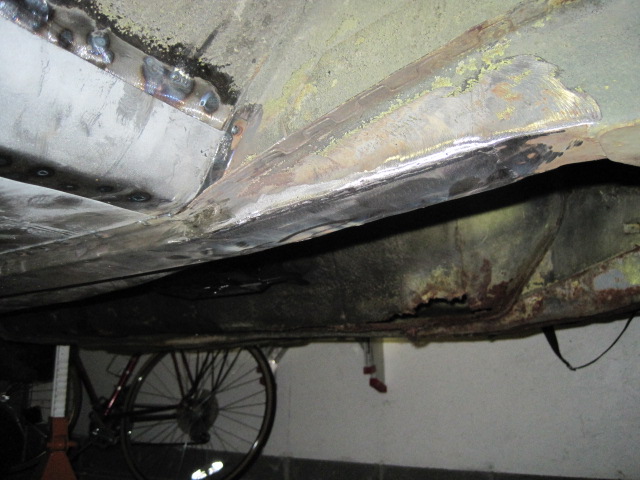
This thread would be for those that have installed these type floor pans only. I know Charlie makes these for other vendors, but I seeking feedback from you guys that have installed his pans. I wrote charlie an email soliciting his response and I also wanted to hear how your install went too. In general I am happy with the pans, but it seems to me that they were made too deep. Lining up the pan along it's original attaching point along the rocker the panel sits deeper then stock. This isn't a problem until you try and line up with the tension box and you end up with the front of the floor pan higher in the middle. Not much of a way to rememdy this unless i'm missing something . I have an original untouched Z in the garage to compare with and take measurements from, and they tell me that the pans sit a little low. This issue is not very noticeable, but makes the fit tougher and I think it could be made a little better---- and that is the ONLY reason for this thread-NOT to bash Zedd Findings. I also suggested to Charlie to increase the length on the frame rail so one can replace the bottom of the tension box at the same time you are installing the rail. Of course the other issue is the lack of pan material up front to tie in with the firewall. That little piece is a PITA to fabricate because of tying it in with the curves of the floor pan. Disclaimer: I am not a professional bodyman, but have done quite a bit of sheetmetal work. These are the first floor pans I have done-but might not be the last-thus the questions:) The pics attached are mostly the passenger side which came out nice, but if you look at the drivers side(not welded yet) you can see what I am talking about in that certain view looking down the length of the panel from underneath.
-
These cars are for a DD, so no v8 conversions for me. It would be a guess to say whether or not the head suffered any damage. We took a took a 5 mile ride half of that showing the temp in the hot range and it was 15 degrees out. My concern is that if it overheated because things froze up enough that the thermostat didn't work, did it do any other damage???? I also have to have an automatic, so no tranny swaps either. I appreciate your insight BRAAP. I love cars-but shopping for one can be a bitch. You come across so many losers and liars it isn't funny-especially in the price range I'm shopping in. If I was really nuts I would buy the 87 325e that was on ebay the other day. It had 87,000 original miles and was super clean and he wanted 4500$ for it. It might actually be the best deal and the easiest to work on of the bunch. It was on craiglist, but he pulled the listing. I am waiting on vin#s from the sellers of these other cars so I can do a carfax.
-
Any major do's or don'ts or stay away from models. I know there is a lot more info needed, but it is a used car. 1994 325is 155K some service records, but car overheated on test drive and it was 15 degres out. It was a flordia car and the glycol solution was weak and the thermostat froze up!!??? 2600$ new tires and service records showing timing belt and ater pump done 2007 1998 328i,no service records, pretty clean 165kmiles. Trans slipped a little under hard acceleration. 4200$-probably take less 1995 540i(beast) no service records,new tires, a little rust here and there, 169k miles, drove good-weird tranny. I say weird because 6 speed auto seems sluggish-but heard that's normal. Did not slip under hard acceleration. Got to love those factory SS headers .3000$ may take less
-
I've done it, but it's not running yet-maybe in a few months
-
Make sure you get the pedal box from a 73 and not an earlier because things won't line(holes for brake and clutch MC)
-
....because it could have been ugly! My daughter was home for the holidays and I try and take the oppurtunity to check on her 81 280zxt and make sure it's okay. I put some new speakers in the car for her Christmas present and I also had some maintenance items I wanted to take care of. Due to the extreme cold here in Indianapolis the 30 year old oil seals were starting to give out. The Crank pulley or front main seal started leaking and the power steering pump started spewing too. I happened to have an extra crank seal and I was actually able to order a shaft seal for the pump from Napa(6$). I never had messed with the PS pump before but thought it couldn't be too bad. I was actually guessing the seal was bad on the shaft since I hadn't taken it apart yet. Both jobs went pretty well and I was bale to replace the crank seal without disconnecting my condenser and moving it. The hardest part was getting the keyway to line up when reinstalling the pulley-I couldn'y really see it and had to feel my way around. I was really nervous about dropping it into the timing cover. The PS pump was a learning curve but not too bad, but I did booger up the first seal when i tapped it into place, so I had to order another one from Napa(last one they had). I was doing this job without removing the PS pump, because I didn't have a wrench big enough to hold the HP line nut to get the line off. I got in a hurry the first time installing the seal but came up with a better paln of attack the second time. Since I had to wait another day for the new PS pump seal I was putting my schedule in a bind. I told my daughter I would get the car to her that day that the seal came in, so I had to move effeciently to get everything done and checked out. The second seal went on great and I finished putting the car back together and test drove it-no noises, no leaks-i'm cool Well I hop in the car and drive it 50 miles to her school and drop it off and everyone is happy A busy day and I was done Z-ing and I would clean up the garage tomorrow. Tomorrow came and I cleaned up the aftermath on my work bench of the pile of tools rags and stuff. Then suddenly I locked up looking at my bench--------there sat a C-clip-a C-clip to hold the PS shaft in place--OH Sh%t, I said about a million times. I called my daughter right then and told her to not drive the car until I get down there. Then I had this scary image of being on the highway at 70mph when the shaft came out of the PS pump and how much damage that would have done I really got lucky this time-thankyou Z Gods __________________
-
Cool, at least I know a couple of things to look for. It keeps getting busier for her and she's starting to complain about not having her ZXT to drive around. I'm fixing an oil leak and will be taking it down there Saturday.
-
Thanks Bob. So a weak transmission and what's up with the wiring? How's school going?
-
All I know is that I worked at a F.B.O.(airport fixed base operator) for 12 years and ran 100ll in my 71 and it was the cure for my sticking valves and the car ran beautiful on it. Lead contact is very high even though it is called low-lead. The manager at my place wouldn't sell it it to anyone that didn't have a plane-maybe things are looser where your at.
-
Okay, so maybe the 93 190e I have been looking at might be looking a little better here. It has a few more miles, but it's also cheaper. Plus I have heard good things from you guys about these cars. Anything I should look for on the 190e? I think the owner said it had 175k miles.
-
Looking for a used car and have noticed some decent pricing on late 90's Audi's. Looking at a 98 Quattro A-8, but don't know much about them except for the fact they have really depreciated from original sticker-ouch! Going to look at one with 125k miles for 4000$. Looks really nice and is loaded. Are these garage queens or do they make a decent DD.
-
http://forums.hybridz.org/showthread.php?t=89111&highlight=toe+adjuster
-
Where do you find one?????????? I've been calling all morning and can't find anyone that carries them..