woodboxer
-
Posts
113 -
Joined
-
Last visited
Content Type
Profiles
Forums
Blogs
Events
Gallery
Downloads
Store
Everything posted by woodboxer
-
no problem i hope u find a good home for him, as long as people understand that they are an energenic dog and as such need someone who can be with them for walks etc everyday at least for a couple more years. although they say that boxers are pups there whole life. good luck bob
-
is there any interest in shipping him to Nova Scotia . could u find the cost . my postal code is B0M 1X0 later bob
-
hey there , have u found out anything , we have one boxer now and yes they are a little hyper, LOL I wonder what it would cost to ship to good old Nova Scotia is there any pics yet later bob
-
oh how nice it is. LOL GOOD ON U BOB
-
Aziza z update. ITs painted candy apple red.
woodboxer replied to v8260's topic in Body Kits & Paint
what is the motor that u have in her? btw i also love tha colour , it is sooo rich locking. later bob -
how do you properly clean a head cylinder?
woodboxer replied to biohazard53188's topic in Trouble Shooting / General Engine
isn't that funny? anyway what are u planning on using as a chemicials? if u use it before me , please post how it worked for u. thanks bob -
how do you properly clean a head cylinder?
woodboxer replied to biohazard53188's topic in Trouble Shooting / General Engine
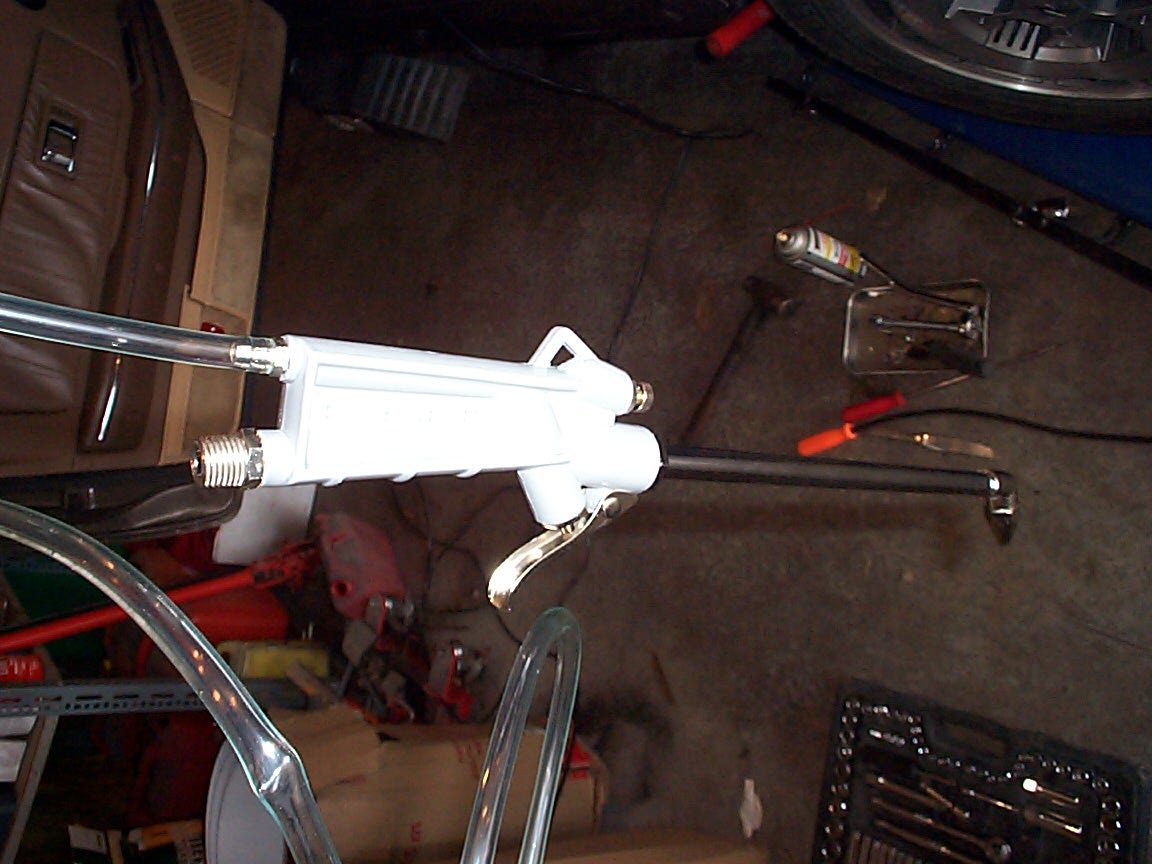
here is a picture of the thing hope this helps, u can see where the air hose hook ons and also i am holding it by the hose which sucks up the liguid. bob
-
hey warren i went to our local auto salvage today, 2.5 hr round trip, anyway the pieces a seen on the back don't look like they would be able to be removed and reworked so now that i know that i can proceed and make something myself. sometimes it good to get a close personal look at thinks to help decide what to do. but i di pick up e rear spoi;er for my 86 know to paint and install it. later bob
-
how do you properly clean a head cylinder?
woodboxer replied to biohazard53188's topic in Trouble Shooting / General Engine
i just bought a air tool from Princess Auto and it claims to be an engine cleaner and hase an tube that u stick in a chemicial , but it does say what to use with it, any suggestions? the chemical tube and air pressure are ajustable as there is a adjusting knob on top. has anyone ever used this thing? bob -
u do realize that its a joke about the 5 minutes. it hard to believe what is involved in changing the plugs until u do it , i think i spend over 1 and 1/2 hrs. it is a new car to me so i had to make sure the pockets where the plugs go were clean out first, i don't know when the last time they where changed, these was alot of dirt there. but like i said it was well worth it, the only problem is making sure the new wires are put on correctly especially #6 , does anyone have any suggestions? opps .. don't want to change the intent of this thread , sorry. bob
-
-
hey warren better late than never, anyway i did ford yesterday after posting here, they have a part but its the complete piece that goes across the rear end, at $300. i then called the local JY and they say they sell the parts with the complete rear quarter panel. so thats out. i think i have to go to ford and try to show them the part on a real car and see what happens then. as well how did u trim the black plastic around the edge of the light. i used a small trimmer on my electric dremmal. btw if anyone has ever watched the video "get over it" by warren u would know its not photoshop. but it looks that good that it could be. later bob
-
hey warren i was reviewing y'r video , and i noticed it looks like u used buckets to mount the lights , are they from the mustang or were they made, they look factory, but i'm not sure. i have trimmed the sides of the light itself and have cut off one of the mounting screws as it seemed in the way, anyway, could u let me know as i am at a standstill because i don't want to ruin the lights as they are expensive especialy if i cut them up and its not right. later bob
-
What's the right way to repaint plastic body panels?
woodboxer replied to gvincent's topic in Body Kits & Paint
which type did u use, the H2O or the the normal stuff, i was recently in MAine and picked up some H2O, haven't had time to try it. bob -
SO how did itwork i don't see any finished pics I am trying to do a shave and don't know how to proceed bob
-
What's the right way to repaint plastic body panels?
woodboxer replied to gvincent's topic in Body Kits & Paint
have u tried the krylon paint for plactic, it is available in a few colours and is in spray cans. i have tried it and it seems to stick good . I think it wouldn't hurt to clean of the wax with a degreaser 1st. good luck bob -
well i am planning on doing this light switch and would love some ideas how to do it. Please help, bob i already have the lights and am trying to fiquire how to do it.
-
hey warren i am still trying to fiquire out how u did it, i have mine now and have trimmed the black extra on the side and top. i would really love to know how u trimmed them and if u made new cases for them? i watched y'r video but its hard to tell how u managed it. i would just hate to ruin the lights as it took a bit to get them any help would be appreciated . thanks bob
-
ya it nice to see u got y'r hood fixed. I know up here in atlantic canada its hard to find these guys and then they work for min cost od $200, but its still cheaper than repainting. good on u bob
-
well there u go . i waited and found the proper one for 86 on e-bay, i bid and won it and it is now on its way. i still don't know how to fix the flexible rubber one , but at least i have a decent one on the way. Sometimes u have to wait and good thigs will come to u. will post a pic once its here and on. later bob
-
do u have sound when u play this? mine didn't but it might be my laptop. bob i now have sound , just a setting that was changed on my laptop bob
-
So warren how did u remove the sides and parts off the new lenses? or did u remove the lense then make a new case for it? thanks bob
-
-
thanks for the tips btw i do have a electric buffer so i should be OK also KIm (my wife wants to know if u have any pups) LOL
-
do u need poppers as well or just the kit for $119 bob