Dat73z
-
Posts
852 -
Joined
-
Last visited
-
Days Won
8
Content Type
Profiles
Forums
Blogs
Events
Gallery
Downloads
Store
Everything posted by Dat73z
-
240z Turbo- interesting points on charge air density and piping diameters. I had not considered that. If at all possible I'd like to go 2.5" and be done with it but I'm thinking packaging will be the issue. Do you think the 2.25" piping on the hot side would make a noticeable difference in boost/turbo response at these power levels ~300whp? Albatross Cafe- I have yet to mount my electric fans. I have been running a Mishimoto radiator with the mechanical fan/clutch for years which has been working great in my weather and recently picked up the ZCarDepot 12" dual fan shroud. I have yet to purchase my electric fans but I'm looking at running the following SPAL models: Spal 30101522 Puller Fan (12" Medium Profile) ~1300 CFM ~2.5" thick Spal 30100467 Puller Fan (12" Low Profile) ~ 900CFM ~2" thick So far as I can tell I'll need the twin 12" medium profile fans for >2000 CFM to match the factory mechanical fan (or a combination of one medium, 1 low profile). Really the main constraint for me will be running the hot side pipe across the front of the engine with the fan shroud and electric fans. I could probably just mount the fans directly to the radiator and save an inch or so that way but would prefer to run the shroud as it gets over 100*F over here on summer days. Also I've been in contact with Craig @ Simtec (really nice and knowledgeable guy). He'll be fabricating the piping for me but I'll need to get him the measurements of my setup once I have it all mocked up.
-
Hello, Are there any benefits (or drawbacks) to varying intercooler piping size between the hot side and cold side? I am considering running 2.25" from the turbo (T3/TO4E 50 trim 2" outlet) to intercooler (2.5" inlet/outlet) and 2.5" from intercooler to intake manifold (2.5" inlet). This is for packaging reasons to give more clearance for electric fans. Does it make more sense to just go 2.5" for all piping instead? Any thoughts on boost response for the 2.25 versus 2.5 (or hybrid 2.25/2.5) or is this negligible? I'm shooting for ~300whp L-series so I don't think the setup would be choked but in the future may consider going for more power. Thank you!
-
Update- got it all sorted. Should have checked this first: took everything apart again and tapped the inner counter bearing race with a socket. Reassembled and tapped around counter bearing with a rubber mallet. Remeasured around and found ~4.3-4.35 dimension A which indicates a 0.2-0.3 shim in the table. The shim from the SR20 transmission cover was a 0.3 so will be reusing that. Cover now sits flat against the bellhousing with the shim in place and no gasket. Thanks again for the help!
-
NewZed- good point on the "Allowable Clearance." I was scratching my head on what that was in reference to (e.g. is a gap of 0.16mm between the countershaft bearing and the front cover acceptable to account for thermal expansion or conversely if the cover fits flush to the bellhousing and there is no gap between the countershaft bearing and the cover is acceptable...it would have been helpful to have those measurements called out in the drawing unless I've missed it in the 30 page body of text).
-
NewZed, thanks for the thoughtful reply and detailed info. Yes, dimension A is slightly beyond the FSM chart (which I assume takes into account the thickness of the front cover gasket) so likely I'd be getting too much preload on the bearing just from the front cover with no shim. I'm going to attempt to tap the countershaft bearing inner race with an appropriately sized socket to ensure it is fully seated against the counter gear and re-measure just to be sure.
-
Hello, I am currently mating a 280z 5 speed bellhousing to a SR20 transmission. All of the machining has been completed and shifting is smooth when assembled. I was taking measurements on the countershaft front bearing (larger 62mm) against the bellhousing and came up with ~4.85-4.9mm. Following the chapter in the service manual (http://zhome.com/ZCMnL/tech/240SX5spd/Mt.pdf) MT30 (page 30 of 30 in PDF) I am slightly beyond the maximum allowable clearance listed in the table (4.71mm...which requires no shim). So I am somewhere on the order of 0.15-0.25mm out from the maximum clearance. Test fitting the front cover on the bellhousing with no gasket just -barely- touches the outer race of the countershaft bearing first and leaves a hair gap around the cover where the cover doesn't sit flush against the bellhousing. Does anyone have any insights on the following? Am I correct to assume I can run no countershaft bearing shim here and the front cover gasket will take up the additional room? I am assuming that since the outer race remains stationary and countershaft/inner race area in the front cover has been relieved/machined for movement this wouldn't cause any issues? Am I missing something major here (like needing to press the countershaft bearing in or something)? Thank you!
-
Tires 225/45/15 or 225/50/15
Dat73z replied to theczechone's topic in Brakes, Wheels, Suspension and Chassis
I am actually still on that set of tires. I drive it nearly every day but my commute to work and the grocery store isn't that far . Weekend trips occasionally maybe a couple hundred miles each time. I figure I have ~6000 miles so far, maybe another 4-6k left on them. Not too much wet weather driving but I've noticed they aren't that great in the wet. With a 3.9 clsd rear end and close ratio 5 speed, triples and tight suspension I can easily kick out the rear in the rain. Overall I'm happy with the tires and can't wait to get the updated set. -
Tires 225/45/15 or 225/50/15
Dat73z replied to theczechone's topic in Brakes, Wheels, Suspension and Chassis
Thanks! I've found that is the ideal ride height on that tire/wheel setup to service the car. 2 finger gap all around and a low pro jack barely slides under the crossmember/diff. I was tucking tire before and the crossmember was basically on the ground. Absolute pain to get the car in the air. -
Tires 225/45/15 or 225/50/15
Dat73z replied to theczechone's topic in Brakes, Wheels, Suspension and Chassis
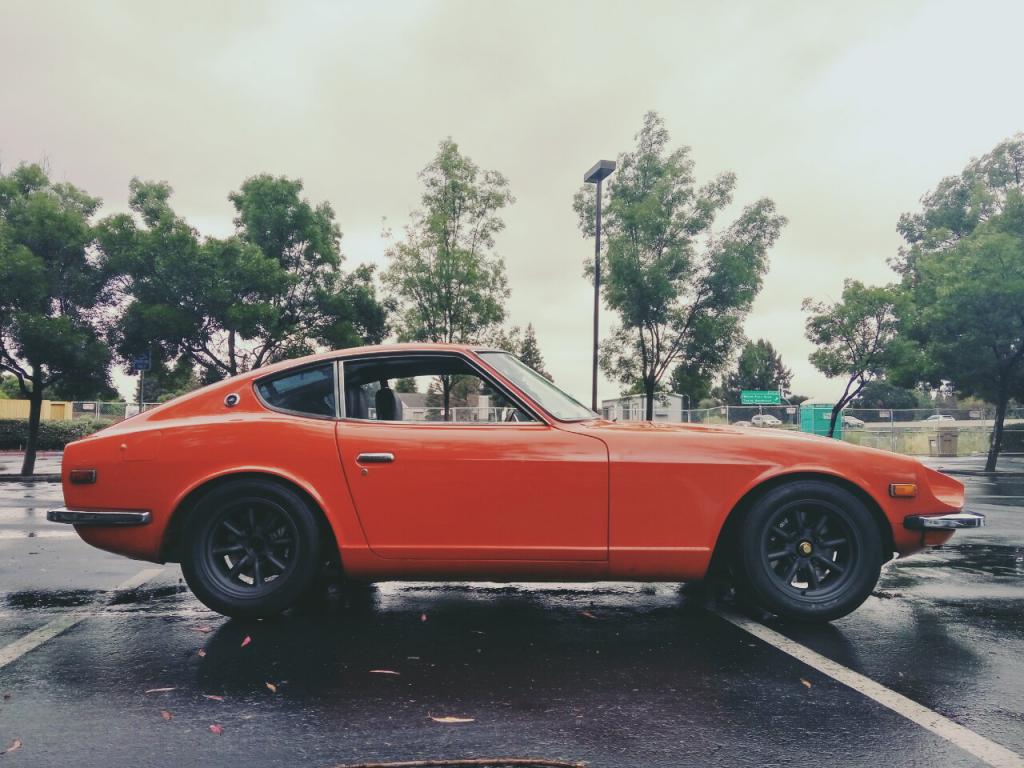
I would go with 225/50/15. Here is an older picture of my car on RKR 15x8 +0 225/50/15 R888 (old style). T3 suspension all around. Needs a light fender roll to clear the rear.
-
Yes, you have the general gist. In terms of adjusting valves yes intake/exhaust. This is part of getting each cylinder to be doing the same thing before you start tuning...you can adjust them cold for now to start. Check them again hot and you may need to rebalance the carbs slightly afterwards if the adjustment is large enough. My method of setting up triples is slightly different as I use a single wideband o2 but same principles. The tuning is an iterative process. Let's say my valves are adjusted cold before starting and no vacuum leaks: I start by disconnecting and zeroing everything out, new spark plugs. From there I set idle mixture screws evenly across the board (something like 1.5 turns out). From there I start the car and evenly adjust the idle mixtures to hit 12.5-13 AFR at idle. Now I'll use the STE still to sync the carbs. Carb to carb (1, 2, 3) then barrel to barrel. You'll notice some cylinders may need no adjustment while others may need moderate adjustment. If there is a wide range of adjustment bend throttle shafts or butterfly position is suspect. Unless the jetting is really far out the car should be drivable now. I'll usually drive around a bit until everything is warmed up and check the valves again, adjust as necessary. Drive the car around some more to warm everything up then double check the sync via STE tool. Jet for 12-13 AFR across the board and smooth power delivery. Edit: In terms of idle speed, I've noticed idle speed sits around 800-1100 after balancing and engine warmed up. I suppose you could also shoot for a rpm target, but I usually tune as above and just let the idle RPMs sit where they are happy when warm (800-1100 RPM).
-
HKS Surge Tank Mikuni Jetting Recommendations
Dat73z replied to subyman1440's topic in S30 Series - 240z, 260z, 280z
I am curious about this as well- my plan was to jet NA around 12-13 AFR across the board and see if I needed to make any adjustments after the surge tank on low boost (<7psi or so). Edit: Also, I am local to the Bay Area although my setup will be OER 47's. Let me know if you'd like to compare notes in tuning, I'm in the process of porting my turbo mani/turbo and getting them out for ceramic coating this week. Hoping to have my setup going in a couple of months. -
Here is something to help with the sidedrafts (read the whole thing but the 123ign takes the timing issues out of the mix): datsunzgarage.com/weber/ Hopefully you have the later DCOE 151 40's...The air balance screws really make tuning a lot easier. If not you may need to play with the butterfly positions and drill some air bleed holes to balance. You need a synchrometer, this is what I use: https://www.amazon.com/Carburetor-Synchrometer-Weber-Dellorto-Mukuni/dp/B00SLH03R4 In terms of the 123 ignition if I recall correctly at tdc rotor points at 1. You can actually check bunny cam ears with the oil fill cap off. Take it off and look at the cam lobes over cylinder 1, they are right there. Get the timing dialed in then start syncing up the webers and idle speed appropriate. From there adjust your valves, change the plugs and start tuning. Once you get the sidedrafts dialed in they should provide some great response, start easily, amazing soundtrack, etc.
-
Also, you should be able to check your timing from #1. It's been a while but after the calibration I locked down the distributor and haven't touched it since (no need to rotate after calibration to change timing). I recall the timing was pretty spot on at idle from what I had set in the 123tune and I could see the changes I was making with the timing gun for each tuning iteration. Really handy to have a tunable dist via smartphone app.
-
Not matching #1 on cap is fine. What's important is you correctly locate #1 terminal based on the calibration and ensure the firing order (and spark plugs) are hooked up in the correct order. Double check your firing order and tdc calibration (piston #1 up and bunny ears on #1 cam lobes). I personally dropped the oil pump and drive shaft to clock the rotor closer to where #1 used to be as I'm running some custom spark plug cables I had made for the ZX dist (specific lengths to cylinders). Again what's important is tdc calibration, correctly locating #1, and ensuring you follow the firing order. In terms of the triples you will need to warm up the engine, check for vacuum leaks, adjust valves, new plugs, sync carbs, set fuel pressure, adjust floats, etc. In other words make sure all 3 carbs are doing the same thing then start tuning...hopefully you have a wideband o2 because that makes life much easier. New ignition or not they will run like garbage until you get everything dialed in . A hot ignition like pairing msd6al to the 123 and opening up spark plug gaps will significantly help cold starts and drivability but may mask a poor tune. Report back and let us know if you get it resolved, good luck!
-
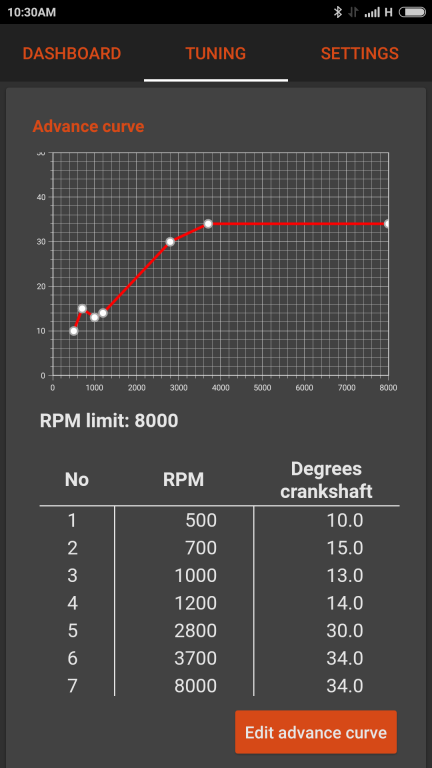
Yep it works pretty good thanks to the guidance here on hybridz. My rpm never dips that low (maybe when I get the AC installed) but I'm sure the cranking timing helps a bit and starting/idle/power delivery across the rev range feels better than the ZX dist. Next level of tuning would be to hook up the vacuum line and add timing for light load/cruise which I'm sure would make a noticeable difference in fuel economy.
-
Here is what I am currently running on my 123ignition BT. Probably room for improvement but runs great (went from points to 280zx dist to 123ignBT). I drive the car nearly every day and haven't really messed with the tune over the past 6-8 months or so after setting it up. L25 with triple Weber DCOE 40s.
-
ATL Black Box into Factory 240z Gas Tank Nut Plate
Dat73z replied to Dat73z's topic in Fuel Delivery
Just a quick update for anyone looking to do this. I got in touch with ATL and they offer a steel version of he ring p/n TF110S about 70$ -
Hi all, So in these next couple of weeks I will be getting an ATL black box into my factory 240z fuel tank. For access hole cut into the top of the gas tank who makes a steel threaded 24 nut plate for welding to the tank? Everything I have seen is either composite or aluminum. Here is what I'm after: http://www.atlinc.com/pdfs/Design-Helper/Plates-Nutrings/TF110.pdf https://jacob80a.wordpress.com/2012/01/30/gas-tank/ I'm open to other options and ideas as well. Thanks all!
-
I removed my pan in my 240z and installed the AZC pan as well. I recall pulling the pan was fairly straightforward. I jacked the engine up a bit after loosening the front mounts and tied the engine off by the hood latch. From there just carefully maneuvered the pan out around the pickup. Installing the AZC pan with the engine in the car was a different story though but also doable.
-
Hi all, I am currently setting up a triple sidedraft carb blowthrough turbo project on a L-series and am working on gathering components for the fuel system. Here is my current setup as installed on the car NA with triples: 1) 1973 240z gas tank 2) Rising rate Mallory/MSD bypass FPR (Return to top vent on tank) 3) Carter 4070 Fuel Pump (Using stock feed) Here is what I have available to me: 1) 1975 280z EFI gas tank 2) Rising rate bypass FPR (could use existing Mallory or similar...need to remount in engine bay for vacuum line) 3) FI Fuel pump selection Here are the Q's: 1) I'm looking to run a Walbro 255 or similar (http://walbrofuelpumps.com/walbro-gsl392-inline-fuel-255lph-pump.html). The rating for the pump is 43-87 PSI and I'll need to regulate it down to 3-4 psi to run the triples off boost. Anyone ever try to regulate down a FI pump to carb pressures and if so any issues there? 2) I'm debating between running the 75 280z EFI tank, modified 240z tank, or a custom tank. Don't want to run a fuel cell. With the stock 240z tank and the carter pump on mallory regulator I was initially having difficulty regulating the pressure down to 4psi using the top 1/4" vent as return on bypass. I am assuming with the rising rate bypass FPR I don't want to put a deadhead regulator before the carbs as I'll need more fuel pressure on boost. Any thoughts on plumbing the bypass off reg to the stock 280z tank return? Not sure if the return diameter is sufficient to keep the off boost fuel pressure down or I'll need to modify the tank anyways. Thanks!
-
Weber jets??All who live for their triples please read this
Dat73z replied to datfreak's topic in Nissan L6 Forum
Hi all, Figured I'd get some thoughts before I go to town on this. Have a set of DCOE 40 151's I rebuilt myself. To get a nice idle I need to crank down the idle screws which exposes the first set of progression holes and idle AFR's are 10 flat. 900-1000 RPM idle with 50F9 idle jets with the idle mixture screws 2.5 turns out. Timing set at 34-35 BTDC at 3500 RPM. Gets lean (~15 AFR's) at the transition between the idle circuit and mains and pops on occasion. I'm thinking this is because the first progression hole is uncovered on all 3 carbs and bleeding out that system. Mains/air correctors seem fine and I'm at 12-13AFR's on the mains so also a bit rich so maybe I can go a size up on the air correctors? Car drives decently but exhaust tip is covered in black soot from running rich at idle I presume. I've tried covering the progression holes to where a light tip in of the throttle allows the butterflies to expose the first progression hole and turning out the air bleed screws to where the engine will idle. The problem is I need to turn the air bleed screws all the way out and the some of the carbs begin to drip fuel from the trumpets (4PSI fuel pressure). Also, I hear an audible air leak on one of the carb barrels at this setting so it seems like the setting is too far out. I've been thinking of drilling a small hole in each of the butterfly plates (1/32" starting to 1/16" from what I've read online) to let air bypass the butterflies and not have to crank the air bypass screws all the way out to keep the first progression holes covered. Thoughts on this and am I approaching this the wrong way? Thanks! -
The search is on for new rims!
Dat73z replied to rickyellow zee's topic in Brakes, Wheels, Suspension and Chassis
Depending on how low you are, my experience is 15x8+0 and 225 50's will fit with a slight roll.
-
Also maybe a return higher in the tank would be better? Looks like the #2 area would be submerged in fuel thus the return would need to fight that additional head? I'll take a look and report what I find. From reading online it sounds like people have repurposed the vents for bypass/return before. Worst case I could get another pump but I'm going to try a couple things before going down that path.
-
That actually sounds like a good idea. Was thinking the #2 vent since it would be easy for me to get a new fitting on the reg where I've mounted it and just unplug the existing hose/run a new hose to that location (#2 hose is visible and accessible from under the car). Haven't had time to measure the hose diameters yet but the #2 hose already looks like 2x the ID of the factory return which is smaller than a drinking straw. I'm thinking this should drop me somewhere in the 4psi range for the triples...hopefully lower. Was actually surprised the Carter 4070 pump is putting out so much pressure (~6-8+psi) after reading online that you don't need a reg for it and triples but fortunately my friend convinced me to get a reg anyways.
-
Thanks for the insight, yep 3/8 return stated for Mallory/MSD reg. Also have a smaller feed from the carter pump as well but I am not sure if that makes a difference here. Was running the mechanical pump deadheaded and after dripping fuel everywhere I came to find my mechanical was putting out 14psi! Decided to go electric for feed consistency instead of a deadhead reg off the mechanical. Worst case scenario I could drop the tank and get some larger feed/return lines welded but I'm trying to avoid that at the moment. So it sounds like #2 at the thin portion of the tank is the way to go?