JMortensen
-
Posts
13742 -
Joined
-
Last visited
-
Days Won
68
Content Type
Profiles
Forums
Blogs
Events
Gallery
Downloads
Store
Everything posted by JMortensen
-

Strut mods. How far off base am I
JMortensen replied to rabrooks's topic in Brakes, Wheels, Suspension and Chassis
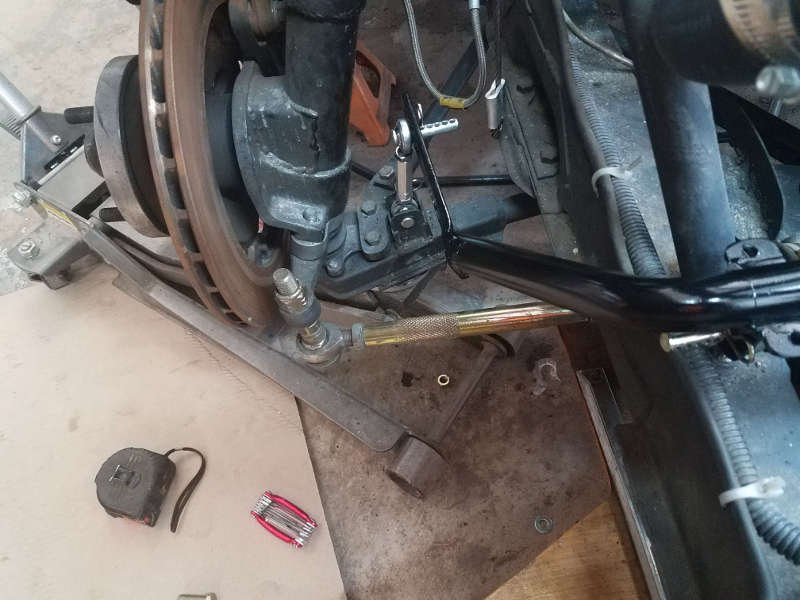
The issue with lowering the car and altering the geometry in the front has mostly to do with bumpsteer. The camber curve is very consistent throughout the travel. The caster curve is affected, but that's minor. The bumpsteer curve on the Z is crappy out of the box. You can run the bumpsteer spacers to get it back to where it was (crappy) or you can make it adjustable and minimize it. You can do this with a bumpsteer spacer kit from a vendor like Apex Engineered, or you can drill out the steer knuckles and run shims to fix. Bumpsteer shims are commonly available circle track parts. FWIW I do run bumpsteer spacers to help with the front roll center and have the bumpsteer adjusted with the shims to counter both issues. https://www.apexengineered.com/store/p11/Front_Tie_Rod_Kit.html http://www.colemanracing.com/Bump-Steer-Bushing-Kit-P4444.aspx As it is the roll center in the rear is quite a bit higher than the front and I can tell you from personal experience with a low race car that even very low, the rear roll center is still above ground and higher than the front roll center, which are, generally speaking, the things you want. You can weld a new pin tube under the stock one, Ben Cort did that on his autocross car, and Terry Oxandale modified the bottom of the strut housing to make it longer to raise the rear roll center higher, but it isn't the first thing that I'd be worried about. It's pretty far down the list of things to do IMO. 2 way Bilstein struts are not low dollar. They are very good, but there isn't a bolt on option for them for the Z, so you'll be fabricating to get them on your car. If you want a low dollar solution, there are weld on adjustable struts that are not as good from vendors like Tein and BC Racing. They run ~$1000 or so for the set of 4, and you get coilovers in the process. Be careful sectioning the rear struts on a 280. The tubes are longer and the top insulator is taller in the rear of a 280 than the front. You can just get a 240 or 280 front insulator and run that on top of your stock 280 strut and that drops it down an inch with no sectioning required. If you run camber plates front and back, that accomplishes the same thing but you'll drop the car roughly 1.5" front and 2.5" rear. If you section the rear strut tubes and change out the strut top, you'll have trouble getting the rear of the car high enough. You can literally set the frame of the car on the ground and still have several inches of suspension travel left if you screw this up. -
The turbo is bolted directly to the head on that EcoBoost motor, so that's going to make exhaust pretty simple I think. It might also make upgrading the turbo more difficult. Not sure what kind of power you are after, Richard, but here's a vid where they did intake/exhaust/tune on a Mustang and gained 113 hp and 96 ft/lbs:
-
Yep.
-
No quality control? How long have these been for sale? Since Ross was selling them at Modern Motorsports, maybe 15 years now? How many have had this problem? Sheesh.
-
That's the old 2.3L. Heavier than a V8, BTW. I'm thinking the OP is talking about the EcoBoost 4, which makes 310whp out of the box. I am biased because the worst car I've owned was an NA 2.3 Mustang, but I sure wouldn't go that way...
-
Pantera hatch + rollover protection
JMortensen replied to Max_S's topic in S30 Series - 240z, 260z, 280z
Just put the supports off of the hoop on the sides, they'll fit in around the hatch window. Mine go from the sides of the hoop just below the bends to the top of the strut towers. That one shown above is terrible. If there is a fore/aft load on the main hoop if the car rolls, there is almost no support for it. Would fold like a mousetrap. -
Pantera hatch + rollover protection
JMortensen replied to Max_S's topic in S30 Series - 240z, 260z, 280z
If you're planning any aero mods in the back skip it, as it creates massive flow separation and lift. If you check the windtunnel testing info in the FAQ, you can see it has the highest rear lift number of any of the tests. Makes me wonder what people are thinking when they put on the Pantera hatch and a spoiler or wing, or the worst combo, roof spoiler with Pantera hatch. It also increased the drag by .2 which is the equivalent of setting the wing that was tested for its highest angle of attack. So you get all the drag of pulling a wing through the air, and quite a bit less than none of the downforce. If you are just in it for looks, it appears to me like there will be plenty of room for a roll bar. Most of us try to get the main hoop of a roll bar as close to the rear fenders as possible and as tight against the map light area as we can, that's still well forward of where the hatch is though. -
If you can fab up that tilt frame and the fender liners and all that, you could make a mold and do a FG version. It's tedious but not that difficult.
-
After seeing the frame underneath, my guess is that the two materials expand and contract at different rates, and it may be impossible to paint them together without it cracking. How about having a seam there and treating as two separate body panels? Other suggestion is take a mold off of it and do the whole hood in FG.
-
Oil control mods for autox/road racing
JMortensen replied to JMortensen's topic in Gen III & IV Chevy V8Z Tech Board
In my searching I've found 2 common vacuum pump setups. One is hardcore drag racer stuff where they use a big, powerful mechanical pump driven off the crank to put some serious vacuum to the crankcase. Runs about $1000. The other is to use a vacuum pump from one of the newer turbo cars that need it for power brakes. Newer Ford pumps seem to be the popular option, but they don't pull anywhere near as much vacuum. I still like the old drag racing exhaust systems as there is no pump at all, but they're not legal in basically any road racing organization in the US. -
Front sway bar mounting
JMortensen replied to artishard116's topic in Brakes, Wheels, Suspension and Chassis
A bolt through the frame rail with a nut on top is not the best, IMO. Better is a plate on top and bottom, or top bottom and side with a tube welded in so that the plates are spaced properly. I went through a couple of revisions on mine but ended up with plates top and bottom and tubes welded top and bottom and nuts welded to the top and bottom of the tubes. Then I recently flipped the swaybar to the top of the frame rail because I was having issues changing bars with the splitter on. Now I can change the front bar out in a matter of 2 or 3 minutes.
-
Cages - Experiences wanted
JMortensen replied to EF Ian's topic in Brakes, Wheels, Suspension and Chassis
tube80z has talked about doing this in a Z. Several people have run tubes in the rockers, so that has been done. A pillars aren't big enough to hide a tube, but you could stitch to it and cover it and that would work fine, I expect. The problem is the roof and the halo. You could get the tubes right up next to the roof and stitch them in directly too, then box it in, but it isn't going to be far enough away from your head to be "safe". Safe is relative though. Even without a cage I once smacked my head on the top off the door opening pretty hard with a helmet on and rang my bell a bit. Did a 360 at an autox and when the (slick) tires gripped again... whack! Wasn't serious, a couple ibuprofen took care of it, but it got my attention. If you're looking for safety though, there are better cars to start with! -
Cages - Experiences wanted
JMortensen replied to EF Ian's topic in Brakes, Wheels, Suspension and Chassis
I ran gussets from the hoop to the map light area and I did two vertical plates from the sides of the main hoop to the door area. Hope the OP checked helmet clearance before welding in that diagonal across the roof. I wouldn't fit in my car with that bar in place. Would have to do it the other way, then no passenger. -
FWIW I think that spec of torquing until reaching the correct drag on the axles is BS. I know, heresy, it's right there in the FSM, but what is happening to increase the drag? Are you squeezing the spacer so hard that it's distorting? Doesn't seem likely, but that's really the only way that I could see it working. Torque specs for fasteners generally have something to do with the bolt stretching. I'd like to see a torque spec for these based on the size of the thread, not the drag at the hub.
-
Oil control mods for autox/road racing
JMortensen replied to JMortensen's topic in Gen III & IV Chevy V8Z Tech Board
I had so much oil in the catch can that it made me think part of the problem was just pumping too much oil up to the heads, so I bought a set of oil restricted pushrods with .040" orifices. Also picked up some valve covers with -10AN fittings off of ebay. Looked at my old catch can and it actually has 1/2 NPT fittings on it, so I'm going to buy some -10AN pushlok fittings and try straight venting again. If that doesn't work then I'll convert the can to vacuum and run a fitting back to the intake. Not sure what to do with the 3/8" line off of the valley cover. I've been told that I can run it to the intake but that basically creates a vacuum leak. Could T it into the -10 line and vent it, but it's a restricted orifice (not that easy to blow air through it) so not sure that it is worth it. Thinking T it into the vents and if I still have problems then I'll maybe remove it, drill a hole in the old valley cover and put a -10 fitting in there too. Most people seem to think that the bigger vents should cover it, I'm hoping that is correct. Will have to install parts and wait for spring (or dyno tuning) to find out if it worked. -
Cut & Shorten 240Z Steering Column in Race Car
JMortensen replied to Gmagno's topic in Brakes, Wheels, Suspension and Chassis
Take it apart and see. I can't remember because it's been so long, but I can remember that taking the whole thing apart and reassembling is not a big deal. -
Oil control mods for autox/road racing
JMortensen replied to JMortensen's topic in Gen III & IV Chevy V8Z Tech Board
Did a leakdown test today, engine is fine. Hooray! At first I just had the 3/8 lines from the valve covers to a vented catch can. Then I added the LS6 valley cover with the PCV. I haven't taken the stock valve covers off in years, so I don't remember if they are baffled or not, so in anticipation of this last autox I plugged them and ran the PCV from the valley cover to the intake and that was it. I bought a catch can but it showed up and only has 2 3/8" NPT ports, and I'm not convinced that I can vent all the pressure through a 3/8" hose. Thinking about returning the catch can and getting a different one and running -8 lines to it instead. Only problem is how do I get -8 to the valve cover and valley cover. Suppose I could drill and tap like I did the intake, but it's just another PITA. After looking at it I'm also not inclined to do a vented catch can. Think a sealed can to some source of vacuum is the best answer, whether that be intake or a vacuum pump or something else... -
Oil control mods for autox/road racing
JMortensen replied to JMortensen's topic in Gen III & IV Chevy V8Z Tech Board
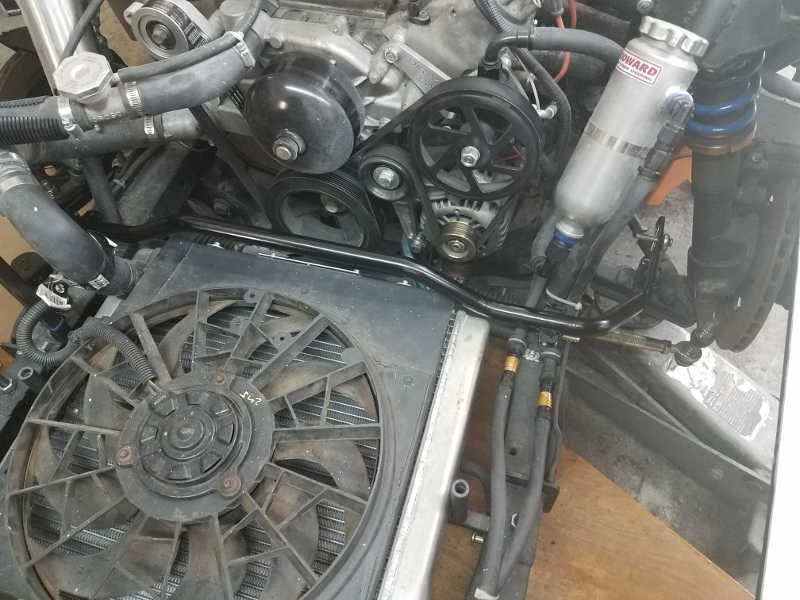
Well I changed out the valley cover for LS6 which has integrated baffled and restricted PCV. I plugged the valve covers and ran the valley cover PCV direct to the manifold. I have a catch can on order, but it didn't arrive in time for me to hit another autox. This one was wet and the car saw neither high rpms nor high g loads. After the morning runs with Mark Haag as a co-driver, everything seemed fine but we pulled the hood, and there it was: oil all over. Brand new part torqued to spec and everything. Borrowed a leak down tester from a friend. The motor still makes plenty of power, but thinking maybe blowby with load or something. Anyway will report back. Fast car driving slowly: <iframe src="https://www.facebook.com/plugins/video.php?href=https%3A%2F%2Fwww.facebook.com%2FJon.E.Mortensen%2Fvideos%2F2059742714072074%2F&show_text=0&width=560" width="560" height="315" style="border:none;overflow:hidden" scrolling="no" frameborder="0" allowTransparency="true" allowFullScreen="true"></iframe> -
Oil control mods for autox/road racing
JMortensen replied to JMortensen's topic in Gen III & IV Chevy V8Z Tech Board
Interesting. I did replace the oil pump when I installed the cam, but I just put a regular pump in it. The PCV setup on the LS3 includes a valley vent which I don't currently have, so maybe that just adding that vent will make the difference, don't know. I'm getting the parts in hopefully today or tomorrow. If I can get them delivered and installed I might hit the last autox of the season Sunday and that way I'll know if the problem is solved before the winter downtime. Other option was to do a dyno day, but that sucks funds away from my fiberglass project for the winter (wing). -
Oil control mods for autox/road racing
JMortensen replied to JMortensen's topic in Gen III & IV Chevy V8Z Tech Board
The car has only been out twice since the V8 swap, and this course was much more favorable to the high hp rear drivers so there was a lot more high rpm/rev limiter stuff going on. But yes, this is the first time this has happened. Course was about even right to lefts, maybe a few more rights, but not a lot more. -
Oil control mods for autox/road racing
JMortensen replied to JMortensen's topic in Gen III & IV Chevy V8Z Tech Board
Thanks for that. I purchased something very similar yesterday. I'll post pics of the original setup and the new when it's all done. -
Oil control mods for autox/road racing
JMortensen replied to JMortensen's topic in Gen III & IV Chevy V8Z Tech Board
Well, still working it out. Now thinking I might not have the fresh air vent at all, and instead route the valve covers and valley cover to the can then to the intake. EDIT--would have been one valve cover to the vented can, the other two PCV hoses T'd and attached to sealed catch can and to intake manifold. -
Oil control mods for autox/road racing
JMortensen replied to JMortensen's topic in Gen III & IV Chevy V8Z Tech Board
Talked to David Carroll and we were both thinking this is a PCV issue. I think I have a fix planned. Upgrade to LS6 valley cover and then run the PCV to the intake with a sealed catch can to separate the oil. Keep vented can as air intake. -
Had my Z out at an autox last weekend and after three high rpm runs my L33 5.3 started leaking oil out of the top of the engine, still not sure if it was valley cover or valve cover but it was all over the top of the engine. Question is for those of you who have road raced or autoxed: what mods have you done to get the oil out of the heads and back in the pan? What worked, what didn't, etc. Right now I have a baffled trapdoor pan and 3 qt Accusump and my PCV is just the hoses off the valve covers to a catch can with breather. I've been looking at drilling holes in the lifter trays, porting the oil return holes in the head, switching to later PCV (LS2 I think is the one with the baffle in the valley cover), seen return hoses added directly to the head and oil pan. Would like to solve the problem without pulling the motor if I can, but may not be possible.
-
The guy who did mine used that pic and calculated it out. He also owns a race shop that builds a whole lot of cages. Another way to do it is to bend conduit to shape and then bend the tube to match the conduit. That's how I did the halo and A pillar bars in my cage.