LooseRocks
-
Posts
112 -
Joined
-
Last visited
Content Type
Profiles
Forums
Blogs
Events
Gallery
Downloads
Store
Everything posted by LooseRocks
-
Platinum Racing Product out of Australia. https://platinumracingproductsusa.com/
-
I spent a little bit of time looking to see if there was already information/image available for that area of the chassis. So far no luck. If the chase thing doesn't work out (which I don't think it will) I was going to go M12 but I think I'm just going to fill/drill/tap instead.
-
I guess I'll try chasing it first. If that fails I might just do an M12x1.25. The drill hole for that is .425" so there should be enough meat there for that.
-
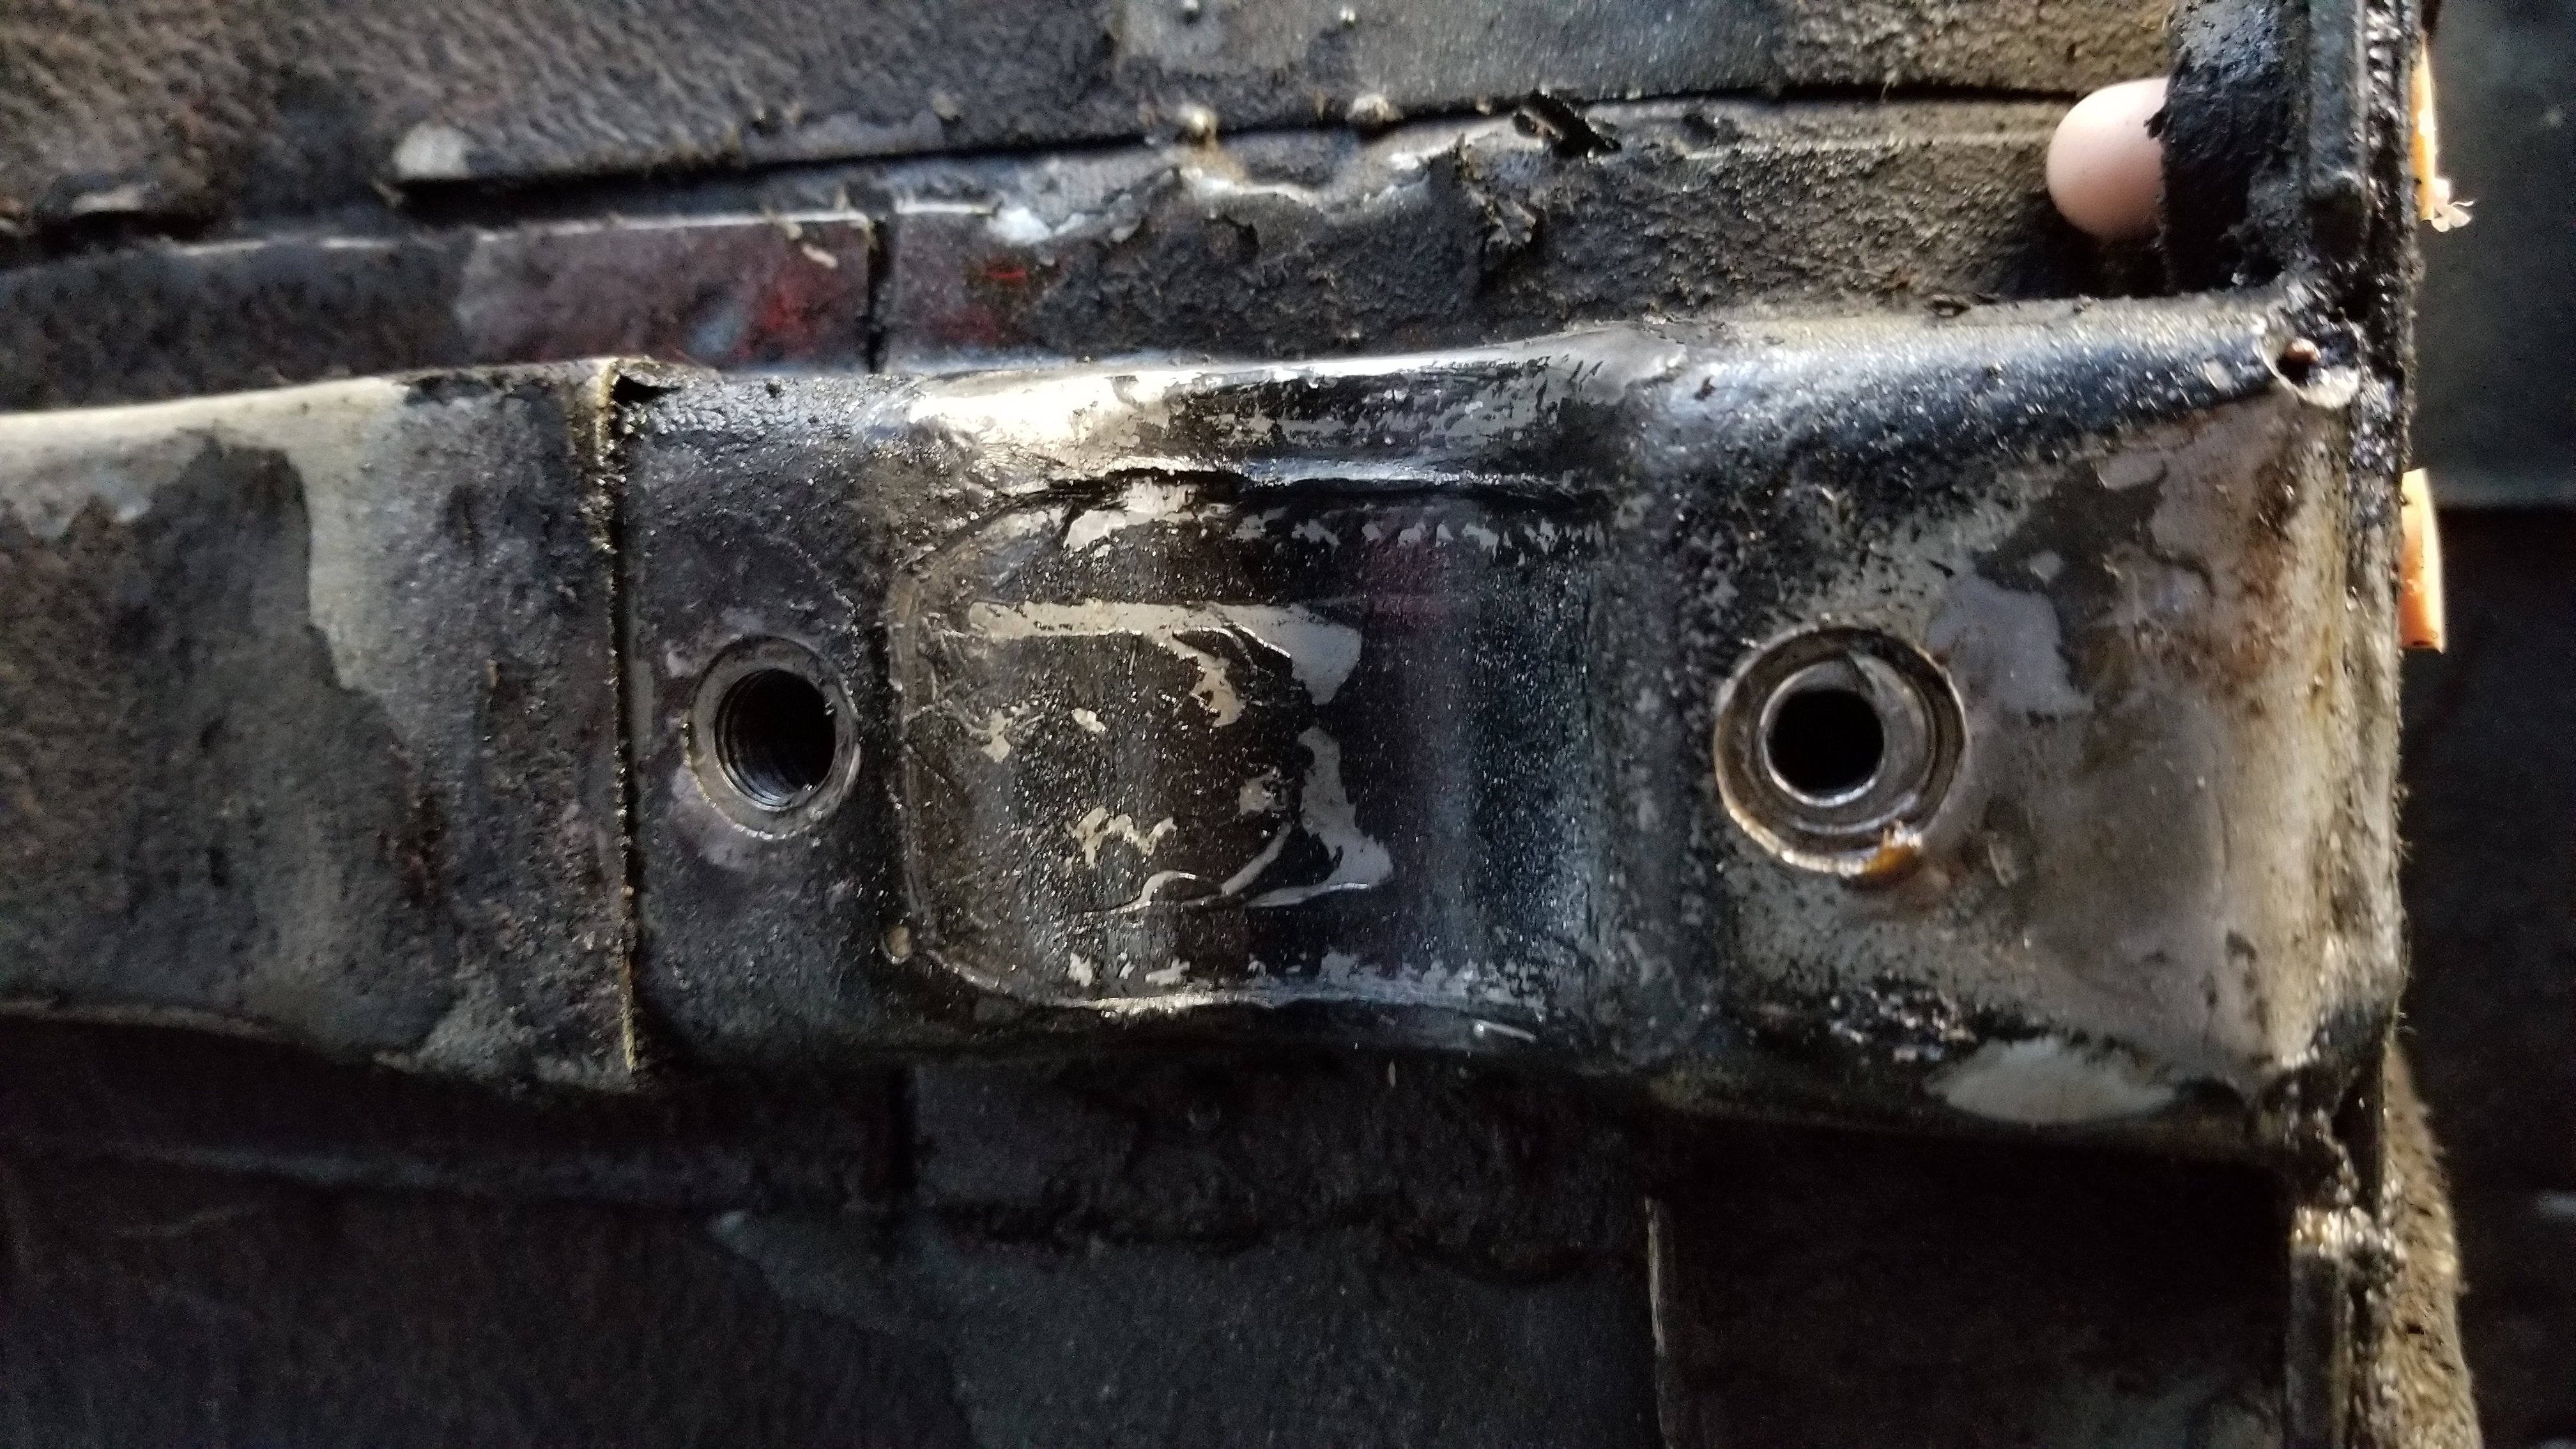
I’m in the process of disassembly. I found that there were only 3 bolts installed for the brace for the front of the rear LCAs/diff support. After removing the brace, I found the hole that was missing the bolt actually had one in it. It was just missing the head. I drilled the bolt, heated it and was able to extract it. Awesome! Unfortunately, it seems the reason for it breaking off in the first place was it was badly galled or cross threaded. It probably broke off being inserted and who ever was doing the work deemed three bolts good/safe enough. Now I’m in the process of trying to figure out what to do to remedy this situation. I could just re-chase it but the damage on the left over nub looks to me that the hole is damage well beyond using that as the solution. The other “easy” option is to put a key locking threaded insert into that hole. The thin wall threaded insert requires an M14x1.5 hole (12.8 mm drill size, ~.5”). My question is, is there enough meat in the chassis (likely a captive nut) in that location for a hole that size? The “hard” solution would be to fill the hole with a weld, drill it and re-tap. This is probably outside of my comfort zone.

-
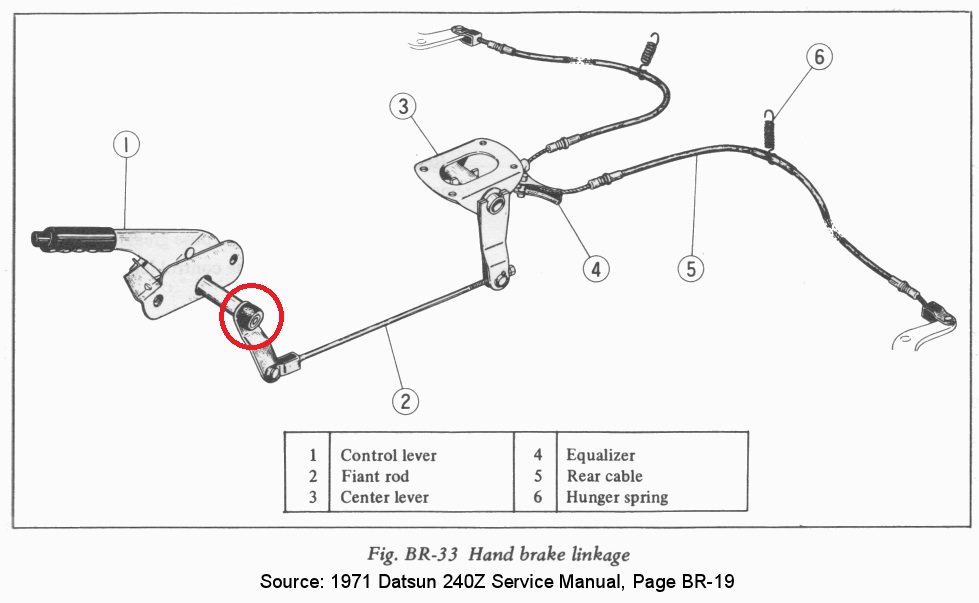
The plastic/rubber collar that sits on the end of the pivot rod inside the chassis body. Where can I get one for a 1971 240Z?
-
He's already on the bottle.
-
There's a pretty good one at Francisco Gutierrez Youtube page. No real details but it shows placement at about 1:11. I''m going to do the same but place it a little bit lower, closer to the fill and more forward. That should avoid both the fill and the sender.
-
Looks like it. OEM switch drives relay switching circuit. Relay supplies high current to lights. You just have to make sure that it will work with what's available on your OEM harness/multi-function switch. On the '71 240Z the power is source from the fuse panel and the multi-function switch provides the ground for either the high or low beam. If that's the case with the 75 280Z, then the relay circuit that you're connecting to the multi-function switch needs to be ground activated.
-
Harness upgrade with relays. https://www.datsun-240z-upgrades.net/product-info/
-
Just remember to add relays into your circuit so you don't end up sinking all the current through your switches.
-
3 months for a home build going from shell to dyno. That's impressive.
-
What are you using to get the glue residue up?
-
This one seems over the top expensive but I thought I would ask if anybody used it. It looks like the 280 one with the bolts moved inward with a spacer to correct the placement. https://jdm-car-parts.com/products/datsun-240z-1969-1972-8-5-inch-brake-booster-upgrade-kit
-
The Apex design nearly boxes in the rear diff. The two members that projects forward and is connected to the front diff mounting point is part of the rear cross member (Apex's mustache bar). Those same members continue forward past where the front of the diff is mounted and connects to where the OEM LCA mounting point. If you connected the caps on the front mounting point it would essentially add a box structure to the rear of the car. The design also looks like it would eliminate any flex due to the drop mounts for the LCA.
-
First block of quotes references my questions with regards to Rear Suspension Conversion. The second block of quotes are answers for the Rear Track Attack. There are no push rods in the Rear Suspension Conversion. You would probably get a better response from him if you contact Apex directly through e-mail. He's very responsive. Kudos on him for that.
-
Not really sure why you would want to do that swap outside of just want which is valid. Probably not much info on such an obscure swap anywhere. Most guys looking for big power just upgrade the EJ. There's a few out there that go H6.
-
Again these are questions that currently have no answer. For the Time Attack Kit (not the one the OP is interested in) that information is not available. That kit also has "Wider track width" under Key features. The belief is that since the strut is now replaced with a push rod that is thinner than the OEM strut there will be room for a wider wheel. Until actual numbers are available there's no way to know how this setup will work with what you're planning. Since the track is wider you will likely need need more positive offset to get wider to work without chopping the fenders? How much offset? Will it go wide enough for the size tires you want? Do they make the wheels you want with that offset? Answers to know before pushing that add to cart button. Especially since this kit is 5 grand.
-
If you're going to pay somebody to repair it, you should consider having one made that has U-joints that you can replace. I can't imagine that it would be that much more than having it repaired. Places like Hoke Performance are offering custom CD009 to LN diff for $400. A shop is probably going to charge you 4 hours + parts.
-
The OP is looking at the "Rear Suspension Conversion". The HellZ uses the "Track Attack - Complete Rear Suspension".
-
I give them credit for posting pretty good instructions with their earlier products. It has torque specs and all. The new ones which look more complex are missing them. Arguably you could say that one can mosh together previous product instructions with various OEM torque specs and get there. A complete set of instructions for something in the $2K neighborhood would be nice. I know that documentation is expensive and lots small shops just don’t do it. It saves money in the end though. Saves bandwidth on the phone calls and e-mails. Just a gripe of mine. Enough bitching and on with the Qs. This is more of an observation. Product says “Bolt-In”. Not going to be very bolt in of it comes with axle shaft. That means disassembly of the axle of your choice and replacing the axle shaft. I know that anybody taking on this level of work should know what has to be done. One would think but spelling it out couldn’t hurt. Probably providing some instructions for that particular aspect of the destruction/construction would help sell these kits. Under “Key Feature” there is a list of what would appear to be improvements since it has “!” and all. You probably should understand what that entails. Improve roll center! Is that with all 3 settings for LCA (see inboard mounting point)? I imagine the lower hole would potentially raise the roll center. Then maybe not since the pivot point is further out from the OEM. Widen track! This one is probably more critical to understand if you don’t want to add flares. Can it be set to OEM width? I’m going to guess no and will require chopping of the fenders. What wheel offset can you run before the inner rim encroaches on the coilover? You might want to know if you’re chopping fenders and plan on ridiculous wide meats. Speaking of coils, what coils? Any 300ZxTT or 370Z will work? How do they mount? Alter Camber! Alter Caster! Alter Toe! What does that even mean? Adjustable? How and how much? Lots of knobs there. Might want to know what the knobs can do. Sway bar mounting point? Can you get the specs for the axle shaft? They might not be around forever and this is a custom part that’s subject to breakage. I suppose you can just break out the mic and take some measurements before the install.
-
Looks like a nice kit. Lots of questions need answering before the add to cart button is pushed.
-
Race Car Brake Assistance, no vacuum available
LooseRocks replied to 260DET's topic in Brakes, Wheels, Suspension and Chassis
What do you have in your setup? Brakes & size of MC? -
For a street car it's nice to have taller final ratio. I had an STi with a close ratio box. Highway speeds was in sixth at 3200 RPM. That was why I looked at the T56. I wished the CD00A was a bit closer to the T56 wide. 3.56 diff (common for R200) + 25" tires @ 75 MPH CD00A = 2835 RPM T56 Wide = 2225 RPM T56 Narrow = 1795 RPM The T56 also has a speed output that the CD00A is lacking. Not as big a deal with modern GPS speedo available. The T56 is definitely the more expensive solution going apples to apples.
-
Pertinent to this application. Magnum F
-
T56 is a possibility. Look at the ratios and make sure you're happy with it. You can get just the kit. Not sure how much tunnel work will be required to make it fit though. You might want to research the shifter they offer with it. Not sure where that sucker pops out. I know there are two other possible shifter that can mate with the T56 that will sit further forward. But the one they offer might be the right one. Will require some legwork on your end. https://www.grannasracing.com/products/quicktime-2jz-to-t56-bellhousing-rm-4030 Or have them ship you the whole enchilada with a brand new T56 Magnum: https://www.grannasracing.com/products/supra-t56-magnum-swap-kit-mkiv-2jz-tr6060 That said there is a guy in youtube land that has one mated to a 2J in an SC300 that had some issues with one. Not sure how applicable it is to your application but thought you might take a peek. Guy is annoying but there might be some useful info in there. Good luck.