AydinZ71
-
Posts
1073 -
Joined
-
Last visited
-
Days Won
27
Content Type
Profiles
Forums
Blogs
Events
Gallery
Downloads
Store
Everything posted by AydinZ71
-
IMSA GTU vintage racer build
AydinZ71 replied to clarkspeed's topic in S30 Series - 240z, 260z, 280z
Looking good!! Did you fabricate the G-nose yourself? Any reason you wrapped the AL sheet in fiberglass, vs. leaving the air dam as AL instead? -
L28 sounds like it's running on one cylinder
AydinZ71 replied to Mike33Stig's topic in S30 Series - 240z, 260z, 280z
Does the problem go away after she is warmed up? Start running OK after 10 min? If so, the cold starting capabilities of your OEM EFI have been compromised. I don’t know Enough about the OEM system to help diagnose though. Usually and easy fix is to artificially increase your idle with the throttle body set-screw, but you will be running higher rpm’s at idle once warmed up. unless there is something mechanically wrong, it can only be fuel, spark, or air. Air is unlikely since you have a single throttle body, and you have already tried adjusting your idle Screw. Spark is easy to check with a timing light. You can also pull each plug, ground the threads, and watch for a spark as you turn the engine over to confirm each plug is sparking. Make sure your plug wires have not been crossed, or out of order. Last and most difficult to diagnose is fuel. Check for fouling (black soot) on your plugs and smell gas out the exhaust pipe, indicating a rich mixture. If lean, the plug ceramic insulation and electrode will look white, but that will not happen until the engine is warmed up and under load. Proper mixture will yield a brown/dark grey electrode. I tune adjustable EFI and carbs, so I’m not much help on OEM EFI. Sorry 😕 -
240z SCCA vintage race car, restoration
AydinZ71 replied to AydinZ71's topic in S30 Series - 240z, 260z, 280z
@Datz44 thanks friend! I think you should decide one of the following courses: 1) race in an SCCA class w/ very very specific rules 2) race in a vintage league. Less competitive and the rules are really loose. 3) build whatever you want, and just enjoy track days, time trials, etc. your decision on what car to build and how, will be very dependent on this decision. If going with #1, definitely go for the 240z. It is one of the most competitive weight/power potential in the production class. If going for #2, id buy a cheaper 280z chassis and lighten the heck out of it. If I was going for #3, I’d buy the various panels and build a tube-frame from scratch. The only component I have not found so far available aftermarket in fiberglass is the roof. Every other exterior panel is available. I think the ultimate track Z (just my opinion) is a full tube frame, with flat panels in either AL or fiberglass. I’d look at a Honda K24 engine w/ a small quick-spooling turbo. I would source forget aluminum hubs and control arms, make my own crossmembers and subframe. I bet you could get the weight down to 1700lbs, and still have 350+hp to play with. The problem is, it will not qualify for any class that I am aware of. If it does, it will likely be uncompetitive without some serious aerodynamic mods. -
@88dangerdan yep! Just like that @mainboyd yeah I think the purpose of the cable hand brake requirement makes a bit of sense. Hydraulic systems can fail. Leaks, a cut line, an accident, etc. having a back-up means of braking in an emergency that does not rely on the same materials (reservoir, etc) has some merit. Now we all know the cables stretch, and they are a pain in the ass to maintain though. The OEM drum brakes are actually an elegant design when observing in hindsight. Unless you have some reason for your car to be inspected, I’m not sure anyone would know of an alternate solution you employ. My cable brake did not work for 20 years, and I just left it in first gear when I parked.
-
280z propeller shaft with 4 speed
AydinZ71 replied to Ennisdavis's topic in S30 Series - 240z, 260z, 280z
I’m not aware of any driveshafts for an S30 that came with replaceable u-joints. Hopefully I’m incorrect, and someone can correct me. -
I think I’m going to install a ball valve in the trans tunnel to lock my rear brakes. It will lock whatever pressure I have in the rear brake line and act as a super simple “parking brake”. I have front/rear MC’s, so it will just be my rear calipers. adding an additional caliper is ideal, but this is for a race car and I seldom need a parking brake.
-
240z SCCA vintage race car, restoration
AydinZ71 replied to AydinZ71's topic in S30 Series - 240z, 260z, 280z
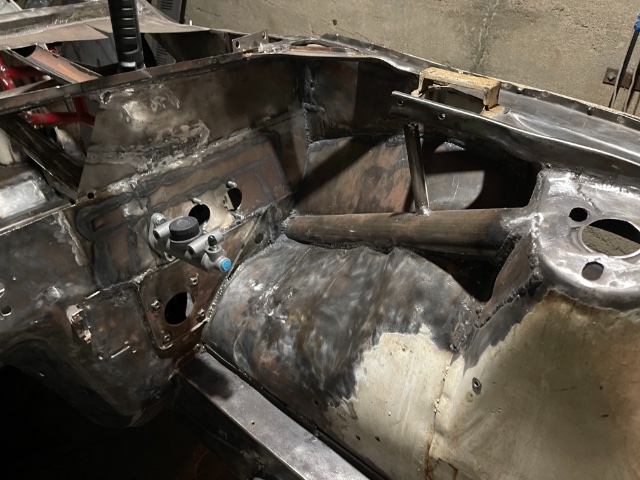
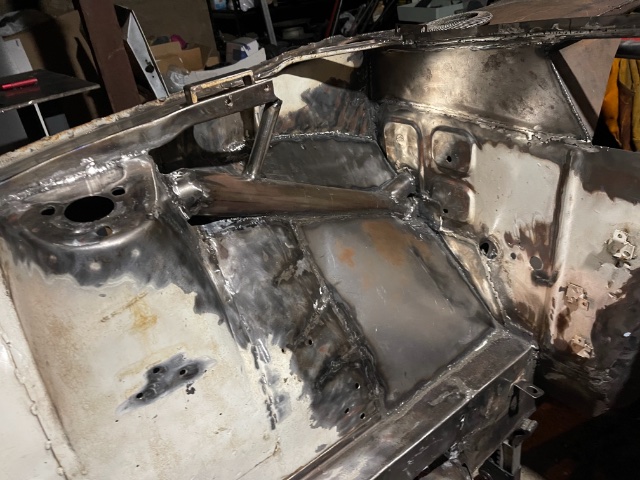
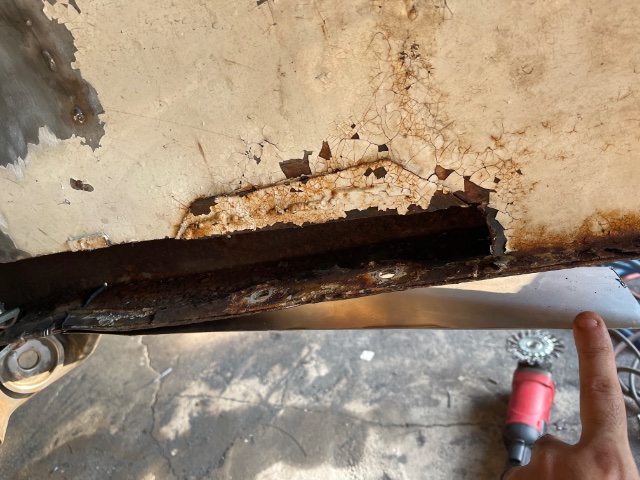
Missing sheet metal in wheels wells are done. Used sheet to create webbing around the strut tower stiffening tube. Only chassis rust work left are my engine bay frame rails. Got a great deal on some 316SS tube, and the OD is identical to the OEM square tube ID. Now to think through how I’m going to attach it. other updates: - Megajolt parts are all in hand. - Still waiting on my Stahl header. Should be done late Oct., then in to ceramic coating. - Mishimoto radiator in hand - acquiring gauges. Mostly looking for cost effective ones available used. Only interested in electric units.
-
curious to know what are the best L Series Transmission options now?
AydinZ71 replied to primaz's topic in Drivetrain
Wish I could! Still have the race car on Jack-stands. Il probably have the trans adapted sometime in the next 4-6 months. I believe the “noise” is well documented though. You can search Google or this forum. I believe it is common with the trans, and not unique to the bellhousing or L-series. My guess is the 350/370z has better insulation so the noise is not as clear in the cab 🤷🏽♂️ -
I agree. I can see why it can be a problem. Il do some research on their competitors (fuelab etc.) and see if they have similar leak down issues. I did run this as a daily for several years when I had it in high school, but always had the switches. Might be time to try a different FRP on the next EFI engine I install.
-
Plates around bell-housing - racing application
AydinZ71 replied to AydinZ71's topic in S30 Series - 240z, 260z, 280z
Yeah I absolutely read that! I plan to just put them in. 1/4" AL plates I have. Comes in at a little over a pound, so not the end of the world. Weird that Greg Ira did not install them and he is the EP champ. I spoke to him about this like 6 months ago, and I think he mentioned arguing that the exposure of the bellhousing horizontally to the adjacent pedal area was insufficient to warrant a concern. Most of the bellhousing is just outside the tunnel. Meh...il just put them in. I just had them sandblasted and repainted anyways -
No V8 here, but I do have an EDIS ignition module from a v6 ford, and diff from a mustang GT Either yet to be installed, but "dude, I got a Ford!" 😜
-
-
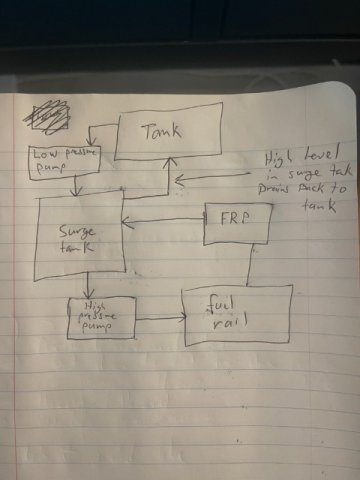
No doubt, if your fuel rail stays pressurized it is ideal. If you are using the OEM key start, I agree with you 100%. Going straight from "off" to "start" in one throw requires your fuel rail to remain at operational pressure. In my case, I have switches and always prime for 1-2 seconds. I have not experienced the air bubbles concern you have mentioned. When vapor bubbles are created due to fuel boiling from heat, those bubbles collapse/condense back into a liquid under two conditions: 1) temperature drops minutes/hours after engine is off. 2) operating fuel pressure (30-50psi depending on your tune) will likely collapse the vapor bubbles based on the vapor/liquid pressure/temperature graph for gasoline. The pressure component is why it is so much more likely to experience fuel vapor related issues on a carb fuel system (3-5psi) vs. fuel injection. Air bubbles specifically are a problem. They are unlikely to collapse back into solution even with full fuel pressure. However, getting air bubbles into the fuel rail requires a leak in the system that is allowing ambient air in. If there is a physical leak path for gasoline to come out of containment, there is a path for air to get in. However, air is unlikely to bleed into your fuel rail from the RPR seat as it would require: air downstream of the FPR to be present (should be saturated with gasoline vapor worst case, else liquid gasoline), and ambient air pressure would need to be higher than that in the fuel rail. Here is a sketch of my fuel system on my L28et.
-
Mine does immediately after the engine is turned off, but does leak down to 5-10 psi overnight. It is bypass type, so it bleeds fuel back in the return line. I'm not certain if this this is caused by my FRP or the lack of check-valve at my pump outlet. It doesn't bother me. As long as pressure drops slowly, I know it is doing its job while the pump is running. Never had any pressure related issues with this regulator, but my Walbro 255 has gone bad once in the last 20 yrs. I think I read on their website some time ago that they do not claim to meet the 30 min zero p-drop spec. the EPA requires for OEM vehicles. I also run a surge tank in the engine bay, so my plumbing between the pump and the FPR is only 2' long. A small leak on the FRP seat will cause a quick drop in pressure due to the low volume of fuel in the line.
-
+1 @clarkspeed I feel it is a balance between several considerations: 1) Anxiety about reliability - In my case, my own anxiety is sometimes worse than the actual consequences of running old(er) components. 2) Budget - obvious 3) Your time - It is important to value your time. Unless this is literally a hobby, you will get frustrated with performing re-work. 4) Down-time tolerance - Daily driver vs. race car I am Bias. I always tend go deep down the rabbit hole in most cases. I like knowing what is "new", and therefore unlikely to be the source of a problem when one is encountered. At 50 years old, your electrical insulation will be failing. It is brittle, and prone to shorting. The copper wiring will have started corroding (brown/green build-up). Not really an easy fix here, so I would just strip the car and start from scratch if you enjoy the build process. It isn't what you want to hear, but electrical and electro-mechanical devices are going to be a game of wack-a-mole. Unlike mechanical systems which are pretty darn reliable on these cars, you will have periodic failures on: 1) Switches 2) fuses and fuse trey wiring 3) engine electronics (but these are maintenance items): Distributor points or electronic module, cap, rotor, wires 4) wiring to and from all lights, including the light receptacles themselves. 5) gauges and instuments
-
Looks good! Welcome! Early suggestion: If you plan to truly hybrid your Z, buy yourself a decent MIG welder and practice as much as you can. I wish I had done so earlier. Depending on you plans, you may find yourself buying many components and paying for services you can do yourself. Examples: 1) Rust repair 2) Full exhaust system, from header to tail pipe 3) mounting brackets for all sorts of fun stuff. 4) Roll cage, or chassis stiffening. If you push the torque on your V8, you may stress the relatively week unibody and start warping it over time. Let us know where you want to go from here, and we are more than happy to give you some suggestions!
-
curious to know what are the best L Series Transmission options now?
AydinZ71 replied to primaz's topic in Drivetrain
If you are unskilled at shifting, I can see a clear performance advantage to DCT. I think the control a true manual provides is unique though, and adds to my driving experience personally. I also like skipping gears LOL. -
I have am using an Aeromotive FPR w/ boost pressure reference. Several other equivalent high-quality manufacturers out there, like "Fuelab". They all run somewhere between $100-200. Typically a 6061 alloy AL body to save a bit of weight. Mine has lasted 20 years now with no problems. It has a soft-metal/hard-metal seat with practically zero need for future maintenance. My fuel filter is upstream, so unlikely to get contaminants on the seat. If you are planning to use a fuel return line (highly recommended), make sure you get the "right" FPR. If you want the maintain pressure in your fuel line, do some research on the FRP (reviews) and see how the pressure holds up over time. Also, make sure you have a check-valve at the outlet of your fuel pump, as the pressure can leak-back through the pump depending on the type/manufacturer. I can't think of a clear downside from using a larger-than-necessary fuel rail besides the obvious size and weight. It will take a fraction of a second longer to pressurize fuel with a large volume, but I doubt you would notice. A fuel rail with a significantly larger ID than your fuel feed line just isn't necessary. Mechanical engineer here with a working background in process design (I design fueling facilities) so if you need some tips for a rock-solid fuel system design let me know. Extreme demands on fuel systems is not typical unless you are planning for huge torque. For most applications, it comes down to proper placement of component sand focusing on reliability/durability. I see a ton of people overlooking simple fixes like fuel lines touching engine components (boiling gas). Good luck!
-
I have separate master cylinders for front and rear. I’m thinking… could I add an e-brake that just just pressurized the rear fluid? Man that would be convenient.
-
IMSA GTU vintage racer build
AydinZ71 replied to clarkspeed's topic in S30 Series - 240z, 260z, 280z
Woohoo! Wish I was ready to put switches in. Did you get these from summit? Did they come with the breakers or did you wire separately? -
240z SCCA vintage race car, restoration
AydinZ71 replied to AydinZ71's topic in S30 Series - 240z, 260z, 280z
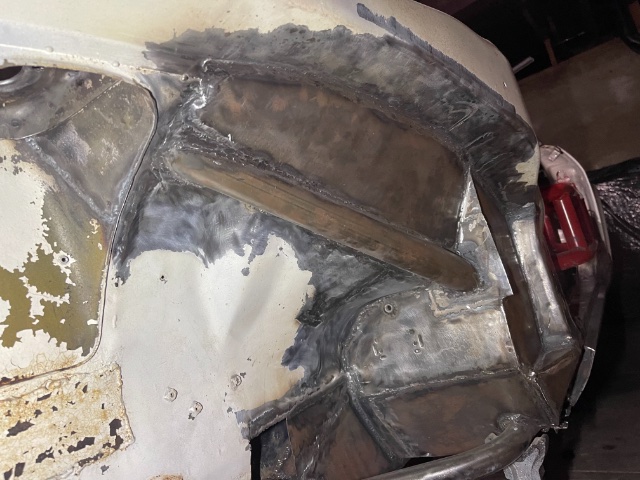
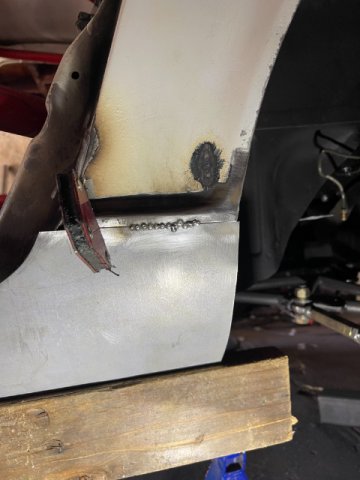
I hear ya! Same… I got the steering column refinished and the Tilton pedal assembly in so I can weld the firewall, stiffen the mounting surface, and get the clearances right. I purchased most of the EDIS parts for the “megajolt” ignition. ATI dampener and trigger wheel are at the machine shop now getting balanced. Everyone is busy as hell so trying to get a head start. Got the cam oiler on order from Greg’s dude. Going to take a big step and get all my electronic/analog gauges on order. I don’t have the funds for AIM (but I sure wish I did!). Plan is to run the 10:1 320 duration .500 lift head for now until I get more experience. Next step will be 12:1 w/race fuel. Clear display of my ADHD, I’m already planning the next chassis. An all tube-frame Street/fun car. Plan is to buy a junker <73’ w/ a clean title. Use all the body panels and build a complete AL tube frame around it. Eyeing an K24 @ a modest 16 psi boost. Idea is to optimize weight/power with no specific interest in racing class. attached some pics of my recent progress on the EP car. Driver side rocker and dogleg are on. Next is clean-up and starting on the engine bay subframe IMG_6698.MOV
-
240z SCCA vintage race car, restoration
AydinZ71 replied to AydinZ71's topic in S30 Series - 240z, 260z, 280z
Appreciate it friend! Need to take some days off work so I can finish the structural work. I will look into the innovate data logger. I have been spending like a drunk sailer, and the Stahl header I have on order will be almost another grand. Man… race cars are expensive! -
240z SCCA vintage race car, restoration
AydinZ71 replied to AydinZ71's topic in S30 Series - 240z, 260z, 280z
Thanks Clark! That is all very helpful MegaJolt (the EDIS timing module) suggested a TPS for “big cams”. They described the erratic vacuum off-throttle from a big cam as the reason. My 320 duration will probably be an issue with a MAP because of reversion at lower rpm’s. The timing advance I’m looking for is to maximize the off-throttle response when shifting. Otherwise everything will be optimized for WOT. I really need to get an O2 logger. Il look into one. 12:7 is something I will target and see how she wanders! -
240z SCCA vintage race car, restoration
AydinZ71 replied to AydinZ71's topic in S30 Series - 240z, 260z, 280z
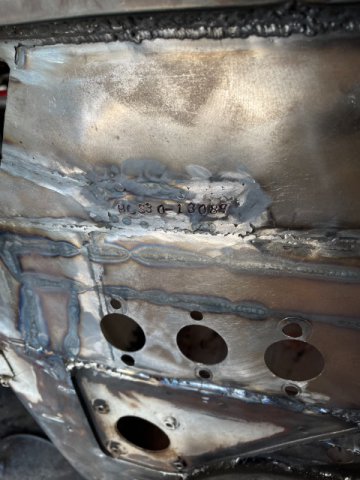
UPDATE: - Firewall metal work is complete for pedal assembly - Steering column drop-mount is complete and tested. Engine Ignition: I have decided to go with the open-source EDIS-6 crank-fire ignition system from Ford. My ATI pulley/damper is with the machine shop getting the trigger wheel mounted and balanced. Will buy the MegaJolt EDIS ignition module which will allow me to set advance etc. with a TPS, and map the ignition across all RPM's. QUESTION: Anyone know of a good resource or book for learning more about fuel and ignition tuning principles? EP runs SU carbs, so I will have 2X Air/fuel O2's and gauges (one per each carb) so I can monitory and adjust them before track days. I know ~14.7 is stoichiometric, but i have a feeling I should be targeting different A/F across the RPM band (13? 12?). Same with ignition, I need some guidance on what I should be targeting. I know the best approach is to Dyno tune the engine for max HP, but id like to get close in the meantime and modifying my SU needles can not be done on-the-fly. At $400 per session, I will be unlikely to budget for multiple sessions. -
A pic and a vid for reference IMG_6632.MP4