clarkspeed
-
Posts
878 -
Joined
-
Last visited
-
Days Won
49
Content Type
Profiles
Forums
Blogs
Events
Gallery
Downloads
Store
Everything posted by clarkspeed
-

IMSA GTU vintage racer build
clarkspeed replied to clarkspeed's topic in S30 Series - 240z, 260z, 280z
I wish I could tell which was fastest. The S30 Z really likes no bar on the rear. That is how Greg runs but in grippy turns he is always lifting a front wheel. The books will tell you that is traction lost, but you are making it up with sooner throttle..... so it depends. I think my chassis is stiff enough to treat it more like a full tube car. If you run without a rear bar, you just need to reduce the stiffness of the front bar accordingly, regardless of coil spring stiffness. -
I try to challenge myself any way I can. I try to race cars with manual shifter as much as possible to practice heel and toe and I wear race boots. Even put myself at a big disadvantage sometimes by running races with no practice. At this point, I only race head to head. Yes it is a crap shoot in iRacing to avoid wreckage, but I find the better I get, the better I am at avoiding. In certain races, you are guaranteed a podium if you can qualify top 10 and stay out of trouble. I don't like driving the GT cars and faster. Too much electronic intervention and in iRacing the higher level you go, the more you are diving into setups. To win requires dedicating yourself to 1 or 2 cars and even paying for setups. I don't have time for that. My ultimate goal is to master that 67 Lotus GP car, what a handful, but those cats only race a couple days a week.. I own around 20 tracks and I do race multiple cars on each. I find my biggest gains come from stepping away for a couple of weeks. When I am really trying to find speed I find myself over driving. When I return to a track after some time off, with any car, I almost always set a new personal best. Just like in real racing, the magic happens at turn in. When I attack it with some kind of calm, confidence I always go faster. I don't have a lot of PC. I can look up specs if you like. Paid $700 for thr laptop on Amazon. Basically minimum vid card required for iRacing. I had to up my memory for the headset, but that is all. I got the Samsung VR headset new for $200. They may be cheaper now. They are rated very high for screen quality, but crappy for the hand sensors. You don't use the sensors when racing. It's pretty damn immersive. I can't ever go back to a monitor. As far as dizziness, I have a horrible inner ear. I get sick on roller coasters and every time I go to sea on a boat. It took me about 2 weeks to acclimate to 1hr+. Someday I may upgrade to DD and motion seat, but it is low on priority list. Maybe next pandemic.
-
I really really like the VR. I started with it and a new gaming laptop. I tried to switch to a monitor or giant TV for comfort and could not. I think a giant curved monitor might work, but I am not going to invest in that if the VR works so well. I can look L & R 90+ degrees while racing which is just super cool in an open wheel car. The only real negatives eye sweat and I can't drink beer while racing. But it takes some acclimation, I started with 5 minutes, then 10 min, and so on to keep from getting sick. I have a bad inner ear, but I mastered it. I chose iRacing because they had specific tracks I wanted to master and cars that I am familiar with. Regrettably I have not had a chance to see if it makes me a better racer. But hopefully soon. It will be a definite advantage if I go to a new track. It definitely makes me a better race engineer for others because I know what to expect from the track.
-
Only if you build your own rig! Damn near all the pros sim race in some form or another. Besides I have way more geek point topics than this. Better adjust the scale.
-
IMSA GTU vintage racer build
clarkspeed replied to clarkspeed's topic in S30 Series - 240z, 260z, 280z
More ass end work. I originally bought this 1" light weight hollow sway bar to mount in the front and not run a rear bar. That is normally how I build a Z up with basic unibody. But after thinking about it, I think this partial tube chassis will be rigid enough to go a different direction. So I decided to run slightly lighter springs with stronger sway bars both front and rear. So I moved this bar to the rear and will purchase a heavier bar for the front once I do all the math to calculate what size it will need to be. For the rear I purchased some weldable arm kits from Speedway Motors. I also built a bearing holder and used the 3D printed Delrin bearings I already have. 1/2" rod ends and clevis bolted to the control arm in the original location.
-
IMSA GTU vintage racer build
clarkspeed replied to clarkspeed's topic in S30 Series - 240z, 260z, 280z
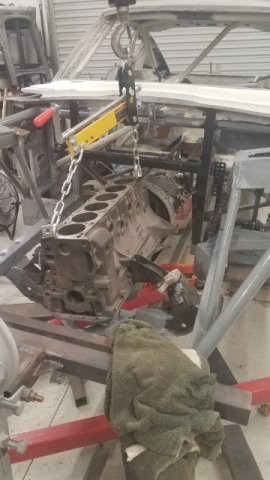
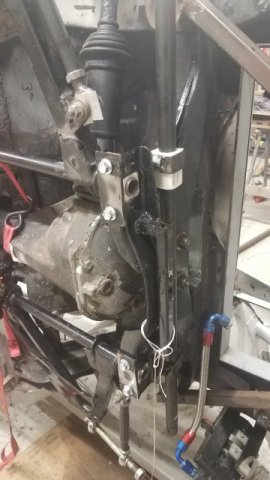
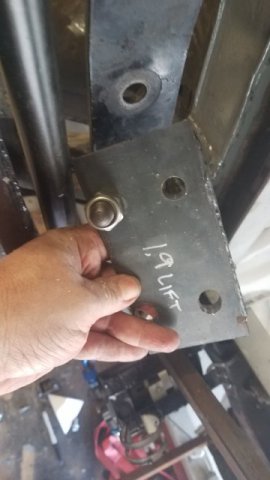
Here are some details of the differential mount. First I raised the stock cross beam to add some room because I think will need some space to raise the differential. Goal here is to keep the axles close parallel to reduce stress. If you can keep them relatively parallel during operation, the stock half shafts along with some good u-joints can handle just about anything a NA L6 can throw at them, therefore saving me some money over a CV conversion. Next I cut some metal out of the dog bone cross link to have better access to the oil change plugs. I added a brace to compensate. Then I used a cut up stock lower front diff mount to mate with the front cross member I am using. It will be hard bolted using the stock long diff bolts. Then last I built an adapter plate that bolts to the moustache bar and raises the diff up 1.9". I don't think I need that kind of lift, but if I add it in, I can bring it back down with some shims on the mustache bar mounts. The mustache bar will be also hard mounted to the stock studs with a rigid bushing.
-
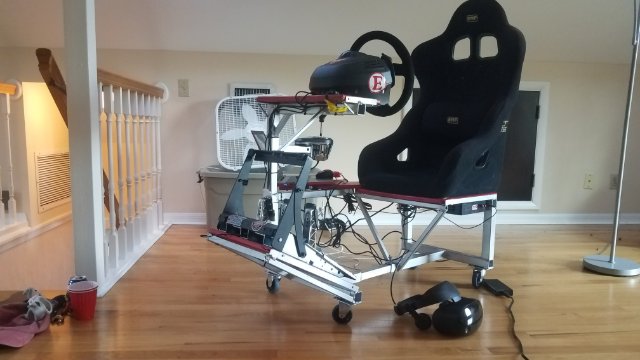
Wow, not much posted in the Motorsports section for awhile. Anyone else out there sim racing? I built up a rig in winter of 2019 just before the pandemic hit. It was great timing. Anyway I run iRacing software and run in a few different series with different cars to challenge myself. Any way here are some pics of my rig that I built myself. I run Thrustmaster gear with a Samsung VR headset.
-
Depends on what material you print and where it I used. A good home printer can run carbon-nylon good for up to 500 degree F. Pro shops can print carbon polymers just as good as OEM intakes. And if you have the money, you can print aluminum or more. I saw a pic of a $5000 3d printed inconel exhaust last week.
-
IMSA GTU vintage racer build
clarkspeed replied to clarkspeed's topic in S30 Series - 240z, 260z, 280z
Thanks for the kind words. It will have a straight shot of air down the tunnel to keep it cool AND I plan to add plenty of insulation to the surrounding panels. Yes this is a common technique used by tube frame GT cars. The car will have a flat bottom and I will try to squish that down as much as possible. I have used oval exhaust tubing in the past, but that didn't seem feasible for this build. -
IMSA GTU vintage racer build
clarkspeed replied to clarkspeed's topic in S30 Series - 240z, 260z, 280z
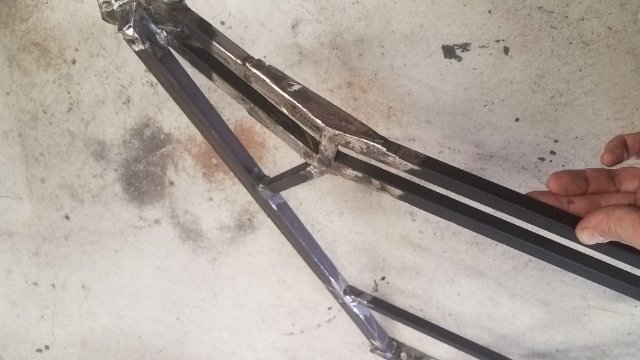
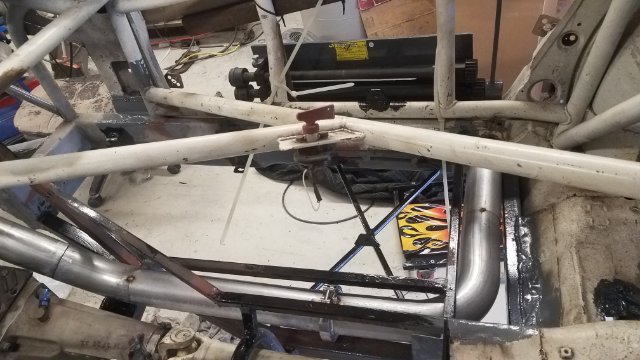
This is the strut tower brace I fabbed. It is made from something like .060 steel square so it is very light. That is why I added so many gussets and triangles. It seems very rigid. It will be hard bolted to towers and roll cage.
-
IMSA GTU vintage racer build
clarkspeed replied to clarkspeed's topic in S30 Series - 240z, 260z, 280z
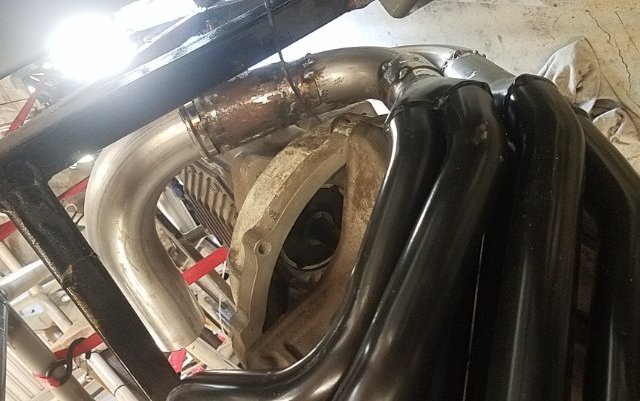
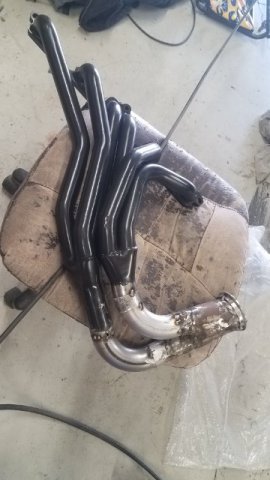
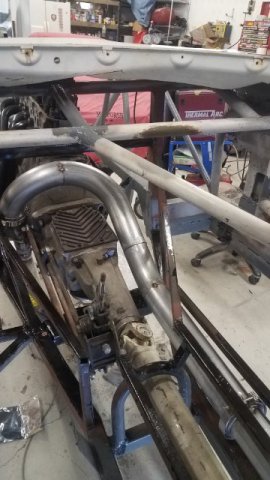
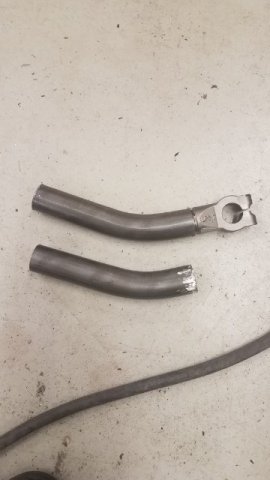
And here are some pics of the exhaust. To keep ground clearance I needed to wrap the exhaust around the transmission and it will exit on the passenger side rocker panel. I took a standard 6 into 2 header and fabbed a some turns and a collector. A couple of v-band clamps allow removal of the entire system. At some point in the future I need so sandblast this thing and coat it.
-
240z SCCA vintage race car, restoration
clarkspeed replied to AydinZ71's topic in S30 Series - 240z, 260z, 280z
Honestly, I think it might have been the first race/setup book I ever bought, but I have yet to see anyone cover the basics as well. And yes there are some really funny old pictures in there, like 8 degrees camber or something. I think it has been revised a few times by now. -
240z SCCA vintage race car, restoration
clarkspeed replied to AydinZ71's topic in S30 Series - 240z, 260z, 280z
Ha, not sure that clutch saves 20 seconds, but it does help. Roll center not super critical. Just like most settings, you want to know where it is, and where it goes after you make changes because it influences what you feel on track. Again if you follow the advise you have so far you will be in the ball park. -
240z SCCA vintage race car, restoration
clarkspeed replied to AydinZ71's topic in S30 Series - 240z, 260z, 280z
Jon, you just gave away every race engineer's secret! Just kidding, but that is where every great set up starts. Once your setup is in the ball park, test sweep the tire pressures and sweep the camber. Make large changes so you have an obvious change. Data collection helps if you are not a consistent driver. Maximizing the grip of the tire pays huge dividends. When a pro team buys a new car, they go to the track to test and run sweeps. -
240z SCCA vintage race car, restoration
clarkspeed replied to AydinZ71's topic in S30 Series - 240z, 260z, 280z
100% agree books are not going to help much if you already understand the concepts. My shelf is also heavy, I think I have the Costin book but not the Rally one from Roberts. My fallback has always been Puhn's How to Make Your Car Handle. It's an old one but i think it covers the basics well. Tuning a race car is not covered in any books that I know of. Someone will probably write it eventually or even post videos, but for now it is reserved for seminars and consulting (some online!). My advice is keep doing what you are doing. You have not gone off the tracks yet. -
Best 280z rear end for lots of torque
clarkspeed replied to 280cummins's topic in S30 Series - 240z, 260z, 280z
Hmmm, the perfect question for this forum. Gotta love that conversion. Reminds me when a guy ask me to recommend a clutch for his 1000HP 2JZ. There is just not a cheap solution for that. If you want to do it on the cheap, go with a live axle conversion. If you just want to do a lot of skinny tire smokey burnouts, you can probably keep the IRS with some upgrades. If you want to put that power down at a drag strip with sticky tires, and keep the IRS, you have a mountain to climb with every step built on a roll of cash. -
240z SCCA vintage race car, restoration
clarkspeed replied to AydinZ71's topic in S30 Series - 240z, 260z, 280z
5. 350 is not super heavy but probably a good place start. I forgot to mention grip level affects camber also. You will have a lot more body roll with super grippy EP cantilever slicks than with a 200TW street tire for example. Make sure you can get to 3 degrees, you may need it. 6. Yes the Futofab TC's look decent but I have never run them. I had some TTT TC's on another and they were solid for sure, and heavy as hell. -
240z SCCA vintage race car, restoration
clarkspeed replied to AydinZ71's topic in S30 Series - 240z, 260z, 280z
See, I told you it was a little complicated. Especially since 1 change affects many others. And add the fact there are multiple designs available to make the changes, and you end up with a post that is too long for me to sort out. Mostly all good advice above. I commend JHM for trying to put all that together! I am not going to endorse any supplier solutions since there are so many different designs out there. I have not had any beers tonight so I will try to simplify some of this: For the front suspension in my order of importance 1. A means to lower the car. Adjustable coilovers. Or the cheap garage solutions of cutting springs or lowering and rewelding the spring perches. If you do these remember front and rear are different. And unless you shorten the struts, you may run out of shock travel and bottom out. Rule of thumb is lower the car until something scrapes and then raise it back up a little. 2. Eliminating bump steer=high priority and needed on all race Z's. You are trying to make the control arm and tie rod operate in parallel. Must be estimated to be adjusted and there are some easy/cheap ways to do this. I use plywood on a piano hinge with 2 screws that touch the wheel. I adjust until no gap. Or you actually measure it with a nice tool and dial indicators. May be accomplished by spacers at the tie rod end or slotting/enlarging the inner control arm pivot hole in the cross member. It does not take much on either end, maybe 3/16" max and usually less. Slotting not legal in most classes, but an offset bearing is another option. Perhaps a bigger hole or smaller bolt? Tie rods with rod ends can be purchased and you can straight drill through steering knuckle. Or you can build one yourself by cutting off the end of a stock inner tie rod and welding it into some tubing. Thread adapter on the other end for the rod end. I prefer using Pinto bumpsteer kits with a tapered bolt rather than drilling out the knuckle. Be careful the bolt/spacers do not hit the wheel. 3. Roll center is important but not important. Most conventional setups will try to keep the RC just above ground which means the control arms are slightly pointed down toward the wheel. I posted a roll center calculator in the forum somewhere and it is accurate. But running the roll center below ground is also possible. I think the general rule is not letting the RC move through the ground plane during operation. And never run a high roll center (more than 4"), it puts much of the loading back into the chassis which is not a fast recipe. Roll center location is very dependent on wheel/tire diameter and lowering the car. There are a couple ways to move the roll center. Different wheel/tire and ride height as mentioned above. Also again slotting the cross member to raise inner control arm hole. A more common solution is to add a spacer between the ball joint/steering knuckle and strut body. There are various lengths available including offset ones. And you can weld 2 together for a longer solution. On the tube car I am building I put a bolt here and will use spacers similar to a bump steer kit combined with a spherical bearing as my ball joint. Either way, to change the control arm angle you either must relocate the inner pivot or the ball joint in relation to the chassis. 4. You will want to run as much track width as possible but will be limited by rules or fenders or geometry. Rear track does not need to equal front. More track with in front is a good thing. Longer or adjustable control arms or wheel spacers can work here. 5. Normally a means to adjust the camber is needed. Many solutions here also. If you lower the car just right and run bias ply tires, you can get away with nothing. Otherwise, depending on spring rates, you probably need between 0.5 and 3.5 degrees of camber adjustment. Bias tires 0.5-1.5 and radials 1.5 to 3.5. Softer the spring, more camber usually required to get a good tire contact patch under full G load. Camber can be adjusted by moving the upper strut bearing (camber plate) or extending the control arm. 6. A different solution for the T/C rod. Rubber bushings are not acceptable for road racing. They will make your butt tighten up on heavy braking. Poly is almost acceptable but still wallows a little under heavy braking and has lots of sticktion. The Delrin ball aluminum cup works well but the Delrin doesn't last long and will really scare you (and drivers near you!) under braking when it cracks up. A common solution is replacing the joint with a rod end. But most of these involve bolting a clevis into the pocket which moves the pivot point slightly outboard. I never liked that but it is better than nothing and you can add couple degrees of caster at the expense of pushing the wheel forward in the wheel well. Seems like I saw some vendor did this correctly but I can't remember which one. More caster is good, but if you push the limits and add lots of caster here be very careful of interference. 7. Weight. There are some cool control arm designs out there. Some of them weigh many pounds more than stock. I always ask myself, if the stock stamp steel stuff is plenty strong to race with, why do I need extra thick wall tubing to replace it with? It is not good to add 5 more lbs of unsprung weight. Some of the more popular vendors use very heavy designs because they are designing for street cars and extra safety. That's when building your own starts to look attractive. 8. Eliminating friction or "sticktion". Replacing the stock control arm inner bearing with a spherical bearing or purchase of a control arm with rod ends. 9. Steering knuckle - driver preference, some road racers shorten but not that many. Many autox'ers do but not all. That's all I can think of for now. -
240z SCCA vintage race car, restoration
clarkspeed replied to AydinZ71's topic in S30 Series - 240z, 260z, 280z
Shit gets complicated depending on diameter of your wheel/tire combo, spring rate (wheel travel), ride height and desired roll center.. I replied somewhat on my thread. But there is a lot more involved. Tube control arms dont solve for any of those challenges. For a race car, you want to run as low as you can with no bumpsteer. There are many ways to skin that cat. I can only recommend what I have used in the past depending on your diameter. -
IMSA GTU vintage racer build
clarkspeed replied to clarkspeed's topic in S30 Series - 240z, 260z, 280z
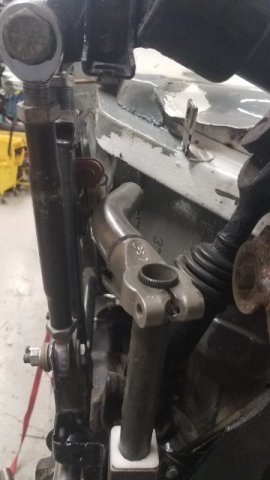
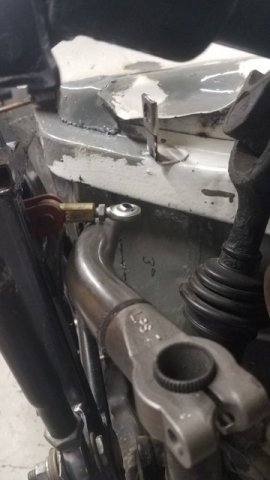
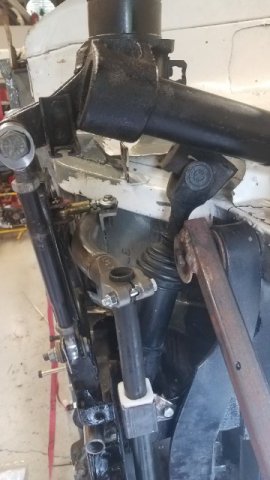
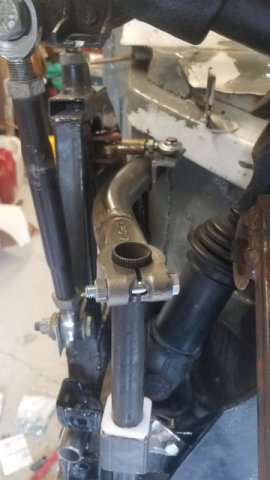
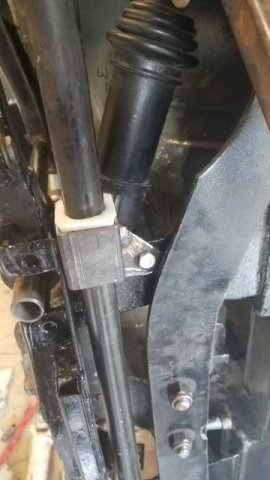
I keep a close eye on suspension anyway. I made them fairly tight so they need to loosen some. For front LCA's it depends on what you need. If you have camber plates you dont really need adjust at the arm. And I normally use a wheel spacer to adjust track. Personally I just pop a spherical bearing in a stock arm and slot the cross member vertically about 1/8-1/4 inch to adjust out bump steer. (You can cover that with a washer if needed!) The only reason I built for this car is I replaced the t/c mount with a rod end in the exact same location. -
IMSA GTU vintage racer build
clarkspeed replied to clarkspeed's topic in S30 Series - 240z, 260z, 280z
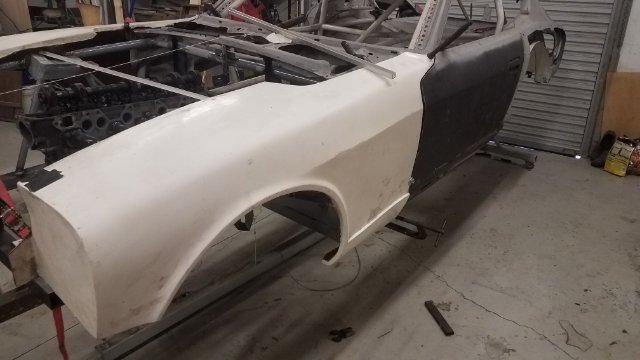
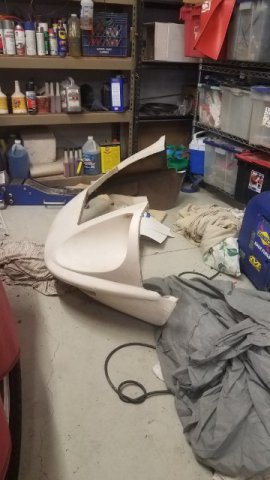
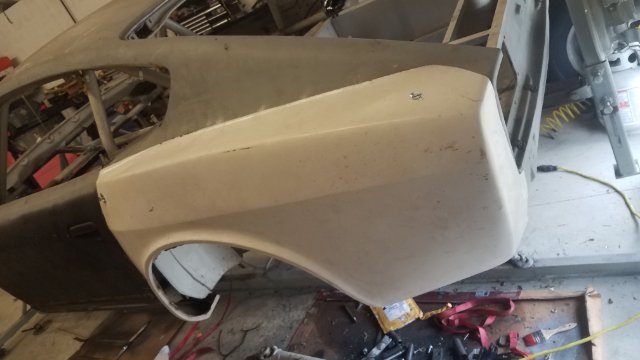
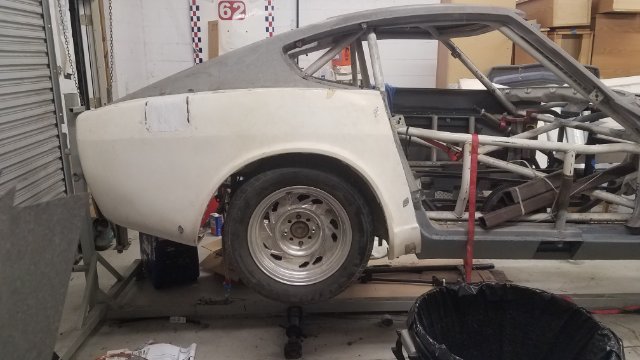
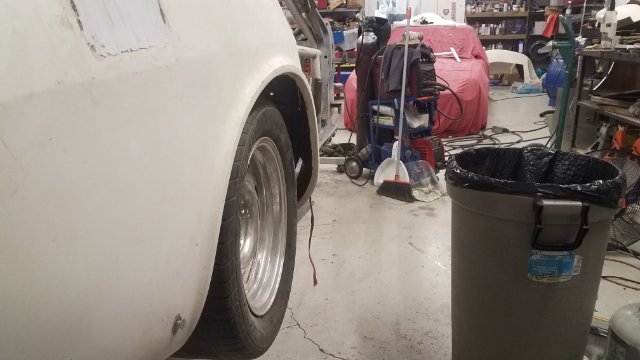
This is the body kit I have decided to build around. I had a full 5 piece IMSA GTU bubble fender wide body set and sold it when I found this G-nose based kit. I bought it off a guy in Tampa and I have no idea where it came from or how old it is. I have never seen another one like it. I came with 4 fenders, G-Nose, cowl induction hood, and whale tale spoiler. Not the best gel coat finish, but I can work with it. I like it because it widens the fenders out exactly 2 inches all the way around. Very subtle. No wasted drag. And I intend to run 15x10 wheels square, so perfect fit. I am convinced I can get some gains out of 15" wheels/tires as opposed to the 16x10 and 16x12 setups common for this type of build. They are mounted using 1/4 turn fasteners for fast removal. You can see a 15x9 inch wheel fit up.
-
IMSA GTU vintage racer build
clarkspeed replied to clarkspeed's topic in S30 Series - 240z, 260z, 280z
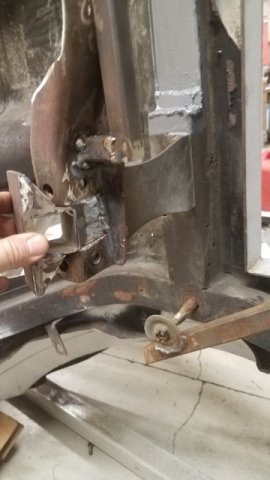
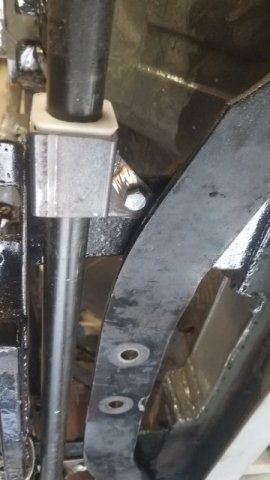
Here are some details of my rear suspension redesign. My goals were using the modified rear control arms I already had and having an adjustable roll center in the rear. I never liked the idea of welding or bolting on another tube at the bottom of the strut to drop the outer pivot bolt lower. And my rear control arms had the restriction of the 1" tubing inner pivot. After a lot of thinking, I came up with these Delrin bearing holders that raise the inboard roll center about 0.7" . I can shim them down if I want to reduce it. Light weight, low friction. This also eliminates the big ass bolts with a fore/aft brace that keeps the bearings centered. I think I am going to change them to something a little beefier in the future. As you can see, raising the inner pivots quickly jams the control arm up into the tub. So I cut out some clearance holes and added another brace there.
-
IMSA GTU vintage racer build
clarkspeed replied to clarkspeed's topic in S30 Series - 240z, 260z, 280z
At some point I built this rotisserie. It saved an unbelievable amount of time with this project. -
Awesome update. I traded off my "street/track" Z for a race prep Z many years ago, got my license, and never looked back. Most fun you can have with your pants on and very addictive. No real allegiance to the Z car, just happen to have a lot of parts lying around and know how to work on them blindfolded. We had a little Toyota sports racer around for awhile and that was a blast too. I can attest it is much much much easier and cheaper to purchase a race car than to build one.
-
IMSA GTU vintage racer build
clarkspeed replied to clarkspeed's topic in S30 Series - 240z, 260z, 280z
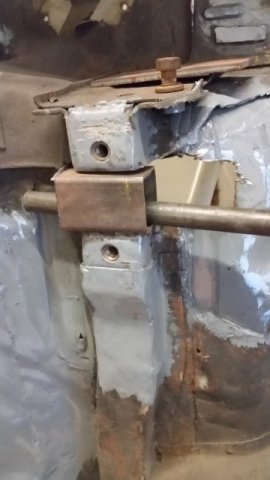
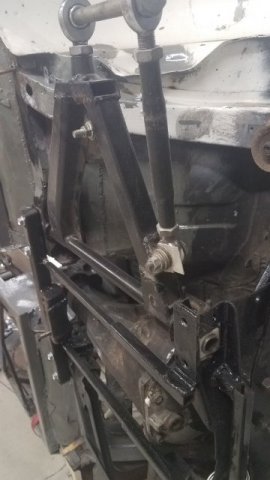
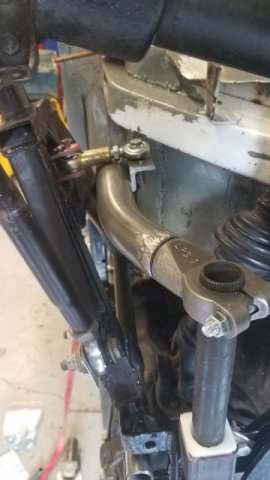
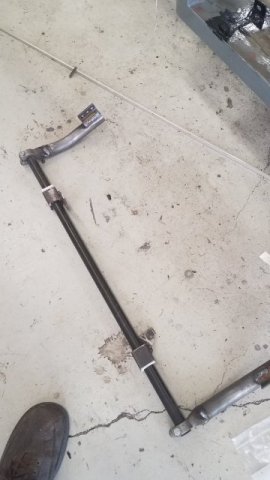
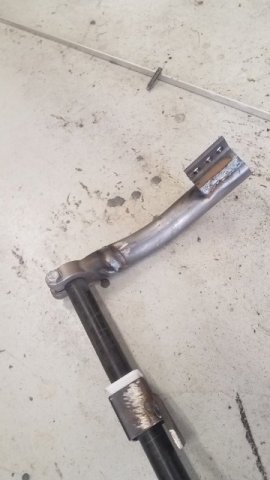
Lots of info on this forum on the doggone support. On other cars I have tied it into a bushing on the mustache bar studs. I WAS planning to run my R200 diff raised slightly to get level halfshafts after lowering and keep the u-joints. Another cheap, light, reliable, and effective solution. But now I am considering the Ford 8.8. I saw Tube80 post this control arm years ago and could not resist copying. Such a simple solution, but just a little heavier that stock. Something lighter than that formed steel stock arm that includes adjustment would be an accomplishment.


.jpg.1b499e8057c3485208ceecb8177d4e34.jpg)