Gollum
-
Posts
3202 -
Joined
-
Last visited
-
Days Won
18
Content Type
Profiles
Forums
Blogs
Events
Gallery
Downloads
Store
Everything posted by Gollum
-
He didn't buy it for tuning purposes, trust me. Actually I think the only reason he bought it was because he found a good deal on it and figured he'd be upgrading to a wideband eventually so why not do the work of mounting the same size gauge while he's got his car half apart? This friend of mine has made his fair share of "moments of stupidity" but he's the best I know when it comes to tuning. He's actually worked for a high profile subie tuning and has really shown that he knows his stuff when comparing his "uneducated" tunes versus tune files of the "pros". I'd go more into his history and how he's developed as a tuner now, but I think that'd just be getting us farther off topic.
-
Technically it's illegal in california, IF (and that's a big IF) it uses the factory O2 sensor. The reasoning is that even though the gauge is in parallel, not series, it can affect the O2 reading which is "smog controlling device" thus and AFR gauge is "tampering with a smog controlling device". It's complete rubbish, but it seems the smog bureau has mad it's stand on it and even if it's not something openly spoken about it's in the smog ref's reference materials.
-
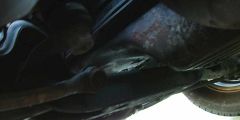
While I was rolling my fenders a touch today I pulled off my right side axle to check out the ujoints and they actually seemed fine, though my axles seemed like they were torqued down my a shy third grade girl. Some of them came off by hand!!! That could have been some of my vibration/noise issues. It's too soon to say, but I think some of the highway vibration could have been my wheels being crazy out of balance as they were bald and have been so for a long time. Got new tires on there and bubble balanced them and there's only a small vibration under had accel in 3rd. I'll post more info as it comes.
-
First off, wonderful work Ray and Tony. My hat is off and from what I've read you guys know what you're talking about, and what I personally know regarding the subject seems to line up nicely. I want to give a real world example though, just to play the role of devil's advocate here. I truly believe the key for the O.P. is to get the car running right, but that being said... My friend, who happens to be a smog technician who's worked for state refs with good report, had a CRX with a JDM B16A1, OBD0 engine. Ran the car with a test pipe, aftermarket intake, lightweight flywheel, good clutch, cold air intake, and maybe some other small items I can't think of. But the EFI was completely stock and untuned. This car had a slight smell when going through the drive-thru and it was just part of life. It was a budget 14 second street car that we drove the hell out of. A slight smell when in a confined space was the least of our worries. But after a handful of tickets, even after having cops have him lift the hood (had CARB stickers on the intake and such, which was enough to satisfy most cops), one finally sent him to the smog ref for an inspection (cop noticed the AFR gauge and knew that was illegal in most cases). Well, the answer only had one solution. Convert the car to USDM EFI from a del-sol. He got the necessary parts and started on converting it over (during breaks working for the very smog ref that would be doing his inspection). Before the EFI swap, it was obviously running a little rich and as such wasn't going to pass smog, it was surprisingly close though. But with the USDM efi it was ABLE TO PASS with NO cat installed!!! But due to visual reasons and genuinely wanting to make it legal, he installed a cat. What really surprised all of us, is that his two way cat actually reduced NOx by a decent amount. Not astounding, but enough to be certain. Never quite figured that out, but it wasn't a huge concern for us at the time. After that the car never stank as much waiting for our fast food, but we also felt a decent drop in power. The power difference was most likely due to the ECU difference, not the cat. The cat certainly affected the SOUND, which can change the perception of power, but even between the changes it was less than a 5hp difference. I'm positive if the CAT made a difference, it was less than 1hp either way. But the question remains, did the CAT affect the smell, or was it the USDM tune? I personally believe it was the ECU, while my brother is certain it was the CAT. The owner of the car though, thinks it was a bit of both, but doesn't have a strong opinion as he doesn't care much either way.
-
So I'm acquiring a $400 Datsun 521, don't know if it was worth it
Gollum replied to josh817's topic in Non Tech Board
Ever seen a 280ZX 2+2 tow a S30? -
1. The stock crossmember comes into two varieties that I'm aware of. One for the recirculating ball steering setup found in power steering models from 79 to 81. Then there's the rack and pinion steering cross member found on manual steering models and power steering models from 82-83. The lower control arms mount to the xmember so you might not want to remove it, but it's just bolted in and very easy to remove. I actually swapped an entire xmember, steering, suspension, and brakes from a '83 into a '81 and the only thing I took off was the wheels. Took the whole thing out as one giant unit and had one other person help me haul it from one car to the next. Bolted it all up and done! Just had to connect the steering linkage, attach the brake lines, and bolt up the PS pump once the engine was back in. Regarding engine mounting, the L engine just as the two mounts on the Xmember and the trans mount, which is a little wishbone unit that has a single isolated bolt on the trans and two bolts running the direction of the length of the vehicle, that go through a simple mounting arrangement with tabs on each side of the trans tunnel. Some have used these mounting ears by putting longer bolts through and mounting the trans BEHIND the ears and putting a spacer between the ears so they don't cave in. Interesting arrangement that I wouldn't think would last, but it's seen quite the abuse in some cars with nobody reporting problems I've seen (and that's in the S30 cars which have weaker looking ears to my eyes, but I might be wrong) 2. The only "issue" to worry about is shredding a tire when you romp on it on the freeway, and then kill yourself. There's several ways to prevent this, all of which won't cost much. Just something to keep watch on as you progress. 3. Get the engine far enough back and you shouldn't have much issues. Guys have fit plenty of V8's even OHC V8's into the S130 and found ways around it. You'll most likely have the entire engine behind the steering rack, putting the steering arm pretty far forward relative to your exhaust, but I'm not sure how the turbo manifolds look on those engines and what you'll have to deal with.
-
I personally must say, even having been a member here since..... '04? I LOVE the new direction for the FAQ's. I've spent hours sometimes looking for a thread, that I thought was a sticky just to find it hiding in a place I didn't expect. Having all that information in one location that's well organized will really help I think. Plus that way you can also search the FAQ section alone to easily find something.
-
I'm getting less than 20mpg right now. Switching to MS2 and getting over 25mpg would likely pay for itself in less than 6 months! And it seems like most people are getting closer to 30mpg. I can't see any sliver of economy difference being worth doubling my investment for MS3+Ms3X. Thanks for the input guys. I think I'm going to plan on building a MS2 setup and will price things out accordingly.
-
Like many I'm rather sick of the old L-Gata factory EFI. I'm hoping this summer, or early fall at the latest to do SOMETHING about it finally. Local yards are now charging over $50 for any ECU out of the yard and another $50 for a MAF sensor. This makes even the Z31 ECU swap look rather expensive for what it is. So megasquirt is still on the table front and center. I really want to build my own kit as I'm fairly handy with a soldering iron and would love to see the guts of the ECU I'll be tuning (I'd love to get into EPROM burning in the future). But looking at the feature list, I'm not exactly sure what I'm getting for my money with the new MS3 daughterboard if you don't use MS3X expansion card, which is yet almost another $100 on top of the MS3 board. Other than the finer fuel resolution, SD logging, and built in USB port, what am I getting for shelling out the extra cash? Everyone tuning OEM ECU's has to use a laptop to datalog anyways, so missing the SD logging isn't a huge deal to me. So I guess what I'm considering at the moment, is getting MS2 v3.0 and setting it up to run fuel and spark (off my turbo dizzy for now). Then if I feel I need it I can still always buy the MS3 daughterboard + MS3X expansion card down the road. Does anyone here have much experience with Megasquirt lll? Care to comment?
-
Yea I saw that one. Reeks of scam all over. First give away is a deal would never have pictures like that, or a price like that.
-
The curse in Z value more than anything else has always been availability. I can go find several S30's within arms reach right now. S130's are almost free due to them being thrown out. Z31's are right behind the S130 soon to be utterly worthless. But the Z32 had MUCH lower production numbers. Just didn't sell as well. But it still outsold any other Japanese sports car of the time (that I can think of). But magically the Z33 production numbers were right back up where the Z32 should have been. Any I know why. I'd say at least half of the time I pass a 350Z it turns out to be a female driver. It's getting to be less so, but that was certainly the case when they were new. Female buyers really fill out the market and help make a car popular. But how many women want some old used Z car? Not nearly as many. When women go to a dealership the cars they gravitate towards will always do well. Mustang is a great example of that.
-
Not that I'm really in the market right now, but my wife really likes the Z32's, and every time she sees a NA one without a rear spoiler she points it out and shudders "it's naked" (she obviously prefers the spoiler). But finding the right Z32 really seems to be almost impossible. So here's my ideal Z32: Later year with door mounted seatbelt. (94 up) TT Model Manual Trans White or Blue (too much to ask?) Non-Molested Reasonable Price Edit: Oh, and needs to be a non-2+2 It seems whenever I find one with most of these, they want like $8k+... I know production numbers aren't very high, but I believe I'm right in saying that even the lowest production year Z32 had more units made than the entire life of Mark 4 Supras... So what gives? Will prices ever come down? Or will prices only go down as every single TT specimen out there gets utter ruined by JDM kids-yo?
-
Today was a landmark in my Z history. Those that know me understand that my S30 is scary for many reason not common, even to this site. One of the biggies is tires. I've never had decent tires on my car... even my other cars actually... Now that I think about it I've never had good tires on ALL 5 OF MY Z CARS... wow... But lookie here. Toyo Proxes TPT 215-60-15 That's a bit tall, as they came off a 300ZX which had been wrecked just a short while after new tires had been put on. My father in-law bought them at a flee market for $50 a wheel and game them to me. Nice eh? So I'll deal with the tall height, as it's still not as bad as what most people with the 17" rota's end up with. My desire is to get 225-50-15, but that'll have to wait. So I knew they'd fit on my rim no problem, and sure enough they fit fine. Though these rims could use a touch more backspacing. The 300ZX rim had way too much and was a good 1" shy from fitting and I didn't want to muck around with spacers, and I'm glad I switched. Those OEM wheels were TANK LIKE heavy (for being a 15"). But these aftermarket wheels I have push them out a bit too much, and I'm going to have to roll the lip a little in the rear, though the front's seem to clear fine. If I want to move up to a 225-50 then more rolling will most likely be required, or some different rims. But wait, there's more! I also procured a brand new set of wheels for 14" rims, which my S130 wears. Those are a bit on the short side for a S130 though at 205-60-14. Should I swap them you think? Run the 15's on the S130 and 14's on the S30? My issue with that is that I've been running a 195-50-14 in front on the S30 and I hate how easy it scraps everywhere and I was looking for something in the mid/high 24" wheel height range if possible. This would only be around a 23.7" wheel, a whopping half and inch taller. I guess what it really comes down to is what feels better. I might swap around back and forth to see if the extra tread width is worth it, and how much I actually still scrap with the 14's. At any rate, I've got 4 brand new tires, and 4 practically new tires and I'm happy as a clam. Now I just need to replace some u-joints and tie up some other loose ends and I'm ready to rock for summer! More pics for your pleasure.
-
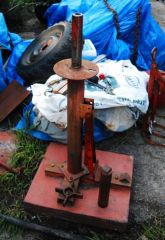
So I'd made a thread recently talking about my first experience changing tires, and as promised I had some pictures taken this next time through, so I can provide a nice write up people can use for reference. I can tend to use more words than I probably need to, so I'll do my best to let the pictures do the talking, which is why I'll be posting so many of them. I want the process to be clear and concise for everyone, that someone in my shoes with no experience can still get it done without taking all day. First let's start with some of the tools you'll be wanting. This is a basic tire changing stand available from northern tool supply, harbor freight, and similar tool supply stores. Here's a comparison of the bead breaker attached to our tire changing stand and an antique of a bead breaker, which you can still buy variants of today. Here's a valve core tool, used to remove the little valve that allows you to put air into your tire. Step 1: Remove Air Easiest way is to remove the valve stem core using the tool above. It's threaded inside the valve stem, so just put the tool on and lefty-loosy righty-tighty. Tada! This is what you should have now: Step 2: Break the bead. Oh fun. This is what a bead breaker tool might look like. Make sure to lube it up nice and good! Dish soap and water will do. With a bead breaker like this you'll need some weight on the rim to keep it from sliding out on you. Stand on it! Apply pressure in a bouncing motion rocking the bead back and forth. This will let the lube in little by little. Have someone keep spraying it while you rock if you can. Progress The tire will snap loose when it drops into the drop center, then you can work the rest of the bead below like this. Now flip it over and repeat! Step 3: Tire removal. Now that you've gotten both beads broken you can mount the wheel onto the stand. You can put something between the clamp and the rim if you're worried about scratching the rim. I did no such thing and the rim was fine so proceed at your own discretion. Make sure to get it nice and tight so it doesn't move! This is the end of the tool I used to tighten the clamp and will now be sticking under the bead. Dig in! Now pry it over the lip. Shouldn't take much energy at all. Now to keep the bead you've gotten over to follow your tool, stick in the end of a spoon (you can even just a screwdriver if need be). This will stop that opening from moving on you. Now just use the center post as an axis to rotate your tool around the bead pulling it over the lip. MAKE SURE to keep the rest of the bead that hasn't moved over the lip down into the drop center of the rim. Otherwise you won't have any slack on the bead and won't be able to pull it over, just marring up your rim. Keep that bead in the drop center! Once you've gotten a small bit of the bead over the lip the bead will hold itself over the rim, so you don't need the extra spoon holding the bead anymore. You can pull it out getting it out of your way. Just keep moving around the wheel. Before you know it, once you get about half way across it'll just pop over nice and easy. Now you can get your tool under the lower bead. And pry it over just like before. Get your 2nd tool in to hold the opening still Just as before, work around the wheel. I'm going the opposite direction just to show that either should work. If you're having to work really hard (use more lube!) work clockwise around the wheel so that you don't loosen the wheel clamp. By this point I could have taken the tool out, but it was going really smoothly so I just kept working around Tada! Victory!!! (less than 5 minutes total at this point, even with stopping for pics) Step 4: Clean rim. Look at all that junk in the bead area! This can lead to slow leaks. Clean this while you have access. This also gives you a great image of the drop center that you're needing to keep the bead in to get the slack required to get the bead over the lip. You can use a wire brush by hand which should only take 5-10 minutes. I used an air powered wire wheel CAREFULLY and it went pretty quick. Step 5: Putting the tire on. Here's the other end of the tool I've been using that's used for putting the bead onto the rim. You'll notice it's wedge shaped, meaning you can only work one direction around the wheel, not both like when taking the bead off. So put the hook side over the rim and get the bead on the outside groove. You can use the tool to work around, or you can "put the tire on like a man" for the first bead. Then get a bar in there and just force the sucker over. Before you know it, success: For the second bead you'll definitely want to use the tool, so here's how. Get it over the lip of the rim, and get the tire onto the tool as shown. Keep the bead over the lip in the drop center, which will be complicated at first, and this is the main part that I feel really benefits from having an extra set of hands. Keep working around. Careful that you don't loose the bead off the end of the tool. Go slowly if you have to and force the bead down by hand on the tool to keep it in the center. Just keep working around. Almost there! Once you to the point above, just lift the bar and it'll push the last of the bead over. Tada. The tire is on! Step 6: Seat the bead and fill with air. You can use a basic quick connect connector on the valve stem since you don't have the core in. This will get you maximum flow getting the bead to seat relatively easy. If you have issues with air leaking by, thus not making progress, push down on the tire to get it sat on the lower bead a little, then apply light upwards pressure right at the valve stem seal and when you put the air back on it you shouldn't have issues getting it to seat. You'll heard the bead pop on. Listen carefully for both pops and once they're on pull the air off. No need to explode a tire in your face. Tada, seated tire! Fill up to pressure with gauge Now stick the core back in, and if I can do this with gloves on... Handy core tool used again Now I'll run through some few details about using the bead breaker built into the stand. Notice the block under the wheel. You need to get the wheel close to level. Then stick your bar in and push away. Should get the bead off in short order. If it seems like the tool is slipping up the sidewall then push down, then release tension for a second and slip the edge inward towards the bead edge and apply pressure again, effectively choking up on the edge of the bead. Repeat this as necessary to get a good grip on the bead. Once you have grip, leverage, and lube it'll push down with ease. Step 7: Balancing. I'll be showing how to use a bubble balancer which looks something like this. Above is the bottom half, and then with the top half: And here's a very handy weight wrench tool that makes the job much easier than just using normal pliers. Notice the three main parts. There's a mouth at the top to grab weights with, a hammer to put them on, and groves on the inside to close the clamp on the weight. First remove any weights on the wheel (you can do this before starting any of the day's tire work, or just leave it till balancing. Your choice. Just put the pointy end of the pliers in the hole of the weight clip and rotate inwards to the center of the tire. Comes off with ease. Now put the wheel on the balancer, making sure to lift it lightly several times to get it nice and seated on the balancer. If it's not mounted level then you won't get accurate readings, which is probably the biggest problem with a bubble balancer. This unit here isn't extremely accurate, but will get the job done for around town and safe freeway speed driving. Note the position of the bubble. You'll want to add weight in this direction. Just set the weight on the rim to then check the bubble. Weights come in quarter ounce increments. I only needed .25 and .5 weights for my wheels but having other varieties handy might be nice. Check the bubble again to see where you're at. If the bubble didn't move in the exact direction you wanted play around with shifting the weight around to see if you can get it going towards center. Play with heavier and lighter weights to see if it's where you want it. I ended up getting a little closer than this, but you get the idea. Mark the position the weight is at and then pull the weight off. You'll need to close the clamp like so, so that it doesn't fling off on the freeway (at hit some poor guy's windshield!!! Shame on you!) Then pull the wheel off the balancer and hammer the weight on. You can do this on the balancer, but it IS a precision instrument, and it's probably best not to abuse it if you can. Now just set it back on the level and see if it's as close as you were hoping for. If it's gotten worse, check and make sure that it's sitting nice and level on the balancer, and check again. If you have to repeat the process to get it as level as you can. Being a little anal here can really go along way, and if there's no vibrations then you can save a trip to the local tire shop to have them use their fancy balancers (which might be wise anyways if you're going to be doing much racing). And that's about it. In case I didn't stress it enough, use lots of lube on the beads, it will make life easier. First weekend doing this I was quite sore the next day, but this time I feel much better and we even ran into more snags. Still beats what most local shops charge to do it, with their much nicer machines at that! I just wanted to show people it can be done, and easily at that. It doesn't take much. I'm getting good enough already (after a whopping 4 tires) to get each wheel done under 15 minutes. With more practice and another young guy with energy helping me I'm sure I could cut that in half. Some key points to make it easy. 1: Lube. 2: A stable stand!!! Get it bolted to concrete if you can, or welded to a base that's a good 50+ pounds, maybe even 200 pounds or more if you don't plan on moving it much. 3. A good air compressor. What I really found amazing about using such simple tools is that I really can see doing this with ingenuity with what you might have on hand, once you understand the basic concepts. It doesn't take much more than keeping the rim stable and some good bars to pry with. If and when I have a truck that's towing vehicles for track days I plan on having a basic tire changing stand I can bring with me and mount to the truck. You never know when these skills might come in handy. Hopefully I haven't missed too much, and I hope it's help to someone out there.
-
-
-
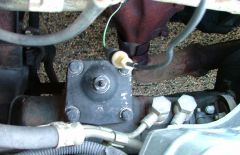
From the album: Steering Rack
-
The VG30DETT's main drawback is it's size and initial cost. I have every reason to believe the VG30DETT is just as capable with as many stock parts as a 2JZ motor. I know that's saying a lot, but there aren't nearly as many guys building VG30DETTS as 2JZ's, probably because it's not the "cool" thing to do. I'd never condone the VG30DETT in a S30 or even S130 though. These engine bays are long, but not wide enough to fit one and still be able to easily/comfortably work on it. It's like a ford mod motor in a Z, it's just too tight to have fun (to me at least). Where the series ll motor really shines (in my opinion) compared to these other options is displacement. If the series ll wasn't pushing the numbers it is then I'd say it had crappy heads, but it doesn't. With it's 3.8" bore size it's got plenty of room for a nice big intake valve to let that motor breathe compared to the relatively cramped 3.43" bore of the VG and 3.39" of the L motor. But at nearly 4 liters the series ll is better compared to engines of similar size. I'm not sure on the weight of the buick, but I know an assembled longblock 1UZFE weighs in just little over 400# but it quickly gets up over 500# when adding liquids and accessories. Those motors make over 250hp NA stock, and will easily reach 500hp on stock internals with boost (at which point the 10:1 compression ratio will not like more boost due to knock threshold limits). These motors are cheap and available everywhere. Their main issue is that they have crap for auto trans and manual trans options. So custom is the only way to go. That adds up. Plus you'll be making your own turbo manifolds most likely, that adds up. This affordable motor's bane is that it's too costly due to the rarity of it being built up for boost. The VQ35DE is close in displacement to the series ll, but can get really expensive to build if you're not careful, and came with high compression, making high HP turbo builds require some form of race gas to break the 600 wheel hp make safely. At any rate, if you're shooting for 10's with room to grow, the series ll will be a wonderful budget option. That I can definitely agree with. Regarding MPG, having a turbo motor will great help. Then it's just up to how much time you want to spend tuning the low load/high vacuum portions of your maps and how lean you're willing to take it on the highway. Any motor will do. There's guys getting nearly 30mpg with 400+ wheel HP LS V8's on this board. Shocking, but true. Turbo that beast and you can get 700+ hp and hardly affect highway MPG still. One of the keys to that motor's brilliant MPG is it's .5 overdrive T56.
-
Yay, you responded with what I was looking for. How about that. I still wouldn't say you're not going with the L28ET or VG30ET because they're "inefficient" but rather "not financially agreeable to your wallet" Nothin' wrong with that. Search these forums high and low for threads from Scottie-GNZ. He had an extremely fast buick V6 powered S30 that really tore it up. Also, it's not an unsolvable problem, but at around 400 wheel HP the 280ZX's whole rear suspension subframe will want to flex it's bushings just enough to shred tires if you're not careful. People have solved the problem before and information is out there. It gets touched on here, and Tony D talks about it well enough I won't try to convey it myself. http://forums.hybridz.org/index.php/topic/95522-guess-the-280zx-turbo-rwhp-based-only-on-dyno-video/page__view__findpost__p__900585 The S130 is a great chassis, and I think you'll like it. It has all the handling potential of the Z31 with serious low weight potential. For the front bumper, I'm somewhat liking the new MSA front air dam - http://www.thezstore.com/page/TZS/PROD/7FAD/50-1444 If you're not concerned about having a front bumper, you can just ditch it entirely with that FG air dam. The rear I'd just pull off and then weld in the gap flush. Between the two bumpers and a FG hood that's almost all the weight savings most street driven S130's will ever need. (note that I don't condone pulling bumpers off street cars as that's illegal)
-
Don't try to take this next post as an attack, I'm just trying to flush more information out of you. 1: Does this mean in a competitive fashion though? We've already been looking for this info out of you in this thread. Are you running a specific class? What limitations will be involved? Or are you just going to the track during open track days? 2: You don't need a turbo model for a R200. You mentioned wanting a later chassis, so just get any manual trans car and it'll have a 3.9 R200 in it already. 3: In this case I wouldn't even bother with a solid diff and tubing the rear. Just stick with the stock suspension and make it work. It'll save you time and fabrication costs. 4: Low 10's? I'm confused. Earlier you started with saying 11's maybe 10's. You need to nail down what you're really looking for. 5: Careful, as some might take that personally. There's quite a lot of guys getting 300+ even 400+ wheel HP out of L28ET motors knocking back well over 30mpg on highway drives. Same goes for VG30ET too! Both of these motors would support 400wheel hp on stock internals, without even taking the heads off, so be careful to call them "not effiient". They might be "old" in some ways, but they're certainly great motor options. I'm not saying you have to use one, I'd just rather hear you say "well I know the buick motors well" or "I'm just biased towards *****." Those are perfectly good excuses to go with a motor, but knocking down a suggestion like you did reeks of ignorance towards them. Which if fine, if it's admitted. I personally wouldn't go with a motor I didn't know anything about, because I'm ignorant (by definition) to those motors requirements and benefits. All of this leads me to just beg you for more detailed responses. I can understand that some people find communicating on forums a tedious task, but you'll only get out what you put in. If you want in-depth and insightful responses then you need to get really specific about your questions and show that you've done your homework. I have a strong feeling I'm wrong about this, but you kind of come off as some 19 year old kid behind a computer that knows just enough to post some ideas like these in a thread but have no real clue on what you're actually wanting out of a car project. If I'm wrong I'm more than happy to hear the truth, I'm just sharing how this thread has come across. I first posted because you seemed kind put off by the fact nobody was giving you good info, so I'm doing my best to see if you can actually handle good info. If you show yourself able to receive it, I'll pour out more of what I know.
-
If it's not going to be in competitive drag racing then the R200 is fine. If the goal is just to be able to take it to the track from time to time, the R200 is fine. You can even live with the open R200 until it really becomes a problem. But if you're going to be in competitive drag racing, you'll want a better rear option all together. You'll have to run insanely high spring rates to keep rear end sag to a minimum. Also don't forget that at many tracks if you're even into the 11's they'll want you to have a roll bar. You might have that planned already, but I didn't see it on your list. I'd say keep the power steering. It'll be nice to have a the strip, especially if you run larger front tires and are running a smaller diameter steering wheel. Ditching the AC might be fine, depending on where you live and what you're comfortable with. I'd estimate for what you're planning you could have the weight down as low as 2500 or less very easily. My 81' slick top in nearly full trim, with AC and PS, Power windwos, etc weighs 2650. Add T-Tops and that'll jump to a good 2750 probably because the roof is much more reinforced. Even still, taking a T-Top model and removing those heavy bricks of bumpers, removing the AC, going for a FG Hood, and little things here and there will easily drop you 200#. At that point you can get into the 10's with as little as 375 hp which becomes very easy to attain in a street friendly fashion and even tuning it conservative towards the bottom end for good MPG. As it's been stated, 275 will fit in the rear well without much work. I've seen larger fit, and I'd say with with careful suspension work and maybe rolling the fenders a bit you might be able to break the 300 mark. In the front 255 is the practical limit with stock suspension, and though you can add some more width with suspension mods, you'll be sacrificing turning radius caused by the TC rod. With careful attention to detail and rolling the fender I'd guess 275 as the practical limit in the front for a street driven car. If you like the buick motor, go with it. The L28ET in the turbo models would probably get the job done just fine, but everyone's allowed to make their own choices when it comes to motors. I'm not a "one size fits all" kind of guy when it comes to motors and love the variety we get to see on this site. Another good turbo V6 option you can look into is the VG30ET motors. They can be had very cheap at the junkyards and have proven capable of 450+whp on completely stock longblocks. they're iron block like the buick, but is SOHC versus the pushrod L36. Benefit or hassle is your choice. Just thought I'd bring it up. Overall these are great cars for what you're looking to do. Just get a motor in there that'll make the power and MPG you're looking for, and the rest should fall into place naturally as you get the suspension and chassis up to snuff. Keep the car light and brake options won't be a problem too.
-
DIY 180 Degree/Single plane/Flat plane V-8 crankshaft…
Gollum replied to BRAAP's topic in Powertrain
I know I'm not going to be arguing fact, just opinion so don't take this too personally, but I think the complete opposite. I find pushrod engines to be simpler, easier, and all around make more sense in a lot of ways. They can still flow well, and when you consider package size and weight produce MORE power because what they lack in volumetric efficiency they easily make up in displacement. NASCAR quality valve train setups are actually more affordable than making a Ford mod motor rev to 10k, and will allow any pushrod motor rev to the moon as long as the crank and pistons are up to the task (watch piston speed as stroke lengths change). Point being, LS1 is definitely the cheaper route to go, but there's no such thing as "cheap" when it comes to flat plane cranks. What I find really sad, is that I feel that if a crank company just buckled down and DID IT and actually knew how to MARKET the dang thing instead of just having it at the back of a catalog it could really catch on. All it would take would be a few key players to promote it and all of the sudden it could become the next hot thing bringing prices down into the reasonable market. Also, I love most FFR cars and the GTM is no exception. Wonderful chassis all around. -
280zx turbo failed smog. need advice to pass on retest
Gollum replied to stravi757's topic in S130 Series - 280ZX
I'm half surprised they passed you with the vacuum change. Does your underhood area have the vacuum diagram? If anything is re-routed or not hooked up they have the ability to fail you on visual. Congrats on the pass. Decent numbers too. HC could still drop a touch considering the timing adjustments you made, but overall good. -
Necroposting at it's finest. Reading through this thread though I was amazed at how much misinformation there was that never got corrected. If this thread topic came up today it'd be a very different outcome I think. And to add my icing onto this old stale cake, the SR looks better and better year after year. Prices keep on falling, and great deals on a L28ET gets harder to find. Rebuilding a L28 kills some of the value factor, but most are getting up there in mileage. But as this thread has well covered, it's all about your goals and intended uses. The original poster was way over budgeting I think, unless they were wanting absurd power levels. Most S30 or even S130 owners are more than happy with 300hp, and both motors will do that for a very low cost.
-
280zx turbo failed smog. need advice to pass on retest
Gollum replied to stravi757's topic in S130 Series - 280ZX
This site agrees with what I'd said earlier, you're allowed +/- 3 degrees. http://www.smogtips.com/functional_inspection.cfm I still wonder if he has a vacuum leak. Judging by the high HC he's probably running lean until the O2 kicks in (which takes a good 5 seconds after the test starts, I've watched it kick in). The high nox is REALLY off the chart for an engine running well. I can only presume that it has to be EGR related. I know in my '81 which has dying rings and thus will only compression test just over 100psi in some cylinders, has a hard timing getting the EGR diaphragm fully open. My NOx is usually near the limit, but my motor also has obvious signs of nearing the end of it's life and the fact I get it to pass is almost a miracle. If you can find a nice smog tech, I'd ask for some time with the car on a smog test run. Take a vacuum pump and when running at 15mph pump the EGR into vacuum and see if the NOx drops dramatically. If it does, then you're not getting enough vacuum to it from the engine, or if it doesn't move at all, you might have a clogged EGR system. I agree though that fiddling with the AFM isn't the solution here. The engine isn't running right without the O2 is my bet. You need to find out why. My suspicions lie in the EGR from the high NOx. -
280zx turbo failed smog. need advice to pass on retest
Gollum replied to stravi757's topic in S130 Series - 280ZX
You can legally cap off the intake manifold plumbing for the Heat/AC control system, which is prone to leakage. I'd bypass that whole system first and see if your vacuum readings change. And though the tech rev'ed your engine to 3,000 for a few moments before the test, that might not be enough to really heat up the CAT enough to "cheat". The real cheat is to stab the throttle over and over right before the test. This will richen the mixture and thus be blowing unburnt fuel into the exhaust, thus heating up the CAT very quickly. I wouldn't go telling smog tech's to do this though... Your numbers are really close though. There's a good chance your car is working 100% fine, just a little tired. Couple that with a CAT that's going out and it's a recipe for smog dyno failure. If the cat isn't welding in on either car, I'd swap it over. Bypass the air system vacuum system like I said, and then retest. Make sure your timing is what it should be (I think you can go 3 degrees from it, in which case to 2-3 degrees retarded), and go ahead and change your oil and such as you're planning on doing. Don't go crazy moving the AFM and such. That only changes transients for the most part. Another interesting tidbit, is that the numbers you have to pass aren't totals for the time of the test, but rather an instantaneous rating (for one second I believe). So if the 15mph test goes really long it's likely you're failing. What will normally happen is that at the beginning of the test the numbers will be high, and then drop as the EGR and CAT start to do their work under a constant load. Then as the numbers drop the machine sees what's happening and passes you onto the next test. Quick smog tests are a good sign. Its usually those first few seconds that will fail you, and when you're over the smog machine keeps going for a full test to see what the engine is going to do, to see if they can reach higher peak numbers.