NewZed
-
Posts
6700 -
Joined
-
Last visited
-
Days Won
72
Content Type
Profiles
Forums
Blogs
Events
Gallery
Downloads
Store
Everything posted by NewZed
-
Oops. Sorry about that, I didn't even know the Search engine was case-sensitive. Good catch, useful information, thanks. I must have used caps in my search then posted lower-case. I hope that's what you were looking for.
-
Option 2.

-
This thread has been jacked, tortured and murdered...
-
It is possible if you can find the right combination of extensions with the right socket on the end. I think I had two longs and a short (maybe two 6" and a 3"?, not sure of the lengths). It's almost a straight shot to all of them except the one in the front, which will be cocked a little bit, If I recall correctly.
-
I searched using these three words - msd 280z tachometer - and found some threads that will probably help you out. Not trying to be sarcastic, it really was that easy. Since this post should show up in your search, the sixth result down will probably be the one you want.
-
These guys will give you a quote over the phone. I don't know how wide their range is but might be worth a call. http://www.picknpull.com/locations.aspx
-
Help! Erratic idle, backfire, then no fire. ???????
NewZed replied to Robert77's topic in Nissan L6 Forum
Do you have battery voltage to both sides of the coil, with the key at On? If you do and the points have a place to ground to and are set correctly then you should get spark when the engine turns over. If you don't have power at the coil then you can start back-tracking to find out why. If you do have power to the coil then you can focus on the points and everything after. -
According to the FSM, the Turbo distributors did have a CAS. NA didn't. I'm only reading from the FSMs... Your choice of distributor probably depends most on what ignition module and ECU you'll be using. The 76 distributor is setup for a simple VR triggered ignition module, either the stock unit or a GM HEI or similar. Very basic centrifugal and vacuum advance curves. The 83 distributor is setup for some feedback from the ECU and (I believe) knock sensors, thermally activated vacuum control switches, etc. It also has 30 degrees of vacuum advance available at the crankshaft, apparently with the knock sensors to retard the timing if necessary. I don't know all of the ins and outs, but the 76 distributor is a simpler device. The Engine Electrical and Electrical sections of the FSMs have some good diagrams and descriptions. Either way, if you haven't already, you should take the one you choose apart and make sure the inner workings aren't gummed up before you use it. I've only taken three apart, but all of them had broken bearing races in the breaker plates and were gunked and rusted up. Even the one that looked shiny and almost new on the outside.
-
Did you see lowrider's thread? - http://forums.hybridz.org/index.php/topic/97253-hei-spark-control/page__pid__913356#entry913356 The 8-pin GM HEI module is essentially the same as the 7-pin module except it has a separate ground wire. The relay is to give 5 volts to the B pin only when the engine is running. It allows the car to start with the original static timing, then applies the Megasquirt timing advance when the engine is running. That's all I know.
-
I have been studying this same setup recently for future reference. I don't have Megasquirt now but am interested in your problem. If I could ask a couple of questions, for my own purposes and maybe to add a little clarity - 1. Have you measured voltage at B to be sure it's actually at ~ 5 volts? Maybe you're overpowering the B pin with 12 volts and that's why you're losing the R pin signal. Just a WAG but I wonder why you're losing your tach reading, it comes from the R pin on the module. I assume that what you mean is that you connect B before starting, hit the key and no more tach reading in Megatune. 2. Does your trigger offset in MegaTune match what you read with the timing light, with B disconnected? Your static distributor timing must be close already if it runs without the B pin. It sounds like mechanically everything is right but either Megasquirt is not getting its information from the R pin or it's sending out the wrong information to the E pin. You must be connecting B before starting, as Matt Cramer suggests, since you don't mention the car dying, just not starting. To Matt Cramer's point about connecting B while running, the diagram on this page shows the use of a relay to disconnect B while cranking, and connect it only while running. http://www.megamanual.com/ms2/GM_7pinHEI.htm About halfway down the page. Hope I'm not muddying things up... Edit - came back to change your to you're...
-
I was kind of off-base on this anyway. The crank spins twice as fast as the distributor so you'd end up with wasted spark on a single coil. That might be too much for the coil. Unless you used a three tooth wheel on the crank. My mistake. I'll go back to my own business now...
-
This guy's approach is interesting - http://forums.hybridz.org/index.php/topic/90889-wasted-spark-ignition-no-edis/ Instead of holes and Hall effect, you could drill and tap for bolts, grind the heads and create teeth on the engine side of the flywheel, so you could use the VR sensor and the Motorcraft EDIS unit. A lot of work (not too much if you went 6-1 like he did) but would allow you to stay away from the front end of the crankshaft, but get the same result. No comments on wiring the three signals together and running one coil. Not my bailiwick...
-
280zx alternator....turbo vs na?
NewZed replied to AleksS30's topic in S30 Series - 240z, 260z, 280z
Be careful that you actually get a 70 amp, looks like the auto parts store have simplified to 60 amps for everything. Here's a link to O'Reilly's listing for an 83 Turbo and they show 60 amps, with compatibility to other non-turbo cars - http://www.oreillyauto.com/site/c/search/Alternator/01468/C0330.oap?year=1983&make=Nissan&model=280ZX&vi=1209406&keyword=alternator The "special connector" just jumps the wires that need jumping, plus comes with the diode installed correctly to prevent the engine from running when the key is turned off. If you're upgrading a 240 (280s don't need the diode). Pretty convenient and clean looking, not too expensive, plus it's reversible if you've got a classic. Doesn't really look like a rip. http://www.thezstore.com/page/TZS/PROD/12-4067 -
280zx alternator....turbo vs na?
NewZed replied to AleksS30's topic in S30 Series - 240z, 260z, 280z
Error... -
Don't forget that there is a resistor in line between the coil neg. (-) and the tach in the stock configuration. Probably to limit current through the coil, I would guess. If you still have the wires in the engine bay you could connect there or find the resistor up by the old ignition unit in the passenger footwell. I would be interested in how accurate the stock tach is compared to the MS RPM reading in the MS software (which I would assume to be accurate since it is essentially all digital). Just curious, if you get a chance to compare (or anyone else that knows).
-
My comment was mainly for KillerBjt. He asked the question.
-
The Picasa photo-editing program from Google is free and will let you export pictures to a smaller size. http://picasa.google.com/#utm_campaign=en&utm_source=en-ha-na-us-bk&utm_medium=ha&utm_term=picasa Import the pictures then export them to a smaller size <1000 x <1000. They will still be of high resolution. This is an interesting thread but the pictures are killing me, both loading-time wise and trying to read the text, then shrink the pictures down so I can see them. They might be the biggest pictures I have ever seen on this forum. Just trying to be helpful...
-
I don't know about the S130 but on the S30 you can see the slave cylinder from the engine bay. With a stretch you can actually reach down and work on it. Follow the hydraulic line. You could at least pop the rubber cover and see if it's full of fluid.
-
You could put a six tooth reluctor ring on your damper and get the stability of a crank trigger.
-
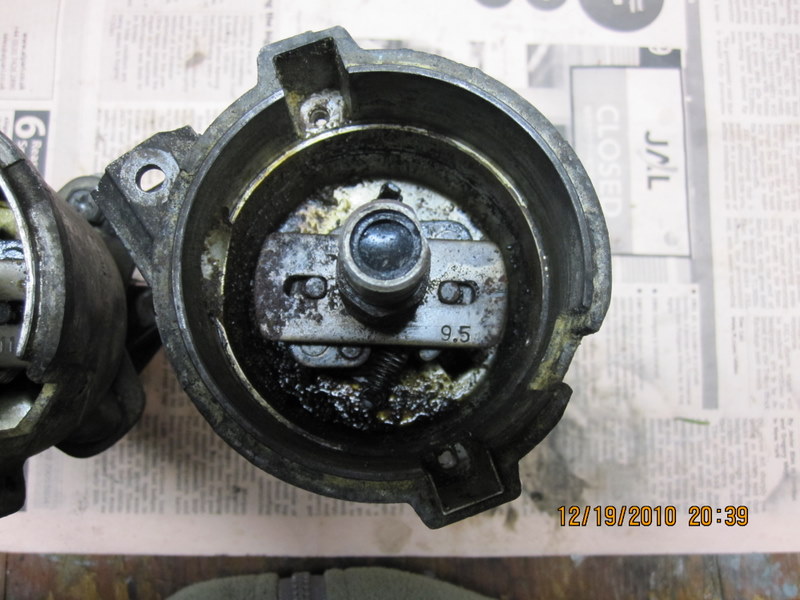
Looking for memories from your past... Unlike many here, I am still working with the 30+ year old mechanical distributor. I have a couple of distributors that have numbers on the advance mechanisms that don't match the specs. from the FSM. Am I correct in reading the numbers on these two distributors as 11 and 9.5 degrees of centrifugal advance at the distributor shaft? Which should translate to 22 and 19 degrees at the crankshaft? If so, they must be modified from stock, or there were more varieties from the factory than listed. They are a D6F4-01 (should be 10 [20] degrees, from FSM) from a 1976 280Z and a D6F5-02 from a 1978 (should be 9 [18] from FSM). Both manual transmission. Pictures are attached. Thanks for any insights. Edit - What I'm really wondering is how a 9.5 and an 11 got in to two different 280Z distributors. But any comments about the changes in distributors from year to year would be appreciated.
-
280ZX distributor vacuum advance
NewZed replied to AkumaNoZeta's topic in Trouble Shooting / General Engine
Look down at the bottom of this link - http://www.datsunstore.com/index.php/cPath/7_634/sort/2a/page/2 They're cheaper than the early models but still spendy. Not terrible though. You should check the specs. though on the 83 vacuum canister and see if that's what you really want. 83 had knock sensors and extra gizmos, valves, etc. on the engine so that they could run lots of vac. advance at certain conditions. I asked ZMan what the specs. were on their replacement canisters (in the link above) but he couldn't say. Stock 83 had up to 30 degrees crankshaft vacuum advance possible (according to the FSM, I'mnot really sure whn it comes in to play though), which is a ton. Were it me, I would try to find a 79 canister, which would be very close to the 75 specs., although there are still many possibilities. They had 5 different distributors for 79, with from 10 to 18 degrees vac. advance possible. The canisters look like they should interchange from at least 74 through 83, but I heard that they won't. Probably worth checking though. -
Heat, via flame, on the strut housing works wonders. The cast iron will take a lot with no damage. If you're not replacing the bushings though, be careful not to damage the bushing rubber. If you are replacing the bushings, you can heat it hot enough to soften the rubber, and the center metal and rubber of the bushing might come out with the pin.
-
The stock tach counts the breaks from the negative terminal of the stock coil. A wire runs from the negative terminal, through a resistor and to the tach. Probably not what you were looking for but might get you started. EDIS will most likely have a different output or outputs for you to use.
-
Chevy LS1 V-8/72 240z Conversion Questions
NewZed replied to digginmyz's topic in Gen III & IV Chevy V8Z Tech Board
The cheapest, simplest, kit-based V-8 Z is probably one with a carbureted Generation I or II small-block chevy engine. JTR has kits and an instruction manual and it has been done many times. http://www.jagsthatrun.com/ The LS series engine swap will be more expensive, especially if you go with fuel injection, although you can get them carbureted also. Engine control for a fuel-injected engine swap will cost more over the carbureted engine. Quite a bit more, if you go for one of the high end EMS's. Plus tuning, etc. By the way, 350 and 400 are common Gen I/II displacements. The LS's are designated in liters, generally, and are also known as Gen III engines. Just an observation from another low-budget guy... -
I put some misinformation out here and don't want to steer anyone the wrong way. With the above setup, I did get light pinging at ~2000 rpm, low-load (high vacuum). The combination probably has timing up in the low 40s at those conditions (17 static + 18 vac. + mechanical = too much). I went back to a 1976 vacuum canister (15 degrees of vac advance) and it's still there. I dropped two degrees of static advance and all seems good now. 15 static, 1978 mechanical advance (17 total) specs., 1976 vacuum advance (15 total) specs. Putting this out there for anyone watching, that might still be messing with distributors. I'm stating to see why programmable EMS are so popular now.