Search the Community
Showing results for tags 'Paint'.
-
Hey guys I recently bought a Honda Civic 2006 the car is an alright car for what I paid but iv run into a bit of rust in the boot of the car where the spare sits... it looks like water has been down there for ages and I’m wondering what the best thing would be to do to fix it.. I attacked it with a metal wire brush but it seems to be too deep and don’t want to risk putting holes in it. What’s the best option for fixing it here? I’m open to rust converter, bondo ect I’m just wondering what would be the best way to go about it. Thanks in advance
-
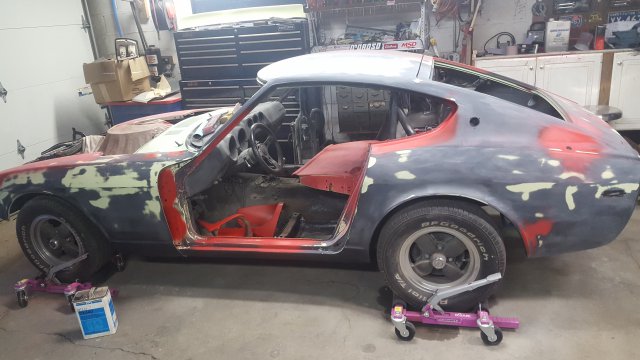
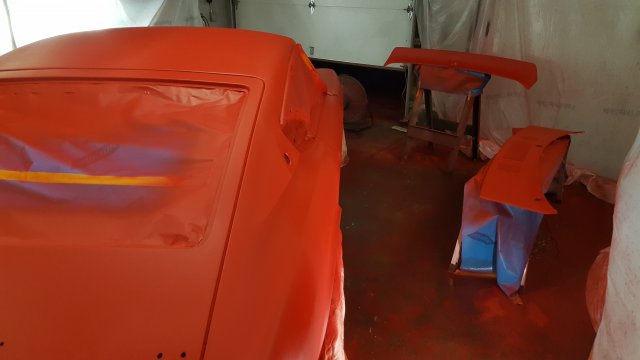
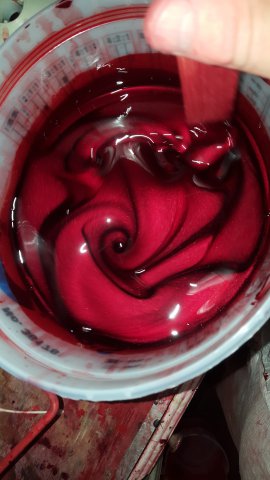
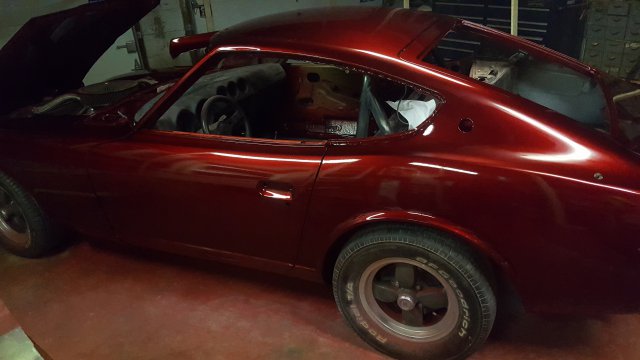
Hi guys. I finally finished up the body work and sprayed my Z. It has been a long long process. The color is House of Kolor KBC11 candy red. It came out good. There is soo much reassembly to do after I finish color sanding and buffing. Here is a few pics.
-
From the album: New Parts
-
I have been searching for a certain yellow for my '77 280Z as I am getting ready for paint. I am contrasting the yellow with black and carbon fiber. I cannot find a color code for the certain type of yellow I am looking for. The closest I came to deciding on a color was Mercedes Solarbeam Yellow but as I am unable to see it in person, I have my doubts that that is the right color. I am aware that the color will most likely be a pearl and I am fine with that. I'm just trying to stay away from that bright lemon yellow lol. All suggestions or advice would be much appreciated.
-
Hello everybody, I would like to open with: Yes I did in fact search for my answer. I found a lot of advice for the do it yourself painter who is going down to bare metal on a rotisserie, but that person is not me. I was looking for some confirmation on what I've been hearing about painting a z. A paint shop told me that it has old lacquer paint on it, and if they try to paint modern paint over it it will not stick, and it will bubble and crack within the year. They said that the paint would need to be sanded down to bare metal first. Is this true? Is there any kind of primer that can "adapt" Lacquer paint to modern paint? I am very lucky, and I don't have very much rust damage on the car at all (it's from the desert in California), so the body is in good shape but the paint is VERY faded. I want to just get it resprayed black and keep the stock color, but I don't have 5 grand for a crazy paintjob. I also can't do much, if any, of the prepwork myself because my garage is a rental. I could wait and spend that much, but I'm not looking for showcar quality, just average. The fun part for me is the engine and suspension Any help would be greatly appreciated.
-
Hi I was looking to get my z's trim painted like this guys car: http://puu.sh/gemvj/448a4585ab.jpg and was wondering if you guys think it would need to be powdercoated or if I could just take a rattle can to the chrome. (door handle, and window trim) Thanks.
- 5 replies
-
- trim
- powder coating
-
(and 2 more)
Tagged with:
-
Hey guys, I got a 74 260z a few months ago and the paint and body is in very good condition...... on the surface. I don't know much about the history of the car, so I don't know where it's originally from or where it's been most it's life. There are obvious signs of deep rust though... above the tail lights and underneath the car on one of the frame rails. It has rusted through, so I'm sure there's more rust hiding somewhere else. Other parts like floor pans seems like surface rust. Nothing going on in the battery tray area. My question is, is it worth it to sand blast the car and strip it down to see what other rust is hiding beneath? I plan on keeping the car forever and don't want to start building/modding and end up having to strip it down later if it's going to be an issue.
- 6 replies
-
- rust repair
- paint
-
(and 1 more)
Tagged with:
-
So I had a couple extra valve covers lying around and with my Z being in the shop for body work since November I was hunting for a project. I decided I was going to shave and paint my valve cover like the japanese rising sun flag. I've never attempted anything like this before, so I'm going to add in my mistakes so hopefully other people can learn from them. Despite that, I think it turned out pretty cool. Old valve cover: There was a big hole in it covered up by some JB weld and it was in generally crappy condition. Sanding and cleaning: The filth of ages was on there, but nothing some engine degreaser and a lot of elbow grease can't get off. I used a belt sander and 36 grit sandpaper to grind off the lettering. You can see that this revealed some casting defects. I used an xacto knife to cut out the paper thin aluminum. I then taped a shop towel to it and flipped it over and used the xacto knife as a mini putty knife to apply the JB weld to the inside of the valve cover. After it set I ripped off the towel and sanded down the excess. I had to fill in a depression by the oil cap with more JB weld to make it smooth. The other areas also got some extra JB weld to help get them smooth. Then I sanded it down all over with 120 grit, then 240 grit and was ready for primer. Primed. After priming I noticed tiny pin holes in the JB weld. I sanded these down, cleaned out the pinholes, and smeared a tiny bit of JB weld in there as filler. It really makes you appreciate Bondo... Every time you apply JB weld you have to wait 24 hours for it to cure. Sanding and re-filling with JB Weld: The primer was pretty smooth and it filled in most of the imperfections on the metal. I sanded it again with some 1000 grit (I didn't have anything between 1000 and 240) and painted it white. I then sanded the white down with 1000 grit. This looked cool, but was probably a waste of time and if I was doing this again I wouldn't bother. Before: After: Now the fun part! The original Japanese rising sun has 16 rays, but I thought that they would look too thin, so I decided to go with 12. First I traced a circle on the cover with pencil. This scratched the paint and I couldn't erase it. I ended up having to repaint the cover white and sand it again to get rid of the marks. Next I tried a dry erase marker. I taped it to the end of a compass and traced my circle. I then used a green marker (the red was busy being taped to the compass) to measure tic marks along the circle. I took the circumference of the circle and divided it by 24, then measured with a ruler. This is not quite exact, but it won't matter since I was about to majorly distort the rays of the sun to curve around the bulges in the valve cover. I used 3M blue painter's tape to mask off the white areas. I first cut the tape into little rectangles then laid them along the tic marks in vees. Then I traced over the circle again with my compass. Then I lifted the tape up and cut along the line I'd just drawn. My girlfriend helped a lot with this part and the rest of the taping too. All masked off: Now I sprayed it with red paint. This was another mistake... The red paint bled under parts of the tape onto the white. Worse still was that the red paint turns out to be mostly transparent, so I could see the green tic marks through it. The only thing I could think of was to just put on more coats of red paint. This kind of worked, but made big ridges against the masking tape. If I was going to do this again, I would use a red marker for the tic marks, and first spray another coat of white paint so that it would "seal" the tape and prevent the red from leaking underneath it. I touched up the runs with a tiny paintbrush and used the same spraypaint I'd sprayed in a little puddle on some masking tape so the color would match. At this point it was never going to be perfect, and trying to sand the ridges smooth made the red paint smear onto the white. I just called it a day and sprayed on 4 coats of clear. I could do it better if I did it again, but I think it looks pretty good. FYI I used VHT high temp paint for primer, white, red, and clear. If I had to do this again, I would sand it down and cut out the casting defects. Then have it sandblasted and the holes welded up. This would have saved me about a week of work.
- 11 replies
-
- valve cover
- paint
-
(and 5 more)
Tagged with:
-
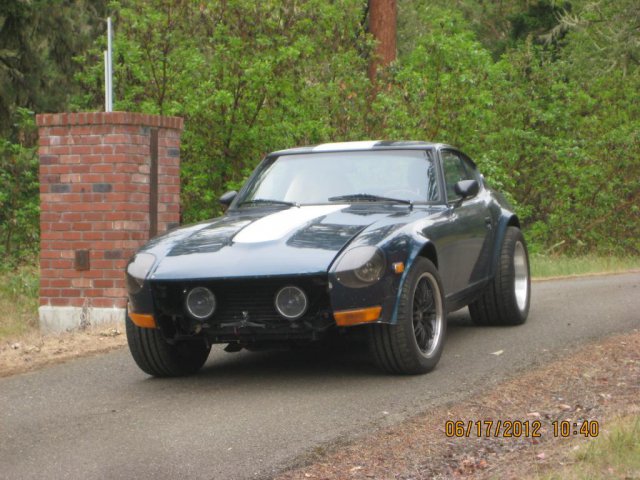
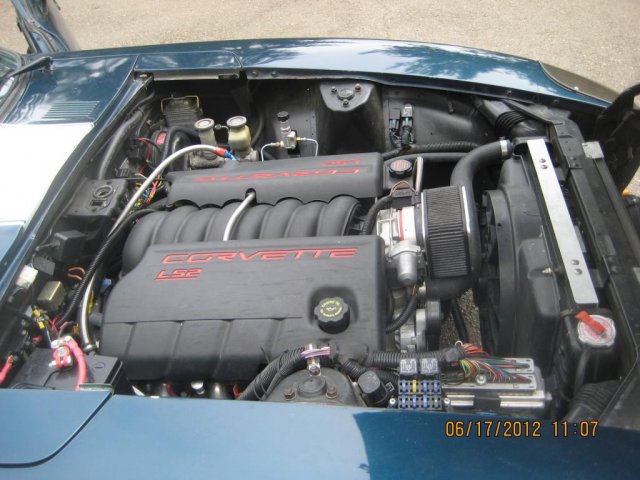
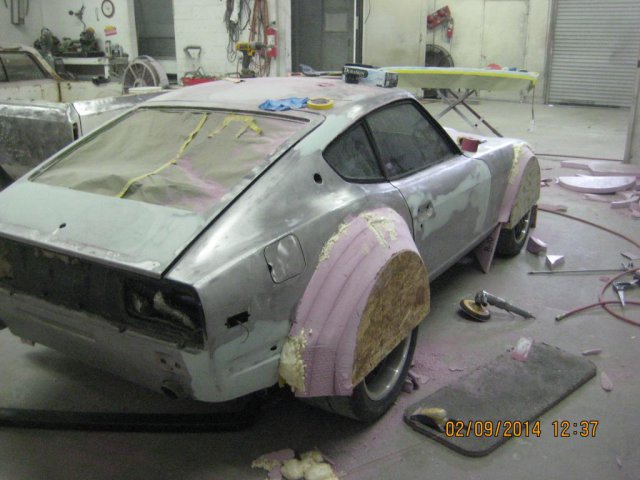
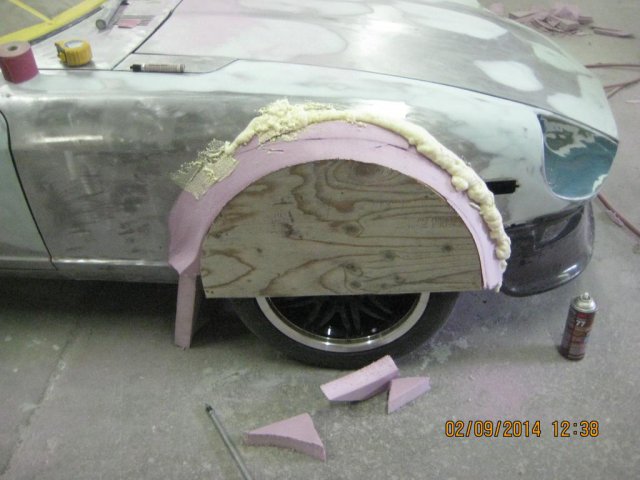
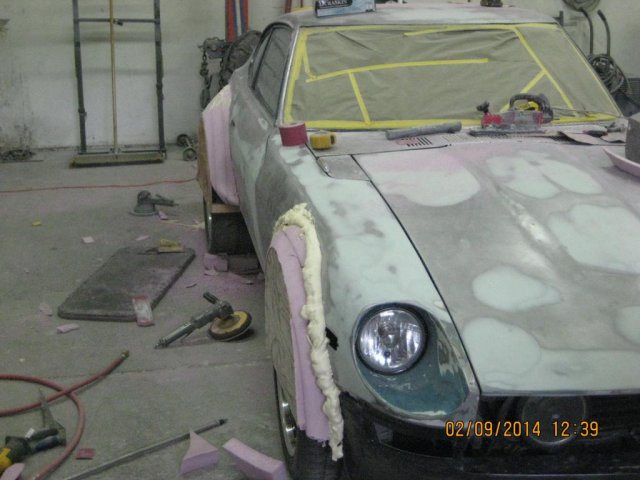
I have a 72 240Z with 6 liter LS2 and T56 6 speed. After the engine/trans install (by Dave - (Viperredls1z), we did a 4 wheel Willwood disc brake setup from Arizona Z Car and while I was doing that, I opted for the package with 5 x 4.5" lugs which gave me the option for larger tires and wheels. I got a set of wheels (11x17 rear and 9x17 front) and mounted Michelin 335/35-17 rears and 275/40-17 fronts. The car originally had hand built flares, but they were poorly done and in any case did not cover the larger tires. This gave me the perfect opportunity to do some paint and bodywork that I have been putting off. The car is in Ralph Garza's Body shop in Roseburg, Oregon for complete body work and paint. Check my facebook page: Datsun V8Z. The old paint is almost all gone,body panels are being aligned and this weekend they started on the flares. I made templates out of 1/2 inch plywood that would be the outside opening of the flares. The template radius is 1 1/2 inches larger than the tire radius. I located the center of the template 1" above the center of the wheels/tires, allowing for a bit more suspension travel. This weekend, Ralph and his buddy John from Portland (who has done SEMA class winners) started mocking up the flares. They are using rigid styrofoam blocks and spray foam to construct a workable surface, then filing and sanding down to a final shape. Hopefully this will be done this weekend, and the fiberglassing can begin. The side marker lights go away, and I'm adding turn signals behind the front grill (yet to be fabricated). No front bumper. Thin black fiberglass bumper? in the rear. It will be painted with many layers of Kandy Tangerine over gold metalflake with a black stripe down the center. This is my preferred daily driver, so we are adding some comfort touches: Lots of sound insulation, Honda S2000 power mirrors, leather reupholstery on the existing 350Z power/heated seats. Also adding a small overhead console for rear-view camera. I've attached a photo of the car before bodywork and a few pictures of it as it sits in the shop. I'll try to post every few days to keep everyone updated.
-
Alright guys, It is time for me to think about the aesthetic qualities of my '73 240z since I have finished the L28 swap. My car has the original paint, Yellow, and color code of 112 on the radiator support. These cars came with black vinyl interior, which is KILLING ME. I cannot drive in the summer without showing up to my destination drenched in sweat (I live in St. Louis, MO). I want to go to a white interior: White seats, white vinyl, possibly a white headliner, white door panels (just the nice looking white interiors like the Blue and Orange Z's had an option for). This will clash so bad with the Yellow that the car will look disgusting, I'm colorblind and just picturing that still looks ugly to me. I want to know whether anybody has done the white interior with the metallic grey, metallic black, or the white exterior Z paint? I love monochromatic color schemes since it is all I can see so I don't really want to paint it blue or orange. I also plan on going ZG style with this car down the road with the fender flares, fender mirrors and g-nose kit, so I'm taking that into consideration as well. Thanks for the help (and for the moderators if this borders more on exterior section then feel free to move it).
-
So I'm now in the bodywork phase of my project trying to smooth out the dents and dings, I'm going with a flat green after I primer it. I'm kinda doing everything backwards mechanically. I've decided to refinish all the suspension and underbody hardware after I get some paint on her. Its been a hell of a road with this car, house buying put me way behind on this whole deal. I love this car! Oh and the pic, I got a notion to just up and do it last night at like 1am. I brought out the flash gun and my camera. Anyway back to the bondo party outside.
-
I had a heater core hose leak. After removing the old carpet, this is what it did: Do I just grind away the paint around the affected areas and prime? I won't be repainting the car for a while.
-
I just posted a few pics to be brief. It was primer grey, matte black hood, cowl and access doors. The body was COVERED with glazing compound. It was like a friggin M&M. I spent I know two weeks, sanding with like 80 grit and a mouse sander, chiseling with a hammer and screwdriver. Dear Lord. Paint it Rustoleum Gloss White, I painted it with a roller. Welded in new dog legs, new frame rails, welded the gas neck to the body, patched a hole in the left quarter. had to patch a hole where the left side of the front sway bar mounts to the frame. A rectangular sized piece of metal had been ripped off and was still bolted to the sway bar, leaving a hole in the frame. Painted the tail light housings/bezels, painted the chrome black based on Vintage-TechZ's instructions. New weatherstripping, fixed some wiring, installed all the AC components under the hood except for putting my compressor back on (Idk yet if anything is wrong with it). The hood is off a 73 and was junk when I started the project. Managed to save it and the original hatch (which was rusty...). I had another hatch that was clean but the hinges on one side had rusted at the weld and allowed the hinge to warp. I ended up deciding to save my old one. New struts (kyb), new tie rods, patched 4 spots in the floorboard and had to make new rear seat mounts on both sides, which I did with come C-channel from Lowes. POR-15'd the engine bay, top and bottom of the floorboard. Used internal frame sealer from Eastwood everywhere it would reach, in addition to drilling holes in the frame rails and capping them with plastic rivets. Then I undercoated it heavily with the nice 3M stuff that's like $10 a can. I believe I used four cans. Did the fusible link upgrade, polished my wheels, installed the cowl drain tubes inside both fenders. For the money, I did everything I could do and as well as I could do it. I don't mind the Rustoleum paint job so much. Looks good, and I can always repaint if something happens. I don't intend to get rid of the car, and I'm aware that I can't paint it with anything else unless the Rustoleum comes off. I figure if it looks good it's more apt to last longer than it would looking like a dog turd with window louvers. I spent about 7 mos on the car and about $1500 or so. Someone gave me a pretty nice CD player to put in it. Basically, I got the car as close as I could to the condition I wanted it in, balancing with that cost. I was unemployed during this project (I have an amazing fiance who has preferred, for the time being, that I stay home and do bitchwork, which I enjoy), so my budget was limited. I was also completely hammered or otherwise inebriated throughout pretty much every aspect of this project. My goal was to have fun during the project. Other than a handful of things, I absolutely dreaded working on this car, and for no particular reason. Some of what should have been fun was a complete pain until I had a 6-pack or a 40. Probably not the best example to set, but I did enjoy it, and I learned a lot about the car, about myself (yea, I went there), and I learned some pretty decent skills and unwound some - which, like I said, was my initial goal. I live in an apt and just moved to a new city. My best friend let me keep the car in his garage throughout the entire process. Very cool of him. I bring that up because, when I showed up for the last weekend of work, and to bring the car home, my friend had killed himself (rubber hose...exhaust...his car), right where my car was before I backed it out of the garage a few weeks earlier. Knew him for 14 yrs, very upbeat and positive guy, commercial airline pilot, really had his stuff together but apparently kept much of his depression to himself. It was excruciating to clear out that garage, and then to have to work on the car before I could move it. I had to have a friend hang out with me, because I couldn't stand to be in that room alone. But because I spent so much time there with Danny chewing the fat, tossing back beers and watching tv with him while I worked, this car has particular meaning. He was very encouraging in the project and was a hell of a friend. Wanted to show you guys my car, after I bugged some of you on how to do these things. I have to put the interior back in it, but other than that it's pretty much done. Sorry for the sad story, but...thanks, and enjoy.
- 18 replies
-
- restoration
- rustoleum
-
(and 1 more)
Tagged with:
-
Hello everyone, I bought my Z in 2007 in New Mexico for 600 bucks with what appeared to be not much rust ( and it still is a fairly rust free car). It ran when I put a little fuel in the lines and I did a bit of work to drive it back to houston. Got it back to town and funds dried up after I couldn't get it to pass the state safety inspection. Fast forward to now and things and great I got most of the parts on the surface that I thought I would need. Today the brakes were bled, the back were easy but when I got to the front the front brakes wouldn't bleed. The brakes now have pressure, they didn't have pressure till I bled the back brakes and this was one of the reasons why it didn't pass inspection on top of the wind shield wipers not working. Any hints or tips I was thinking of running air through the lines to clear a possible blockage. Tomorrow I am doing a radiator flush, and sunday I am doing the popular windshield wiper motor replacement with a acura integra motor. Mondays plan is to start her up and get her to pass inspection( then it will be body work and interior ) The brakes were also stuck when I tried to move the car, a little work with a rubber hammer soon had them free, pictures will be up as soon as I can find the folder I put them in. Please people enjoy the thread as I refresh my 240z
-
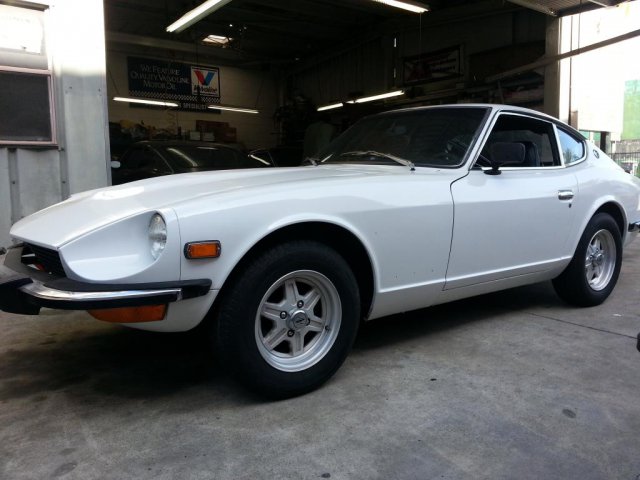
I'm rolling the last coat on tomorrow, but I took some pics yesterday and wanted to post them. Rustoleum Gloss White, rolling with high density foam brushes. Paint mix is a little thicker than the recommended 50/50 mix with mineral spirits. I just liked the paint going on a little thicker... Got lucky and have had more than a week of unseasonably warm weather, which I thought would help. Wetsanded every two coats - 800 grit, 1000, 1200, and I'm gonna do the last wetsand with 1200 before polishing. Car was originally metallic blue. Since I was going with a different color, I painted the door jambs with the roller and a foam brush. Also painted around the doors. My hood was almost junk when I started the project. It was on the car when I bought it, and originally came off of a 72. It had rust and bondo, both of which I think I cleaned up decently well. The bottom side of it looked awful. It was chipping from at least three repaints. So, before I started rolling on the white, I rolled the bottom side with POR15 to smooth out the surface. I think it came out pretty well. And keep in mind before I started the entire car was covered with a 2+mm thick sheet of dolphin glaze. I used a screwdriver and hammer to chisel off around the windshield. I'll do a build thread after I finish putting it back together. Til then, check it out. My welded-on gas filler

