gvincent
-
Posts
663 -
Joined
-
Last visited
-
Days Won
2
Content Type
Profiles
Forums
Blogs
Events
Gallery
Downloads
Store
Everything posted by gvincent
-
LT1 swap AGAIN! Engine differences? Help needed.
gvincent replied to gvincent's topic in Gen I & II Chevy V8 Tech Board
Well a friend came by and took a listen, It started right up but the knock was there and the motor was running real rough, missing and like it was running on 6 cylinders. I am going to take the motor and tranny out ((, no more messing around, I will start to prep the Iron head LT1 as well. Crap! I am bumming! Looks like my first attempt at a rebuild this winter. I will start looking at Grumpy's list of suggested reading material. I'll try and call JTR or Sanderson to see if my angle plug head headers will fit the Iron head straight plug heads. -
LT1 swap AGAIN! Engine differences? Help needed.
gvincent replied to gvincent's topic in Gen I & II Chevy V8 Tech Board
I installed a new mellings HV oil pump and metal pump shaft and coupler and an 8 quart Hamburger oil pan and pick-up tube and screen on just before I installed the motor in the car. The motor only had 80K on it and sounded just fine when I picked it up and drove the wrecked Firebird on and off the trailer before I pulled the motor. The engine did sit from late August until January when I first got it started. I currently have 60 PSI oil pressure reading on the mechanical gauge even with the knock. I hooked up to the gauge to the oil port just above the oil filter. I just don't understand the knock, I wish somebody was near by that can identify the sound better than I can. I don't have a camcorder or I would of recorded it and posted it to get some opinions on the sound. Maybe I can bring my sons iBook laptop out and record it.., it has a built in mic and camera...HMMMM Greg -
LT1 swap AGAIN! Engine differences? Help needed.
gvincent replied to gvincent's topic in Gen I & II Chevy V8 Tech Board
Picked up the Iron Head LT1 last night, it is definately a straight plug head. At first look I don't think my Sanderson angle plug headers on my Aluminum LT1 heads will work on these guys. Anybody tried this? Anybody have a used set of Blockhugger Sanderson LT1 straight plug headers they want to sell cheaply???? Greg -
LT1 Cooling, is this backwards? DOH!
gvincent replied to gvincent's topic in Gen I & II Chevy V8 Tech Board
Hi Wheelman, It is the LTI Universal length from Taylor, I bought the wire set with the 90 degree spark plug end attached and bare leads with a bunch of old style crimp boots. and then bought their LT1 Opti end boot kit which was a disappointment because it came with 4 straight and 4 90 degree boots? I couldn't figure that one out, I ended up using the 4 straight boots from the kit and re-used 4 of my old Opti straight rubber boots from the old plug set. I had more than enough metal crimp ends to do the job. I also wasted money on their aluminum bench vise crimper and wire stripper, the stripper worked ok but the crimp sucked, I ended up re-crimping them. The Loom holders are made by Russell, they look nice but the little plastic holders don't hold as tight as I would like them to and I ended up loosing 2 of them. I will see if I can get replacement holders, otherwise I will buy a set of those 4-3-2-1 individual plastic wire holders that have a screw hole in the middle to bolt them to the Russell aluminum loom holder. The ones that come with the Russell holders are a split type with a plastic spreader type center pin that simply pushes into the hole on the holder. to Install the wires I numbered the wires and put them on the plugs and then routed them as neatly and as best I could back to the Opti, I them marked them where I thought they should be cut, by mating them up to the correct Opti plug hole then and adding an inch for insurance. I then pulled them back out and put the Opti end boots on and cut and crimped them. I then re-installed them exactly the way I routed them earlier. The drivers side is a piece of cake, the passenger side was a pain as I had to remove my custom plate which hold my 2 pulleys to route the wires behind it and up and around the LT1 accessory bracket to come out on top of the valve covers, I did re-use that little plastic clip on the accessory bracket that holds the 4 wires tight around the corner of the accessory Bracket. This was a plus, as it made it nice and neat, If I had bigger diameter wire though it would not of worked. I did not gut the power steering pump but made a plate to house both a grooved and a smooth idler pulley that I scrounged at a junkyard to take the place of the AC compressor and Power steering pump. I still had to try several belts to find the right length and chewed it up a little until I got all the pulleys lined perfectly. Although I haven't replaced the belt yet since I have other problems that are more important right now. I still have the Taylor box at home and will post back the part number for the plug wire set. Greg -
LT1 Cooling, is this backwards? DOH!
gvincent replied to gvincent's topic in Gen I & II Chevy V8 Tech Board
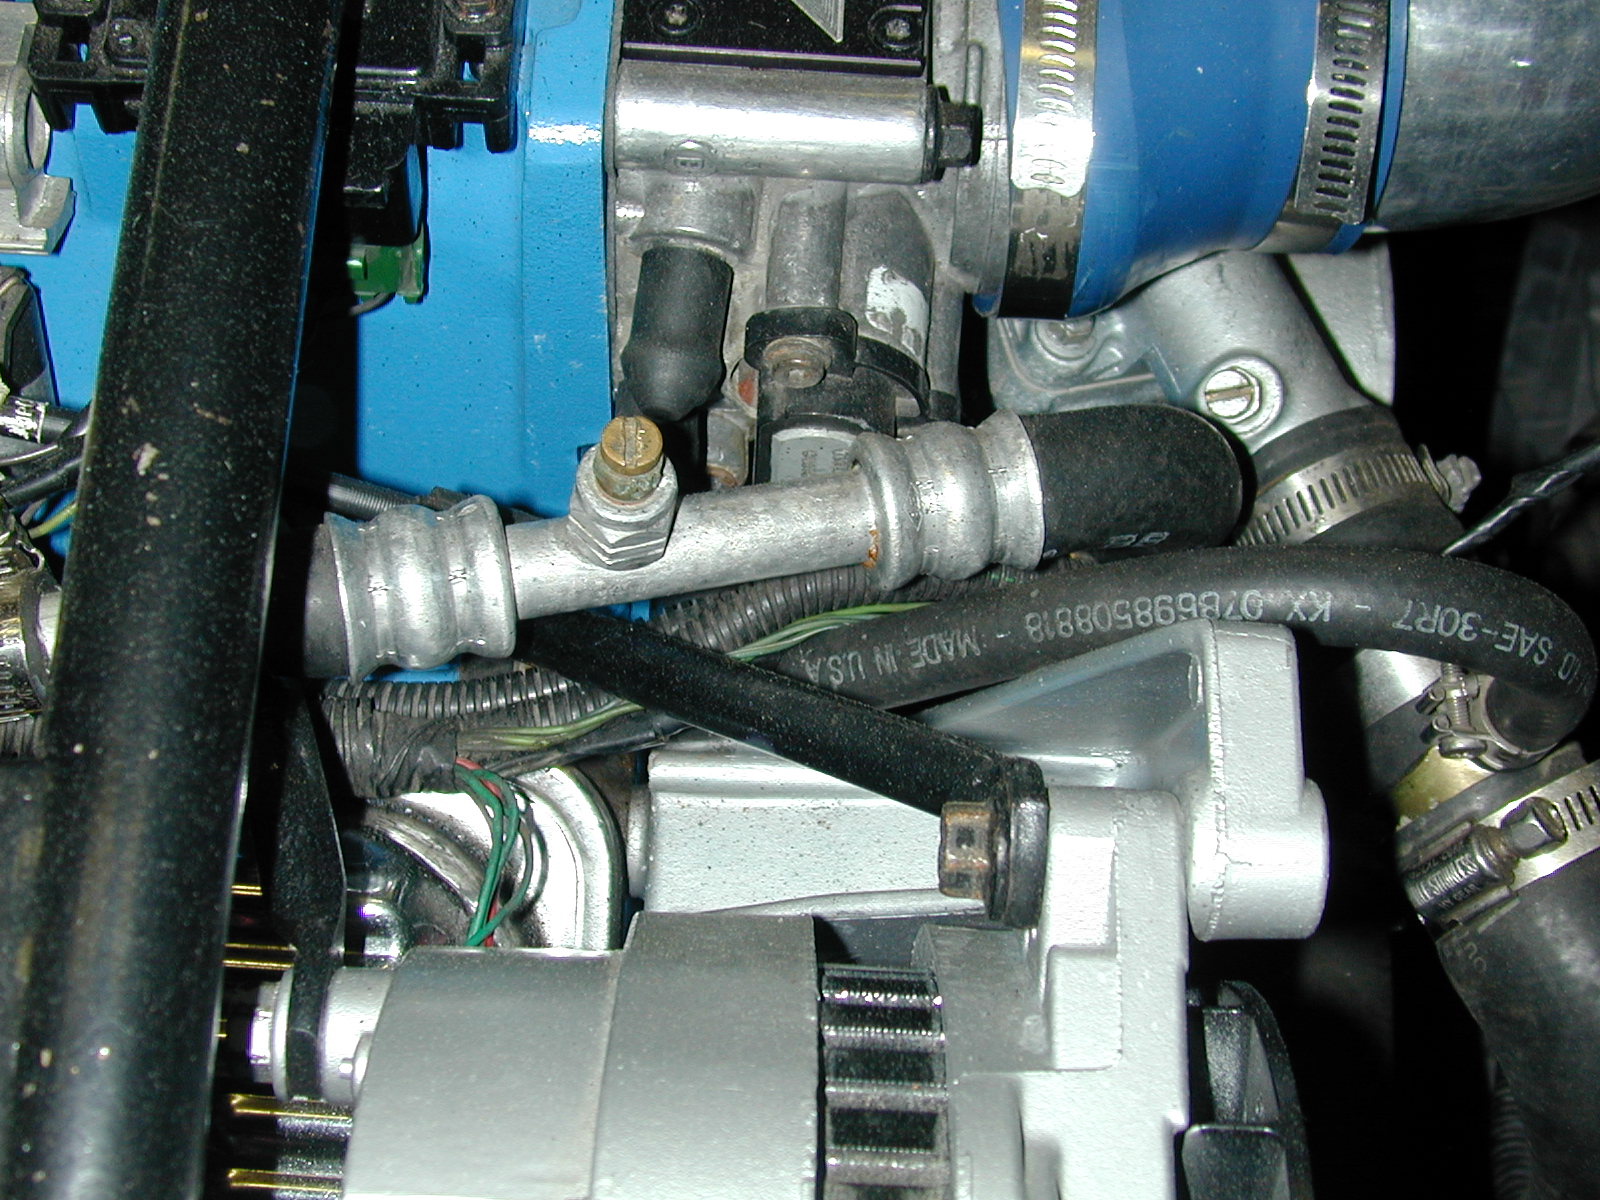
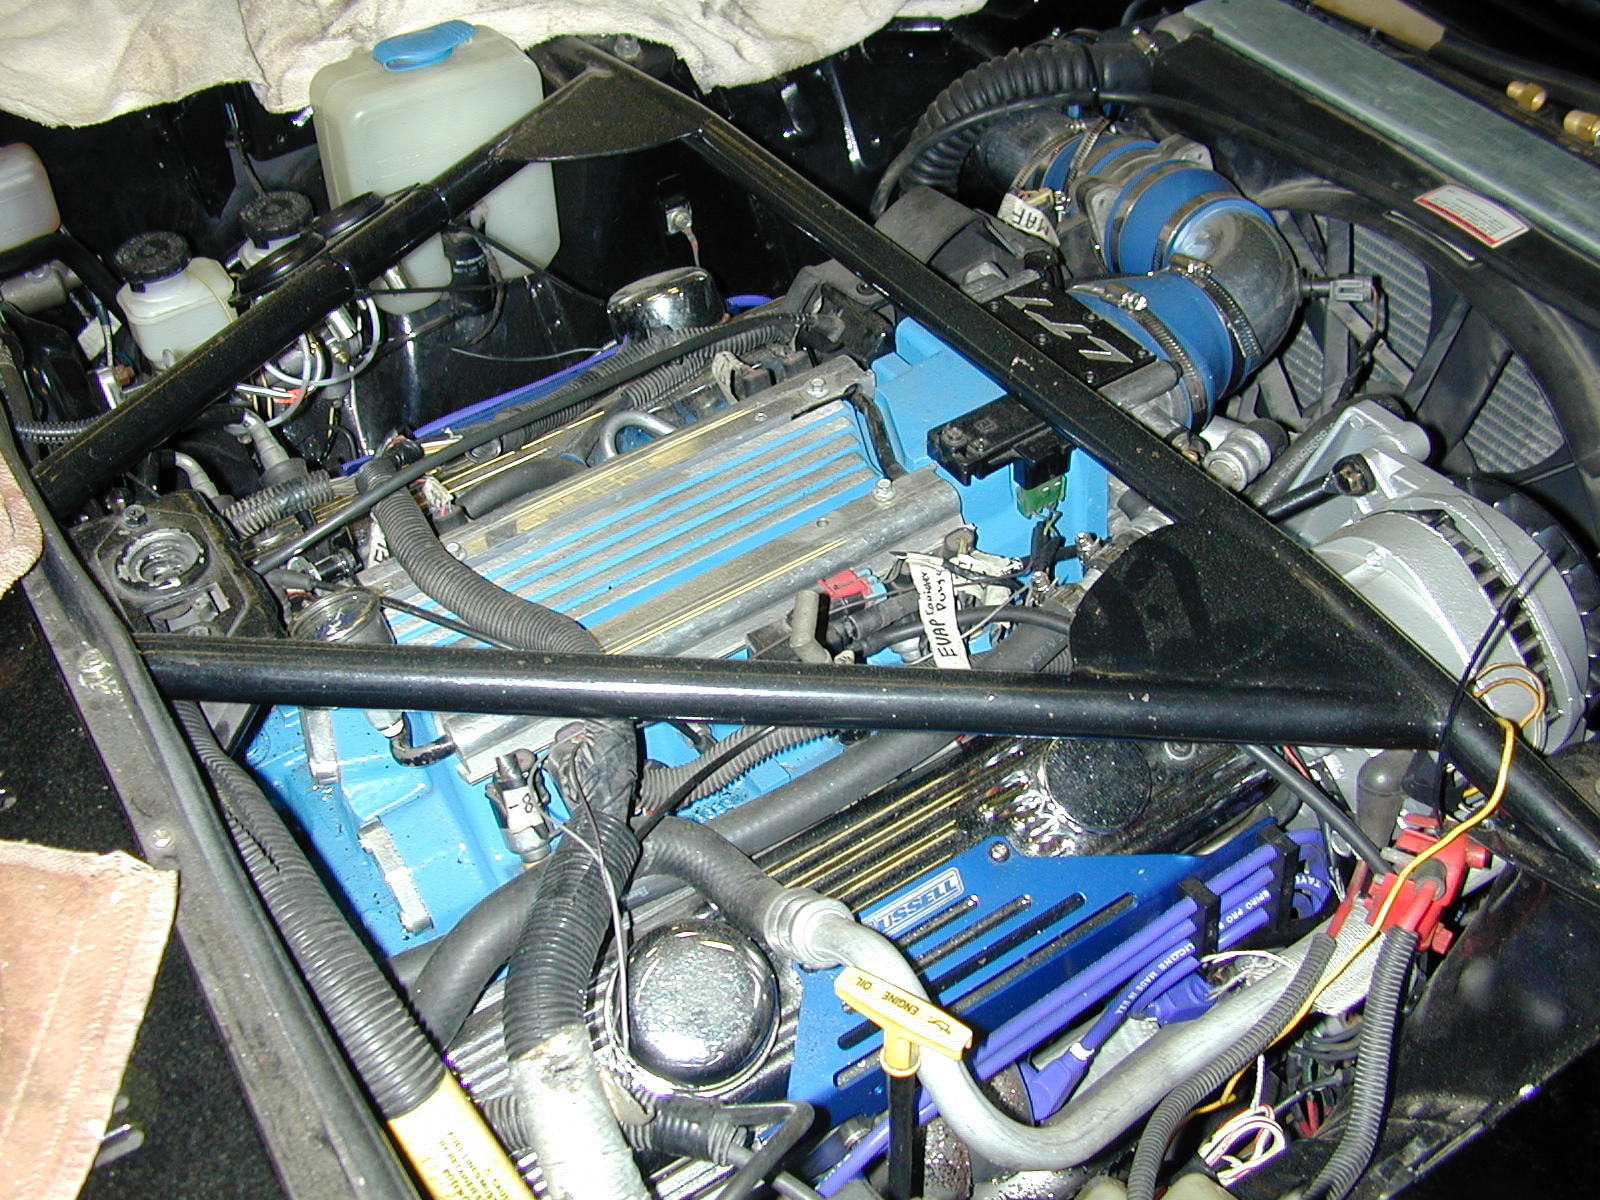
Thanks, Mike, Wheelman, Deja, and a6t8vw. Attached are pics of my setup. From what you guys say: 1 I need to move the tee to the top radiator hose on the passenger side and connect my steam hose there. I do have the bleeder on the heater hose so I am ok there. I should remove the restrictor heater hose and replace with a standard hose as there is a restrictor in the 280Z heater system already. I need to see how I hooked up the fan, I did use the firebird fusebox and relays but I think I only have one of the speeds hooked up, I did not use the other wire and taped it off for the time being as I saw no difference is speeds. I will sketch it up once I check what I did this weekend. Thanks again guys Greg
-
LT1 swap AGAIN! Engine differences? Help needed.
gvincent replied to gvincent's topic in Gen I & II Chevy V8 Tech Board
Wheelman and other Iron Head Caprice, Buick Caddie LT1 guys, Did you use a different header than the Sanderson "D" port header for angled plug heads? The Iron head is a straight plug "D" port head? I may have to swap motors and rather not have to swap the heads also. Thanks, Greg -
LT1 Cooling, is this backwards? DOH!
gvincent replied to gvincent's topic in Gen I & II Chevy V8 Tech Board
Thanks Mike, I will take some pics of my plumbing tonight. So I should of installed the JTR Tee fitting for the steam hose on the hose between the drivers side top radiator inlet and the lower drivers side water pump outlet? The thermostat housing inlet with vent, passenger side, on the top of the water pump should be routed straight to the outlet on the bottom of the radiator? I tried every single combination of the 3 fan wires and could not tell the difference in fan speeds they both were hi speed to me. I will have to go back and look to see if I wired it as a two speed or a one speed fan. I will check it with an amp meter this weekend. Wheelman, I now remember that I special ordered that 160 thermostat from AutoZone specifically for the LT1 motor. And as I now recall the 180 I took out looked almost identical to the 160. Deja, So my plumbing diagram has the flow arrows backwards right?? I could not find anything to tell me which tube on the 280Z firewall was the heater core inlet and which was the outlet, Top or Bottom? I also read somewhere in another thread that the 280Z heater core or under the dash somewhere is a flow restrictor already. I have the LT1 heater hose with the inline restrictor module and the arrow heading to and connecting to the bottom firewall heater core tube and coming from the bottom water pump connection. I have the top heater core tube connected to the top water pump heater connection using the LT1 vented hose. I'll post the pics, easier to look at picture than describe it. Thanks, Greg -
LT1 Cooling, is this backwards? DOH!
gvincent replied to gvincent's topic in Gen I & II Chevy V8 Tech Board
Yeah I have the knock sensor wired in, I drilled and tapped the JTR setback plate and mounted it there. I don't have a working temp gauge, I need to trace the positive feed to the 280Z gauges as I don't think any of them are getting voltage except the volt meter. I mounted a mechanical oil pressure gauge in the engine compartment and a mechanical water temp gauge. I will hook up the water temp gauge on the opposite side of the block that I have the Datsun temp sender on. In the hole that used to house the knock sensor. I was going to remove my expanded plug in the water pump and thread it but that requires removing the water pump again, another time. I believe I already lowered the fan temp but my fan is a single speed one from the Lincoln/Thunderbird, I thought it was a 2 speed because it had 3 wires but it isn't. So would I set them both the same for a 1 speed fan? I will check my TunerCAT settings and see what I set the fan temps at although I haven't gotten past getting the SES light to go off so the fan comes on and stays on right now. I think the motor knock/rap has got me flustered right now, I need to go back to solving one problem at a time starting with a working temp gauge and a good running cooling system with no air trapped, then work on getting rid of the SES light and the Datsun gauges working. If I spun a bearing or something then I will rebuild it later and swap in the Caddie LT1 that I have. -
LT1 Cooling, is this backwards? DOH!
gvincent replied to gvincent's topic in Gen I & II Chevy V8 Tech Board
Thanks Deja, So I do have it plumbed right, the only difference is that my head steam pipe is connected at the JTR "T" fitting on the thermostat inlet hose coming from the bottom of the radiator. So my plumbing diagram is right, I just have the flow arrows in the wrong direction? On the overflow tank I used the stock 280Z tank and just connected it to the radiator cap vent tube. I am using a pressurized cap, I don't remember the rating though. I also swapped out the 180 degree thermostat for the 160 degree one. (could I have put this in the wrong direction?) I did have coolant squirt out of the vent hole on the top of the cap on the overflow tank though. I haven't driven the car yet and have only run it on jack stands and now I have a motor knock. I was thinking I over heated it by not running the coolant plumbing right, now I don't know how I developed a knock, I certainly never over revved it??? I am racking my brain trying to think where I went wrong and what the rap is. Frustrated! Thanks, Greg -
I attached a rather crude sketch of my cooling system and I think I have it backwards after reading this: LT1 Coolant Flow: The LT1 is completely different since it uses reverse flow cooling. The incoming coolant first encounters the thermostat, which now acts both on the inlet and outlet sides of the system. Depending on the engine coolant temperature, cold coolant from the radiator is carefully metered into the engine. This allows a more controlled amount of cold coolant to enter, which immediately mixes with the bypass coolant already flowing. This virtually eliminates the thermal shock present in the old system. After entering through one side of the 2-way thermostat (at the appropriate temperature), the cold coolant is routed directly to the cylinder heads first, where the combustion chambers, spark plugs and exhaust ports are cooled. Then the heated coolant returns to the engine block and circulates around the cylinder barrels. The hot coolant from the block re-enters the water pump, and hits the other side of the 2-way thermostat, where it is either re-circulated back through the engine or directed to the radiator, depending on temperature. All of this means that the thermostat housing is the INLET (opposite of most engines), while the water pump is the OUTLET. The water pump (outlet) on the engine runs to the top left (inlet) of the radiator. The lower right (outlet) of the radiator runs to the thermostat housing (inlet) on the engine. This also means that the "upper" hose on the radiator would be connected to the water pump (mid/lower part of the engine) and is the outlet of the engine, so it should be hot with the thermostat open. The lower hose on the radiator is connected to the thermostat housing (upper part of the engine) and is the inlet to the engine. The main concept behind reverse flow cooling is to cool the heads first, which greatly reduces the tendency for detonation, and is the primary reason that the LT1 can run 10.5 to 1 compression and fairly significant ignition advance on modern lead-free gasoline. Reverse flow cooling is THE KEY to the Generation II LT1s increased power, durability, and reliability over the first generation smallblock engine. There are three main circulation systems for the LT1, while most engines only have two systems. As with most cars there is circulation through the heater core and the radiator, but there is a third system on the LT1 which includes steam vents in the head, along with a pressurized reservoir. Coolant to the heater core comes from the water pump. The lower hose on the water pump is the heater core inlet, and should have a flow restrictor mounted in the hose. This is to prevent over-stressing the core at high engine rpms. The heater core outlet hose returns to the water pump at the upper hose connection, and also has a T-connector to the pressurized reservoir to bleed off any air. This means I probably overheated the engine which is probably the cause of my knocking noise, would this caused a spun bearing knock or should I look for something else. I feel so dumb and depressed right now. Greg scan00394.pdf
-
Dang, 12 out of 18, The Mopars are what got me, I never really looked at them so I was guessing.
-
Hi, I was almost done with my 76 280Z 95LT1/T56 swap, I had some wiring issues to resolve and I thought I was good to go. My 95 LT1 was from a TransAm with 80K and sound and ran fine when I pulled it last August. I got it to fire up in January and have been completing the rest of the install ocassionally starting it up and doing the TunerCat deletes etc. I was having problems getting the stock gauges to work but have an AutoMeter Tach and Speedo, The SES light is on, no codes present but a single speed fan. I had fuel pump issues with the stock tired fuel pump and put in an Aermotive AFPR and a Mallory Fuel pump. I recently started it up to hear an engine knock I think it might of spun a bearing, how is this possible???? Anyway for fear of causing any more damage I have available a LT1 from a 1995 Cadillac with 80K also. I am thinking I will swap motors so I can at least enjoy part of the summer driving this car while I rebuild the other LT1 with some goodies next winter. So the obvious: 1. I'll need to swap the flywheel from the TransAm LT1 to the Caddie motor. 2. Swap my CAI system over 3. Will my Sanderson Block Hugger headers from JTR work, they are for the angle plug aluminum heads aren't the iron heads straight plug? Do I have to swap heads, any cheaper ideas? 4. swap all my front mounted accessories and mounts over. Is there anything else I am missing? God I hate to have to pull this out, It was almost done. I just want to drive this car for a little while! Anybody nearby want to help? I am still going to have to figure out the tune and SES light. More to follow. Greg Bumming in MA
-
A hint of things to come, with video(fixed).....
gvincent replied to CR260z's topic in Gen I & II Chevy V8 Tech Board
Couldn't hear a thing, Had the volume cranked?????? -
Old thread, Yeah I know but here goes. I might be having a similar problem, I mounted the knock sensor on the JTR plate because of clearance issues. The link for the Mike Chaney mod is no longer good, anybody have a copy of this mod? I haven't purchased a LT4 module yet but will if I have to. I have other issues also and have to get the new fuel pump installed before I get back to this problem and others. Some day I will actually drive this thing on the road! Oh those desensitizing variables tables in Tuner Cat...Where?? Thanks, Greg
-
LS1/T56 pullout or parts car???
gvincent replied to Horatio's topic in Gen III & IV Chevy V8Z Tech Board
Thanks 1 Tuff Z, 24TZ, I hate to see anybody go into debt to build a project car, A project car is supposed to be fun and to work on it during your free time, the last thing you want is the pressure of having to pay off a loan or rushing to get the project finished, it is a recipe for disaster or worse having an unfinished project and having to sell it off for a big loss to pay off some loan. I am an old geezer and I would hate to see a youngster with a family get into any additional debt when it really isn't necessary. Be patient Grasshopper! Start Planning everything out, make a realistic budget (then double it) and like I said earlier look, look, and look some more. Stay focussed on the primary goal and try not to get sidetracked, Like many have said before it is really easy to want to buy all the go fast parts or get caught up in the "while I am at" syndrome. You can do that stuff later a little at a time during the winter months. A lot of members have already posted some great advice here that I read and followed like the bible when I first came here in 1995. I would, and still do spend countless evenings reading posts getting ideas and printing out tons of info. I already had a 78 280Z car but I always wanted to build a V8 Z, so I devoured as much info and planned out as much as I could for over a year before I bought the 76 280Z. I am going to guess that 80 percent of of all are cars on this site are not our daily driver or we at least have a second beater car to drive. Heck It will be 2 years ago August when I bought the 76 280Z for my project and I still am not done but am almost there, I spent 6 months just finding the right donor car, but I yanked the 280 drivetran and sold most of that off and traded some parts for some welding work and prepped the car and bought items here and there when I had the extra cash from selling some parts. I mean I am sure there are some members here that have probably built their cars in a couple of months but I bet that number is low and they did a lot of planning up front to prepare for their swap. Deja, put those parts up for sale now, people are looking for F body parts right now, put them on several Craigslists in your area and on the forums, LS1.com, LS1LT1.com CamaroZ28.com, Fbody.com etc. If I was able to sell all my stuff on those sites you should be able to also, in fact I sold a lot of stuff to people mostly in GA, VA, TN, TX, OK OR, WA, OH, FL and MO almost everywhere except where I live in New England! I only sold a few big parts locally. Sorry for the long winded post, I had too much coffee today!! Greg -
LS1/T56 pullout or parts car???
gvincent replied to Horatio's topic in Gen III & IV Chevy V8Z Tech Board
Stay away from a loan on a donor car, 60 months is a long time!!!!!!! Buy the donor car when you have the money, you can do prep work on your car in the mean time. Don't buy a pull out from a wrecking yard or any wreck from Ebay. Stay within an area you are willing to drive to and tow home a wrecked donor. Check all the Craiglists in your area of search, get the "Want Advertiser" type rags and look in the "Cars for parts" pages, I found my sons 1995 Formula for $2100 in one of the local car rags. Car was originally from your area with slight plastic only nose damage and needed a windshield. They can be found, be patient and look, look, and look some more, a good deal will come around. Be patient! Greg -
LS1/T56 pullout or parts car???
gvincent replied to Horatio's topic in Gen III & IV Chevy V8Z Tech Board
Listen to Clive, He knows what he is talking about and has a knack for finding donor cars, who do you think talked me into doing my donor part out. In my situation I just couldn't afford $3000+ for a wrecked LS1 at the time but had $2000 and scrounged up the additional $300 to do the LT1 deal when it came around and jumped on it because the kid who sold it to me had spent $1500 buying the parts to fix his car and then decided not to do it. So I already had a bunch of parts already boxed up! There are wrecked F bodies all the time, and the LS1's are getting cheaper and easier to find now, I knew of a couple recently. In the Northern climates where it snows Kids that drive their F bodies in the winter time are always sliding into something in the snow and totaling their F body cars. These cars are big sleds in the snow for inexperienced drivers who are used to front wheel drive cars. Late Winter/early spring is a good time to find them as they are freshly wrecked and the ones that are repairable will soon be looking for parts to buy and fix their wrecks. Save your coin and buy a totaled F body then make most or all of your money back. Greg -
LS1/T56 pullout or parts car???
gvincent replied to Horatio's topic in Gen III & IV Chevy V8Z Tech Board
1. Buy 1 Totaled 1995 Trans Am LT1/T56 with 79K miles complete with all replacement parts to fix car for $2300 2. Give nose, fog lamps, front fenders, windshield, Taillights, tires and wheels to son for his 95 Firebird Formula. (Loose about $1200-$1600 there) 3. Pull Engine, Transmission, ECU, Wire harness, driveshaft, Fuseblock and Misc stuff and install into 1976 280Z 4. Sell off as much as possible. 5. Scrap Body shell for $120 AS of yesterday I have sold $4833.28 in Firebird parts and I still have some more stuff to sell yet. Cost of LT1 Drivetrain... FREE Money available to be dumped back into swap for suspension, radiator, JTR kit, Gauges,custom exhaust, Headers, Welding, etc $2533.28 Sold all parts through LS1.co, LS1LT1.com CamaroZ28.com and Craigslist Have not put anything on EBay yet! Car is Almost done. Oh, the 280Z with only a couple of rust spots, blown motor $2400.00 Started Parting the car last August, scrapped the shell end of October, still selling what's left slowly. When finished I will post my very detailed list of parts sold, for how much and parts and labor bought and for how much. Biggest pain in the ass....packing up big items for shipping, waiting for people to show up and never do, wasting your time getting shipping quotes. You make up your mind. Greg OH, one last thing, having to put up with your wife asking how long the yard is going to look like a junkyard...... -
Not if you use the pumpkin cover from your R-200 open diff in place of the finned 300ZX on the CLSD, If you want to run the finned cover you need to modify/make your own mustache bar or buy one of those nice aluminum ones. I am running the stock 280 pumpkin cover like jeffer949 I haven't done the CV axle swap yet so am still running the "U" joint axles. I will use the CV axles from the 300ZX but I think you can also use the CV axles form a 280ZX The late 1987-1989 Turbo CLSD are getting real hard to find and expensive, I lucked out and stole one from a junkyard with axles and driveshaft for $125 but looked for months on Ebay and would stop bidding when they went past $450 as you can get the Brute Force for around $500 and put it in your open diff. Also a lot of the old Turbo diffs need new clutches anyway so you really have to search and search to find one, It took me 7 months to find mine. Greg
-
Feeling down? need inspiration to continue....
gvincent replied to gvincent's topic in Gen I & II Chevy V8 Tech Board
I thought the song was the perfect fit to the video, more so than the other one you made with a different song, I really liked it! Greg -
Feeling down? need inspiration to continue....
gvincent replied to gvincent's topic in Gen I & II Chevy V8 Tech Board
Yes, and thank you for making that video, I stumbled upon it tonight and it hit home, just what the Doc ordered! Yes, The Darius Video was the inspiration that drove a lot of us here at HybridZ. -
I'm almost there with my LT1 280Z but am struggling with the last bit of wiring and getting the motor to run right. I am so tired of Winter and having too many projects that it seems all to overwhelming recently..... so I went to You Tube and watched some videos to pick me up. This one is really good: or search for "HYBRIDZ.ORG ROCKS" on YouTube of course then there is the one video that got me started almost 2 years ago. Thank you Darius! I needed that! Greg
-
Is that the Mallory 60FI or 110FI pump? I just bought the 110FI for my LT1 280Z and will be mounting it when it gets here. Nice m-bar set-up! Thanks, Greg
-
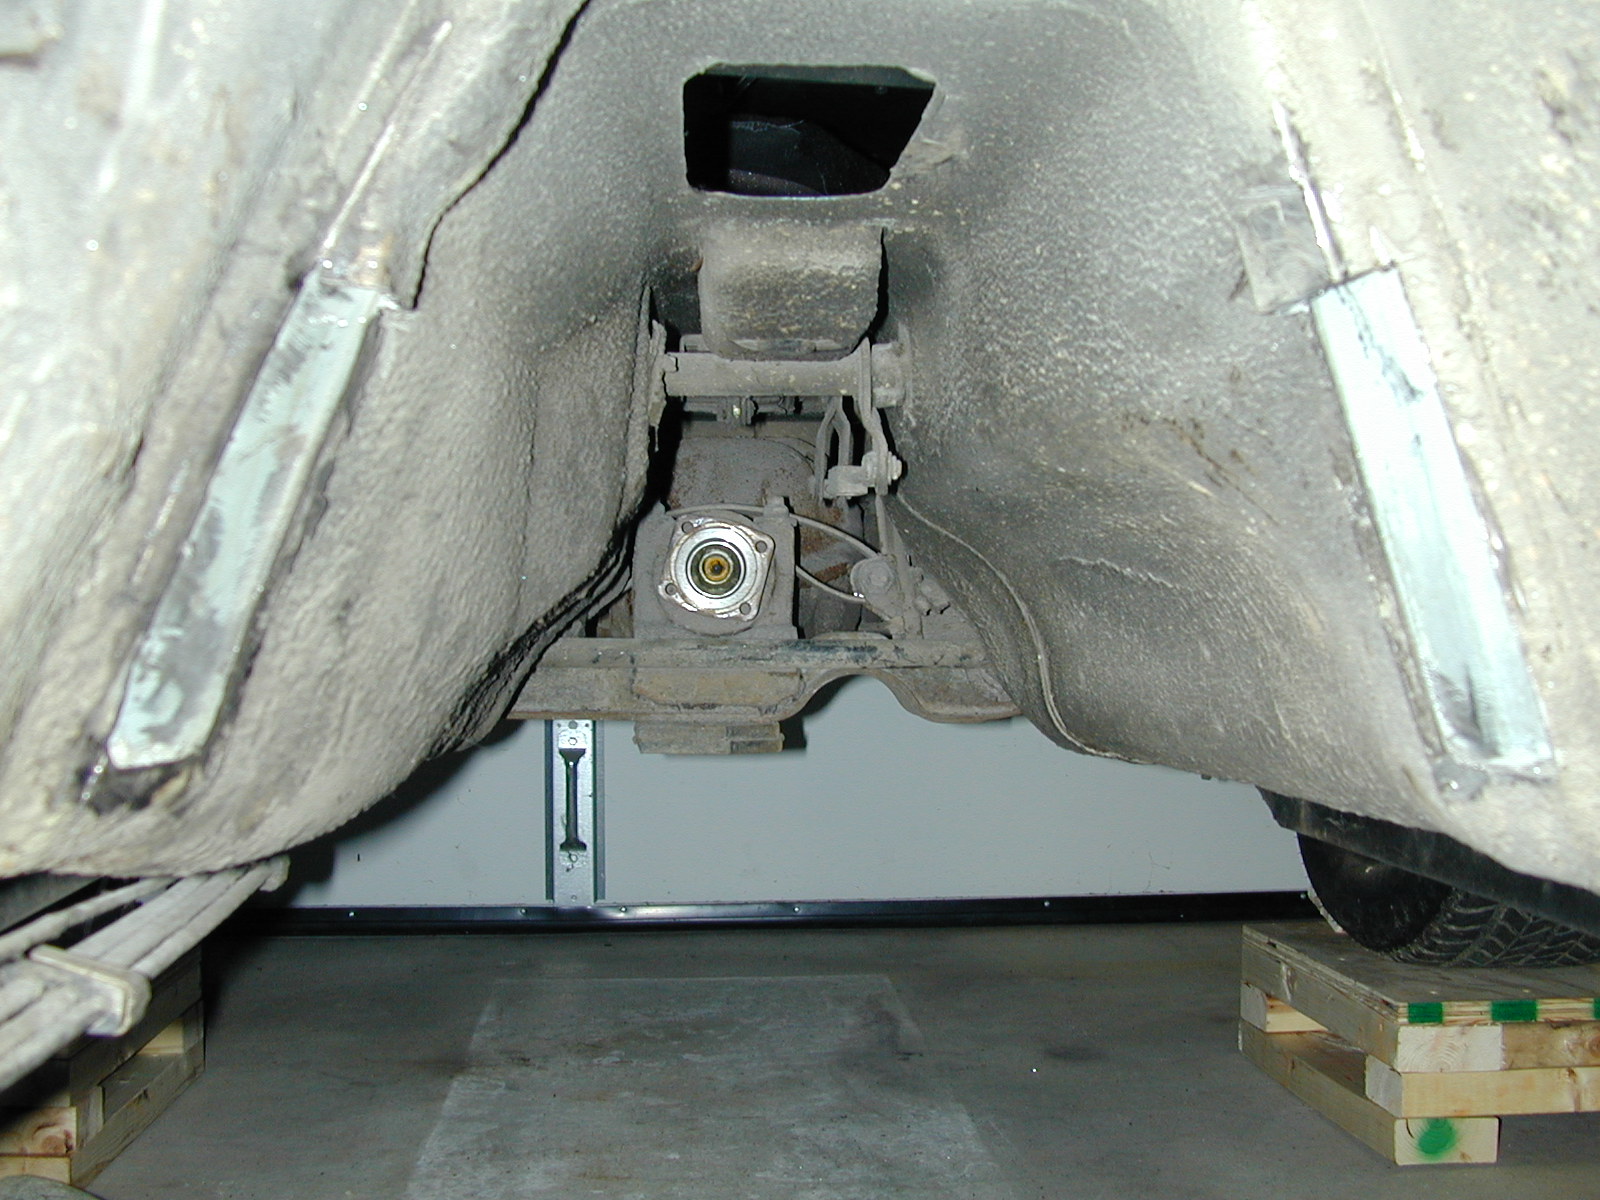
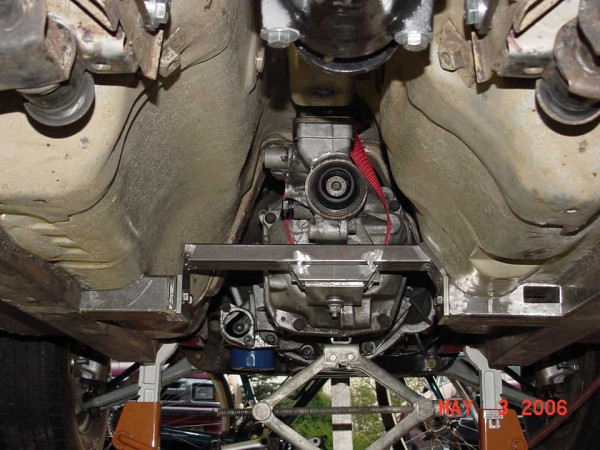
If you do a search there are lots of mounting options for the T56. I didn't like the JTR one as it seemed wimpy to me but lots of people have used it with no problem. I had a friend of mine make one of the mounts another member here made and was nice enough to supply drawings. I attached the drawing and a pic of the mount the member installed. I have pics at home of my mount but not here at work. I also show a picture of what I removed from the tunnel to fit the T56, it is tight on the passenger side and I trimmed off the ears on the T56 around the back-up light sender and had to dimple the tunnel a little up top in the area of the trans tunnel on the passenger side just about where the trans bolts to the engine block. The shifter sits perfectly in the shifter hole. If I find more pics I will post them soon but some are already in my gallery Thanks, Greg 280Z_T56_XMEMBER.pdf
-
$129 balanced with all new u-joints and flanges. South Shore Bearing Quincy MA. do great work and also carry the R-200 flange adaptor. Greg