gvincent
-
Posts
663 -
Joined
-
Last visited
-
Days Won
2
Content Type
Profiles
Forums
Blogs
Events
Gallery
Downloads
Store
Everything posted by gvincent
-
I'll give this one last shot, Anybody? Someone has to have a 76 280Z that they are parting out and have one of these heater control valves, anyboody? Otherwise I'll either hack up a new 240Z unit and make it work or try some junkyard Toyota or Honda fix, but I would love to have the parts lined up now for when it gets warm enough to start wrenching again. Thanks, Greg
-
280z 240z DIMENSIONS FRONT SWAY BAR
gvincent replied to zgeezer's topic in Brakes, Wheels, Suspension and Chassis
So which is it, 16mm, 18 mm, anybody know for sure? Where would you find this info? Thanks, Greg -
280z 240z DIMENSIONS FRONT SWAY BAR
gvincent replied to zgeezer's topic in Brakes, Wheels, Suspension and Chassis
Curious, What is the size/diameter of a stock 76 280Z front sway bar? 24MM? -
OUCH! $235 Plus the core charge of $150! Can't do that. Santa had no funds this year(( My 76 was a no AC car from the factory, I only occasionally need a defroster as I only drive in the good weather months, is there some other heater control valve I can use? Anybody have a good used one? Thanks, Greg
-
My Heater valve assembly was stuck/frozen so I freed it up and now it leaks bad. Anybody have a good used or new working unit they no longer need? Can't seem to find a new one anywhere. Also need the plates and brackets for a stock 78 280Z front sway bar, I lost them somewhere between moves. email me please, gregory.vincent@comcast.net I have tons of 280ZX Turbo parts if anybody needs anything, no Motor though, it's going in the 78 280Z Thanks, Greg
-
LT1 Intake still leaking
gvincent replied to lgoodson@pacbell.net's topic in Gen I & II Chevy V8 Tech Board
When looking at the rear of both of my LT1 engines from the factory there is a thick bead of exposed factory sealant about 5/16 in diameter along the back of the intake. I was thinking how sloppy and was going to trim this blob of excess sealant off to clean up the look before I painted but a mechanic friend of mine told me not to unless I wanted leaks. After reading about the LT1's on the other forums it is a common leak and generous beads of sealant are used at the rear when replacing the intake on these motors. I think Shobox has a write up on his site. Greg -
I too tried the RTV on the Sanderson headers on both of the LT1's and both times they leaked. I followed Deja's advice awhile ago and picked up a set of EARLS metal/graphite headers and have not had a leak since. Shop around I forget where I got mine but it was $33 shipped. Greg
-
I just have a breather on each valve cover... Is this a no no? I plugged the old PVC hose connection on the throttle body. I kept the PVC valve and metal tube from the side of the intake manifold to the front of the engine block. 95 LT1 Thanks, Greg

-
LT1 Hard start when cold
gvincent replied to lgoodson@pacbell.net's topic in Gen I & II Chevy V8 Tech Board
The one thing I noticed after watching a new belt at Idle was that it looked like it was starting to curl-up on the inside of the alternator pulley and after about 10 minutes had started to fray the first inside rib of the belt. Now the Alternator and the balancer are what I would think the only constants as they are stock. I did not use the metal rod bracket that bolts to the intake manifold and the top bolt on the accessory mount on the alternator. I had this bracket on the first LT1 motor and it started to fray as well so it seems it doesn't matter if it is attached or not. I never got to drive that motor before the rod bearing spun. Without hacking up the engine covers you can't use it anyway. I will pick up another belt today, $16 at AutoZone and try the straight edge washer shuffle on my home made idler pulley plate when I get back from LA. I'll post my results. Thanks, Greg -
The 3 way brace is a home made, bolted to the firewall and struts. Yeah I don't know where all the room went, I have hardly any room on the passenger side because of the wiring harness, the stock fuse links and the braided fuel lines and fuel pressure regulator. I could probably get rid of more wiring that I don't need because I kept the Firebird fuse block and mounted it up front, I have plenty of spare power circuits and relay sockets for future stuff.
-
LT1 Hard start when cold
gvincent replied to lgoodson@pacbell.net's topic in Gen I & II Chevy V8 Tech Board
Yeah I keep chewing up belts except I only get about 20 miles! They start to fray on the inside. I had made my own bracket with an ac grooved idler pulley and a smooth idler pulley where the power steering pump was. I checked it many times for alignment and will try adding/deleting washers one at a time to see if it will stop. If I can't get it right I'll go and buy the power steering delete pulley that Deja and others have used but am not sure which AC delete pulley actually works without hitting the frame rail. I know Deja used an Ebay one but don't know which one. How about this one? http://cgi.ebay.com/ebaymotors/93-97-CAMARO-FIREBIRD-1LE-AC-BYPASS-DELETE-PULLEY-LT1_W0QQcmdZViewItemQQhashZitem3efa65ac12QQitemZ270488939538QQptZMotorsQ5fCarQ5fTruckQ5fPartsQ5fAccessories#ht_500wt_1182 Or this one? http://cgi.ebay.com/ebaymotors/93-97-CAMARO-FIREBIRD-1LE-AC-BYPASS-DELETE-PULLEY-LT1_W0QQcmdZViewItemQQhashZitem2556d4ed42QQitemZ160370584898QQptZMotorsQ5fCarQ5fTruckQ5fPartsQ5fAccessories#ht_5235wt_941 The power steering delete pulley was in this thread: http://forums.hybridz.org/showthread.php?t=134479&highlight=power+steering+delete+pulley info: PSC Motorsports (http://www.pscmotorsports.com/) Allen Performance Resources 11468 FM 730 South Azle, TX 76020 Part Number: BK-MB31K LT-1 F-Body Idler Bracket I slotted my mounts so I have no problem with the balancer clearance. I did move the engine forward a little bit. Thanks, Greg -
Struggling with which V-8 to go with?...
gvincent replied to circinus's topic in Gen I & II Chevy V8 Tech Board
Just grab a harness and computer out of another B body, and go with the LT1, Lots of Lt1's on this site including me. Greg -
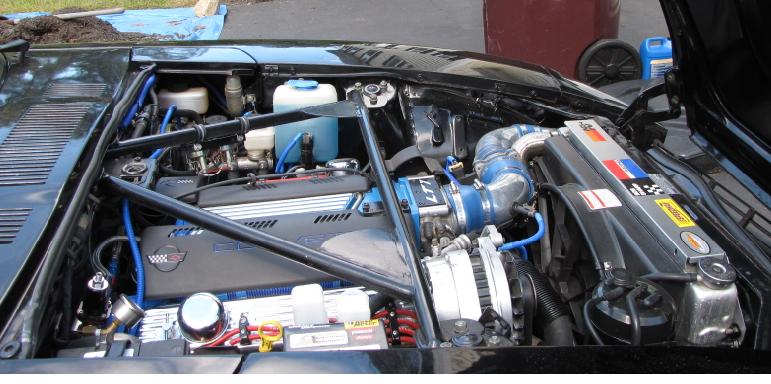
Here are some pics of my 76 280Z 95 LT1/T56 This is engine #2, going to rebuild and stroke engine #1 unless the right deal comes along on a 406 () Greg
-
The LT1 engines have all been discussed before on this web site, do a search and you will find a lot of info on them. When I was researching the LT1 the consensus was 95 with the OBD1 and vented OPTI-spark was the best choice. I posted a lot of these questions my self 2-3 years ago TunerCAT and LT1 Edit were the tuning packages of choice, again both are discussed here as well, The various Camaro/Firebird and Impala forums are also good reading. Good Luck, Greg 1976 280Z 95 LT1/T56
-
There is nothing wrong with the Fleetwood LT1, Yeah it is an Ironhead but is identical to the Roadmaster and Caprice otherwise. The Ironheads actually flow better than the stock aluminum heads as they were a later design but they are no good for porting etc. The Problem is finding an LT1 from and F body that hasn't been beat to death. Get a nice low mileage B body motor and then swap heads and a cam later. Stick with an OBD1 motor, 1995 was considered the best. Do a search it has ben written about a lot here.
-
Deja LOL! That is perfect!!! My LT1 is running waiting for a non rainy day here to calibrate the Auto Meter Electric Speedo, I have put about 30 miles on it so far but had to find some mileage markers on a highway. I keep shredding belts though, I'll start a new thread on this soon, in the mean time I carry a spare. Thanks, Greg
-
Having just gone through something similar, I swapped out the suspected fuel injectors and everything was happy again. The click test didn't locate the bad clogged injectors, even with 2 filters you can suck up some nasty stuff from our old tanks. Of course I went through all the electrical first, and all checked out. Even bought the NOID lights to check the injector pulses. Check for the voltages at the coil/ignition module for 10VDC being present and 5VAC while cranking, I forget which pins right now but can look it up for you, it is in the manual Originally tried to blame the poor old OPTI but had a hot spark at each plug with a spark tester and also tested each plug wire and spark plug with a clamp on timing light Of Course check your fuel pressure at the fuel rail and Fuel Pressure regulator. Too low pressure from a partially clogged inline filter or intermitant fuel pump can do the same thing, been there done that. Good luck, Greg
-
LT1 is alive! sort of...Need Help!
gvincent replied to gvincent's topic in Gen I & II Chevy V8 Tech Board
Thanks Bartman, Yeah, Jody is a great help, I am now obsessed with getting to drive this car, after 3 years, 2 motors, lots of money and work, and now registering and insuring it two weeks ago I WILL get some enjoyment from driving it before it snows or I'll kill myself trying. Thanks, Greg -
LT1 is alive! sort of...Need Help!
gvincent replied to gvincent's topic in Gen I & II Chevy V8 Tech Board
Thanks Dale, Yeah I was keeping an eye on the levels and checking the two bleed screws and all is well. But in keeping with my two steps forward and one step back tradition on this project I now have a leaking heater valve I think. I started putting the dash center and console in as I now have all working gauges again when I thought I would free up the stuck cold/hot slider up so it would work, well i got it working alright still a little stiff but works if you don't move it fast or you will bend the cable. Well I started it back up again to make sure all my gauges were still working after putting the dash back together and I smell AntiFreeze, I had just put the carpeting back also, antifreeze is dripping under the passenger side of the car from the drain hole in the floor. I think the valve is leaking as it wasn't leaking before I messed with the control cable. This is not going to stop me! I just connected the heater hoses together with a short piece of pipe and some hose clamps for now, I am going to drive this thing on an actual road if it kills me! I'll figure out how to remove and replace the valve later this winter. -
Abbott X Speedo Question
gvincent replied to Vette Powered's topic in Gen I & II Chevy V8 Tech Board
Good deal, sounds about the right price considering I bought mine almost 2 years ago. I read somewhere that need to take the VSS signal right off the sender at the tranny and not off the PCM. Never mind I see your not using a computer/fuel injected motor. Greg -
Abbott X Speedo Question
gvincent replied to Vette Powered's topic in Gen I & II Chevy V8 Tech Board
I researched this for a quite a while and was going to go the Cable-X route and then I finally scored a new Autometer Pro Comp electronic speedo for $180 on Ebay. You have to get creative with the turn signals, hi-beam indicator, Hand Brake etc. lights though, some have modified their Autometer gauges and added LED's and some, like me ended up making a pod that sits on the steering column. I was going to go the Cable-X route but the Autometer gauges are more accurate tha the stock Datsun gauges. After making the pod I probably spent as much as the Cable-X would of cost. I think JTR was offering a Mod to the tail housing of the T56 to keep your VSS and run a standard Speedo cable for about the same money. I don't know if they still offer it or not though. Greg -
LT1 is alive! sort of...Need Help!
gvincent replied to gvincent's topic in Gen I & II Chevy V8 Tech Board
The Fan is running! Dale your right, Jody is Da Man! After several emails and swapping a few files back and forth the fans started working, Both Jody and I couldn't pinpoint what did the trick but it works now. I am going to follow Jody's advice and learn more about tuning and visit the websites he directed me to. If anybody is interested I have both the before and after TunerCAT files and will be happy to share the files and emails between Jody and I which helped to narrow down the problem. Now swap out my expensive leaking Mallory fuel pump and I can take it for a real drive. Yahoo! Thank you Jody and all who helped. Greg -
LT1 is alive! sort of...Need Help!
gvincent replied to gvincent's topic in Gen I & II Chevy V8 Tech Board
Thanks Jody I will, I had hoped to check it tonight but here I am working late at work again. I will definately take a look. and will check my settings VS yours. I will send you my file base for you to take a look. The current motor is a completely stock 95 LT1 from a Caddy Fleetwood with the iron heads and the T56 manual from the original 95 Firebird Trans Am LT1 which has a rod knock , I only have the Sanderson headers and a cold air intake system, MSD Opti and blaster coil. Modified fuel rails with AN fittings and an Aeromotive AFPR I am using an Autogauge electronic speedo and tach, although I haven't driven the car far enough yet to setup the speedo and see if I have the VSS signal correct. I really appreciate your offer to help, after 3 years I am so close to actually driving this car further than my driveway and around the block. I was at this point last summer when the Firebird LT1 developed a knock while still on jackstands Thanks again, Greg -
LT1 is alive! sort of...Need Help!
gvincent replied to gvincent's topic in Gen I & II Chevy V8 Tech Board
Thanks Jody, I also got your email and PM, I will copy the .bin file and bring it home on a CD, as the old PC laptop I have does not have a USB port or a working network port but does have a working CD rom reader. I only use it because of the serial port, All i have on it is XP Pro TunerCat, FreeScan, and PCM Communicator. So just direct TunerCAT to open the .bin file and then have it load the program to the PCM? I am very new and ignorant to computer controlled engines obviously. Thanks, Greg -
LT1 is alive! sort of...Need Help!
gvincent replied to gvincent's topic in Gen I & II Chevy V8 Tech Board
Well it is still running and I replaced the 2 injectors and that was problem #1 solved. Problem #2 was the code #29, went into TunerCAT and turned off the air pump and that took care of Problem #2 Problem #3 was code #43 the knock sensor, I followed the Shoebox test proceedure I posted earlier for the knock sensor and did not have the 5 volts, so traced it back to the PCM Pin D22 (Blue D connector dark blue wire on Pin 22) well I discovered I was 1 pin off and had used the dark blue on pin 23 which went for the AC. Swapped the wire and for the first time with both LT1 engines I no longer had any trouble codes and the SEL light was OFF, YEAH!!! EXCEPT here is where the 1 step backwards comes in, my fan no longer turns on!!!! Now the fan was always constantly running when the SEL light was on which is what it was supposed to do from what I have read so it is working. When I read the PCM or Program the PCM with TunerCAT the fan kicks on for a second at the beginning and end of each read or program, so I am thinking I must have it wired right and it must be a setting in TunerCAT that I need to change somewhere. When the SEL light was on and the fan was running I never got above 178 degrees and I have a 160 thermostat which was correct I suppose. Well I have looked at the Tables in TunerCAT to see what my fan settings are at and couldn't find the same tables that are referenced in this thread: http://forums.hybridz.org/showthread.php?t=124211&highlight=Fan+settings which was posted by 80LT1 The part about setting the fan settings was: Fan thresholds: These are the engine coolant temperatures that the ECM must see in order to kick the fans on. For the stock 180* thermostat the fan turn on points are 226 for the low speed and 235 for the high speed. A good starting point for either the stock or an aftermarket 160* thermostat is to set the low speed fan to come on 20* after the thermostat has opened, and the high speed to come on 6-8* after the low speed. It is best to experiment and see what you‘re car likes best. Use the Fan 1 On Threshold (Low MPH) and the Fan 2 On Threshold (Low MPH) for your turn on temperatures. The Fan Threshold High Speed (MPH) allows you to give the computer a mph value to distinguish between the high and low speed fan turn on points. This gets pretty interesting. For example, you drive a lot in stop and go traffic and are consistently driving at 35mph and under. You can set your high speed threshold to 35mph and then at every speed under that the low mph fan turn on temps are active, and at any speed higher than that the high mph fan turn on temps are active. That way you can kick the fans on earlier at lower speeds to make up for the lack of airflow coming across the radiator while you‘re sitting in traffic. Then once your at a speed that allows the radiator to see more airflow the high speed turn on temps take control. Fan Hysteresis Low/High Speed: These values are the temperature changes that will turn the fans off. If you’ve set the hysteresis to 3, then the fans will not turn off until the coolant temperature is 3 degrees cooler than the fans turn on point. Fan control turn-on points based on oil temp are not used in our ECM’s since it takes no input of oil temp. There are also values for fan turn-ons based on A/C pressure. I have not messed with these values as I don‘t see an advantage to it. Now I could not find the settings in the tables I have highlighted in Red above anywhere at least not worded the exact same way anywhere? Am I looking in the right place? What fan settings should I put in there and where? What Table? Shouldn't the fans come on anyway? I let it get up to 210 degrees and still no fan turn on so I shut it down for fear of overheating and blowing a head gasket on motor #2 ARGHHH! I will look at TunerCAT again tomorrow night and write down all my settings from the first 2 table categories, maybe some of you LT1 guys with TunerCAT can compare my PCM settings with yours. I am so close DAMMIT, I registered and insured it as an antique last wednesday and have to have it safety inspected and appraised in 10 days Please help! Thanks, Greg