Miles
-
Posts
2391 -
Joined
-
Last visited
-
Days Won
35
Content Type
Profiles
Forums
Blogs
Events
Gallery
Downloads
Store
Everything posted by Miles
-
I just measured the front flex line. It is 14 inches. I have relocated the rear hard lines so the flex lines are not in the stock location. You can use a coat hanger to mock up and estimate the length of the front and rear flex lines. After installing the flex lines move the suspension through the full range of motion and look for over stretch, kinking, rubbing etc of the flex lines. Flex line kits are available for the Toyota and Maxima/240SX swaps. I prefer generic A/N lines because they are cheaper than the swap kits plus I can get the parts from a local speed shop. Silvermine Motors might have the flex lines for the Toyota/Maxima swaps.
-
I'll check the length for the front Toyota calipers tomorrow. Look here: covers front Toyota and rear 249SX or Maxima brake lines.
-
Yep. All Japanese. The Toyota and the Nissan 240Z calipers were made by the same company. The 240SX calipers are Japanese, made by Nissan, have integrated parking brake, use a big 300ZX non-turbo rotor, and the kits are available from several sources. They all have dust seals. Good luck
-
Max Have you contacted Wilwood to see if they could add the dust seals (gaskets) to one of their calipers? Wilwood now offers a rear caliper with integrated parking brake.
-
Max Check this out. A custom car meet in Germany. Looks like the parking lot of my local speed shop on the weekends.
-
Max: Also, see my response to Grannyknott. An adjustable proportioning valve only reduces pressure. Consequently, if your rear calipers are not keeping up with the front brakes then reducing the pressure with a PV makes it worse. For example, all of these combinations are front biased about 60% front and 40% rear: Toyota solid/vented front with 240SX or Maxima or 280ZX rear calipers. However, at some point you may want to experiment with new brake configurations where an adjustable PV would be necessary (if allowed by TUV). Opinion: Well maintained stock brakes are fine for street use. Some people track their Z cars with stock brakes and like the results. Changing brake components causes a domino effect. For example, bigger/multiple caliper bores require more fluid volume which means installing a larger bore master cylinder which requires more pedal effort to stop the car. Recommend that you research what others have done that meets TUV approval. Germany has a lot of hot rod clubs so there must be some way the hot rod people are making the TUV engineers happy. Check out the German car clubs on YouTube. I have worked out the bugs with my set up (Toyota solid front, 240SX rear, 280Z booster, 1979 280ZX master cylinder. Carbotech AX6 pads) and am happy with it as a daily driver.
-
Grannyknot When I was testing the various popular brake swaps (Toyota, Maxima, 240SX etc) I thought I might need an adjustable proportioning valve (PV) to experiment with front and rear balance due to caliper and/or pad changes. For example, running more aggressive pads on the rear to compensate for too much front brake bias as many owners of track cars do. But, I found that all of the brake swaps I did were all basically biased 60% front and 40% rear making an adjustable PV unnecessary and using aggressive pads on the rear to achieve better brake balance not safe for a street car where you want predictability. I did install a Wilwood PV in the tool compartment on the passenger side so I could adjust the PV while road testing the various brake/pad combinations. I never had to use the PV because all of the brake combinations, for example the Maxima or 240SX rears, are weak and planned on removing the PV, but it is still in place and run wide open (too lazy to remove it). Note: some people running the Toyota solid rotor front and 240SX rear combination just gut the stock proportioning valve located in the rear of the car so the PV just becomes a three way connecting block. See the brake forum for examples. The most notable improvement I made to the Toyota solid rotor front and 240SX rear setup was swapping the 7 inch 240Z booster for the 8.5 inch 280Z booster and installing Carbotech AX6 brake pads. The car brakes well with minimum pedal effort. My only complaint is that there is a bit of slack in the pedal due to the fluid volume requirements of the calipers.
-
Perhaps my set up would work for you: Car: 1972 240Z SBC 350 300hp, 1989 Camaro five speed transmission, R200 3.54 differential, 240 rear wheel HP. Car is a daily driver and not raced. Front: 1979 Toyota pickup S12+8 calipers with stock 240Z rotors. Do not use brake lines with banjo fittings. The caliper is not machined for banjo fittings and they will leak. Rear: 1989 240SX rear calipers with 1984 non-turbo 300ZX rotors. Has built in parking brake. Master Cylinder: 1970 280ZX 15/16 in. bore Booster: 1977 280Z 8.5 in booster. The 280ZX 15/16 in. bore MC causes a stiff pedal. The 280Z booster corrects the brake feel more like stock. Have to re-drill the bolt holes in the firewall. SS braided flex lines Brake pads: Carbotech AX6 all four wheels. Excellent cold bite that bites harder as they warm up. Great for a daily driver. I arrived at this set up after experimenting with all of the junk yard brake up grades appearing on various Z car websites. This set up is well documented on HybridZ and other Z websites.
-
Here is a list of the parts used to set up my exhaust system: HOOKER BLOCK HUGGER EXHAUST HEADERS 2100HKR https://www.summitracing.com/parts/hok-2100hkr HOOKER REDUCER 11026HKR https://www.summitracing.com/parts/hok-11026hkr HEADER BOLTS ARP 400-1107 3/8" X .750" (Recommend 1 inch). These bolts allow good socket/open end wrench clearance. https://www.summitracing.com/parts/arp-400-1107 REMFLEX EXHAUST HEADER GASKET SET 2004 (recommend 3/8" x 1" header bolts as the gasket is thick until crushed down) https://www.summitracing.com/parts/rfl-2004?cm_mmc=ppc-google-_-search-_-brands-_-keyword&gclid=CjwKCAjwwo7cBRBwEiwAMEoXPO0p6x0IaE3z78g6S_WaqfsQ62XlYavgtN0P7ds9oKQ2nkgcYqvh4xoCzkYQAvD_BwE ACCELL "SHORTY" SPARK PLUGS 8199 (any short insulator plug will work - very limited clearance between header and plug). https://www.summitracing.com/parts/acc-8199
-
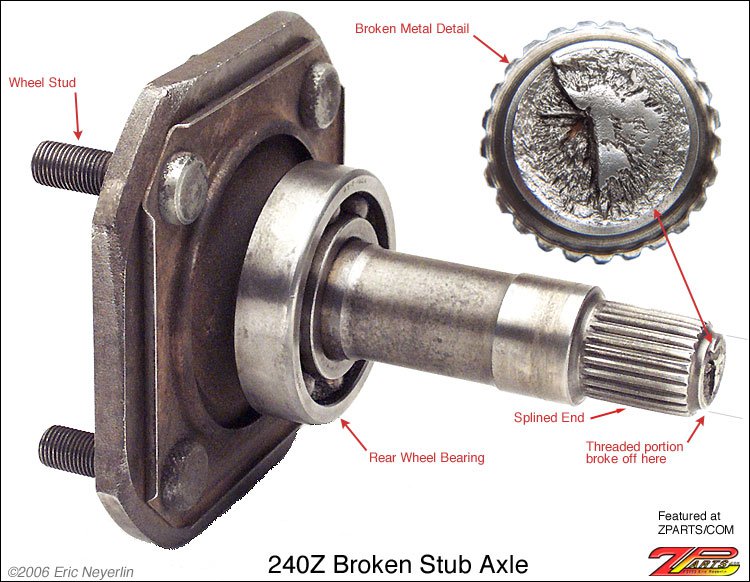
Joe called me yesterday to let me know my stub axles were from an earlier batch so no problem. How many company owners will do that for a customer? Thank you for your follow up Joe.
-
Same manufacturer all these years?
-
No quality control. Ask the supplier if parts are lab tested before they are offered for sale.
-
Do you have the JTR manual? Don't cut anything until you know what is causing the fitment issue. Driveline angles have been covered extensively in the Driveline forum. Search there.
-
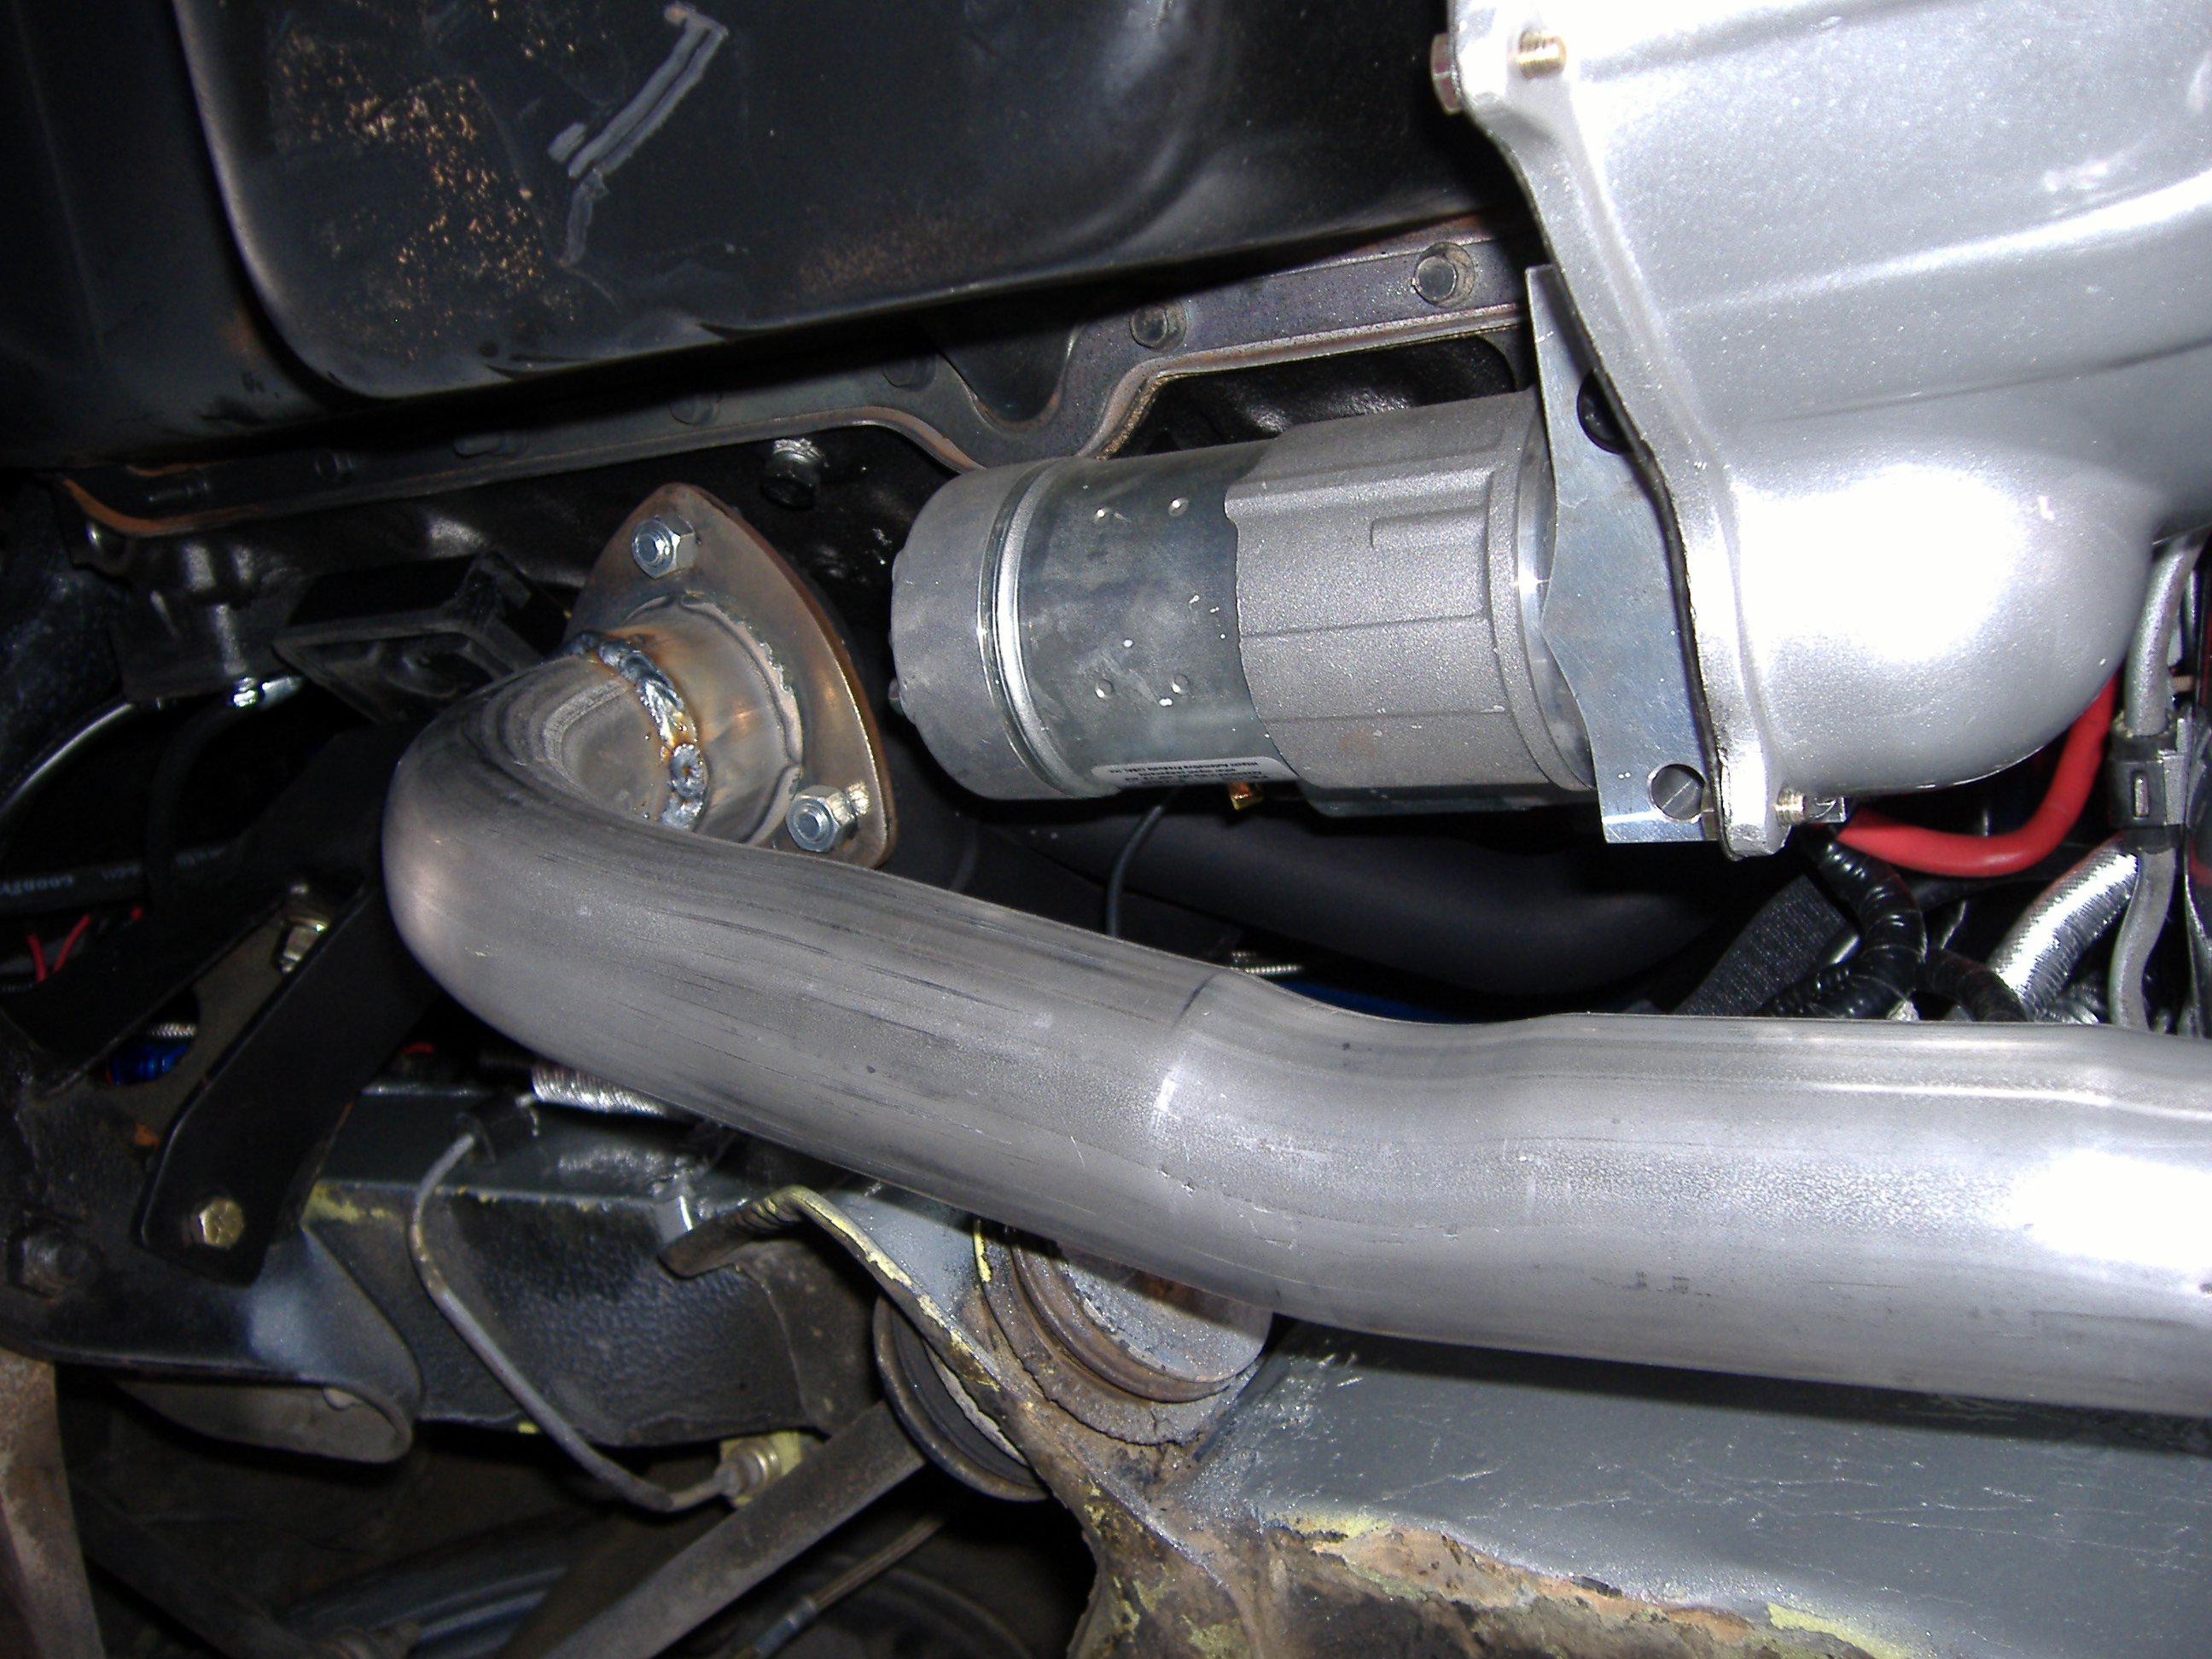
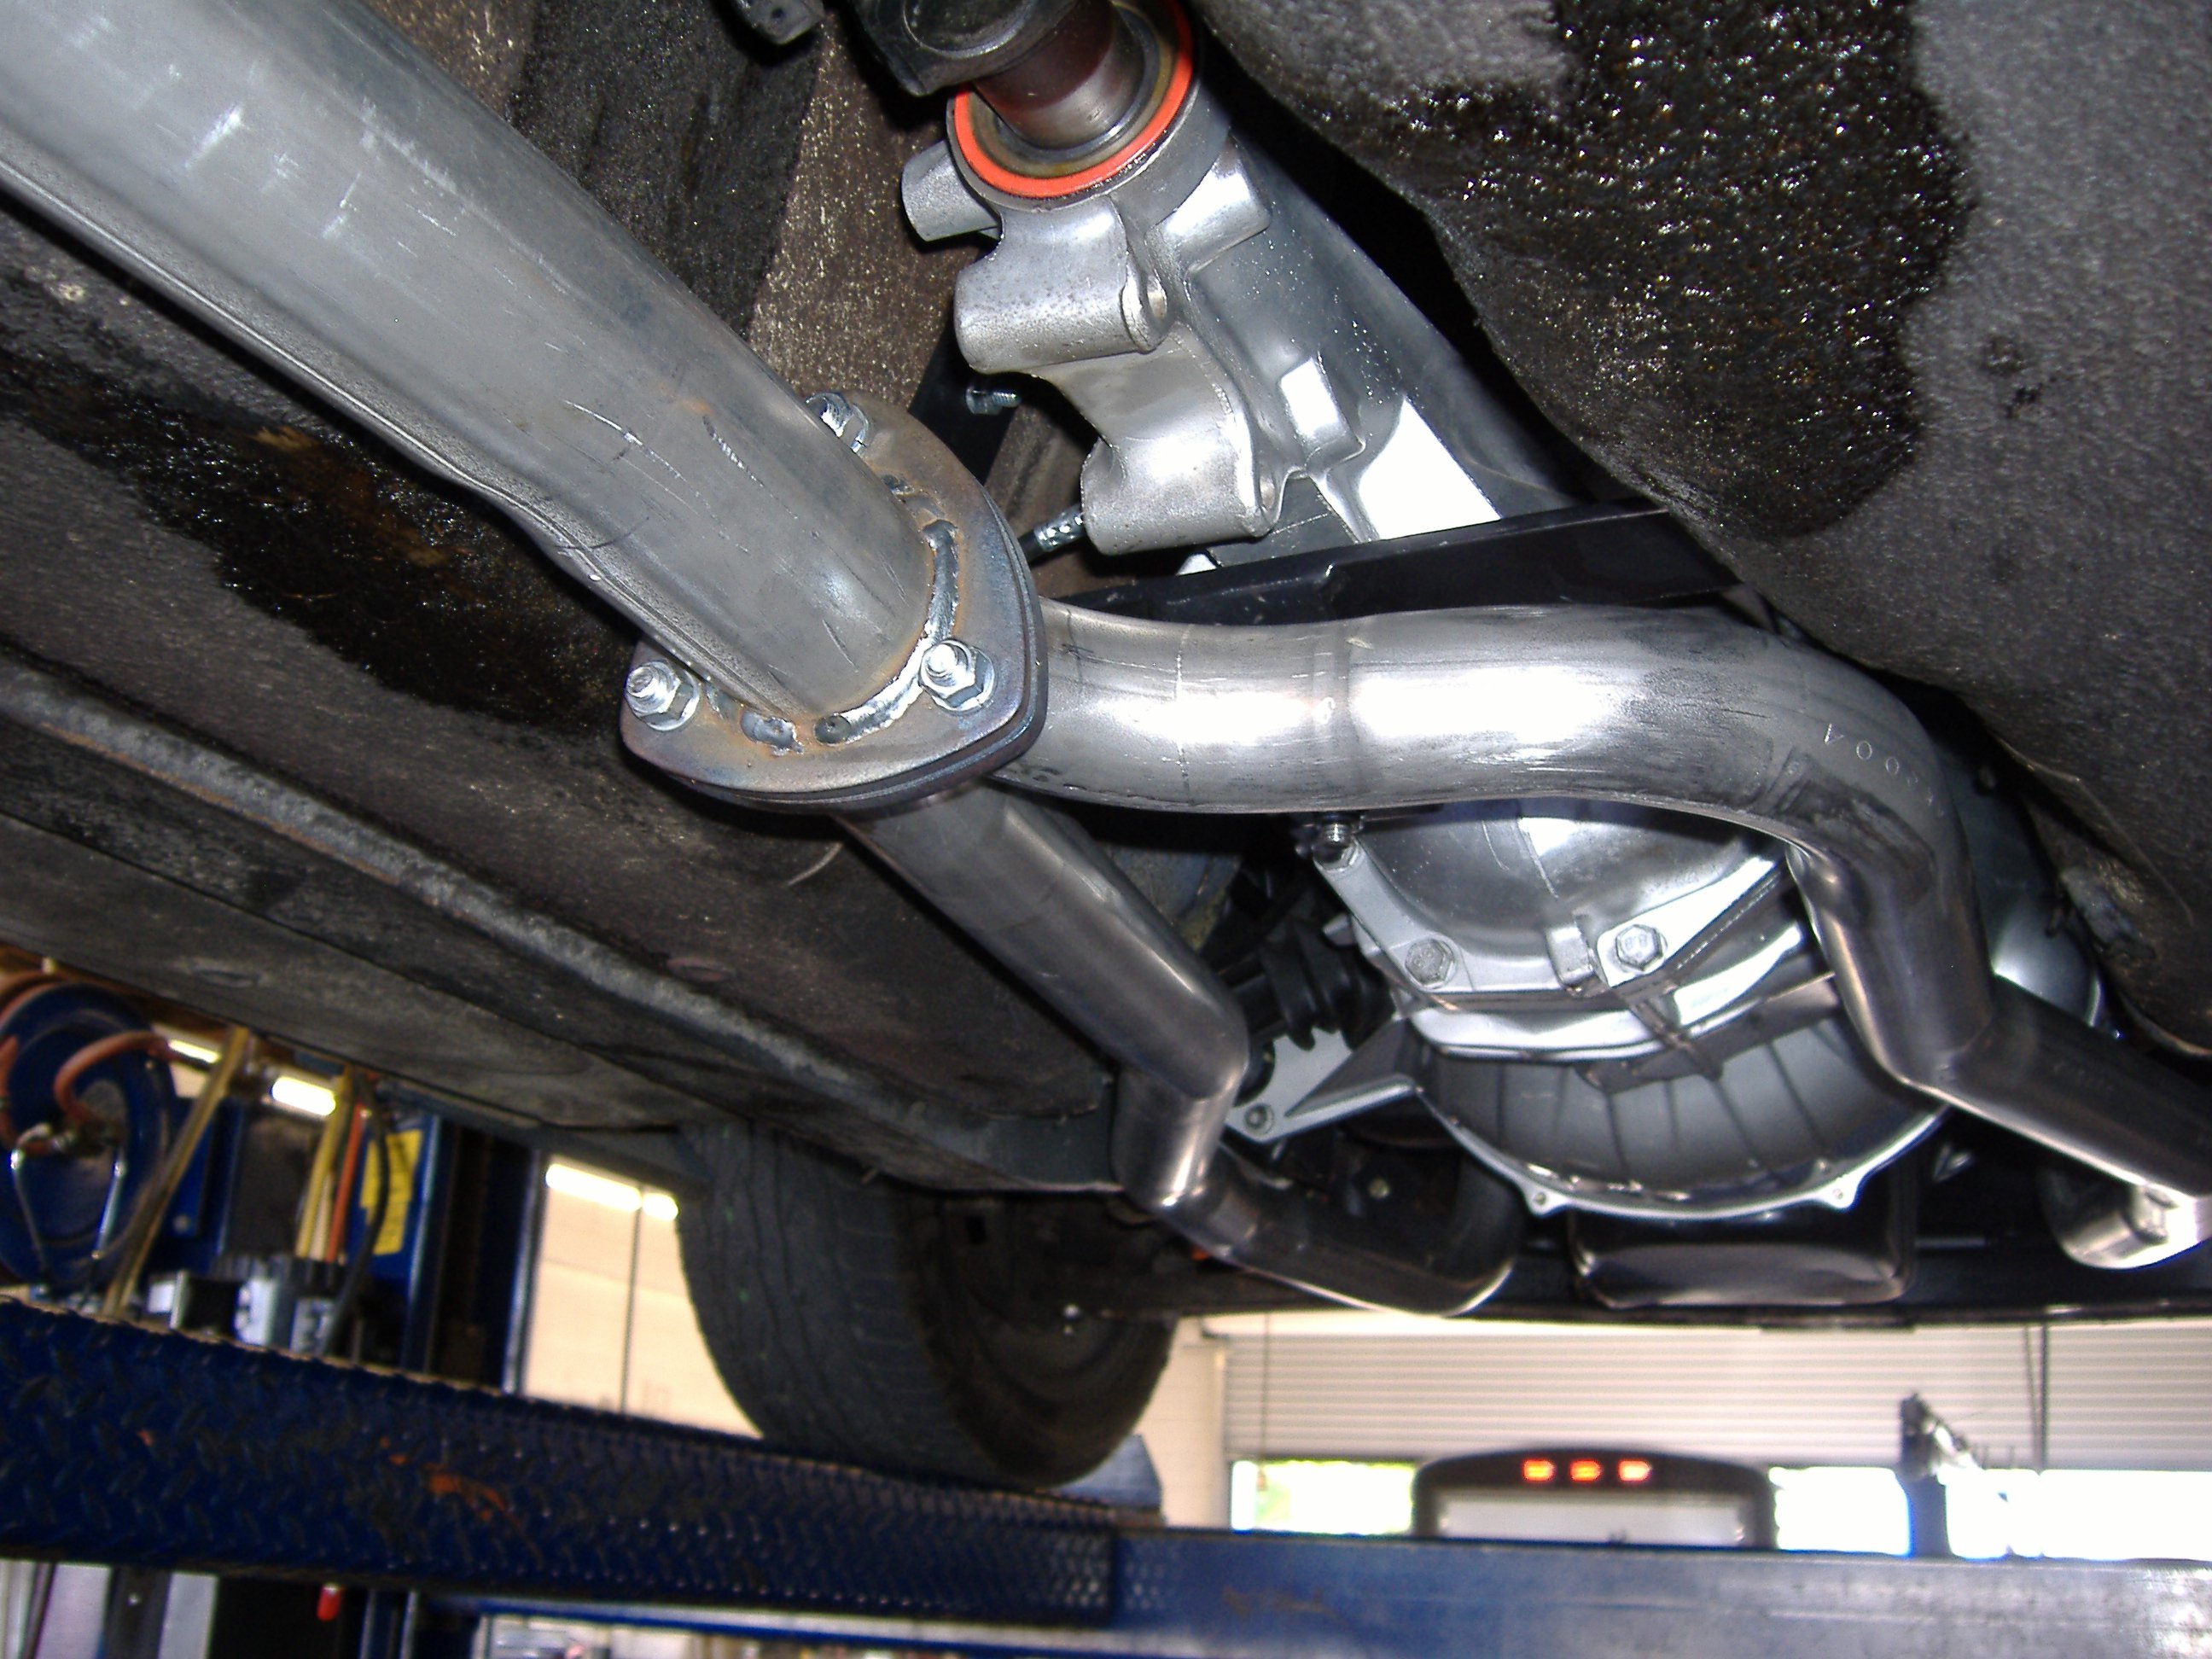
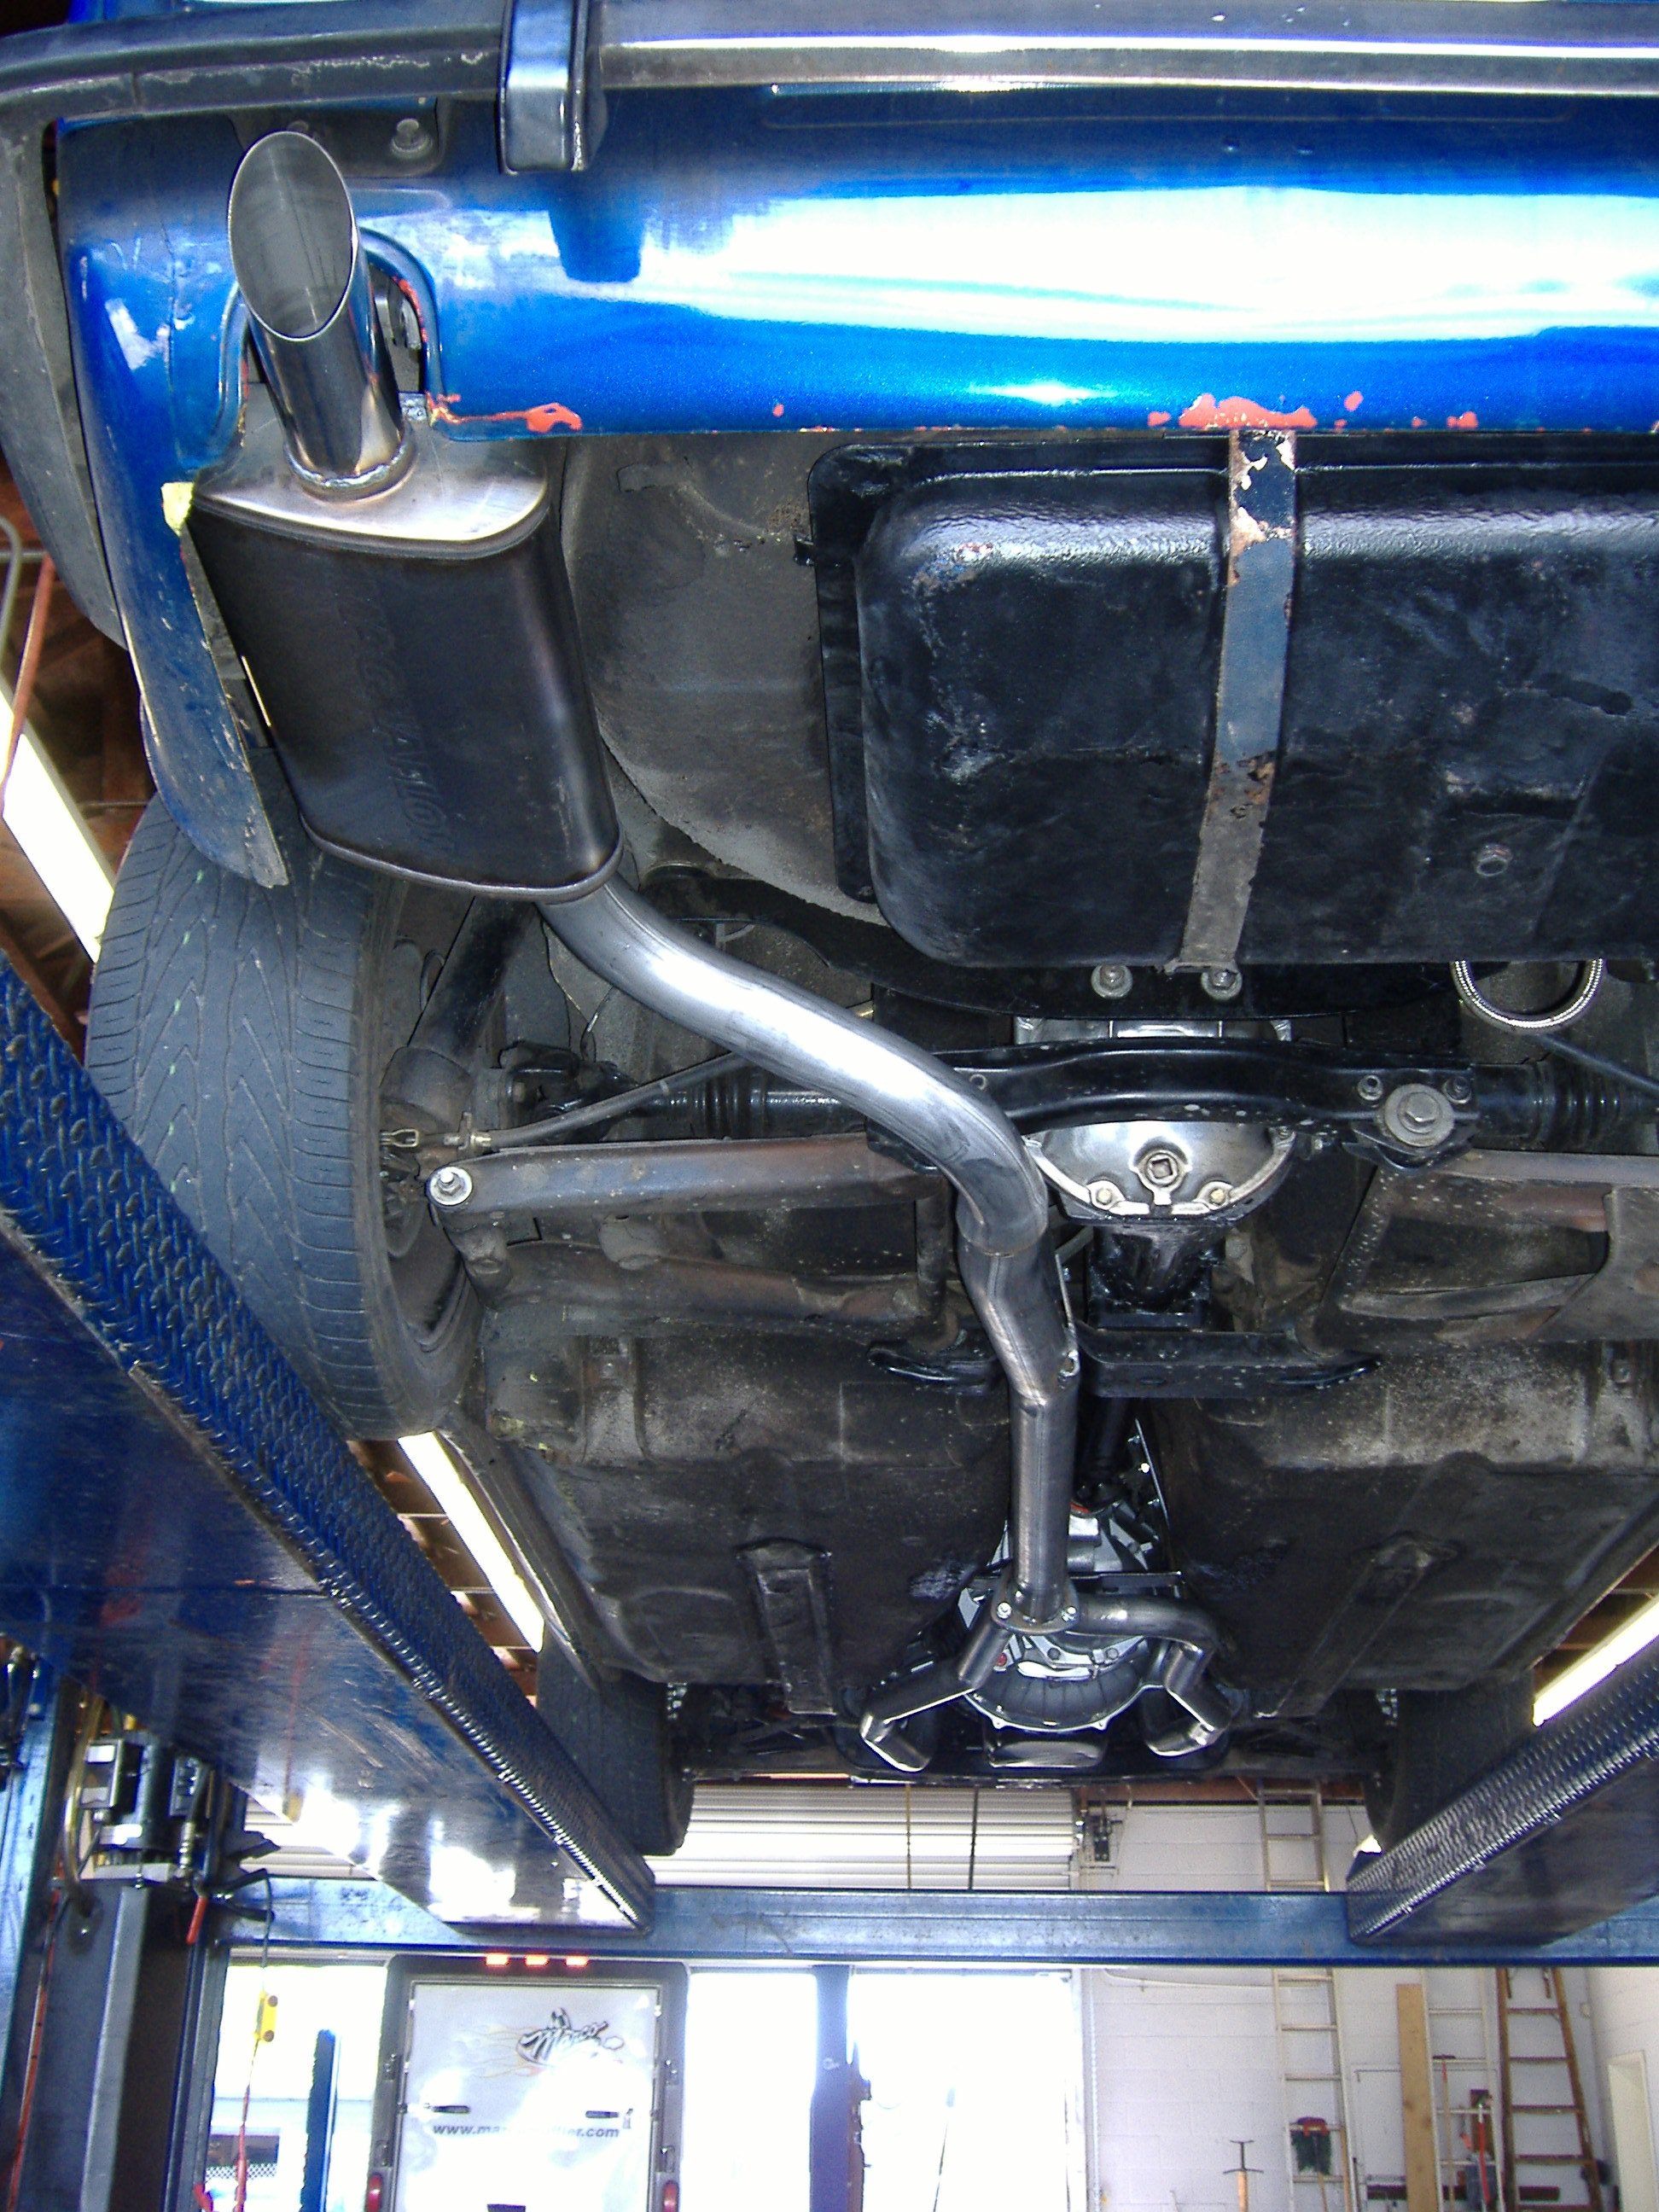
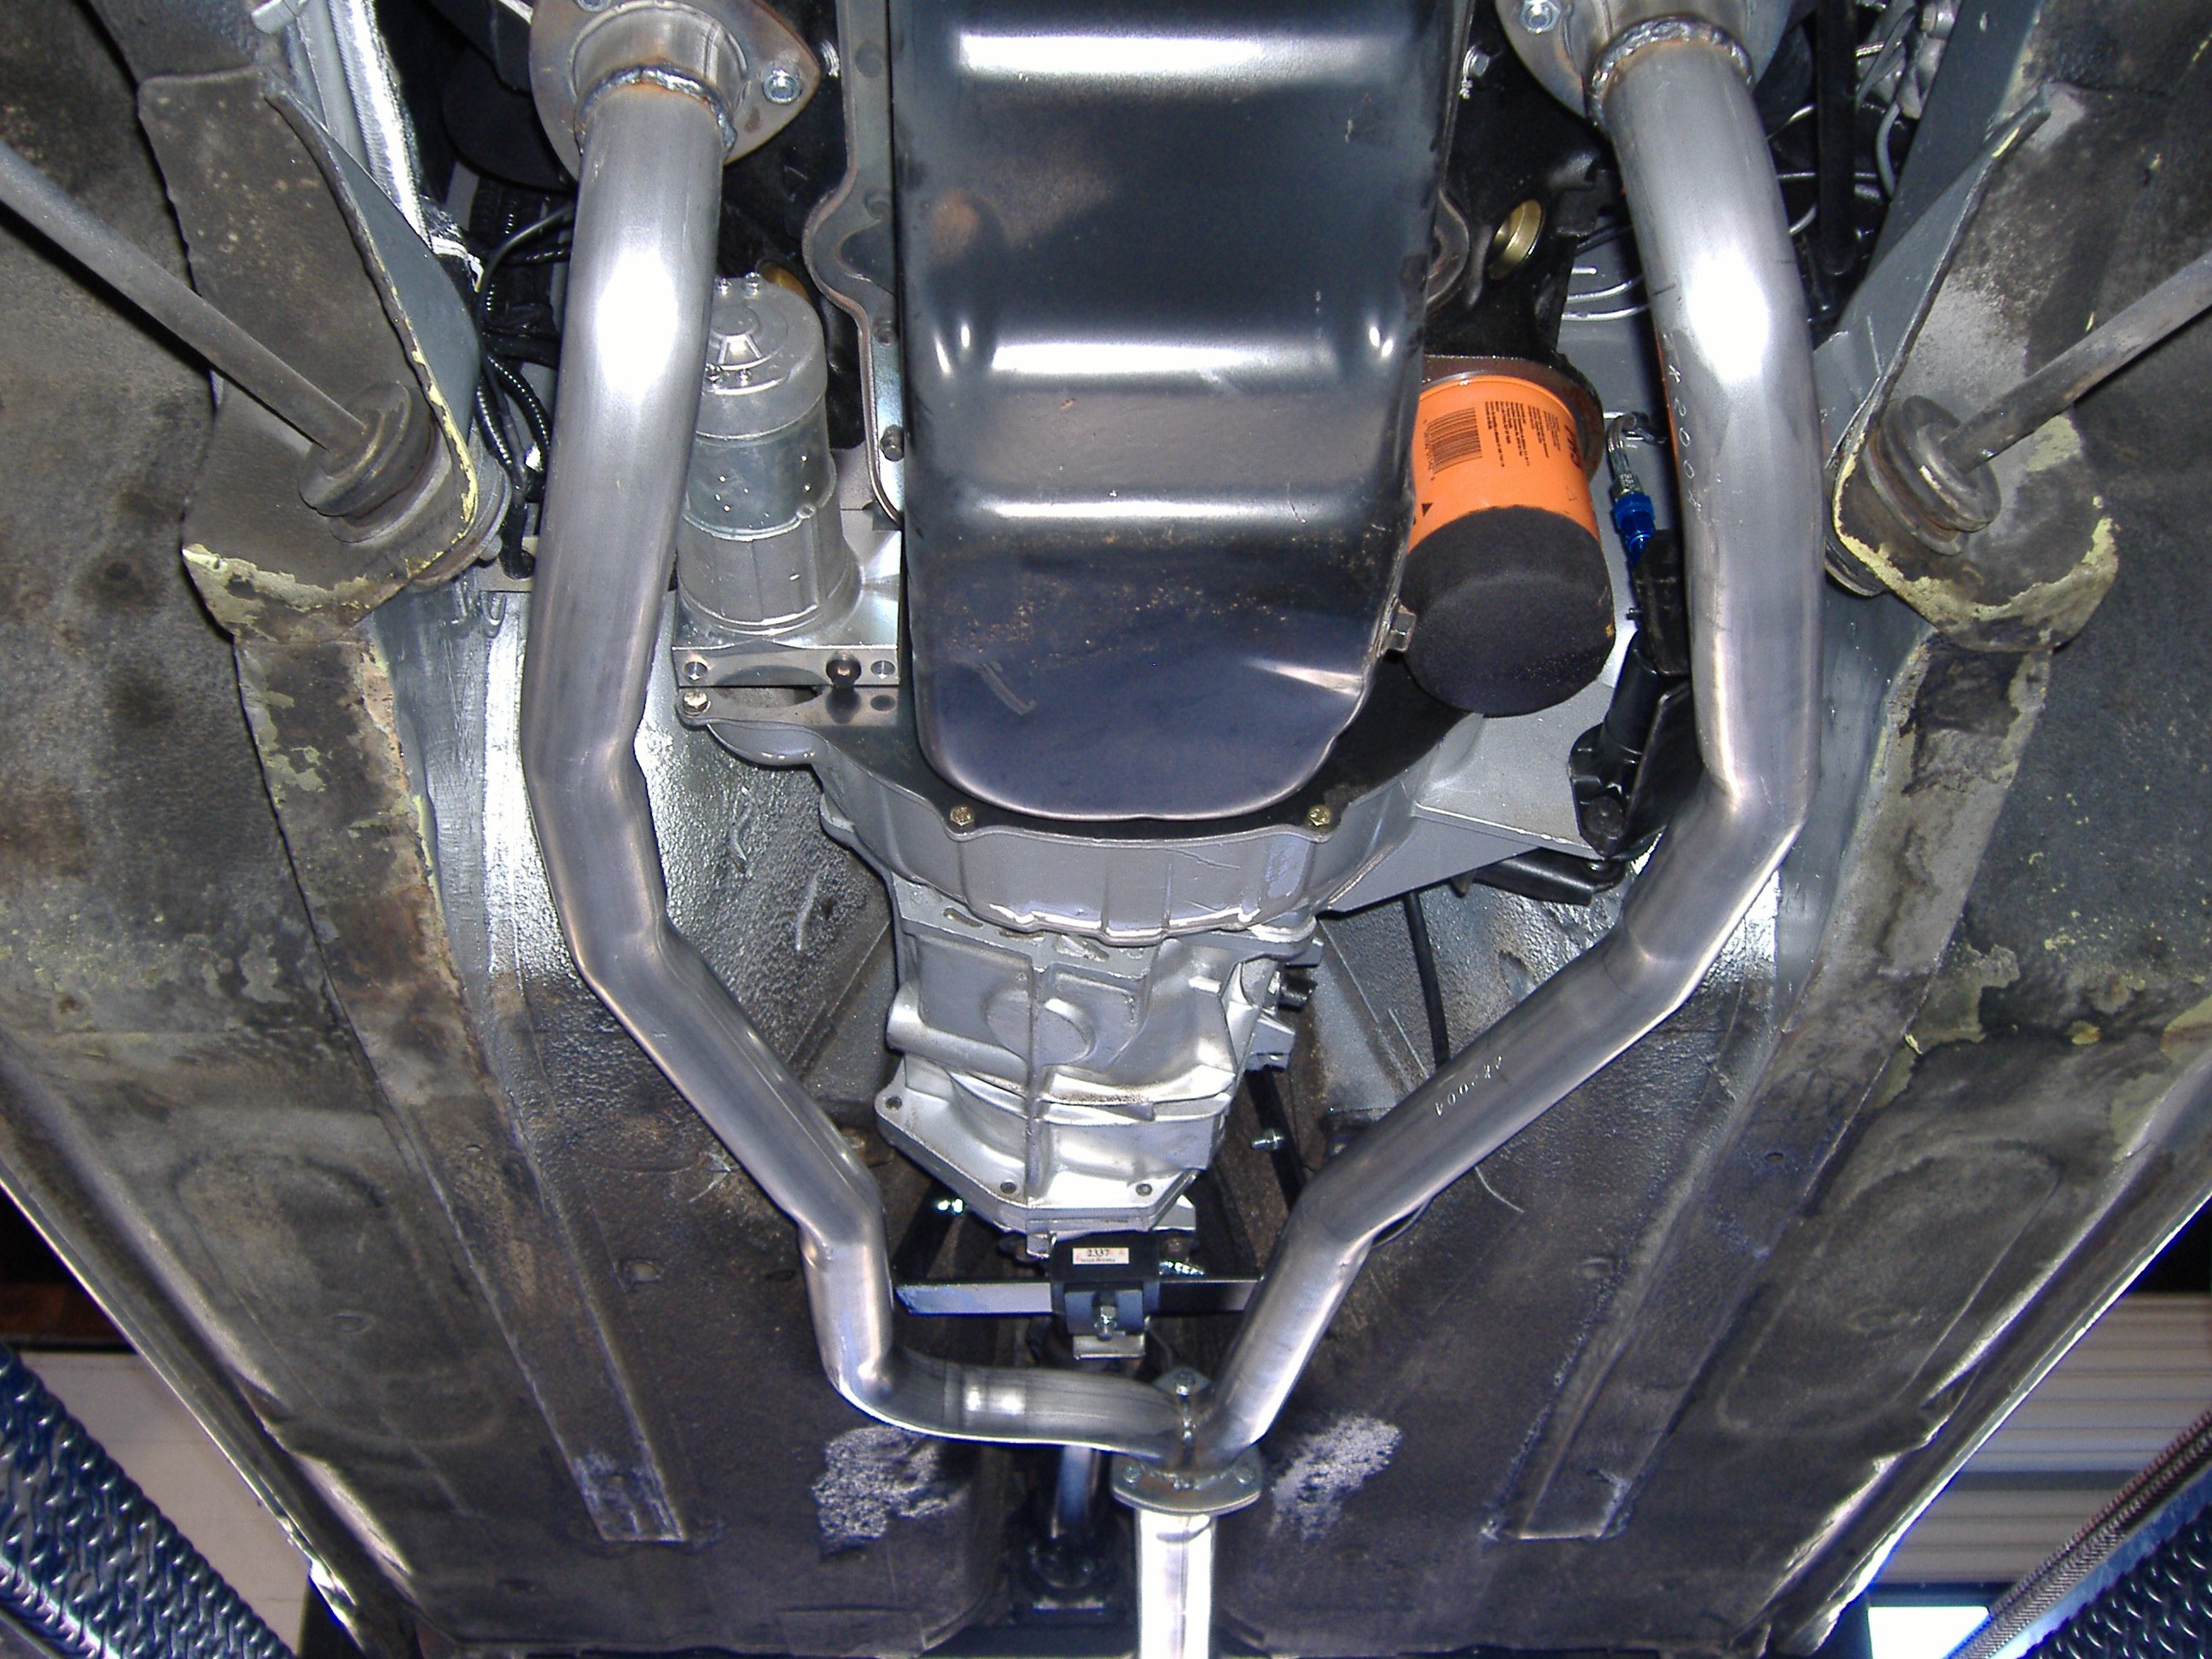
240Z SBC Hooker block hugger headers 2 1/2 in. exhaust Note clearances for oil filter, starter, clutch slave, transmission etc. Also, flange at end of transmission tail stock to allow access to driveshaft without complete removal of exhaust.

-
Search the drivetrain section for laser alignment tools developed by some Hybridz members. They consist of laser pointers modified with magnetic bases that are placed on the trans output shaft and the differential input shaft. Using two of them would give information about vertical and horizontal alignment of the driveshaft. search terms like "laser driveshaft" or "laser phasing" etc.
-
Some of the information in the JTR manual is a bit scattered in other sections. From my my Seventh Edition JTR manual: Installation page 8-2 "If you are using an automatic transmission, check for adequate clearance around the transmission. Also, make sure there is room to route the exhaust around the transmission. If there is going to be a problem, hammer the transmission tunnel to gain clearance." I read this 17 years ago when I was deciding to go T5 or 700r4 in my son's 240Z. We went T5. Can't believe I remembered this.
-
Which installation kit did you use? JTR, MSA, John's Cars etc. JTR recommends making a dent in the tunnel on the passenger side to make room for the 700r4 trans. If I recall correctly from the JTR manual, the JTR engine mounts offset the engine to the passenger side.
-
The following seems to apply here: The way that the hood and the urethane front fascia interface has created a hinge point. Also, once the car is on the road, vibration will cause the bondo and paint to crack along the seem. Possible solutions include: Stiffen the joint where the urethane front fascia and the hood interface by adding a doubler plate under the seem and Modify the support structure for the urethane front fascia such that hood and the urethane part move as a unit without flexing. Or leave as two separate parts with a seem showing as JMORTENSON suggested above. Best solution: Leave the seem showing
-
https://www.carpartsmanual.com/datsun/Z-1969-1978 Download the FSM here: http://www.xenonzcar.com/s30/fsm.html
-
 Welcome. Suggest that you search the FAQ and Suspension forums. All of the data you seek is there. Useful information: Download a Factory Service Manual (FSM). http://forums.hybridz.org/topic/48825-factory-manuals-some/?page=2&tab=comments#comment-1208329 Download electrical schematics for your car. PDFs are easier to read than those found in books. Some are in color. Focus on searching Hybridz as 99% of questions have already been addressed. Start bookmarking Z car parts suppliers - there are many! Join ClassicZCars.com website and search there as well. Become well informed about modifications before asking questions. People will be more inclined to answer informed questions. Search the forums. Useful Links: https://www.datsun-240z-upgrades.net/ Recommend the headlight relay harness http://zhome.com/ https://www.zcar.com/ http://www.classiczc...com/index.html/ http://www.zcarparts.com/ http://www.arizonazcar.com/ http://www.jagsthatrun.com/index.html
 -
1978 satay fuel problem cranks but wont start
Miles replied to Tito's topic in S30 Series - 240z, 260z, 280z
Procedure is in the FSM Useful information Download a Factory Service Manual (FSM). http://forums.hybridz.org/topic/48825-factory-manuals-some/?page=2&tab=comments#comment-1208329 Download electrical schematics for your car. PDFs are easier to read than those found in books. Some are in color. Buy the book How to Restore Your Datsun Z Car by Wick Humble. It will save you hours of searching for "how to" info. Focus on searching Hybridz as 99% of questions have already been addressed. Start bookmarking Z car parts suppliers - there are many! Remember these are 40 year old cars and will need restoration to be safe and drivable. Join ClassicZCars.com website and search there as well. Become well informed about modifications before asking questions. People will be more inclined to answer informed questions. Search the forums. Useful Links: https://www.datsun-240z-upgrades.net/ Recommend the headlight relay harness http://zhome.com/ https://www.zcar.com/ http://www.classiczc...com/index.html/ http://www.zcarparts.com/ http://www.arizonazcar.com/ http://www.jagsthatrun.com/index.html -
Brake booster/master cylinder options on a 73' 240z?
Miles replied to a topic in Brakes, Wheels, Suspension and Chassis
Bawfuls Toyota booster swap should be considered for a sticky. -
Typical failure point for stock stub axles. My stock axle snapped in the same location at 5 mph while pulling into traffic. So I replaced both axles with the 4340 axles torqued to 180 ft-lb. OK so far. Testing is the only way to know why the axle failed. One option would be to pull the other axle and have it X-Rayed. For the axle that failed, you could have it X-Rayed and lab tested for tensile strength, hardness and chemical composition. Joseph Siam would probably welcome test data to improve his product. Something he should be doing anyway. Attached picture shows typical stub axle failure.
-
jhm Reset gap to 0.045. Worked perfectly. Thanks
-
I'll reset the gap. Thanks