V8ZRACER260Z
-
Posts
211 -
Joined
-
Last visited
-
Days Won
1
Content Type
Profiles
Forums
Blogs
Events
Gallery
Downloads
Store
Everything posted by V8ZRACER260Z
-

What clutch should I use?
V8ZRACER260Z replied to Buckv8240's topic in Gen I & II Chevy V8 Tech Board
Yes the 11" will fit the stock bellhousing however you definately want to run a scattershield if you're planning a 500-600HP setup (Lakeland & McCleod both make them for your set up) . Safety first!! -
What clutch should I use?
V8ZRACER260Z replied to Buckv8240's topic in Gen I & II Chevy V8 Tech Board
I ran the centerforce D/F on mine for several years with close to 500 hp and had no problems. I have the 11" set up from Jegs with the billet flywheel also. I think it was around 500 incl the flywheel. -
That's a good feeling when all that hard work pays off! Post some pics or video soon. Those of us who are still working on ours live vicariously through those that have theirs running.
-
need help please battery acid over charging
V8ZRACER260Z replied to datsun 1/2 dozen SD's topic in Ignition and Electrical
They should I'm not familiar with that set up though. If you can get a wiring schematic for the year in question that should help. -
What valve springs should my friend use? He has a 302 with Vic Jr heads with 205 intake & 160 exhaust valve, his cam choice is a 670 lift solid roller by comp cams. this is for a Mustang bracket racer and he only drag races it.
-
need help please battery acid over charging
V8ZRACER260Z replied to datsun 1/2 dozen SD's topic in Ignition and Electrical
Your voltage regulator is malfunctioning or the sensed wire for the regulator is hooked up incorrectly. Put a voltmeter at the battery and it should read 11.5-12.5 volts this is standing voltage. Now start the car and at idle you should not see much diference. However increase the rpms to about 1500-200rpm and your voltage should rise to 12-14.5 volts depending on your battery condition. Idealy you should have a completely charged battery for this test (Charge it over night on a seperate battery charger if needed). Under no circumstances should the voltage go past 14.5-15.0 volts if it does you have a defective regulator or the sensing circuit is reading the wrong voltage. Most of the guys run a gm style 1 wire alternator for simplicty. This alternator is self exciting and self regulating and cheap! You can try testing and if needed replace your voltage regulator. My recomendation would be to go with a GM 1 wire set up and be done with it. -
What is this thing?! Electrical help
V8ZRACER260Z replied to Mauisnow13's topic in Ignition and Electrical
That is probably a starter relay which sends power to your starter solinoid. It is either defective or your battery voltage is low. Check your schematic to verify which relay this is. -
Whats one thing thats makes your Z different from the rest....
V8ZRACER260Z replied to a topic in Miscellaneous Tech
I am still trying to figure out what make mine different? Let me know if you see something? Car should be done in 2008. I need to post some updated pics soon too.
-
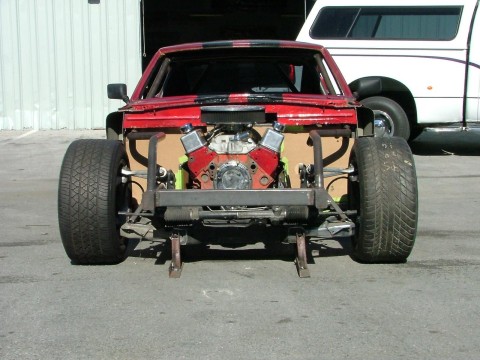
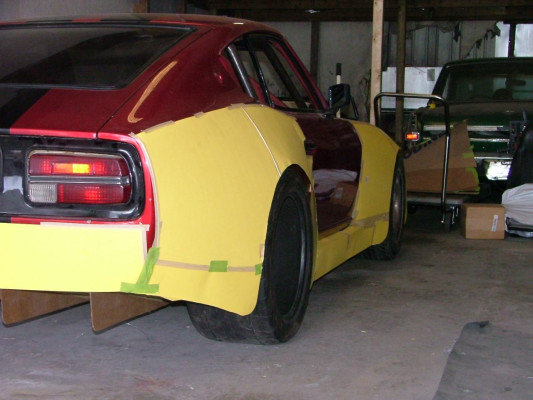
 Front view
 -
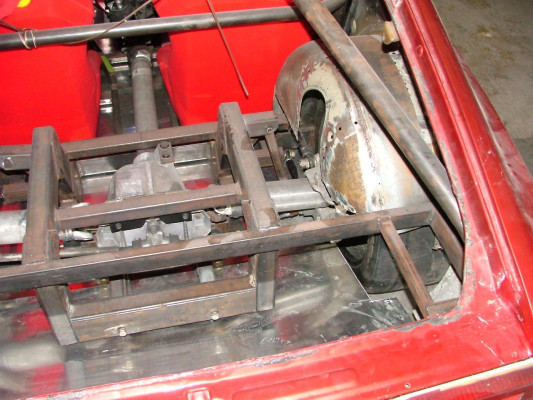
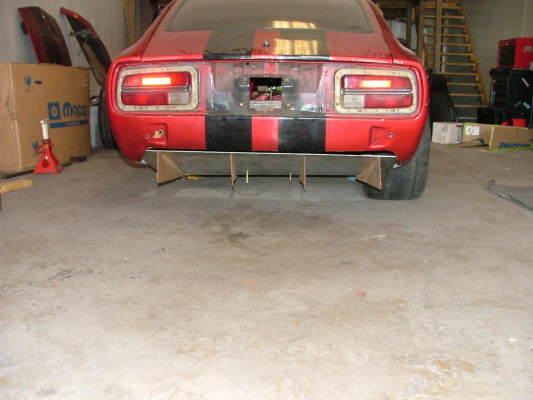
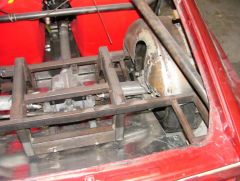 Rear Subframe
 -
-
That is not necesary just weld a tab to the harness bar facing down and wrap the harness around and bolt it on. Make sure you have good welds and use a grade 8 bolt or better to fasten it
-
It depends on the year of your 280Z The early (75-76) 208Z should fit the doors but they changed the doors on the 77-78 to a diferent setup. Usually the only differences are the push/pull lock in the upper corner are in different locations as are some of the door handle locations. As for the seats any seat from 1970-1978 should be a direct bolt in. Worst case you would have to swap the seat tracks out. Hope this helps. Rick
-
I was an avionics tech in Marines on F18's, so I've learned a thing or two about electrical systems. The painless wiring kits a very straight forward and the wires are labeled as to their circuits. I am in Gainesville Florida about 5 hours south of you. If you can get the car to me I can help you put one in over a day.
-
This indicates a high resistance not a dead short which would blow the fuse imediately. Sources of this can be numerous but use common sense. Go for the most likely first. Check your bulbs, the lead contacts on the back of the bulbs spread out over time and can short out. Then check the wiring on the back of the fuse box the culprit should show some discoloration or melting in extreme cases. Note the color code of the wire and locate a schematic to trace the circuit. If you can isolate the items on the circuit you can locate the source. Example if there is a junction point where several wires branch out, one by one eliminate the load (Bulb) and see if the problem goes away. If not this could be caused from a wire that has had its insulation worn away and is partialy contacting some rusted metal. This would explain why it is not a dead short. Let me know if I can help further. I was an Avionics tech in the Marines for 5 years electronics on a Z is simple to me.
-
I believe The "Y" in question is from a dry sump oil system. I'll do some research to find one.
-
Your welcome, Any questions you have on bodywork feel free to ask. as for coming down this week I think that is the plan. I have talked to Rich and he and I are game for it. I'll touch base with Bill and Phil too. Keep us updated on the progress.
-
Derek, First of all, great to see you working on the car! Panel bond is acceptable for repairs in these areas a few percautions should be followed though. First the metal must be absolutely clean no moisture, debris or rust. Second the temp must be in the range specified by the manufacture of the epoxy. This is usually between 65 to 80 degrees but some require higher temps and primers to be applied. With BMWs you have to heat the area with a torch or high temp heat gun and apply the primer while the metal is still hot. Then you let this dry and cool. After that you apply the adhesive and they rivit the panels together with special blind rivits. Also I noticed a couple holes near the bonded area, DO NOT weld these up as the heat will compromise the bond. Use panel bond to fill those as well, just dimple the hole with a body hammer first. Then finish as normal with filler.
-
Drive to the track, run a 9.70 on pump gas, drive home.
V8ZRACER260Z replied to ihatejoefitz's topic in Non Tech Board
Check out the 9.35 pass in car video! I wan't a ride!! -
I ran a Quartermaster Throwout bearing and I had to go with the larger Master cylinder to get the throw needed. NOTE make sure you do not over travel the Throwout bearing as it will rip the O rings in it. The Tilton may have a internal mechanical stop to prevent this, but the Quartermaster did not (Learned the hard way). I installed a mechanical stop on my pedel travel to prevent this. Also don't crank the car without the ground attached as the braide line to the Bearing do not like that, another learning curve by being impatient.
-
Sorry, I have been away front the forum for awhile and missed all the drama. Ernie aka RacerX was an excellent sorce of info. I personally will be sorry to se him go. I to would like to get hold of those responsible for loosing his valuable skills here. I have been a bodyman/painter for many years and have since moved into the management side. I had looked into replying to body questions in the past and always found RacerX's replies to be honest and straight forward. There really isn't an outdated way to do body work & paint. Some of the newer techniques are easier and/or faster but not necessarily better. If I can be of assistance to anyone on paint & autobody questions in his absense please let me know. I look forward to Ernies return one day when those responsible are no longer allowed to visit our family here!
-
If they are like my Autometer "Phantom" guages you can not take them apart.
-
Gas in tank, pump is running, no gas to Carb?
V8ZRACER260Z replied to BillZ260's topic in Fuel Delivery
I am assuming you are using an external fuel pump. Two things can cause this. First make sure the pump is wired correctly as revering the polarity of the wires will cause the pump to run backwards. Also make sure the pick up and disharge line are on the correct sides of the pump. This should fix your problem. If they are wired and connected propery, it is probably a defective pump Rick -
Vintage Big Block 240Z
V8ZRACER260Z replied to Georgia Flash's topic in Gen I & II Chevy V8 Tech Board
Now there is one for sale. Thanks for the post! I try to collect those old Z magazines. -
Here is a pic of mine. Of course with a full tube chassis I can have a flat bottom car with a smooth transition to the diffuser. I'm still working on the front air splitter. I have access to one from a Ford GT and Shelby GT Mustang as ideas to work of of. I will probably make my own design from Aluminum stock. Some of my parts could be adapted to a stock S30 platform though. I have a stock body also so I'll look into it. However without windtunnel or track tests it to deternine effectiveness who knows.