-
Posts
1384 -
Joined
-
Last visited
-
Days Won
12
Content Type
Profiles
Forums
Blogs
Events
Gallery
Downloads
Store
Everything posted by rossman
-
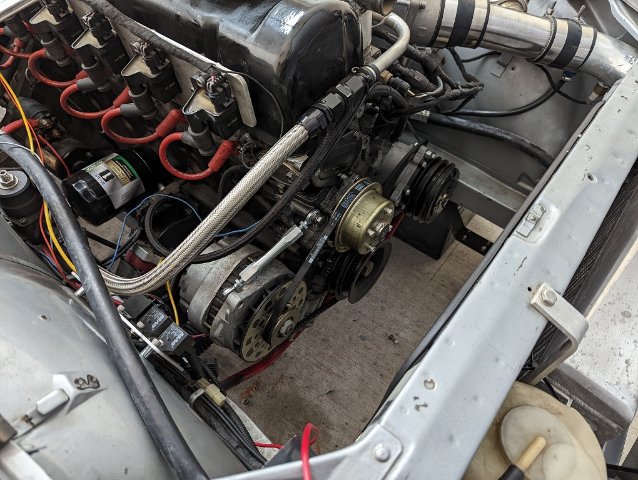
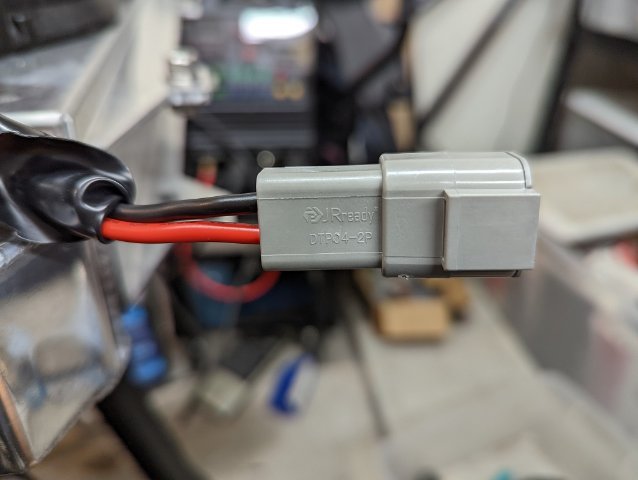
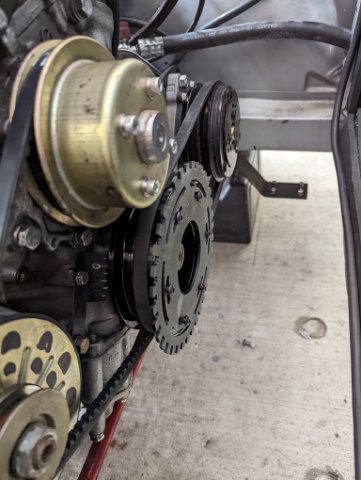
I've had some time off from work so I decided to make a few upgrades that I've been planning for quite some time. This champion radiator has been sitting on my shelf for years. The workmanship is pretty poor so I initially lost interest but recently decided to give it a shot after having some temperature creep while sitting in traffic. I think the main issue with the clutch fan setup was that it wasn't sealed up enough to pull enough air thru the radiator, but honestly the hacked up 280z plastic shroud I had in there was just plain ugly. So here is the shiny Champion radiator and shroud with twin 11" SPAL fans. I'm fairly confident this will do the trick. Also note that I've upped my wiring game with a JRready Deutsch DTP connector. I purchased a full set of JRready Deutsch DT and DTP connectors for when I eventually install a Haltech 750 (that has been sitting on the my for 1.5 years!) and rewire all the car. That's all future stuff... Here is the radiator, fans/shroud, connector, and sub-harness. Added a simple mount for the fan relay that also accommodates the headlight relays too. Here you can see the radiator removed and an upgraded alternator tensioning turnbuckle. It's much nicer than the crappy hardware store version that was previously installed. Unfortunately, the GM alternator bolt is an M10 and the turnbuckle is made for M8 on both ends. I'm still waiting on an M8 to M10 insert to make the conversion. It should be here Thursday. Oh, and some time ago I upgraded all the engine hoses to braided teflon line hoses to reduce fuel vapors. It was a noticeable improvement. Still need to do the tank side hoses. And while the radiator is out, might as well install the BHJ damper and trigger wheel. After reading some horror stories of ill fitting aftermarket dampers, I was pleased when this on fit it should - a light press fit. That's it for now. Next up will be finishing the radiator and fan install then making a trigger sensor mount. Cheers, Ross
-
If you're still having heat soak issues you might consider venting your hood or access panels. I temporarily removed the access panels on mine and the heat soak problems were minimized. I'll probably end up cutting vents in the hood even though I'm not crazy about the look.
-
If the scoring is light, I'd have the lobes polished by Isky. They did mine for a reasonable price. I used new oem rockers.
-
The car looks really good! Love the look of fat tires with stock, un-flared fenders. The chrome surround headlight covers are a nice touch too.
-
Re-routing the lines may help. All you can do is test it out. Regarding heat soak...You might consider a turbo blanket on your turbine. I wrapped my turbine, down-pipe, and fuel lines with the DEI stuff and it made a huge difference. A polished metal heat shield between your carbs and turbo and manifold will make a significant difference too. My heat shield is a piece of sheet metal with PSA backed aluminized thermal blanket bonded to the top, shiny side facing the intake manifold. It seems to work pretty well, although it gets dusty, reducing it's effectiveness. OEM heat shields are made from multiple layers of metal with the shiny side facing inwards and the edges crimped/welded to keep out dust/dirt/road grime.
-
How long after shutdown do you get the boiling sounds? It could be that pulling water from the already heated block coolant is causing it overheat. I attached my coolant line to the water pump inlet to avoid that situation. After shutdown hot water flows up to the thermosphere and siphons water from the coolest point in the system to cool the turbo. At least that's what happens in theory.
-
Mine definitely suffers from heat soak if I restart it between ~20 min and 40 min after warming up. It is common for most Z's and especially turbo'd versions. It's the reason Nissan incorporated a blower that fed cool(er) air over injectors on later model ZXs.
-
Yes, directly to the water pump inlet pipe that the lower radiator hose clamps to. I have braided hose that runs from that location under the oil pan and up to the turbo.
-
That is similar to how mine is routed. Bottom of thermostat housing > turbo inlet > turbo outlet > water pump inlet. I've never had any issues with it overheating. The arrows on either side of the turbo in that diagram are drawn backwards. Coolant flows into the turbo from the thermostat housing and out of the turbo to the heater hose then water pump inlet.
-
The Zcar Depot link looks like the right gasket. Its a composite graphite gasket. I've also used Permetex high temp RTV to seal it, where there was pitting around #1. If I were to guess, you either don't have a flat exhaust manifold or there isn't enough clamping force on it. I've never encountered the problem you're having but I would think the flanges should be close to the same height to get enough preload load into both.
-
The car sounds great! I bet you're excited to finally have it running. It takes discipline to not mash the throttle and send it to the redline! I look forward to that video but obviously best to have it tuned properly first.
-
No 280z came with carbs, at least not in the US that I have ever seen or heard of.
-
Yah, last I checked the AMSOil I use was like $13 a quart, yikes! You should run an oil temp gage if you're not already. From what I've read and my experience, an oil cooler isn't needed, especially if you're using a good ester based synthetic oil that can handle 300F without significant degradation.
-
Same setup on my Rebello built engine. He advised that I run a high volume oil pump. I also have an 8 qt oil pan. The oil temp has yet to get above ~200F.
-

Ford Super 8.8 irs swap thread. Rear brakes too
rossman replied to Invincibleextremes's topic in Drivetrain
It certainly looks beefy and you can't argue with results! I'm curious what moving the strut back does for you?- 280 replies
-
- disc brakes
- suspension
-
(and 7 more)
Tagged with:
-
I don't think so but I'll look to see if I have something from back when I had it out previously. It's been like 12 years since I purchased it. I normally buy bearings and such parts from Nissan or an OEM manufacturer but I don't know for sure. The "teeth" are little radial ridges that are 1 to 2mm tall. It's like they are there to fit in between the pp diaphragm tangs. And, like I said I had NO noises or problems previously. So, something changed and I cannot figure out what that might be.
-
Also, I don't know what measurements you're referring to. The tob collar is tall enough to ensure there is enough stroke in the fork to disengage the clutch. I could add a longer slave push rod but all that does is push the slave piston further into it's cylinder.
-
I haven't tried bleeding the system yet. It's worth a shot however the clutch feels normal and fully disengages so I doubt that's the problem. I think there is always supposed to be light pressure on the bearing. Here is a video of it with me pushing on the fork. https://youtu.be/gYbVYxasK00 I'm putting ~5 lbs or so on the fork to make it stop.
-
This past weekend my son and I finally got around to installing my brand new from Nissan, z32tt gearbox in my 72 S30. It previously had a z32 (non tt) gearbox that I picked up off Ebay in used/unknown condition. It turns out that 1 > 2 and 4 > 5 synchros were pretty worn from day one, but it worked and I've lived with it until now. After installation, the throw-out bearing started making a grinding noise, for lack of a better term. The noise was always there except when pressure is put on the clutch fork/throw-out bearing, i.e. when the clutch pedal was pressed or even with just light, direct pressure on the fork. I got under the car with the engine running and pushed on the fork with with my pinky and it stopped making noise. The bearing and collar are the exact same ones that were removed from the the z32nt gearbox that was replaced, and not making any grinding noise. Comparing the bearing that's making noise to the bearing that came with the new gearbox, the noisy bearing has "teeth" on it's face and the new bearing is smooth. I believe it's these teeth that are making the noise as they lightly contact the pressure plate diaphragm tangs. I "fixed" the noise by simply adjusting the clutch pedal stop until it applied just enough pressure to engage the throw-out bearing. This seems like a band-aid solution that may cause the bearing and maybe the clutch to wear out quickly. I've put a few miles on the new setup and it seems to perform normally, and the new gearbox shifts buttery smooth. Anyway, any thought on what could be causing this? The other obvious solution might be to swap out the bearing with the smooth one but I was in no mood at the time to pull the gearbox again after spending a whole afternoon installing it.
-

A musician's therapist (The $300 Z)
rossman replied to Zetsaz's topic in S30 Series - 240z, 260z, 280z
What a mess! I'm glad it turned out simple and non-catastrophic for you. I've purchased a screw set my steering column cover from Zcar Depot. Turned out one of the screws was the wrong diameter and it ended up cracking the formally perfect, 50 year old plastic. I was not a happy camper. Was the oil actually spraying out the valve cover or were you just referring the the oil pump leak? -

A musician's therapist (The $300 Z)
rossman replied to Zetsaz's topic in S30 Series - 240z, 260z, 280z
Congrats! -

240z SCCA vintage race car, restoration
rossman replied to AydinZ71's topic in S30 Series - 240z, 260z, 280z
In my experience, the metal will rust under the filler if you don't first seal the metal with epoxy paint. This exact situation was occurring with the hood I'm restoring on my build page - rusty metal under the filler. Is it a real problem? I don't know for sure. There was no sign of rust from the outside...but it was definitely there, and the reason I prefer to put epoxy down first, then filler. -
Oh, for sure. I have way more hours in this hood than it's worth. You can buy full replacement metal hoods for like $600 last I checked. I actually enjoyed the work in a weird kind of way, so let's just call it "a labor of love..."
-
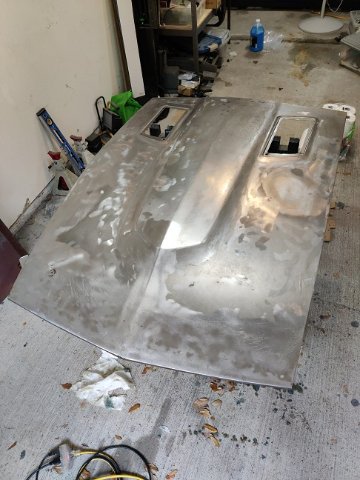
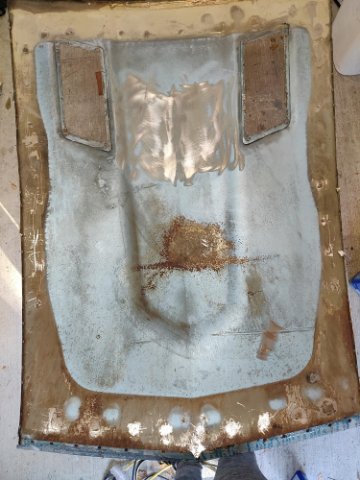
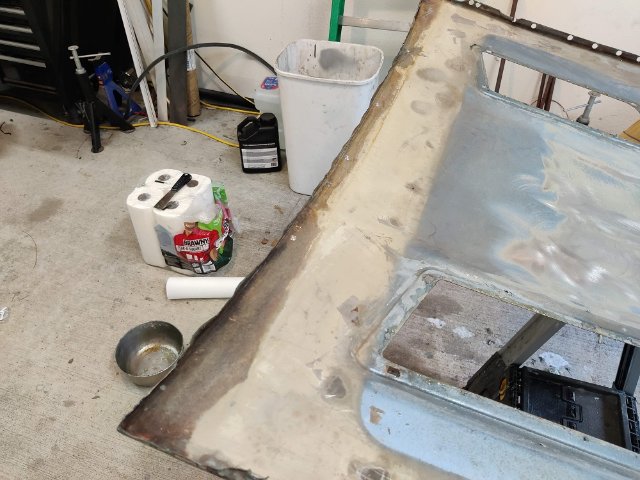
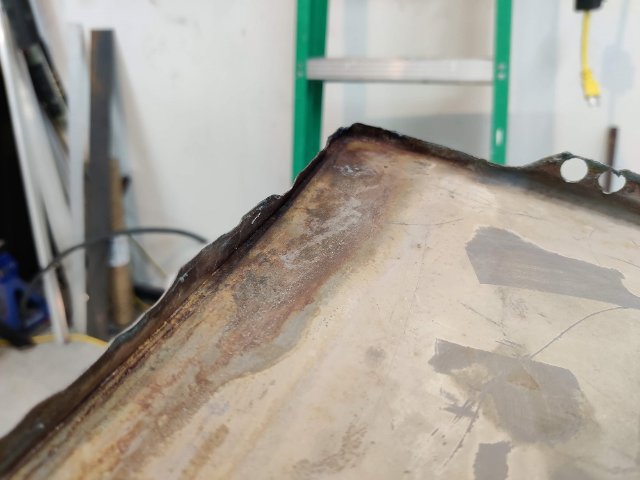
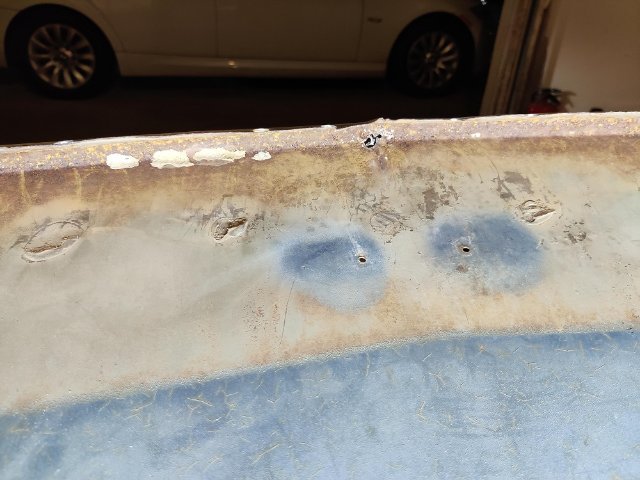
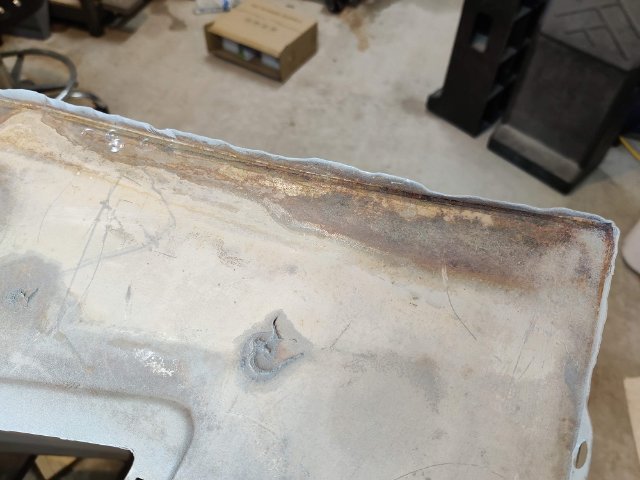
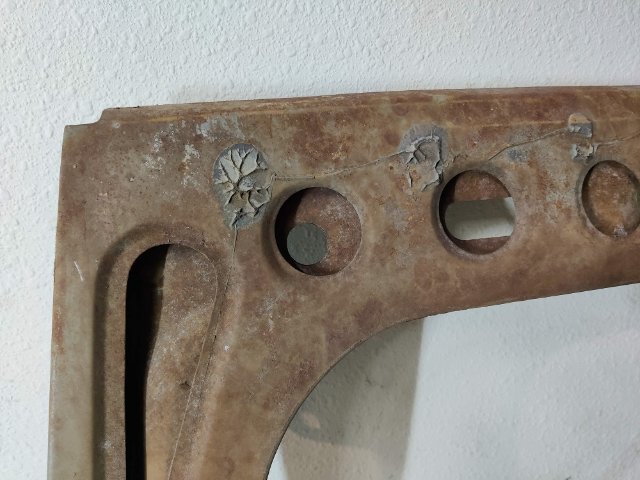
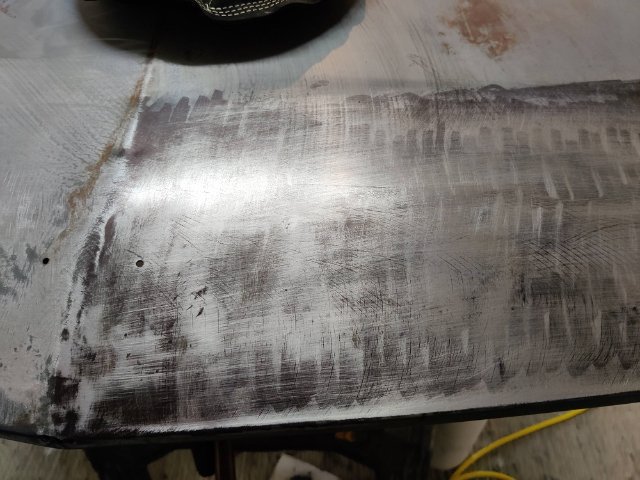
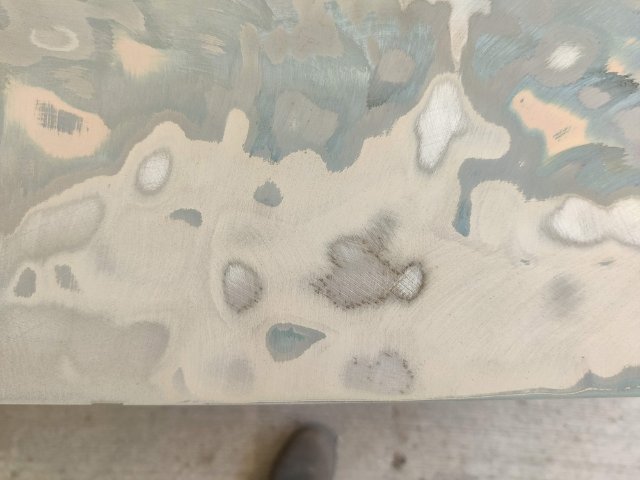
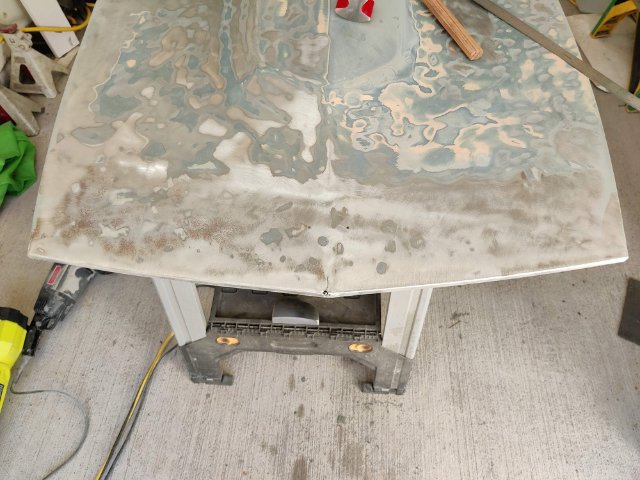
Been doing some work on the Z since my last series of posts but have been too lazy to post. So here is a catch-up post. I have more that I will post later. Many years ago I picked up a 77 280z that I stripped for parts due to a bent front end. It had rust in the usual spots, probably much more than I could actually see too. I saved the hood and hatch since they seemed in good shape neither one appeared to have any rust or damage. To my surprise the front 8 inches or so of the hood had been badly damaged and poorly repaired with lots body filler. I didn't get any pictures of it pre-paint removal but it looked pretty good for it's age. I assumed it just needed a strip and new coat of paint. This picture is after going at it with a 7" 3M stip-it disk for almost an hour. My garage was covered with filler dust. This was just after stripping most of the paint and filler off. Note all the dents, ripples, and holes in the hood. In hind sight, the damage is not surprising since it came off a car that had a bent front end. Duh. Anyway, I decided to fix it right in order to hone my skills for the body damage that I'm sure is lurking under the paint on my 240z. Anyway, so I decided to go deep and remove the hood skin so I could get to the back side of the panel and beat out all the dents. After about 4 or 5 hours of drilling out spot welds, slicing thru hidden panel adhesive, prying, cussing and almost giving up...it finally came off. Surprise, surprise, surprise!...hidden rust. Luckily most of this was just surface rust that easily comes off with metal prep (phosphoric acid), Ospho, etc. Makes you wonder what's lurking inside of those frame rails, doesn't it? Underside of the hood skin at the front where the badge is attached. It's hard to see but it's pretty mangled in this area. This is the hidden side of the hood frame. Note that there is very little to no primer that has since rusted over the years. Underside of the hood skin. I started with the intention to strip all the paint and filler off with a 3M strip-it disk. After getting most of the thick stuff off with the disk, I switched to paint stripper to avoid thinning out the already thin metal. I started beating out dents with a hammer and dolly and was getting no where fast. While I was intent on getting the metal straight, I started looking for other options. I finally landed on Wray Schelin's video's on YouTube. The guy is a master body restorer. I ended up buying his shrinking disks and a couple of beating bags. They were fairly expensive but made well. You'll have to watch his videos to understand what I'm doing here. The black "paint" is actually Sharpie marker that's used to see low spots, sort of like guide coat. The shrinking disks worked like magic. After 3 or 4 iterations of shrinking, cooling, beating, almost all of the dents are gone. It's not perfect but will only need a light skim coat of filler to get it there. That's how it sits now, still unpainted an gathering surface rust. I'm thinking of dipping the rusty frame but that is a job and post for another day.




.jpg.c16fecb9059501df0ff0717e9650c912.jpg)
