Pharaohabq
-
Posts
1959 -
Joined
-
Last visited
-
Days Won
5
Content Type
Profiles
Forums
Blogs
Events
Gallery
Downloads
Store
Everything posted by Pharaohabq
-
Need help with "Restoration Plan"
Pharaohabq replied to rome03's topic in S30 Series - 240z, 260z, 280z
Read through the Paint and body section of this site, it's going to tell you a lot about paint and sealing the car. The fender cuts for the flares should be welded so certainly you want to do that BEFORE you paint the car. As for what to coat the insides of things with, I've always used Por15 or Rust bullet, both work really well and bond to and stop any rust that's already there. But that's just a suggestion. It is YOUR car and in the end all decisions are yours, it's up to you to educate yourself enough to make informed logical decisions. -
Cool, Well depending on where it's coming from, First thing you should do REGARDLESS OF THE PAINT CONDITION is throw a coat of wax on it, because in coastal areas original paint will not keep salt air out of the pores and the metal underneath from rusting. That then get it on a lift with a couple cans of undercoating and touch up everywhere you can see needing some. This way your body should stay in it's as purchased condition until you can get your swap underway. in doing both these operations, you'll also be going over the whole car so you can note anywhere there's dings and rust spots. As for how to do the swap, well there's a ton of threads on it. But you might dish out the cash to McKinney (not cheap) and get the RB mounting kit. it'll save you a lot of headache over building your own. There's a ton of info on suspensions, brake swaps and every other part you can figure to upgrade so, congrats on the car. I hope you'll keep posting pictures. We love pictures. We are happy to answer any questions you can't find an answer for. I highly recommend downloading the FSM and EFI bible, and also the manual for whatever RB donor you're getting. Looking forward to seeing it. Congrats!
-
Yeah I would have expected you to have had the head surfaced and ground valves while it was off the first time. Hope you're not re using head bolts either? Did you torque them properly ?.
-
Yeah, that's a good idea though printing clear is still hard to do. PLA can do some clear but it's water soluble. I did make a replacement light cover for my D21 hardbody truck.worked well in white ABS plastic. I could try to make a new light Lense, do you need one?
-
Progress on my insane VQ35HR 240Z project
Pharaohabq replied to markrolston@mac.com's topic in Nissan V6 Forum
Awe! I saw Mark posted and was hoping for more car Pron. No luck this time. I know you're busy Mark, Keep up the good work and I hope to hear a first start video soon... -
So yesterday I was on my way home and my ABS light came on. This was disconcerting since it's NEVER come on before, not in the 17 years I've had the car. So I was looking into the symptoms and aside from the light, there's a hum of a motor coming from the back right rear of the car. Shutting off the car clears the ABS light temporarily, but it comes back on after a few minutes even at idle. I checked the ABS fuse and it's good, I pulled the fuse and the hum continues. I do still have brakes so that's good, but the motor noise continues even with the key off and out of the ignition. I was worried I'd run the batter down so I got a wrench and disconnected the negative cable. Today I read around a bit and it seems this is a fairly common issue we'll see more of. The ABS relay apparently can get old and get stuck. Tonight I will open the panel and rap on the relay then reconnect the power and see if the ABS pump still is humming. If so I'll pull the relay and it should from all accounts stop. If that's the case I'll order the $50 relay and be done with it. If a new relay doesn't fix the issue then it could be the wheel sensors or some other part. I'll have to break out the FSM to see how it's tested. Failing that it's a dealer diagnosis. I'd much rather do it myself than pay someone to guess at the issue. There are some savvy Z32 mechanics around, but even at Nissan, the newer mechanics have barely touched these older Z cars. I'll let you guys know what I find out and hopefully snap some pictures in the process. Phar
-
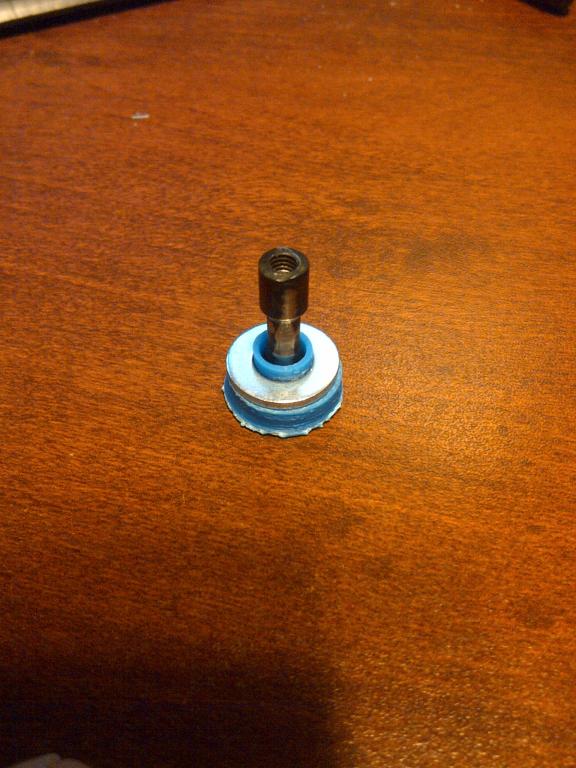
I had a bit of a redesign with this having to bevel the inside of the 5/16" washer. doing that allowed me to move the washer closer to the ball on the pin and allow the washer and ABS plastic to fit within the 7mm height of the track. I also had to eliminate the outside ring as the diameter was a bit too wide. This fits very well though I rounded the edges on the bottom of the metal pin just to be sure it won't bend and dig into the track. Grease was a definite need since this is a metal washer sliding in a metal track. I could have left it with just the ABS plastic, but plastic would eventually break again. The metal washer should last the life of the car.

-
no power to fuel pump and butchered harness
Pharaohabq replied to bahelion89's topic in S30 Series - 240z, 260z, 280z
The Toggle around the radio is probably a manual switch someone put in the raise and lower the power antenna. The mess of wires over the tranny I believe are for the Auto transmission. I'm not certain about that, but they're not connected to anything, so just tape them up and forget about them UNLESS, you really feel like tracing wires with the FSM. The Fuel pump gets momentary power at startup, but needs the switch in the AFM to be open to keep running. This is detailed in the FSM. You should also read the EFI bible. Both will help you immensely. The links are on here if you search. -
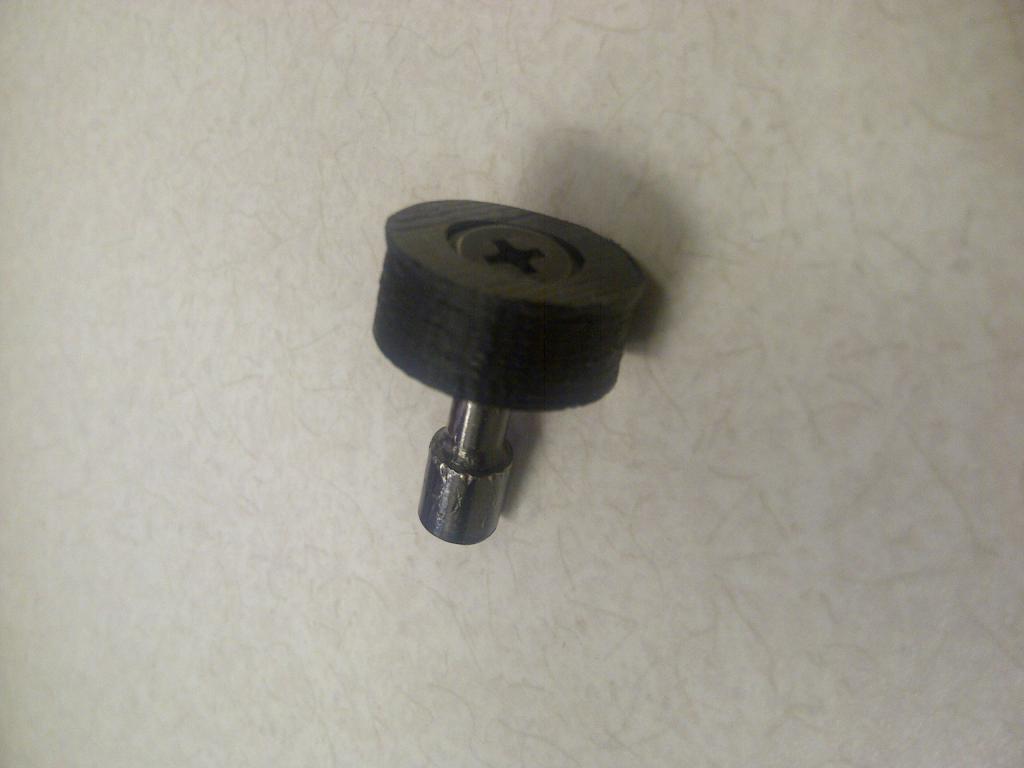
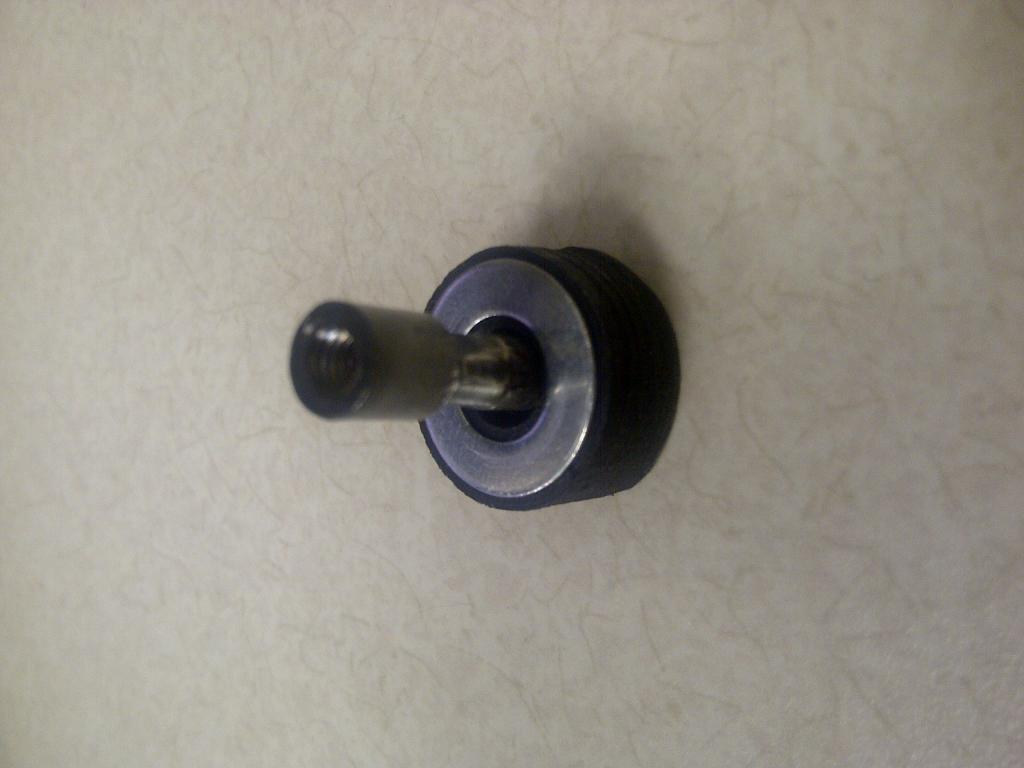
Here's a pict of the refab'd z32 window slider. Pardon the base, I hadn't filed off the extra plastic yet when I took this picture. This one fit very well and the window slide up and down smoothly, Grease is a needed thing since this is metal sliding on metal. Phar
-
Well Every swap has it's issues. but as for swapping from Auto to manual, it's EASY. Nothing in the auto tranny is going to keep you from putting in a 5 speed. Though you may have to change the speedo Gearing so it'll ready correctly.
-
Okay I attempted to put in the remade window slider pin this afternoon. Unfortunately I had to mod it a bit for fit. Turns out there's only about 7mm of space in the track. That means the washer on top has to have .5mm of plastic to hold it in in it's standard configuration. that's not really going to work. So the easiest method is to bevel the inside of the washer to about 45 degrees, this will allow for nearly 1.5 mm of plastic between the pin and the washer itself. The stock plastic roller is 17mm wide, which is 1mm wider than the washer, so the outter rim will have to go, we will rely on a tight fit center ring and glue to hold the washer to the slider. The new part fit within the original dimensions, but the back side with the Phillips slot will need to be filed on the edges to prevent any binding, as that could break the window glass. If anyone is interested in this, I'll post more. Now back to the S30, I was looking at the 240Z hatch dovetails. The metal really isn't bad on mine, I kind of don't think these often go bad. though I did note my drains on my series I hatch are missing, I'm going to have to find one and make a prototype of it so I can replace the missing ones I have. I could make something that would functionally be the same but I'd like to see the originals just to be certain I know what I'm trying to make. The little grilles over the drains are easy, I'll make those soon, and probably have them printed in stainless steel.
-
Out here in the SW there's a ton of cars around, w/ little rust for usually around $1000. Check craigslist/ebay etc. Ask for pictures and a ride from the airport, then get a shipper.
-
Ideas on how to fix hood hinge area?
Pharaohabq replied to s14kouki10's topic in S30 Series - 240z, 260z, 280z
If it was me i'd be looking for a donor body to cut out those panels from. Then a welder could cut and put them up on your car no problem.. -
I believe the 260Z tanks were all similar to the 240Z in the shape, since they fit under the tirewell which fit a full sized spare. the 280Z uses a doughnut spare so the tank can be a different size I don't know about what size the nipples on the 260 tank would be. but likely you can fit a 280Z tank in there no problem. it may just fit slightly differently. 260Z's were only made for 1 year, thus their scarcity. There's a guy w/ a Z junkyard here in Albuquerque, who might have a 260Z tank if you can't find one anywhere else. PM for the info.
-
You don't need MS, but it's a lot easier to manage the engine with it. You'll need a MAP sensor, TPS, CAS and the O2 sensor for megasquirt. Try not to be afraid of it. yes there's a lot to it, but it's a much newer EFI system than the L28's Bosch system. The ZX Turbo engines can be run using a turbo ECU, harness and AFM, but that's a lot of old stuff to swap in. DIY has everything you need including the harness. You can buy it preassembles if you're not up for soldering it together. it's not bad, everything is labelled. Pretty easy. The tunes you can just download based on the settings you want to use. Search Megasquirt on here for a ton of Z related threads on it w/ pictures etc..
-
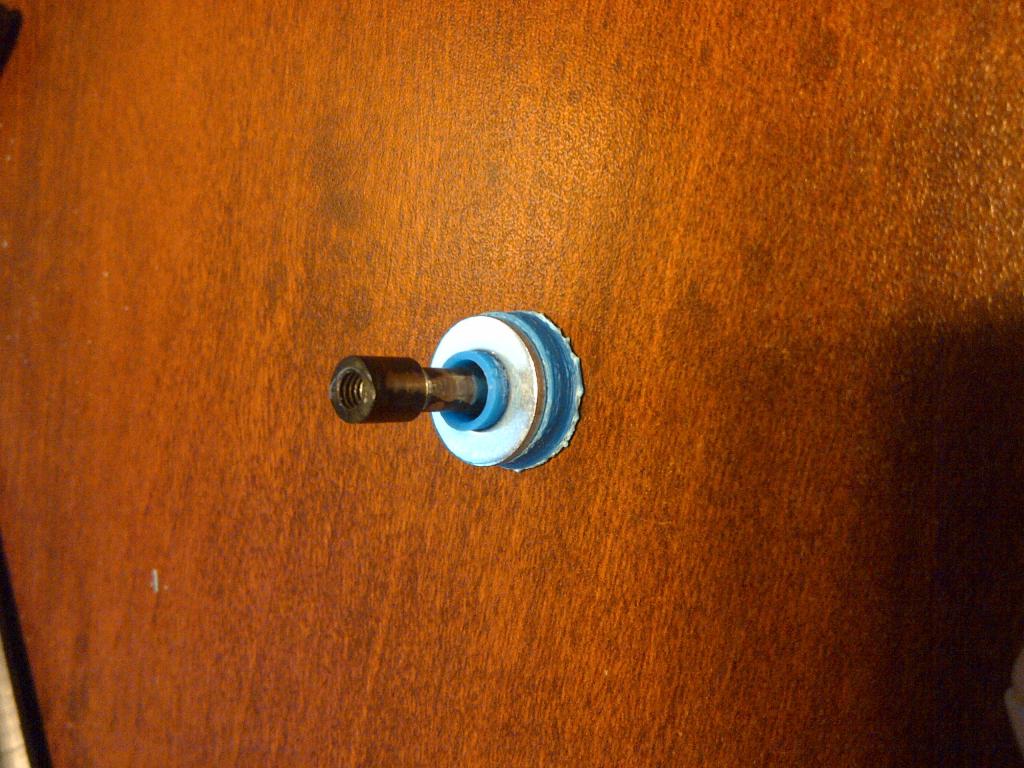
I know this isn't an S30 part but on my 300zx, the upper window pin again broke yesterday. This allows air to whistle while driving and water to leak in with the rain. I'm tired of tearing the door apart to fix a cheaply made part. So, I started looking into what can be done to fix this issue. Well the stock pin has a white plastic ring around a metal ball end, allowing for some movement. The plastic is what breaks. I looked at it and figures a 5/16" washer would almost fit over the ball portion, but would not fit past it. That would be enough to hold the pin in place, but I'm not certain if it required much more than that to keep it from rattling or wearing badly. I got into PTC Creo and desiged a new round bottom portion which would allow the pin to slide in the track AND incorporate the 5/16" washer. I printed it up on my Mendel Prusa 3d printer at .1mm layer height, and a .5mm nozzle. at 80% infill. This created a very strong part with a little xacto persuasion I was able to fit the stock metal door pin and now I've got a new slider made from ABS which should work well. The phillips head is lightly recessed for grease to fill and I will glue the washer into place. This looks like a very good solution for a part that breaks all too often. If you end up needing one of these, let me know, I'll sell it cheap. picts below: I'll add more picts when I get to install it probably this weekend. Phar
-
So I've got a couple other threads about Printing car parts on my 3d printer. Well on my 300zx, the upper window pin again broke yesterday. This allows air to whistle while driving and water to leak in with the rain. I'm tired of tearing the door apare to fix a cheaply made part. So, I started looking into what can be done to fix this issue. Well the stock pin has a white plastic ring around a metal ball end, allowing for some movement. The plastic is what breaks. I looked at it and figures a 5/16" washer would almost fit over the ball portion, but would not fit past it. That woudl be enough to hold the pin in place, but I'm not certain if it required much more than that to keep it from rattling or wearing badly. I got into PTC Creo and desiged a new round bottom portion which would allow the pin to slide in the track AND incorporate the 5/16" washer. I printed it up on my Mendel Prusa 3d printer at .1mm layer height, and a .5mm nozzle. at 80% infill. This created a very strong part with a little xacto persuasion I was able to fit the stock metal door pin and now I've got a new slider made from ABS which should work well. The phillips head is lightly recessed for grease to fill and I will glue the washer into place. This looks like a very good solution for a part that breaks all too often. If you end up needing one of these, let me know, I'll sell it cheap. picts below: I'll add more picts when I get to install it probably this weekend. Phar
-
Did you ever do anything more with this?
-
I see. I keep forgetting how limited parts can be in Dubai. You've probably got the only S30 in the city. Does Tirerack.com ship to Dubai? You're doing a great job with the car. I went back and read your whole build thread. How do you like all the Dynamat/pad in there? Does it really quiet it much? I also noted the vent holes in the C pillar are blocked over, that's kind of odd, but I guess you won't be driving with the windows down very often out there.
-
Hehe, Grats on getting it running! That's always a happy thing. Now the brakes. The stock brakes are plenty good for regular driving assuming the system is working well. If it's not, then you may want to investigate the toyota brake swap/ S130 rear disc swap. The parts for the from brakes are about the same cost and usually a lot easier to obtain than the stock S30 brakes. Look up the Toyota brake swap, there's a few ways to do it. Valve lash, a little valve ticking noise while running is normal on an S30 engine. You probably don't need to mess with it. Timing is a good idea, but sort out your vaccuum issues first.
-
One of my buddies runs New Covenant transport. I've got his # at home if you're interrested. I'm not sure if he gets up to seattle very often. but it's definitely cheapest to deal directly with the truckers. I'd make sure the car was well insured before you shipped it, including before and after pictures. Your pickup location will need to do most of the work to ensure it's well covered and loaded safely. There's plenty of horror stories, but these guys are well insured, or they'd be out of business.
-
SeattleJester has a motor and 5 speed tranny he just pulled out for sale, you might look at his, tho shipping might be a killer.
-
Yup, just like that, Your L24 intake should bolt right up to it, then all you need is the 5 speed. 91K miles isn't a lot at all for these engines. Since it's been sitting, I'd still pull the plugs and load up the cylinders with WD-40 before trying to turn it over, and change the oil, you'll do that w/ the pan seal. The pan seal is EASY with the engine out. get a drill w/ a 10mm socket head and zip zip zip, you'd have it changed in half an hour. including time to flatten the pan holes. Cork gaskets have always worked really well for me. The L28 externally should be the same as your L24, so You shouldn't have any issue. The L28 may even come with electronic ignition which is so much better than points. $300 isn't bad for it.
-
Track down parking/interior lighting short
Pharaohabq replied to DuoWing's topic in S30 Series - 240z, 260z, 280z
Sounds like the Combo switch has some issue, but that doesn't discount any bad wiring. Likely it's one of the lights grounding to the frame. I'd pull loose the dapper kit and isolate that from the light system, then put in a 10A and see if it blows. If it does, then it's nothing with the dapper relays. next you can check that glove door light, since you remover it, it's likely a culpret, but maybe not. Did you rewire any of the running lights when you put in the Dapper? Finally, the clock wiring, It should go from constant power to ground, so likely that's not the issue. -
my 240z starts when i turn the key off
Pharaohabq replied to Turbo72-240's topic in S30 Series - 240z, 260z, 280z
Well, the issue has to be with those wires. The white and the White/red I think you have this confused. The white and white/red should be connected together. in the AMP meter, they show the current running to the battery, either a positive draw or a negative draw. current has to run through it to get a reading. The Volt meter is different, If just measures if there's voltage on the line. So you'll have to verify this, but it seems if you connected the two wires together, then connected one of the terminals, then connected the other to ground you shoudl read volts. This should be switched power, so while key is off it should not be reading power. otherwise you'd have to find a different connection to use for the switched power. there's probably a thread on this, Voltmeter installation.