

LanceVance
-
Posts
657 -
Joined
-
Last visited
-
Days Won
7
Content Type
Profiles
Forums
Blogs
Events
Gallery
Downloads
Store
Everything posted by LanceVance
-
Does anybody know the thickness of the factory glass? I'm planning on replacing the quarter window glass with coated polycarbonate (Makrolon AR2) while retaining the factory metal frame and rubber trim. I would like to order as close to the factory thickness as possible to aid in fitment with the rubber seals. On a side note, Makrolon AR2 is hard coated on both sides. I've read elsewhere that coated poly sheets don't suffer the same outgassing issues that regular Lexan has when trying to use tint film. I've only ever seen this done on sheets with only one hard coat. My concern is that the AR2 coating may somehow be different from traditional hard coats to compensate for the lack of an 'open' side to allow the outgassing... if anybody has any insight I would appreciate it.
-
I bought a motorcycle fuel tank (GSXR I think) with the door and key for around $80. The tank was dented, but the area around the filler cap provided more than enough straight metal for grafting. It's still sitting in storage awaiting the bodywork stage of the build, so I don't have any pictures, but it's something for you to consider. Socorob, I'm really digging the aircraft fillers on the last page, did you ever price any of them?
-
Do you still have the small pieces that are missing in the photo? If so, ABS Cement and a backing material might work. I would carefully drill (or better yet, use a soldering iron) a small hole at the ends of the cracks to prevent the cracks from spreading. Fill/sand with the ABS Cement, and then use a textured paint over the entire thing. ...or find a replacement, depends on how perfect it has to be.
-
I've got one, but it's for an L28... not sure it's the same? If you can compare part numbers, perhaps you could see if they are interchangeable. It's standard rubber, not braided and it's yours for $5+shipping.
-
Racers, which battery shutoff switch in cockpit?
LanceVance replied to RebekahsZ's topic in Ignition and Electrical
That's the set up I'm going to be using, only with a longacre style switch, not the removable red key type. I've got a red key style one, but that will be used to facilitate easy disconnection of the battery during services, and a small measure of theft prevention... -
You want to make him work on it regularly? Offer to help, bring beer and buy the pizza. Otherwise, you're working on his schedule, and people call it paint/body work jail for a reason!
-
Door bars that miss the window crank and door handle
LanceVance replied to RebekahsZ's topic in Fabrication / Welding
I've planned on removing the factory handle from the get go, though for different reasons. If you examine the linkage system in the door it quickly becomes apparent how easy it would be to convert, or even simply add (if you wanted to still retain the stock handle) a cable operated portion to the stock bits. Something similar to the Porsche Carrera RS isn't terribly difficult to put together, and could be put wherever is most convenient. I've got most of the parts ready to go in storage, the door 'roses' from most Porsche parts suppliers are surprisingly affordable! Edit: Just convert to electric windows! I know someone on here showed that the electric conversion actually shaved weight! Win-Win in my book. -
Emergency Electrical Power Shutoff Location
LanceVance replied to RebekahsZ's topic in Ignition and Electrical
I've seen plenty of people mounting the kill switch in the back of the car (mostly the drag crowd), but I've never been comfortable with having a kill switch I couldn't get to from the drivers seat, while harnessed up. I'm planning on mounting a pull-cable attached to a kill switch mounted on the center console. The cables handle will be in a custom made recess, mounted in the quarter window (2+2, so it's a tad larger). I've contacted a few glass shops about cutting the circular hole in the quarter glass and they all say it's doable, but if it breaks I'll just go with Lexan. Here is the recess: Can anyone guess what it started life out as? Few more: If you guessed kitchen sink drain you get a gold star! The threaded body, nut and gasket design make it ideal for sealing against the glass. On the outside I'll use double sided mounting tape to go in between the steel and the glass, while the inside will be sealed with the supplied gasket and nut. I will also be powder coating it in a satin black to match the rest of the exterior trim. Here are the part numbers, in case anyone is curious: Recess - Everbilt - 02554 Pull handle - Rennline -EL20.21 I'm planning on using this switch (not pictured): Longacre - (LA4578) Battery & Alternator Disconnect I'm planning on using a brake cable disconnect from a Richie bicycle to prevent any issues while off the track: Ritchie - (28-248-910) Break Away Quick Disconnect -
Looking for high-res shots of engine bay decals
LanceVance replied to LanceVance's topic in Miscellaneous Tech
That one, being an actual plaque, is slightly more involved but definitely on the to do list. Got to wait for dyno results though! -
Looking for high-res shots of engine bay decals
LanceVance replied to LanceVance's topic in Miscellaneous Tech
Just another pet project to work on when I have the time. It's the small custom touches that really make a build stand out in my mind. -
I'm looking to recreate some of the decals found in the engine bay for my restomod Z. For the most part they will be same as OEM, but where appropriate I would modify them to reflect the current specifications of my build (An example would be something similar in style to the SU carb sticker on the 240z Airbox, only with Mikuni or Webers to match the build; an OEM look for modified motors. Another example would be the paint code decal with whichever non Datsun paint code you may have used). What I'm asking of the Z community is for any high resolution photos or scans of decals that you might have. I would be using them to create duplicates in Adobe Illustrator which I would then share here for anyone inclined to have their own custom decals printed. I may consider offering customized decals as a service, but that would be dependent on whether or not I can find a decent print shop capable of printing metal foil decals. Considering the low volume, it may or may not be feasible. Any HybridZers who work in, or own a printshop capable of doing this sort of work feel free to shoot me a PM if you're interested in getting involved. The decal I'm mostly focused on now would be the valve cover decal from a ZX; can't seem to find a good shot of one anywhere! Any under hood decal would be appreciated at this point however. Thanks in advance!
-
I'm glad to have seen this, much easier than piecing together a kit from the JY... How difficult is it to replace the quarter window pieces?
-
Classic look, with a modern finish. Very good looking! I would have been sceptical of the metallic in the paint as well, but it actually works quite well at tying in the lacquered wood to the glossy carbon fiber.
-
That's what I was going to suggest, beat me to the punch Tony! I found this after about 30 seconds on Google: http://images.thesamba.com/vw/gallery/pix/275088.jpg
-
I've got a few questions... What sort of foam are you using to seal the fan shroud to the rad? What software did you use to design the laser cut pieces? I've been using Adobe Illustrator to make some vector images for a laser engraver, would this format also work for your laser, and if so is it for hire?
-
Left shaved and powder coated, right stock. 'Shaving' is typically done to intake manifolds, but can apply to anything; valve covers, thermostat housings, even the engine bays sheet metal. Take a look at the VW crowd to see the most extreme examples.
-
I'm planning on using a Holset HY35W myself. Perhaps the biggest issue is wastegate actuation (you have to rotate the compressor housing, which puts the stock actuators mounting point in the wrong spot), but you can remedy this in a number of ways. Other issues would be oddball v-band sizes, which necessitate the use of the stock cast iron section coming off the exhaust side of the turbo. Welding steel to cast iron can be expensive and troublesome. There are other small issues, but in my opinion, the low cost and high performance potential of these turbos make them worthwhile.
-
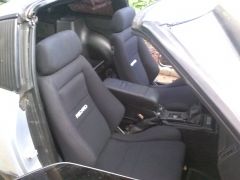 Those Recaro seats look great in the ZX! What model did you get them out of?
 -
Perhaps you could try some 3M double sided moulding tape?
-
There are a few members here looking for products to make with their 3D printers, perhaps they could make a plastic replacement that would work?
-
No bottoms are specific to, or have the name 'LX'. LX is the designator for the back design, bottom is pretty clearly a C or B (depends on wither its got the extendable front or not).
-
I haven't really torn into the car yet, though I have given it some thought. First step is going to be cutting away the inner facing portion of the outgoing metal headlight scoops. This will allow me to center the lights with most of a scoop in place, and with a little bit of thick paper provide a template for cutting the FRP scoops (which can then be further tweaked to perfection). I'm pretty much doing the opposite of you, cutting the scoop to suit the headlight, retaining the factory lenses It's pretty well known that the sealed beam stockers are uncomfortably dim, especially when compared to factory lighting found on cars today (more so when speaking of factory HID systems). That said, my main reason for the conversion was to modernize the overall appearance of the car. While the sleek lines, and overall design are timeless, the details (truck style side markers, Jeep headlights, chrome trim work, gutters, etc) betray the age of the car. Every exterior light on my Z will be replaced with a modern, and in my opinion, more fitting light system than originally equipped. Bang-for-buck thinking never really came into play, though I was able to get some deals on everything by being patient and buying only when able to get them at a significant discount. Once I get the rear side markers I'm after I'll have everything needed to replace every light. I even picked up some fog lights and a third brake light to make things more interesting. The added light output from the HIDs (which should be comparable to any modern factory equipped car), along with the decreased current draw are just added benefits in my book. This won't be a daily driver, and it will rarely be driven at night, so I have different priorities from most...
-
Those look like LS-Bs to me, although it's hard to differentiate from LS-Cs without better puctures. I've been looking for a pair of those for some time now, pretty scarce around here. I plan on reupholstering to match my interior, but I would have a hard time getting rid of that rocking orange gradient! For future reference, when trying to ID older Recaros, this is a good source: http://forums.pelicanparts.com/porsche-911-technical-forum/622150-recaro-information-restoration.html
-
Thanks, it was your Photoshop that actually got the ball rolling for me. I looked into the Mini headlights, but decided they were too large to fit without extensive modifications to the housings. Then the Fiat 500 drove across the seafloor, giving us a new option!
-
This is what you want, much better quality than the stuff you'll typically see on eBay: http://www.dapperlighting.com/products/7-classic-projector Also, he's a member on here and has all the information you'll ever need regarding HIDs in S30s. Alternatives are out there, just search what others have done. I personally plan on using Fiat 500 headlights in customized FRP headlight scoops: