Dat73z
-
Posts
851 -
Joined
-
Last visited
-
Days Won
8
Content Type
Profiles
Forums
Blogs
Events
Gallery
Downloads
Store
Everything posted by Dat73z
-
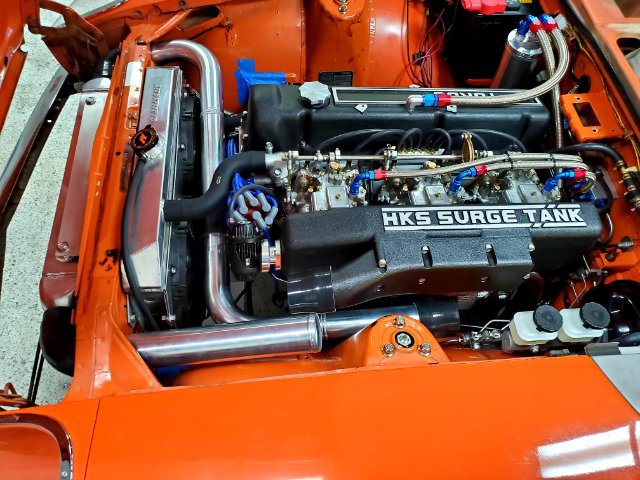
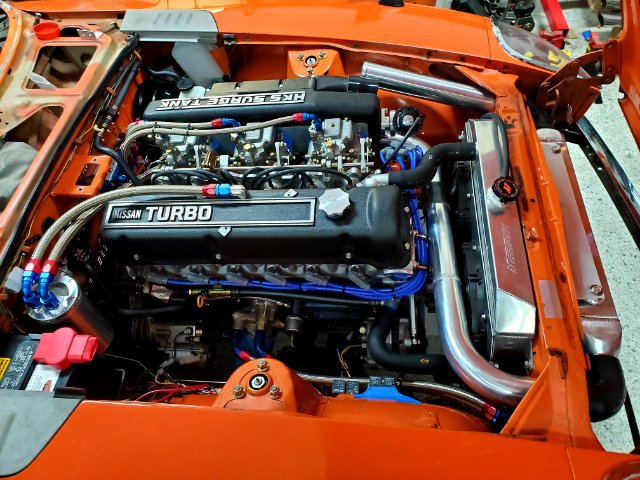
Some rough measurements on the hot side I'll need to chop and shorten on two sides of the run. On the cold side into the surge tank I'm still not sure if I'll attempt to make some pie cuts or just two angle cuts to line it all up. The good thing is now I know everything will fit but it'll be tight.

-
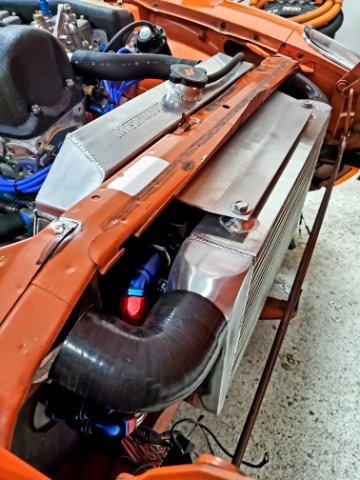
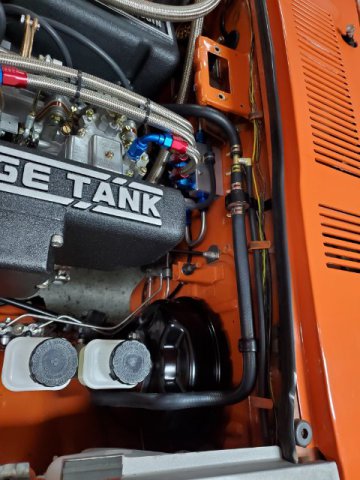
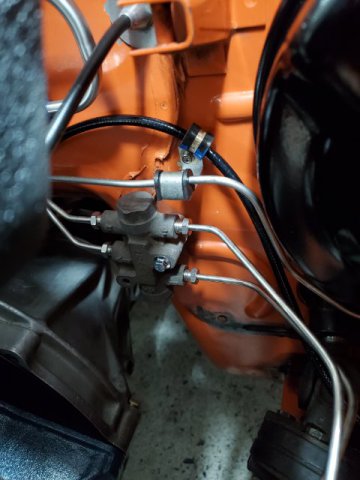
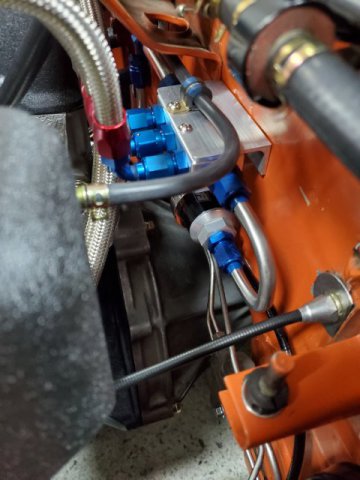
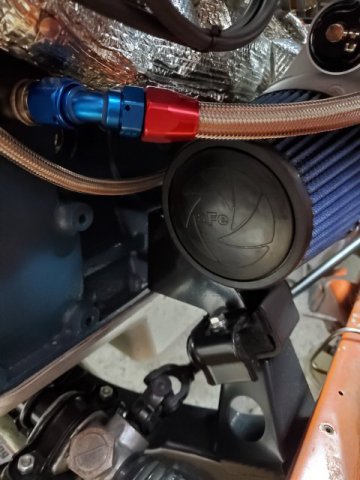
A week and a half ago I attempted to source some 0.045 308L filler wire to finish the exhaust. It turns out the smallest quantity any local supplier around me sells is 10lbs. So I found a 1lb bundle on Amazon and I'm still without filler with a delivery date of next week due to trucking delays 🤬. Oh well. This past week I wrapped up the rest of the plumbing and cooler bracketry for the car. On the frontend the 10AN SS braided really does not like to bend. I decided to fabricate a bulkhead to ease the oil cooler routing. There is a small air gap between each component and my AC condenser fits in there nicely with all the fittings as well. The packaging is extremely tight. This weekend I'm going to start modifying the charge piping to fit. That is the last major component in the engine bay, then I can finish relooming the harness to ensure it clear everything and begin filling fluids. Edit: just realized after posting the photos I also pulled off a bunch of parts to have them zinc plated. Also refurbishing the JDM fairlady grille. Not really turbo related but I figured the inspection light, hood latch, etc. would brighten everything up a bit
-
Lol no doubt, I was just curious if anyone had modeled or tested it. It sounds like no. I was a licensed and practicing fluid/thermal dynamics engineer for a decade so I understand the core concepts and have used all the tools. Nowadays I just work on my Z and other cars for fun but not at that level of getting into these details again...yet 😅 Yes some of these pics are likely from Alan, they came up in Google as I've been looking at the undertray on and off for a few years. I'll gladly remove them if he asks but I'd be curious his take as well. Hopefully I didn't stir up the pot there, at the end of the day these are just hobby cars for most of us and we're all enthusiasts
-
That is unfortunate. Sounds like a lot of strong personalities. What we do know is a frontal undertray was wind tunnel tested and produced at some point in time by Nissan for racing/homologation purposes. I would think there would be some benefit otherwise the modification wouldn't have made it into production. I am curious why it wasn't paired with other aero but unless we find the original engineers from the 60s we may never know. It would've been nice to quantify those benefits, and how those benefits stacked or detracted with other aero but perhaps we'll get another go at it someday in the future... Edit: maybe next go around show the wind tunnel people the actual Nissan racing homologation papers and wind tunnel test pics for the parts. There must be a reason why they went through all of the trouble right? 😁
-
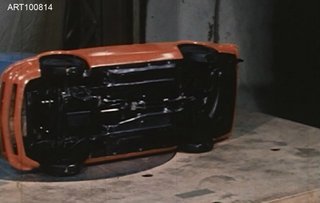
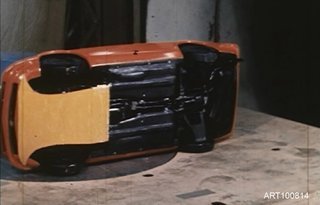
Was a full frontal/engine bay undertray from the front valence to the firewall ever tested (similar to what the z432r had)? Most cars I've seen with front aero use an air dam or chin spoiler but omit even the splash tray. Or they run a splitter just to cover the area under the valence but don't bring it further back. I recall seeing some pictures of Nissan wind tunnel testing some part scale prototypes to develop the full frontal undertray for homologation purposes? I don't believe they paired that with a front splitter or air dam, but the part was actually produced and there are some repro's of them in Japan. Found the pictures. There are a bunch of them testing various aero for the 432r as well including the rear spoiler. Really interesting stuff
-
I have been backpurging everything for the full weldouts. I would say the welds aren't underfilled, but I'm also an amateur so to be honest Im not sure. Before moving and starting back in on my car this past year I hadn't tig welded for at least 10 years...so I've been re-teaching myself how to tig on critical components of my car 😂. I was focusing more on full penetration and heat control. For the downpipe I backpurged all of the tacks and welds. For the midpipe I started tacking without backpurge and got a couple of tiny dots of sugaring which I'm still conflicted if it matters for an exhaust maybe 3 feet post-turbo. I plan to backpurge everything for the full weld outs. Edit: Good call on the weld bead profile. I took a look and some are flush, some are raised. I am somewhat consistent but not consistent enough. I think I need to focus on that as well and perhaps push more rod into the puddle as I go.
-
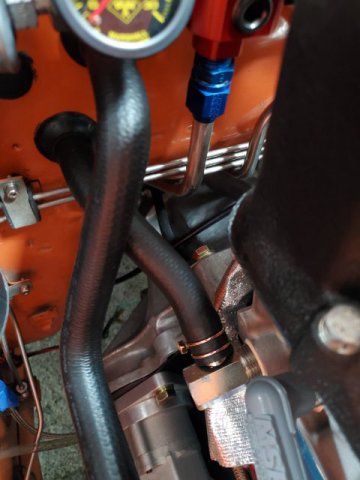
Still waiting for materials and some solid blocks of time. I had an hour last night so I mounted the boost gauge. Originally I was going to use a channel in my Stack integrated tach to run it, but the channels are now being used by fuel pressure and oil temp. I wanted to keep the vacuum line off the engine because there are already like a dozen vacuum lines in that area for all of the other turbo items so I moved the signal source to the firewall between my vacuum log and the 1 way brake booster valve. I also had the challenge of nobody having the right fittings I needed so I silver soldered two fittings together to create the boost gauge feed. Finally I fabricated a bracket off the center console dash bracket to position the gauge in DS footwell area. It's easy to read at a glance and outside of the car you can't see it at all which was the intent 😈 Man nothing is ever easy on this car...but one small project at a time it's getting there
-
@DuffyMahoney yeah thinking about it more as I own my argon bottle and get discounts at my local gas supplier...another $100 of argon won't break the budget when I'm already a few hundred in stainless tube. I am curious how many actually backpurge their tacks for exhaust work. Some youtube vids show most don't. I can understand why for the food industry you wouldn't want and defects or crevices in the welds at all
-
Based on my limited research it's advisable to backpurge everything including tacks for SS like you'd do for critical operations in a nuclear plant or similar where they xray all of the welds, look for tungsten inclusions etc. For automotive applications it seems pre-turbo you'd want to backpurge everything as well to limit the chances of cracking over extreme heat cycles. Post turbo is less critical. I fully backpurged my downpipe from tacks to welding but man that took a lot of argon. For the midpipe back does it really matter so much? Specifically for tacks, I'd still be doing backpurge on the full weld-out
-
One thig specific to the turbo packaging that I had to overcome was rerouting the speedo cable to clear the downpipe. Nowadays more people are probably opting for gps or other sensor methods but maybe someone can find this helpful. When I redid all of my brake and fuel lines in stainless I decided to move the clutch hardline off the firewall via a bracket as I preferred that run over the OE configuration. I had some aircraft adel clamps left over from other routing so I routed the cable following the OE hangers except in the portion above the downpipe where I brought it up and over. The result is more of a tucked look and hopefully no melting.
-
I'm doing a 3" right now on my Rebello 3.2 Stroker Turbo. I'm documenting what's going into it in the turbo sub forum. If I was doing a 3.0 NA I would still go big and free flowing, maybe even oval pipe if it's in the budget Edit: If you're looking for something off the shelf High priced, Kameari makes some big pipes and headers which are artwork. More moderately priced there is Zstory headers and exhausts and they're something like 2.5". I ran their muffler before and it was well constructed. Lowest cost MSA isn't a bad option. I ran their exhaust and 6-1 header for years. I was running triples NA and kept popping the baffled turbo mufflers at the seams on the overrun so I upgraded to a magnaflow straight through then the Zstory straight through twin stack.
-
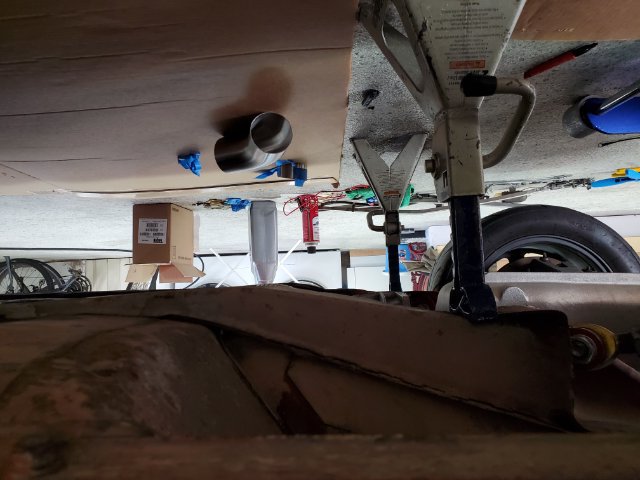
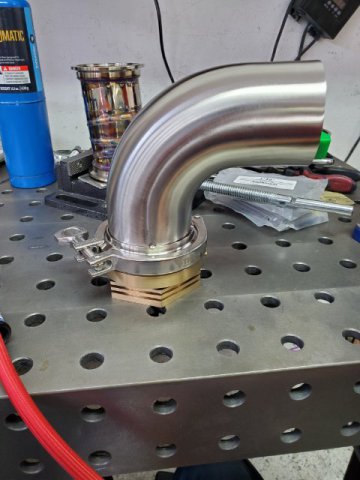
Got most of the downpipe welded out last night but ran out of 308l filler rod. It was probably good to stop and let the part cool anyways as to keep movement to a minimum. So I decided to start in on the midpipe. I think for this section it'll run from the downpipe following the trans tunnel which angles to around the tail of the trans where it kicks back to straight. Around where the diff starts there's another kick back over to run under the diff. In measuring it all out I think I can get good clearance here as well but it's going to be tight...a true test of my mediocre fabrication skills. Hopefully I can get this section tacked by the weekend when I can grab some more filler.
-
@Zetsaz it was linked above by @calZ here it is again If you don't have the T and still want to run your heater you could use a Brass Y or something similar. Not sure how you have yours set up, I basically just did the OE setup but instead of the rear hose feeding the carb heater circuit I repurposed it for the turbo cooling. I could've done any combination of hoses and fittings with the same outcome but I wanted to retain some semblance of OE aesthetic there. Didn't get your exhaust pictures, want to text them to me? 😄
-
Thanks @calZ. I just read through that thread and the final recommendation is what I have currently set up. Except I also kept the heater core in the loop. If I was going to redo my setup, perhaps I'd run -8 or larger lines for more bypass through the turbo. As-is they are -6...a project for another day.
-
@Zetsaz Here are some pics. It's pretty difficult to get good shots now that everything's back in the car...but I think there may be more pics earlier in the thread when I was doing the turbo setup with the engine on the stand. I ran one line from the tstat housing to the turbo. The other line I welded on an AN fitting to the stock heater feed/return location which comes off the lower rad hose fitting from the pump. Perhaps others can comment if this is the correct or incorrect way to do it. Originally I was going to do tstat-turbo-block drain but ended doing the setup I have now after chatting with Dave Rebello. I think this is what @calZ is describing. Btw do you have pictures of your exhaust ground clearance and clearances to the chassis parts? I'm trying to strike that balance between clearance of the midpipe to the trans xmember and the ground. I have it tucked up about half a finger gap from the trans xmember now which gives me more ground clearance even with the 3" pipe than the MSA system I had before. The tradeoff of course is I'm worried about the midpipe smacking the trans xmember. I think we may be running the same trans and t3 trans mount.
-
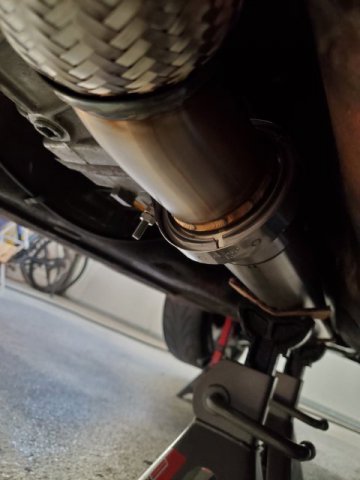
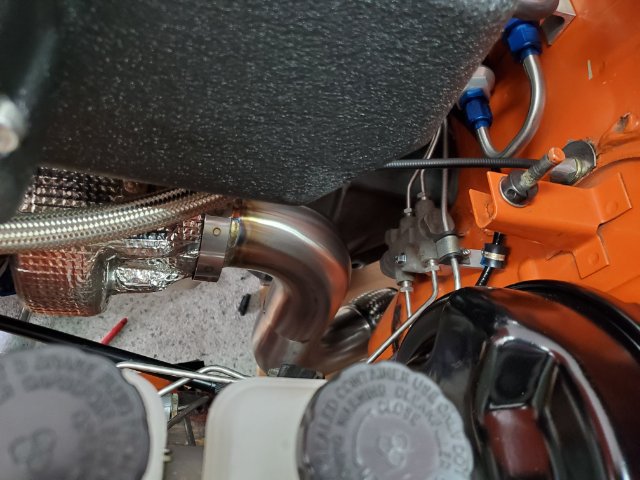
Had an hour after lunch and got the downpipe tacked up. Happy with the run so far. I angled it such that the lowest point on the car is the (now sacrificial) oil pan. There is also a minimum of 1-2 finger gaps around anything which I'm hoping will be enough. I plan to inconel shield this as well like the manifold for thermal management. I think the midpipe will likely hang slightly below the rails so maybe that will bottom out first. Just need to find a solid hour or two to fully weld it out.
-
So my wife has been asking about the box of pipes in front of her gym equipment and I took that as a signal to start turning those pipes into parts 😁 I started on the downpipe this morning. I'm hoping I can get through the exhaust in a week or two with an hour here or there. I realized I should have probably started on something less critical like the muffler or midpipe as I'm really out of practice. My welds aren't perfect but the penetration is good and this isn't a showcar so we'll see if it holds.
-
A musician's therapist (The $300 Z)
Dat73z replied to Zetsaz's topic in S30 Series - 240z, 260z, 280z
@Zetsaz Another option for the mid section might be the transmission ear(s) if you have those. I think the midpipe originally hung from that location. I was considering there for the midpipe and maybe a bracket to the bellhousing for the downpipe but I'm curious what you come up with. Looks great! -
A musician's therapist (The $300 Z)
Dat73z replied to Zetsaz's topic in S30 Series - 240z, 260z, 280z
Very nicely done. Where are you planning to place the hangers? Are you going to brace the downpipe before the flex as well? -
@AydinZ71 What boost were you running on 9:1 which blew the two L24 blocks?
-
I'm Back, 1971 240Z and Yes, it will be TurboCharged
Dat73z replied to 240Z Turbo's topic in S30 Series - 240z, 260z, 280z
That is a lot of work! but I'm sure the end result will be worth it. What amps and wire diameter did you use when tig silicon bronze brazing the seams? I did the same last summer to fill some rust pinholes in my windshield section and I found it really difficult to find the correct balance balance between melting the filler and base material. I think maybe my filler was too thick at 1/16" and I should've been using 0.045" or smaller. -
Offsets hurt my brain
Dat73z replied to 19782plus2's topic in Brakes, Wheels, Suspension and Chassis
@Michael in the link @calZ posted above 17x8.5's were widened via welding to 17x9.5 and fit into the factory arches. There's a lot of good detail in there. -
Diff crossmember structural rigidity questions
Dat73z replied to Zetsaz's topic in Brakes, Wheels, Suspension and Chassis
I was researching this a while back due to AL driveshaft coming close to the crossmember on a short nose diff setup. I've seen pictures of where people just run another set of rear caps up front and no bracing at all but imo if you're going to cut it I'd at least weld in some bracing across. -
Offsets hurt my brain
Dat73z replied to 19782plus2's topic in Brakes, Wheels, Suspension and Chassis
@19782plus2 -
Offsets hurt my brain
Dat73z replied to 19782plus2's topic in Brakes, Wheels, Suspension and Chassis
What pictures are you looking for? It's a fairly basic setup. Nothing custom or fabricated except the q45 diff mounting which doesn't affect the track width or anything