-
Posts
2521 -
Joined
-
Last visited
-
Days Won
6
Content Type
Profiles
Forums
Blogs
Events
Gallery
Downloads
Store
Everything posted by TimZ
-

72 z distributor way out of range
TimZ replied to hatepotholez's topic in Trouble Shooting / General Engine
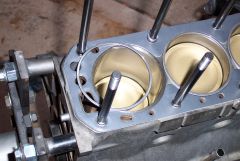
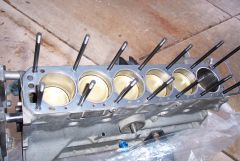
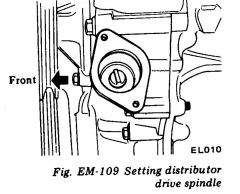
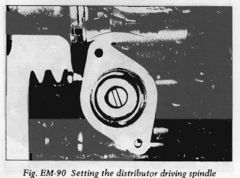
Okay, first off, it looks like you might be off one tooth on the drive spindle. Here are pics from two different service manuals depicting the "11:25" position... In your pic, the spindle seems to be aligned slightly counter-clockwise in relation to a straight line drawn through the two mounting bolts. In the FSM pics it's oriented about that same amount clockwise. Secondly, the cam timing looks funny, assuming it's also at TDC. It looks like you have the first cam lobe pointing straight up - normally the first and second lobes (#1 exhaust and intake) are about evenly spaced on either side of "straight up" at TDC on the compression stroke... EDIT: sorry I had that backwards - it looks like the 2nd cam lobe is straight up, not the 1st. -

72 z distributor way out of range
TimZ replied to hatepotholez's topic in Trouble Shooting / General Engine
So that's not terribly helpful then. Could you get a pic with it at TDC? -

72 z distributor way out of range
TimZ replied to hatepotholez's topic in Trouble Shooting / General Engine
Is that first pic at TDC? That is definitely not 11:25... -
Good for you - have you read this thread (stickied at the top of the page)? Read it several times. Engine assembly isn't that difficult, but it _is_ very tedious if you want to do it correctly. TonyD and PMC raceengines do a really good job of outlining many of the finer points that often get skipped over. If you want to enjoy an engine that you built yourself, get yourself a good set of inside and outside mics and take your time.
-
Yes, I know what coil bind is. So you are saying that the Tokico spring binds _before_ the strut bottoms out? Most lowering springs with stock struts put these cars very close to riding on the bump stops anyway - I'm finding it hard to believe that as long as those springs have been around that a coil bind issue wouldn't have been flagged and remedied long ago. You sure the car wasn't just hitting the bump stops? Did it _have_ bump stops?
- 12 replies
-
- suspension
- s30
-
(and 3 more)
Tagged with:
-
The spring rate increases if you cut the spring. See the equation in the original post. I'm a little confused about what this is fixing though. The lack of suspension travel is due to the stock strut design being at a lower ride height. Are you just saying that the Tokico spring is too low and your replacement raises the ride height to alleviate the problem?
- 12 replies
-
- suspension
- s30
-
(and 3 more)
Tagged with:
-

Steel hose barb to AN fitting
TimZ replied to grannyknot's topic in Trouble Shooting / General Engine
I was originally thinking tube nut and flare, but the oddball -5an size was what kept me from suggesting it. That Swagelock part is a good idea if you can find a -5 female to -6 male adapter. The Swagelock part is probably all stainless, whereas I'm 99% sure the Earl's piece uses a brass compression ring, which is less desirable if you want to run E85 (otherwise it's fine though). -

78 280Z flooding, weak spark, will not start
TimZ replied to Zlost's topic in S30 Series - 240z, 260z, 280z
No, it won't. You've likely fouled your plugs at this point - wiping them off or spraying with carb clearer won't help - you either need to burn the carbon deposits off with a propane torch or replace the plugs. That's probably going to be necessary, but it will likely keep happeing if you still are running too rich. Soulnds like you already checked the AFM and coolant temp sensors. The FPR is a good thing to check too. Basically any component that is used to determine the fuel mix. -

Steel hose barb to AN fitting
TimZ replied to grannyknot's topic in Trouble Shooting / General Engine
Okay, so I'm not crazy (at least not over this )... -

Steel hose barb to AN fitting
TimZ replied to grannyknot's topic in Trouble Shooting / General Engine
Hmmm. Well, crap. -

Steel hose barb to AN fitting
TimZ replied to grannyknot's topic in Trouble Shooting / General Engine
Does that link go to some weird search engine for anybody else, or do I need to go searching for malware? I checked other links on this site and did not have the same issue. Tried creating the correct link and got the same issue... The link was trying to point to Earl's Fittings part number 156056er -
I just got my HVAC back together today, and can verify that this did indeed work. I can now get incremental changes in outlet air temps like one would expect! I initially had the screw adjusted too far clockwise, and the capillary feedback was preventing me from getting full heat. Backed it off about a half turn and it's now working correctly!
-

Need pics of A/C with dash removed please.....
TimZ replied to Ken Smith's topic in S30 Series - 240z, 260z, 280z
I put the bare heater box back in last night - posted new pics. I'll likely start reassembling the heater tonight. If there is anything specific you would like to see speak now or forever hold your peace... I'll take more pics but it always seems like no matter how many pics I take there is one angle I didn't get... -
Did you try just Google-ing the part number? It appears that somebody has one for sale on dragtimes: https://www.dragtimes.com/parts/FITS-NISMO-240Z-L-SERIES-HEAD-GASKET-11044-E4623-NEW_311279374882.html No idea whether the ad is current or not. Sometimes you see these pop up on ebay, but I didn't see any just now...
-
To be fair, Joe chimed in to agree with and illustrate your point regarding the low likelihood of getting a manufacturer to "just change his program" for a few parts to get the part you want. He didn't have any control over others chiming in after that.
-
I've been having the same issue for years on my '78 as well. Since mine started leaking recently I've decided to make this more of a priority. I've got the valve out of mine and have been looking it over a bit. There is an adjustment in addition to the adjustment of the cable that they don't mention in the FSM. The capillary tube is connected to a small piston that pushes on a lever in the water valve - the idea being that if the air in the heater gets too hot the liquid in the capillary tube expands and closes the water valve a bit. You can see it in this pic: https://goo.gl/photos/9ifNLxjAPpDZy6qcA The small Phillips screw moves the lever that the piston pushes on, and appears to change the pivot point such that the piston can have more or less of an effect. It looks like turning the screw clockwise will increase the effect of the capillary feedback. If nothing is leaking currently then perhaps try adjusting the cable per the FSM, and if that doesn't fix your problem, try turning the screw a little bit at a time and see if that has an effect. Since mine was leaking, I've also replaced the diaphragm seal which is still available at NAPA (660-1000 Balkamp repair kit) - there's a good writeup on zcar.com on this. It turns out that this valve design had been in use for many years before our Z-cars - do a search on "Ranco H-16" and you'll find many well documented writeups on repairing the seal on these. Weirdly, I didn't see anybody talking about the adjustment screw though.
-

Need pics of A/C with dash removed please.....
TimZ replied to Ken Smith's topic in S30 Series - 240z, 260z, 280z
Thanks! I ended up not needing so much build-up once I figured out how to adjust the vacuum motor (dashpot) to pull the door all the way closed, so I've now removed some of it. I used this foam from McMaster-Carr: https://www.mcmaster.com/#catalog/122/3613/=15fb1mc It's ultra compressible and the adhesive has a really wide temperature range, and it seems to be sticking very well so far. I was worried if the foam was too stiff that it might impede the door's ability to close fully. This seems to be working really well. I used the 1/16" thickness for the door sealing part and 3/16" for in between units. This is the as-delivered factory A/C, btw. I'll just keep dropping more pics in as I reassemble things. -

Need pics of A/C with dash removed please.....
TimZ replied to Ken Smith's topic in S30 Series - 240z, 260z, 280z
I've created an album and will just start dropping pics in there as I progress... https://goo.gl/photos/YBMYmWNg5rtxZCWy8 Let me know if there is something specific that you would like a pic of... -

Need pics of A/C with dash removed please.....
TimZ replied to Ken Smith's topic in S30 Series - 240z, 260z, 280z
You're in luck - sort of... I've currently got my dash pulled on my '78, but I've also pulled the heater box but not the A/C portion. If you don't mind waiting for a bit I can get some pics for you. Or if you need something specific maybe I can get it now...

