
buZy
-
Posts
960 -
Joined
-
Last visited
-
Days Won
3
Content Type
Profiles
Forums
Blogs
Events
Gallery
Downloads
Store
Everything posted by buZy
-
Well guys drove the Z less than 50 miles since rolling two days ago, never gassed it hard once.....heard a brief light ticking noise for a few seconds, now somewhere its making noise again between the flywheel and DS. sucks! Thats all I know but I have a bad feeling about this. Just threw 1300 at the gearbox. Either way, its back on the jacks.....sigh:(
-
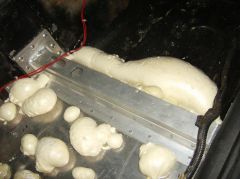
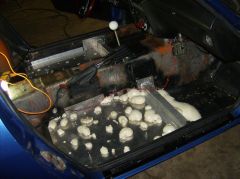
Here are pics of the seat pans/trans x member fully rivited in and foamed. A4's installed low n back. Other mods... Rear sway bar, gone. A huge improvement, (thanks JMort for the advise) Autopower scca 4 bar now open hoop. Laser driveshaft alignment, runs dead smooth. DS angle 1.2 A huge ball of wire gone. $1300 gearbox repair. Total weight savings 70-75 lbs. Now i'm broke so insu and carpet will have to wait till spring.
-

-
-
-
....more piping out back and a rad in the hatch area, more fans....heck! 7.50's I'd mount it on the roof! ...
-
Yea... I'd say it's very fast. Maybe it is a drag car and doesn't really need a rad? Is that a fuel cell where the battey tray once existed. I love all that aluminum piping!
-
WOW Nice Z! Love that hood!.... Is that a crack free dash?
-
Thank you!
-
Dude!.... Awesome Z!
-
Could anyone decode these block numbers? It would be great to find out if it's a 2 or 4 bolt main, large or smal bearings etc. Thanks! Brian Front numbers near water pump. V O 4 I I K L Rear numbers belhousing: 3892657 D77 I
-

I did what any respectable guy would do, I got me a new TIG!
buZy replied to dr_hunt's topic in Fabrication / Welding
Most exelent! -
That Z is really rusted..
-
will WD40 messed up poly urethane bushings?
buZy replied to J__'s topic in Brakes, Wheels, Suspension and Chassis
I did moto thing, enduro-offroad. After the days events after power washing and cleaning used WD to wash out the water, then chain lube, allow to dry and you are re good to go. Interesting idea using molly chain lube on poly bushings. It makes complete sence. -
Strut bars....... Are they worth the money?
buZy replied to biohazard53188's topic in Miscellaneous Tech
Thanks for the info but your weblink did not come through. -
Strut bars....... Are they worth the money?
buZy replied to biohazard53188's topic in Miscellaneous Tech
Was wondering the same about strut bars. I suppose it would be a good idea with V8:) Though the typical msa bar with heim joints would really only control the distance between the towers. It would be great to find something bolt-on that also deals with the front end twisting/racking as well.... Jon, Could you post a pic of how you made your strut bars? Brian -
No I didn't. I am still living with the slop in it. The rest of the steering is soild. Larry, Thanks for the link. I will check into it. Without mods though I can't see just replacing the joint as it appears its an assembly to the flanges. Also I noticed my 71' is different in this joint area compared my 78' parts car. Wish I could find a good used oem replacement out of a Z... Brian
-
72 240z wanders left & right randomly
buZy replied to Miles's topic in Brakes, Wheels, Suspension and Chassis
Might want to check the steering linkage isolator and look for worn u-joints. How about a loose steering wheel nut? It's all possible. Check everthing for movement from the wheel to rack ends. A while back I had the same problem, mainly the isolator was worn so as to replace it with something solid made a huge difference. Brian -
Congrats ULISES! That is a way buZy ride! Nice job!
-
....So what happens then when you floor it? Do both trans downshift? How would the set up be programmed? What!? The input shaft bearing looks very unsupported in 2nd trans. All that leverage on the very rear crossmember.... Not to discourage, but it's a joke. I saw the car on ebay it looks nice, ....for a family car. http://cgi.ebay.com/ebaymotors/ws/eBayISAPI.dll?ViewItem&item=140030733511&ru=http%3A%2F%2Fmotors.search.ebay.com%3A80%2F%3Ffrom%3DR40%26satitle%3D140030733511%26fvi%3D1
-
I love that split front windshield!
-
Nice work! Looking good!
-
-
-
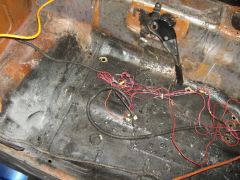
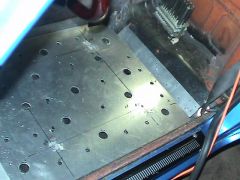
Thanks MatMan! Ok here are pics I wanted to wait but it's almost done. First pic seat pans. A4's mounted low on top of 1 inch high 1inch hex stock, no sliders. More hex welded to pans between floor for seat mountings through bolts typical. You can't see it but in front of x-members the pan material has a 45 break bend to floor. 2nd shot detail of how the 6 bolts tie into interior crossmembers. 3rd, the block between the seat pans and floor. 4th, rear of pan. Last, the before shot. The previous owner cut out the non rusted sub bracings to mount 55 pound seats each. Go figure....That's how this whole project started. To replace and improve the structure while keeping seats low back and everything light. Seat pan holes are for great stuff/home depot spray foam for extra strength. Light and maybe some sound loss. When rivited the pans will be captured on all four sides with additional 90 angle on rockers, x-member and bend areas to the rear and tunnel.
