-
Member Statistics
33319
Total Members5167
Most Online
All Activity
- Past hour
-
Back out in the garage this past weekend. I made some progress sectioning in one of the repair panels: I used the new drill press and a hole saw to cut the drain hole in the replacement section. It is a tiny bit undersize, so I will use a die grinder to open it up the last bit to get to the correct diameter. I also used the "shrinker" die that I got from Mittler Bros back before the holidays They were running a Black Friday special. I also used the sheet metal brake I got from them at the same time. I am pleased to be getting some use out of these new tools. I should be able to finish welding this repair section into the right side floor soon. After welding and grinding down the welds, I will be doing some shrinking with an oxy acetylene torch to get the floor panel flat and eliminate any "oil canning".
-
I was able to find the time recently to make the above mentioned mods. And I made three more panels. I messed up on the second one, but the third and the fourth came out nice. This is the fourth. For this one, I didn't need as much extra material around the outside of the depression. This one will be going on the left floor panel. The third one with some extra material outside the depression will be going on the right floor panel. My attempts to weld supporting material to the back of the oval plate was not successful in making it rigid enough not to bend. I ended up determining that it was easiest to press the part by moving the assembly fore and aft in the press. I applied pressure to the middle, and then to each end. There were some tricks I employed to align the oval plate in the ideal position to push down through the plate with the oval cut-out properly. Mainly, I ran some bolts through to locate everything, and then unbolted and re-bolted the thin sheet in the exact location to ensure the oval plate pushed precisely where it needed to. There is some slop in the two forming plates, so you have to get things aligned properly in a way where you can't get it wrong. I got it wrong on the second piece. So I used bolts and holes in the forms for proper alignment in the final pieces. Next, will be sectioning these in the floor panels of the track car.
- Today
-
So, after the above effort, I needed to address three things: The edge on the pressing side of the oval plate is a bit sharper than it should be. One side of my form - the one with the oval cut out of it is 1/8" wider at the opening than the others side. I want to strengthen the oval plate so it will not flex in the press I was able to quickly address the first item by using an air powered 90 degree die grinder to soften the radius on the oval plate. I use 3" Cubitron 3M sanding discs (36 grit) for a first pass at contouring. Then I follow that with a course hand file for final shaping. For the second item, luckily the side that is too wide is the side that has another plate tack welded to it. Tonight, in a matter of seconds, I broke this plate free from the larger part of the form. Then I pushed one of the "fingers" toward the other just 1/8", and then welded the plate back on. With the form moved 1/8" on this one side, I now have a consistent opening for the length of the form. It'll only take a few minutes of grinding and filing on one side of the form to restore the proper shape. And finally, I will weld a couple of angle iron pieces (cut to the full length of the oval plate) in the orientation shown here so that I will be able to make the next panel with a lot less fuss with moving the clamped assembly around in the press. With those welded in place, pressing with the hydraulic ram just one time in the center should transfer the load equally across the span of the part because the oval plate will no longer deflect at the ends.
-
I tried using a rather thick walled round tube I had on hand to press down across the long side of the oval, without welding to the oval plate. It did better as it was able to distribute more of the load towards the ends of the oval plate, but it still didn't work as well as direct force below the ram. Perhaps it was flexing as well. I'll probably visit my local metal supermarket and look for some suitable drops to add to the plate to make it more rigid. I am thinking about adding some two solid square bars about 1/2" thick lengthwise on the oval from end to end. Then using another plate under the ram to push down equally on those. In the meantime, I turned the assembly 90 degrees and slid it fore and aft on the press bed to get different areas directly under the ram. All of my various sized C clamps made for an obstacle course, making it difficult to maneuver the assembly where I needed it to be. It would be better to bolt the plates together instead of using clamps. If I had to do it again, I'd to make the forms larger on the outer periphery and drill through them and use bolts. This would make a better finished panel and give me the additional material I need beyond the over depression. I could just cut the part of the panel where the bolts held it. Pictures of the finished "prototype" - where I removed one of the C clamps to allow maneuverability in the press I got a large wrinkle. And I got a few more wrinkles around the outside of the panel outside of the form. But I think I'll be able to straighten those without much effort with a hammer and dolly. I am quite pleased with this first attempt! However, I am going to address a couple of small issues and try again. I hope to make an improved version, and then a second one for the other side of the floor of my track car.
-
As I got closer to wrapping up the two plates pictured above, I realized I needed a third. In order to press (or stamp) the floor panel section, I not only have to use the big oval plate to press against the thin sheet against the large rectangular form, I also need another rectangular plate to sit on top of the lower rectangular form and get clamped securely to it. Only by sandwiching the thin panel between these two plates and pressing downward with the oval plate can I replicate the shape of the original floor panel. So, what I have done here is drill a hole in the center of the oval plate that the hydraulic press will push on. And, I have drilled the same size ( 5/16") diameter hole in the replacement floor panel section which is 22 gauge thick (.299"). Then, I bolted the oval plate to the panel section. I moved the other plate (with the oval cut out) to the other side of the panel section. To align the plate with the oval cut out properly, I drilled two holes, both at opposite corners of the replacement section. By drilling these before moving the plate with the oval cutout to the backside of the panel, I was able to establish the correct location for the plate with the oval cutout. In the picture above, after drilling the holes, I moved the plate with the oval cutout to the other side of the repair panel section, and then I ran some bolts through the repair panel section and that plate. This effectively locates the plate with the oval cut out in the correct orientation so that the oval plate will be able to push down through properly. I got to this point when I realized I would have to make another plate. With the remaining scraps I had on hand, I made another plate to surround the oval plate. This new plate then has to be clamped tight to the original plate with the oval cut out to create a rigid structure to hold all sides of the repair panel tightly. With the entire periphery of the repair panel held tightly in place, the operation of the press against the oval plate will be effective in pushing the repair panel downward only where the oval plate is contacting it. I manually operated the press to push down on the oval plate to test how everything would react. The good news is that in the area directly below the ram, the oval plate pushed down on the repair panel section and it definitely performed as expected, depressing the unclamped portion of the panel. I can feel the depressed area of the panel when I reach up under the assembly and touch the backside of the repair panel in the center of this form assembly. However, the oval plate bent very noticeably such that only the center of the oval panel pushed the repair panel downward. At the far ends of the oval plate, there was little to no movement downward. Given the large size of this repair panel, I do not have enough room in the press to shift the assembly to the left or right to apply pressure directly to all parts of the oval plate. Instead, I will need to make the oval plate more rigid and attempt to make depression in the repair panel again. That shouldn't be too difficult. I just need to weld some support to the top side of the oval plate to give it more strength to resist bending when the pressure is applied to the center area of the plate. Stay tuned!
-
Unable to find a hydraulic press on Facebook or Craig's list that was 1) adequate in size, and 2) reasonably priced, I found my way to the grizzly.com website while they were having a free shipping promotion. After much thought, I decided to buy a 50 ton press. Yes, it is a bit overkill. My 12 ton harbor freight press has served me well. I rebuilt a couple of transmissions with it, and a differential. And I used it for some bumper straightening as well as pressing studs into hubs, etc. Oh, and I was able to replace rear control arm bushings with it too. It really is sufficient for most automotive hobbyist needs. I also took advantage of the free shipping promotion and bought a drill press. I had considered buying one many times over the now more than three decades I have been doing hobby work on my cars. All things considered, at this later point in my life, I figure I will buy some of these things while I am still active with my hobby. With the new tools set up in the garage, I have picked back up on attempting to make the floor panel replacement section. I had to resized the length of the form a bit - I had to make the opening longer. Cutting the .250" plate with a jigsaw didn't go as planned. The cutting blade wouldn't quite make the desired cut radius. So, I had to make some adjustments. The part that I cut out of the plate will be used to push the new repair piece into the outer form. I also had to build up the length of the former by welding along one of the curved edges. I built up additional material with weld beads and then ground that new material to shape. The first hole with my new drill press: This is also the location of the factory drain hole. I will bolt the replacement panel to this oval form using this 5/16" hole. That will keep the form from shifting on the part. Additionally, I will clamp the outer form (the one that is a rectangle) to the oval form along all of the edges. The idea is to clamp the sheet in place all around the forms so when I use the hydraulic press to push the oval into the other form, it will make the large oval depression in the sheet. I have many hours into the measuring, cutting, grinding, hand filing, etc. of the forms. I have a bit more grinding and filing to do before I will attempt to "stamp" the part. I am thinking it will not come out as desired on the first try, but I hope I can get it to be a nice replication of the factory shape with a couple of tries.
- Yesterday
-

Fast Floridian's 240Z Track Build
flatout replied to FastFloridian's topic in S30 Series - 240z, 260z, 280z
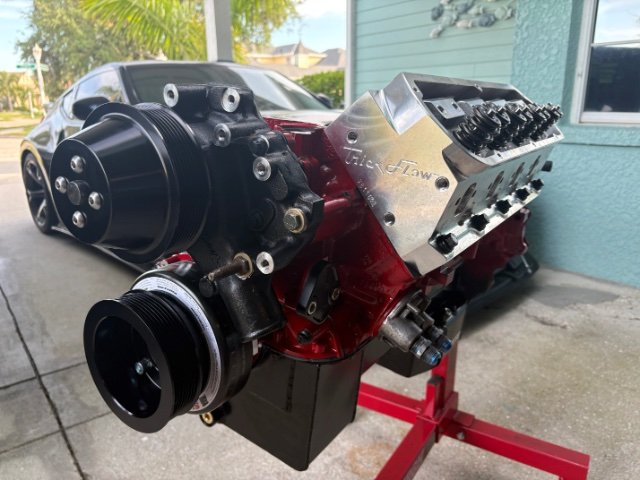
Trickflows are a great choice. I have a turbo 351 so not a direct comparison but when I switched from GT40s to 11r 190s it made a massive difference. Unrelated to the engine. I weighed my stock 280z door today. Its gutted so I can paint them. so no glass, regulator, handle, lock, hardware, window frame ext. just a empty door shell. 34lbs. -

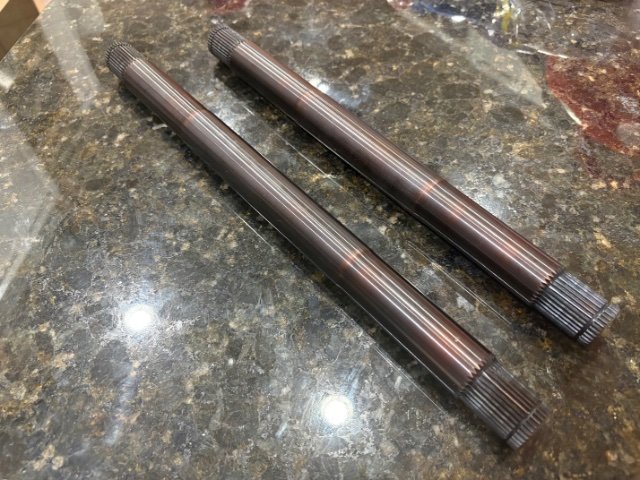
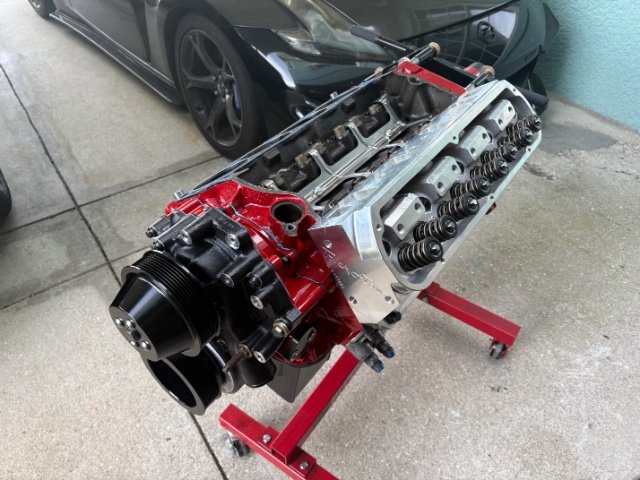
Fast Floridian's 240Z Track Build
FastFloridian replied to FastFloridian's topic in S30 Series - 240z, 260z, 280z
Axles finally came in. Didn’t have much time this weekend, but cleaned the top of the motor and bolt holes and got one head installed.
- Last week
-

Catch me up the last six years of how to Z community the internet
calZ replied to tim.d's topic in Non Tech Board
If you donate to the site you'll then be able to post FS threads. That said, FB Z groups are the big thing now. Craigslist and ebay also still work, but marketplace and group posting get the most eyes on it in my experience. -
RICK URQUHART joined the community
-
 Hey Y'all, Right as COVID hit, career, kids, shutdown, and just about everything else took over and I essentially stopped all work on my car, forums, and deleted social media. Six years later, life has calmed down and I find myself with time, motivation, money, and a little bit of energy to work on the car again. The parts hoarding is done, now I just need to work on it. But the state of internet forums/groups has me completely baffled. 1) I have a ton of OEM and aftermarket parts to sell, and aside from Craigslist and FB Marketplace..how do you do that? Like, how would someone on the other side of the country know I have a bunch of parts to sell for cheap that I'll ship? I can't create a parts FS thread here, and we all know that unfortunately forums just don't get the visits they used to. 2) how do I engage in non-facebook Z chats/community? IS there one?? 3) Generally wtf has happened and how do y'all manage it being a Z / auto enthusiast in the current landscape?
 -

Flowmaster "50-series big block" mufflers for quiet exhaust?
Brad-ManQ45 replied to Michael's topic in Exhaust
It's quiet compared to Flowmasters. You can converse well around town and on the highway. -

Ford Super 8.8 irs swap thread. Rear brakes too
Invincibleextremes replied to Invincibleextremes's topic in Drivetrain
Fastest s30 IRS timeslip is now 8.38@163.9 mph in the 1/4 mile. Shown are Terrys previous 8.42 timeslips in the same car from different days.
- 283 replies
-
- 1
-

-
- disc brakes
- suspension
- (and 7 more)
-
Interesting. How quiet (at least subjectively speaking) are these? I am looking for a mellow, unobtrusive sound... actually I don't much care what it sounds like, so long as it is quiet, doesn't disturb anyone, doesn't draw attention, and approximates (more or less) a 1990s V8 taxicab, like a Caprice or a Crown Vic. In my application, space is not a premium, so huge mufflers (or even two in series, for each pipe --> 4 total) are OK... if that actually helps.
-
Flowmaster "50-series big block" mufflers for quiet exhaust?
Brad-ManQ45 replied to Michael's topic in Exhaust
This is what I put on mine.... https://www.dynomax.com/mufflers/ultra-flo-welded-mufflers/ultra-flotm-welded-centered-centered-598.html -
 I have been having a flowmaster hushpower pro 3" in and out 13012100 for the last 10 years, and it is loud and has so much drone on the hwy. I am looking for something quiet (er) and no drone. What are yall using on your swaps that is quiet and fits in the stock location on a 280Z?
 -
Hello hybrid z, its been so many years since this thread. Im now 46 years old. After reading through my build thread it brought back so many memories. I still have the car (I'm never selling it) it has seen some upgrades through the years gtx3582r turbo, injectors, standalone..etc. the car is still running like a champ and I have never been inside the engine all stock factory toyota. What's most amazing is how reliable the car has been...I think the only major problem i had is when the stock ecu went out.. Things I would like to do in the future are, totally new wiring throughout the whole car, all new fuel system and lines, stainless exhaust system, new dash and seats, new rear suspension setup.( i did the front a few years ago). Reflecting on this build also brings to light how expensive everything is now...in 2008 I paid $2000 for a 1jzgte and r154 trans...today that would cost 6k or more...my z was only $600 running and driving..now, that is about 4k or 2k for a z with trees growing through it... any kind of build like this now us easily 10-15k from the jump.. and thats not counting what you have to upgrade and replace because the car is 50 years old..lol It was and still is a awesome journey! Currently projects (nothing ever changes😊) 84 chevy c10 super charged 4.8 ls engine swap....should be done soon... 84 rx7, s5 roatry engine, ida weber, wide body, 10x17 all four corners😉...
-
I put a 3" in and out hushpower on my LS Z thinking it would be quiet. Its the only thing I dont like about the car, its loud and very droney on the hwy. Im trying to find what would be the quietest muffler that will fit in the stock location, I dont care if it takes a slight performance hit at this point to make the car more enjoyable.
-
L6 3.0 Rebello build with MilkFab Crankfire on the required 280ZX front pulley. The ZX pulley has a "B" size (5/8"width) for the AC and the normal "A" (1/2") width for the alternator and water pump. The car is street only and in Houston, TX. I have the complete AC system that I have used for close to 30 yrs and all I really want is a Sanden clutch for my compressor. I will spring for a compressor if it has the right width belt and can fab my own brackets if needed. Sanden won't answer e-mails and most of the parts sellers don't have the answers. Looking for anyone that has solved this issue.
-
I have a bunch of them from diesel maximas and some did not have the wings. Now they could have been replaced with Gas engine pans sometime since 1984. For drag racing you may need to add at least one baffle because the combination of front lifting upon launch and the acceleration of the car can actually nearly empty the pan and submerge the rear half of the crankshaft in oil. I didn't feel good about what was there from the factory.
- Earlier
-
Today is the first day in over a month with no problem. No slowdowns on other sites. Just left and came back with same problem - took over 1 minute to load, 15 seconds to go to particular forum.
-
it didn't occur to me that it could be something specific to this page but mine has been painfully slow for at least a month. Just assumed it was something to do with my internet.
-
Seems fine to me. Must have just been an intermittent issue.
-

A 2026 SEMA SHOW 260Z Build all the way from Great Britain
toolman replied to toolman's topic in Body Kits & Paint
Part 11- trial Fit of the 370 Rear Drive Sewction into the 260Z. In this episode, the Car is finally on the ground for Rear Suspension construction. Since they are using a Fiberglass Hatch Delete section, there will be very little space for anything else but a Fuel Tank Cell. the major problem is time to finish the car as they are not even at the half way point of the build. The craftmanship truly amazing as they solve problems with building a one of kind vehicle. . -
 uniquesnd joined the community
 -
280z 1jz track build from a pile of parts
flatout replied to flatout's topic in S30 Series - 240z, 260z, 280z
Been a long week but got everything completely stripped and got some epoxy primer layed down on all the metal surfaces. have plenty of body work to do but atleast its sealed and protected now. Hopefully in the next week or two i can get the bodywork done and get some color on it. I did talk to john and his comment is "I don’t claim to be an expert on bonding. But in my experience cracking at a bond line is often due to inadequate surface prep both the underside of the fiberglass and the underlying metal), poor bonding agent, not enough bonding agent, cheap body filler, and/or excessive flexing of the unibody. On the other hand, I know a lot of guys who do the bolt-on installation. For performance applications, it can be an advantage for working inside the wheel well". With that said I think I will spend the time to make the fitment as good as possible and make a last minute decision based on how well it fits/looks.
-
What is wrong with the server setup on the hosting site that causes such slow response times?


-
Who's Online 0 Members, 0 Anonymous, 1179 Guests (See full list)
- There are no registered users currently online