-
Posts
1051 -
Joined
-
Last visited
-
Days Won
9
Content Type
Profiles
Forums
Blogs
Events
Gallery
Downloads
Store
Everything posted by Chickenman
-
You do not want to block the lower hose period. Put an operating PCV back in the system. The 4 barrel manifold or your Holley carb itself should have a fitting for the PCV valve. Hopefully they have added a port to thread the factory PCV valve in to the Intake manifold. If you have that, then attach the PCV hose to that. You can get brass barbed hose connectors that enable you to lengthen the factory lower PCV hose to reach to a new location. 1/2" to 3/8" is a common size, but lots of sizes are available. If your manifold is not drilled and threaded for the factory Nissan PCV valve, then there should be a 3/8" diameter tube port at the bottom rear or front of the Holley 4 barrel. Connect a PCV valve to that. You will have to buy a Chevy PCV valve. The 3/8" tube end on the Chevy PCV valve goes to the carb side. The other end ( about 1/2" diameter ) you connect to the lower PCV hose. Note: The AZ manifold does have a port on the front side of the manifold that could be used for the PCV valve. It can be re-tapped if the thread size is not correct. It may lean #1 and #2 cylinders out a little though. The Holley carb PCV tube gives an even distribution of PCV flow. Connect the upper hose to the base of the Air cleaner as described by the AZ article. . Venting the lower hose or worse, blocking it is entirely wrong. I'm surprsied that AZ even suggested that. There are many advantages to running a properly functioning PCV system on a street vehicle and no disadvantages. Here is an excellent article on Crankcase Ventilation Systems by Arrington Performance: http://www.shophemi.com/images/media/p-2273-arrington_ccv_bible.pdf
- 13 replies
-

No overheat, still get oil cooler for race car?
Chickenman replied to turbogrill's topic in Nissan L6 Forum
5w-30 oil 40 years ago had a lot of ZDDP in it. Modern 5w-30 contains very little. ZDDP is essential for bucket type lifters or sliding finger followers. You may or may not get away with certain low ZDDP oils on a stock Z engine. Depends on the oil. But in a Race Car or a Weekend Warrior, with stiffer valve springs and a high lift , it can result in rapid destruction of the Cam lobes. We see it all the time on Audi VW forums and those engines have a lot less spring pressure and valve lift ( 5 valves per cylinder, 6 mm Diameter valve stems ) than an L-seriers. Anything that is Energy Star rated is low content ZDDP. Thicker oils such as 20w-50, 15w-50, 10w-40 and Diesel oils are not Energy Star rated and usually contain sufficient percentages of ZDDP . It's all buyer beware and you have to really research oils these days for use in Vintage cars, Hot Rods or modified engines. 5w-30 was a recommended weight for Cold climates, but it is certainlt too thin for a southern States climate. These engines ar older designs with larger bearing clerances than a car fom the Mid 90's and up. Things change in 40 yaers. -
The easiest solution would be to use the DIY 6 Cylinder IGN Waste-spark coil IMHO. $75 and you have a setup that is easy to use and powerful. https://www.diyautotune.com/product/ign-6-six-tower-coil-pack/
-
^Thanks for that. Some sound and thermal insulation is one of the additions I plan to make this Summer.
-

Tremec TKO Sequential Clutchless Shifting?
Chickenman replied to 260DET's topic in Gen III & IV Chevy V8Z Tech Board
Here's a good video of proper Dog Box up-shifting with no clutch and no Flat Shift. All controlled by drivers right foot. Unfortunately, not so good of an example for downshifts as this is a fairly tight and slow Stage. Note: This is a Turbo rally car. Ignore what's he's doing with the brake pedal. Turbo AWD rally cars are always using left foot braking to load the Turbo and to set up the car for corners. rally drivers left foot brake much more than Road Race drivers. https://www.youtube.com/watch?v=H98vSNz6vrw Edit: Here is another video by a company in Australia that makes Dog Gear conversions for street cars. Note that this driver is extremely experienced. Clutchless Dog box shifting is harder on the street than in racing. Note where he says, " the faster you go, the faster you shift ". Note the general speed of the shifts. He is not being brutal on the shift lever, but he is committed and shifts are quick and clean. https://www.youtube.com/watch?v=n_1jO64tuQA Some companies such as Liberty, make Face-plated or Pro shifted gear sets. These are NOT the same as Dog rings and are NOT recommended for clutch-less shifting. Liberty specifically warns users about attempting to clutch-less shift with these type of modifications. They are not suitable for Road Racing. G-Force? Personally I wouldn't use them. Very bad reputation and experiences with Road Racing users. Jericho, Sainz, Weisman and a couple of others are the big players for purpose built Road Racing transmissions. -

Tremec TKO Sequential Clutchless Shifting?
Chickenman replied to 260DET's topic in Gen III & IV Chevy V8Z Tech Board
If you go manual, you are going to have to get a box with Dog Rings. A 4 or 5 speed Jericho and Haltech can take care of flat shift on up-shifts no problem. . There are sensors that work on the shift lever that detect when you pull on the gear lever. They are very accurate. You can get either Torque load sensors or linear motion sensors. They work on both sequential and H pattern shift levers. This is what the Aussie V8 Supercars use. You can pick up a good used Jericho 4 or speed from shops that sell used Nascar parts. You can get some pretty good deals if you shop around. All the major Nascar Teams sell off used parts. The junior leagues such as Infinity series are a bit cheaper. For the 5 speed, check out SCCA used forums. If it's in your budget, a used 4 speed Jerico from a Nascar team may be your best bet. You can use a sequential or H pattern shifter. Sequential would naturally be preferred, but could be added later. Then a shift sensor on the shift lever. Transmission with dog rings is going to be the biggest expense. Downshifts just manually blip with your right foot. Note: Make sure you over rev and catch the change on the down swing of revs. A dog box will just fall into gear when you do it properly. No need for fancy Rev-up software. Your right foot and brain are more adaptable than any software programming. The secret to clutchless downshifting is the over rev. Most people don't give a hard enough blip. You have to get the engine RPM range ABOVE the engagement RPM for the lower gear. A slight but swift pressure on the lever, and the gear will just fall into place. Swift movement of shift levers with a dog box is essential. Dog boxes are made to with stand a " Crunch " on gear changes. What they don't like is too slow of a shift, that gives you some " Fine ground coffee " and 10 cents change. Dog boxes take commitment on gear changes. But when you get it right they will literally shift like butter. For upshifts with no clutch, it can be easy. You don't really even need the flat-shift hardware and software. Just do a quick, slight lift of the accelerator and pull the shift lever. Speed of shifting is the secret. Do everything quick and with commitment, and the Dog Box will be happy. One other thing. Always try and shift ( up and down ) at the top of the Rev range. This is where you will have minimal shock loads from Torque differential between gears. Dog boxes don't like to be shifted at low or medium RPM's. Fat part of the torque curve is the worst place to shift a Dog Box. I have some links for shift lever sensors for flat shifting. Gotta run right now, but I'll post them up later this evening. -
Ha Ha .. Green Giants were a favorite choice of the VW/Audi crowd for a long. Since then most Hybrid and BT guys are running E85 and need bigger injectors. And we have a unique spray pattern because of the three intake runners per cylinder ( 5 vales per cylinder ) and the GG didn't really give us the spray pattern that was ideal. Great for a Z engine though ( and many others ) The Green giants were always a favorite for the medium boost crowd. 440cc aren't they? Good choice.
-
Found some adapters to go from EV1 connectors on Datsun harness side to the Toyota Supra injectors with the Nippon Denso plug. $35.70 and Free shipping for a set of 6. http://www.ebay.com/sch/i.html?_from=R40&_trksid=p2380057.m570.l1313.TR0.TRC0.H0.TRS0&_nkw=282316220570&_sacat=0 Edit May,27th: The above adapters don't work on early Supra ( Late 1980's ) Nippon Denso injectors. They are made for the newer style Nippon Denso injectors from around 1993 onwards. They have a light grey color. Locating tangs on side are in wrong position. You could make these fit the earlier style injector by shaving off the side locating tangs on the injector. Updated May, 27th I have found some early connectors from Hong Kong for only $9.99 ( set of 6 ) plus free shipping. They are a Black connector not Gray. Looks like they are a Universal Nippon Denso connector. Note the wide locating slots on the side. This Vendor has a comparability chart and they are supposed to fit all Nippon Denso injectors. I'll let you know when they get here. ( Literally "Slow Boat from China " ) http://www.ebay.com/itm/291929715010?_trksid=p2060353.m1438.l2649&ssPageName=STRK%3AMEBIDX%3AIT
-

Different Progressive springs
Chickenman replied to walkerbk's topic in Brakes, Wheels, Suspension and Chassis
If you're doing any " Canyon Carving", Autocrossing or Track Days progressive springs can make the turn-in non linear. Not a nice feeling. Even a nice twisty highway can feel " Spooky ". It's good to have a car that behaves the same through all phases of a corner. Entry mid-corner and exit. Progressive springs tend to screw that up. Especially on a 40 year old chassis that was not designed for progressive rate springs. -
I'd take some Lacquer thinner or Acetone and wipe away all that spray paint where the oil filter adapter screws on. Why would someone paint that area?
- 3 replies
-
- oil filter
- oil cooler
-
(and 1 more)
Tagged with:
-
Oooooo....shiny!!!
-
BTW, MS and TS are fine for what they are. A learning tool. And the price point is good. But it's a DIY experimental science project. For what it is... " an inexpensive assemble it yourself, piece of kit to learn EFI.... it's pretty good. But its; simply not in the class of Motec, Adaptronics, Autronics Haltech, AEM Infinity and other high end systems. Nor should it be compared to them. That's not it's design criteria...
-
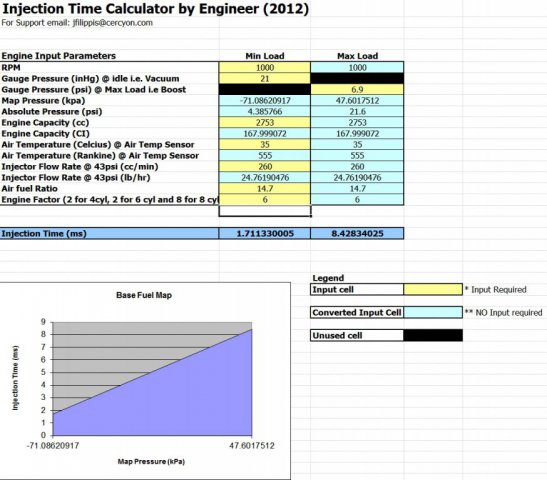
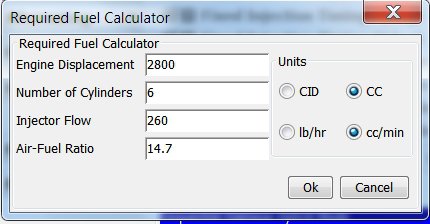
Just because you've never heard it before doesn't mean it isn't true. The information is out there. MS Forums if you dig deep enough, and Forums like HP Academy, and EFI University. You don't see any " Fudge Factor " because it's built into the software code algorithims. MS admits this themselves if you look deep enough. I posted the PW calculator from HalTec in another thread. PW calculators have been around for decades and there are lots of accurate ones to be found online. The fact is that Req_Fuel is just a Table Multiplier and not a very accurate one is well documented. Search harder. The calculations it comes up with are not accurate. It is a very rough calculation. Sorry but I've had too many days where I've been up past 3:00 AM in the morning dealing with ECU and Desktop computer repairs. . I don't have time to search for you, nor go back over 200+ pages of browser history. Not being a smart ass, I'm just tired. And I just had my beloved Cat die this weekend. Garbage in Garbage out is what I've always stated. But when you input the correct values and you get garbage out then that is a problem. Here is a screenshots of a proper PW Calculator which calculates minimum and maximum PW's and is VERY accurate. Following that is MS Req_Fuel calculator ( which is just another name for a Master PW calculator ) . Where are the input fields for Air Temps and MAP values. Below is the Master PW Calculation for a Tune I just made for a member and which is working fine. This is an accurate calculation. TS Req Fuel calculator picture below comes up with 12ms which is way to high of a requirement. That throws the VE Table calculations off. And this is done on purpose. To provide a " Fudge Factor " and make it safe. That is one of the design factors of TS. Well known and documented. The following entries are for the same engine as above. Haltech Master PW = 8.42ms . TS Req-Fuel ( Master PW ) = 12.0ms. Over 25% too high . That is what is called a ROUGH calculation. Going to bed. To tired to discuss any further...
-
^ basically yes, ( There are other constants involved that have to be taken into account. But those are constants ). Tuner Studio adds a large " Fudge " factor on the Rich side so it will be safe for Newbies. Consider Req_Fuel and the Calculated VE tables as a very rough starting point. I find it's really annoying that they do that. It's a common complaint with Tuner studio.
-
^ In theory that's what it's supposed to do. But in reality, the TS Req_Fuel calculation is not accurate. Neither are the TS VE Tables. They are rough approximations... very rough approximations. That is the problem. The Req-Fuel calculations are a good 25% higher than other PW calculators estimate. This is covered in the advanced forums many times over. MS and TS even admit to this if you search hard enough.
-
Which Supra injectors do you have? You can get them in both High and Low impedance. I have the 23250-70040 which are 310cc Low-z ( 2.8 ohms ) . Yellow tops with Nippon Denso style connectors. There are also Green Tops which are 315cc and High-Z. These are the Normally aspirated injectors. There are probably settings in TS that are correct. It's just that the recommended settings from MS manual's didn't work. Nor did the settings from the Hybrid Z article from 2007. Some of the Toyota forums may have more info on the correct settings to use.
-
Success!! Dropping resistors had been removed and I suggested they be put back in. Morgen did that this weekend and flashed my latest Tune . Bazinga!! Idles lean and clean at 14.3 right off the bat. That's with my 9.5ms Req-Fuel Tune , which I worked out using my HalTech PW calculator. He's gonna take it out for a drive and see how she goes. Should be pretty decent now. I've never been a big fan of removing dropping resistors. Changes too many variables. PWM should have been able to compensate, but suggested values were off. We did make some significant changes to the PWM settings, but obviously not enough. Finally some good news. Interesting the MS in their Hardware manual, hints around that Dropping resistors are not necessarily a bad thing.... Edit: Just went back and looked at an earlier post of mine ( #3 ) ...LOL
-

Idea for front knuckles.
Chickenman replied to AkumaNoZeta's topic in Brakes, Wheels, Suspension and Chassis
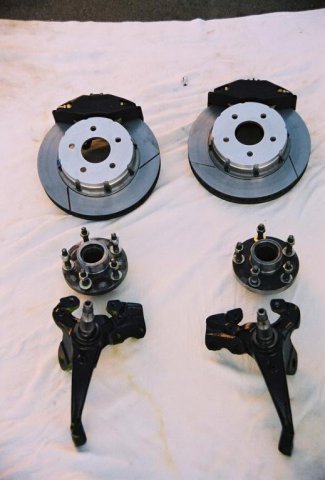
Use a separate Hub with Taper roller bearings and a Hat system for mounting rotors. No need to remove hubs to change rotors. Here are the front front rotor and Hub ( 1 piece ) from my 1986 Camaro. Rotors were machined off leaving a separate hub, Then I bought off the shelf WilWood aluminium rotor Hats that fit over machined hub. Longer 1/2" studs installed ( ARP ) -

Idea for front knuckles.
Chickenman replied to AkumaNoZeta's topic in Brakes, Wheels, Suspension and Chassis
Give me a Taper roller bearing any day over a Cartridge style dual ball bearing. Taper roller bearing will take much higher side loads than a Cartridge BB. This pops up all the time on cars that run track days. Track day corner loads and high brake temps can take a heavy toll on cartridge style front bearings. Drifting is easy peasy in comparison. -
What about Fast system? Are they in stock? Pretty much the same as the Holley system.
-

L30 stuttering/machine gunning issues during acceleration
Chickenman replied to uf240z's topic in Nissan L6 Forum
Could also be a faulty injector. Run some good injector cleaner though it. CRC One Tank Power renew is very good. Or better yet, send them out for ultrasonic cleaning, testing and calibration. InjectorRehab and Injectorman ( Motorman ) are two excellent sources You should also have local places that do Ultrasonic cleaning and testing of injectors. -
Thanks, but we don't think there is any problem with ignition. Nice fat spark, good sync. Timing does what it should and it can fire lumps of wet coal. We will check that though. Faulty injectors or faulty ECU are what we're concentrating on now. Injectors are highly suspect.... used and I just found out that they were never tested or cleaned. Wouldn't surprsie me if both injectors and ECU have faults. Testing and cleaning injectors is next on the list....
-
Thanks... I didn't notice that I had linked the non Text version. I can't understand a danged word Andy says!!
-
Personally, I find Fuel much harder to setup than Ignition. Ignition may be seem harder, because the MS ECU is quite sensitive to electrical noise. Proper grounding procedures and proper routing of Trigger wiring is essential. ECU should be grounded to engine block or cylinder as should the ground to AFR gauges and controllers. Use a Star ground for these to eliminate offset error. Large ground loops are bad. Do NOT remove the factory capacitor which is normally connected to the Positive side of the coil. It main function is to force a small ground loop if the coil is not bolted directly to the engine. Most Z's do not have the coil mounted on the engine. A small detail, but eliminating that one condenser will create a lot of Trigger signal noise. Most sensors all ground to ECU as per ECU wiring. Exceptions are sometimes Knock sensors and O2 main grounds. Those may be grounded to engine block. AFR gauge or controller will have details in instructions. Don't run the Trigger wires anywhere near a sources ( Plug leads, Ignition coil, etc ). 6 inches from Coil and Spark leads is usually sufficient. Try and keep CDI boxes at least 2 to 3 feet away. CDI boxes create MASSIVE EMI. Grounding of CDI box. This is the exception to the rule. Do NOT ground the CDI box to the same ground point as the ECU and AFR gauge or controller Don't Zip tie trigger wires to any =12 v wires like injector wires, main wiring loom or battery cables. Couple of inches clearance from those should be good. This excellent article and video from Adaptronics ( Andy Wyatt is chief engineer and owner ) explains proper grounding procedures and the importance of keeping ground loops as small as possible: https://www.youtube.com/watch?v=ZTDsm6b69Lk Hope this helps. Edit: Oooops.. wrong link. No translation for us Non-Ozzies See GK's link below.
-
Incorporate VE Table is used with an accurate WB sensor. When you use VE analyse and Auto Tune, it will use ( incorporate ) your AFR Target Table ( which you manually create ) to try and match the requested AFR numbers in your AFR table. If you do not have a Wide band, or WB is accurate, you disable " Incorporate AFR Target " Then the Cell numbers in the VE table will try to " approximate " the AFR targets you have in your AFR table. Based " loosely " on the other Fueling factors... It is my understanding that you have to Export your current VE table to the Desktop ( or some folder ) . Change your AFR Target Table numbers. Then Import the VE table again to make the VE table re-calculate. Take plenty of screenshots!!!


