AydinZ71
Members-
Posts
1073 -
Joined
-
Last visited
-
Days Won
27
Content Type
Profiles
Forums
Blogs
Events
Gallery
Downloads
Store
Everything posted by AydinZ71
-
Looks like I have cut springs... what now?
AydinZ71 replied to AydinZ71's topic in Brakes, Wheels, Suspension and Chassis
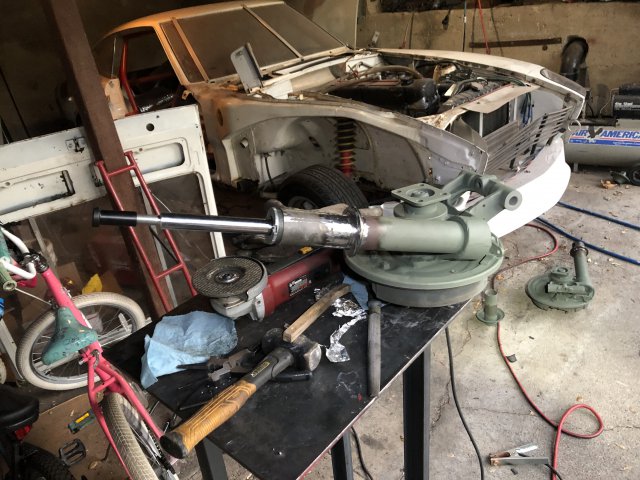
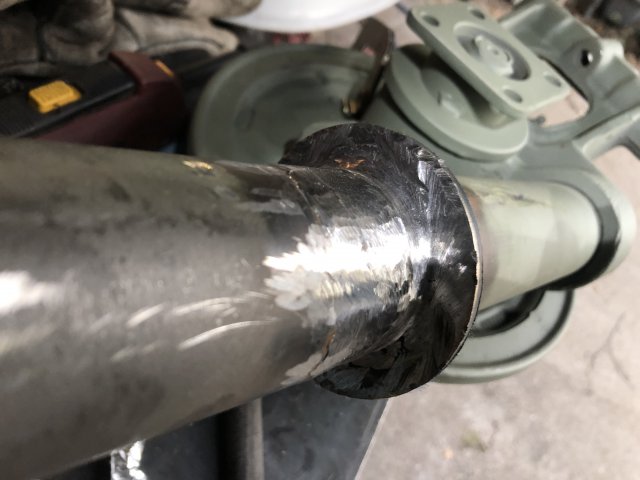
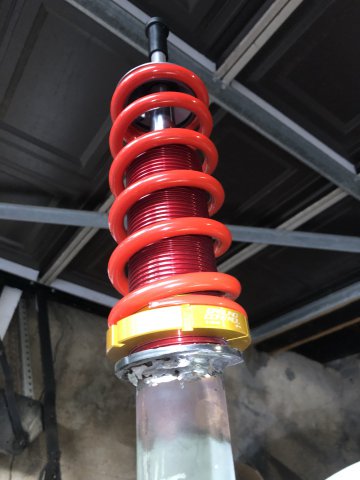
I suppose by now there are several write-ups on how to do this. If y’all think it’s worthwhile, I’m happy to do one. As you know, the Koni’s are a tight fit into the stock tube, so I used AL foil as a bushing to center the strut before tack-welding the threaded tube section. The foil also helped shield the shock from the heat of tack-welding. -
Stainless steel brake line problem
AydinZ71 replied to RDuff's topic in Brakes, Wheels, Suspension and Chassis
The all SS sealing surfaces is poor engineering practice IMO. Hydraulic systems often couple a hard metal with a softer metal for precisely this reason. I don’t think any of the “kits” out there have gone through this effort but I suppose it’s not a big enough problem to warrant a change. All SS coupling in other industries, like swagelok compression fittings, are machined to tight tolerances and include a “blighting” surface to overcome this problem. also, be careful not to gaul the threads. This is a process of over-working or overtightening matted metal surfaces. Most common in SS due to the hardness. Once gauled, it will be near impossible to uncouple the connection without ruining the threads. To avoid this, do not over-tighten the connection past the point where you no longer witness leaks under pressure. -
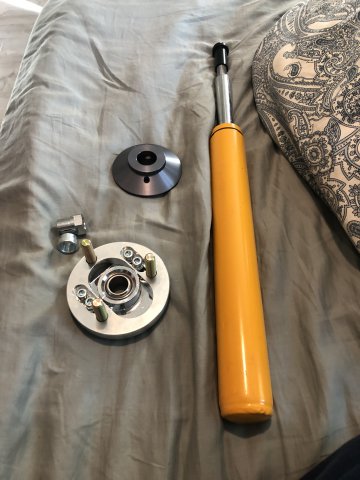
Thanks guys!! I will give ground control and Arizona Z a call on Monday and see if they are willing to sell those parts separately. I think I see what you mean. The coilover top perch (i believe you both refer to this as the top-hat?) will be applying force to the bottom of the camber plate, so it will not slide horizontally due to static friction. Then, as the suspension travels the shock will angle ever so slightly, but will be allowed to do so thanks to the teflon ball bearing. However, the spring perch will not, so the spring and shock will momentarily be forced out of concentricity, which will cause lateral strain. Do I have it right? That arizonaz bushing looks like it forces concentricity between the teflon bearing and the coilover top hat. I do see the likelihood of the top hat shock hole "striking" the shock rod itself (laterally) as the suspension travels. Its about 1/32" oversized relative to the shock rod OD (would not be a problem if it was a tighter fit). However, this striking is not along the length of the shock and would be occurring in the same place, pretty far up the strut rod and away from anywhere it may need to pass through the shock seals/bearings. How about a 1/16"-1/8" sheet of teflon between the top hat and the camber plate bottom surface? Teflon cold-flows, so it should "give" in the direction of strain which would take the stress of the AL & steel. It should also allow the top hat to "slide" laterally relative to the camber plate. Just an alternative idea. PU is stiffer, but I believe it has too high of a static friction coefficient to allow the top hat to "slide". Honestly, I would have rather bought the T3 or ground control camber plates, but both seemed to me to require cutting of the unibody which is not acceptable to SCCA production class. It has to be a true "bolt-in" solution utilizing the same means of attachment (unibody holes). I also agree that without enlarging/slotting the center strut hole on the unibody, I cant get much camber adjustment. Looks like I can only offset 3/8" or so to add negative camber. One idea here is to test drive the car and make the dampening adjustment. Then, "tuck" the shock adjustment valve under the mounting surface using a spacer between the unibody and camber plate. This would lower the adjustment valve low enough to not "strike" the unibody and allow further adjustment. Hope ya'll are OK with me geeking out on this so much. I may be over-thinking this.
-
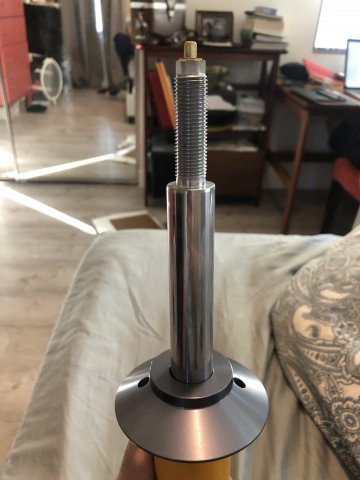
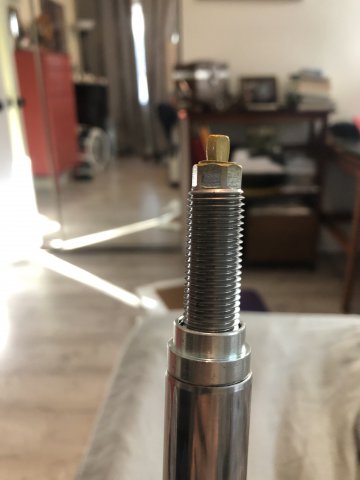
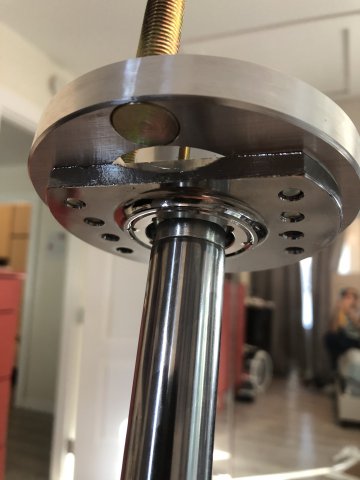
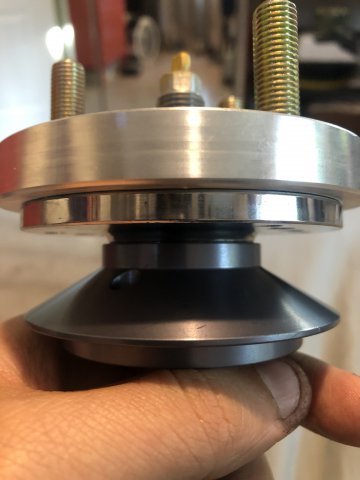
Hi all, and happy thanksgiving! I am assembling the rear strut assembly now, and I’m very anxious to make sure I don’t make a mistake here. Here is the part list: 1) silvermine motors camber plate. Bolt-in type, no cutting or welding necessary. This was important to meet SCCA production class rules. 2) Koni 8610 1437RACE 3) ground control coilovers with 10” Eibach 300lb springs. the camber plate came with some bushings. I have one bushing on the bottom, and the upper bushing seems to screw onto the shock end which not only centers the shock into the camber plate bearing, but also tightens to plate onto the shock. I’m presuming the upper spring perch from ground control then sits flush on the bottom of the camber plate? I attached some pictures and videos to help illustrate. I thank you all in advance again for all your help! I can see this thing being put together is several different ways so I thought I would check with the community IMG_4937.MOV IMG_4938.MOV
-
My L28et was mechanically stock, and my torque started falling off after 4800. It was obviously a breathing issue, but I never pushed it much with the stock internals. Aside from all the usual things I’m listing below, I think chief among them is the cam. To this day I still have not met anyone who has a full grasp or confident opinions on turbo cams for the L series. I often hear (what’s good for NA is good for turbo), but I’m suspicious. I even called Rebello about this, and they had only run a few L28et’s with Reground cams that they were impressed by. They could not quote me the cam they used over the phone and needed to do more research. I suppose I could call Datsun spirit next. The list to consider (in this order, although debatable) 1) polish chamber and pay very close attention to eliminating any sharp edges. Think of anything you would anticipate would “glow” when hot. Deshroud valves. Straighten and widen (within limits) the intake and exhaust runners. Port Match to your desired manifold. Shave deck or add gasket material to adjust CR. 2) cam and valve timing. I’m not an expert here so others can chime in. 3) stock exhaust manifold and down pipe are quite restrictive. Need to replace with Better flowing units. 4) 3” exhaust mandrel bent or 3.5-4” standard bending. 5) upgrade intake manifold and throttle body from stock. Obviously you will need an inter cooler, which should be 2.5” mandrel bent. I believe these improvements really matter after you get past the 250-300ft-lb range. this is just my opinion, and I do not have data to support this. Only my first hand experience which is anecdotal.
- 15 replies
-
Looks like I have cut springs... what now?
AydinZ71 replied to AydinZ71's topic in Brakes, Wheels, Suspension and Chassis
Great points! If its just a matter of noise, im going to pass on the rubber. Great point on the angular change... I didn't think of that till just now. -
Looks like I have cut springs... what now?
AydinZ71 replied to AydinZ71's topic in Brakes, Wheels, Suspension and Chassis
Thank you! y’all are so incredibly helpful! I will definitely hold onto them The rubber seems surprisingly good given the age. Must have been the midwest humidity. Is there a need to replace the isolators dampening function? I’m not sure how a 50 year old Frame (even though it is stitch welded) with the delightful hidden rust will react to no vibration/force dampening. I was thinking about buying a sheet of 1/2” thick EPDM rubber and cutting out holes to sandwich between the plate and the strut steel. -
Looks like I have cut springs... what now?
AydinZ71 replied to AydinZ71's topic in Brakes, Wheels, Suspension and Chassis
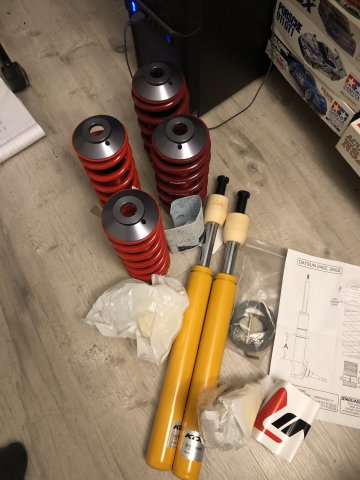
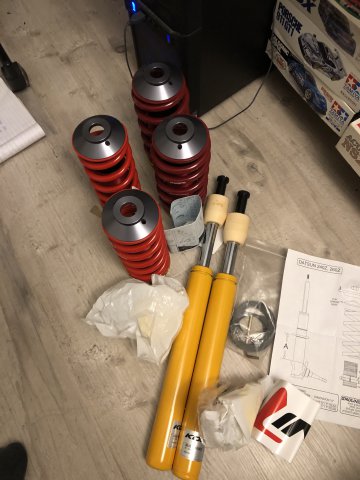
Parts in hand! Pulled the stock isolators, wire-wheeled the rust, primed and applied my favorite 3M rubberized undercoating. Ran into my first snag. The isolators seem to have a smaller strut hole which is “D” shipped to keep the shaft from spinning when you tighten the strut retaining nut. I searched the forums and saw some people drilled this out for the larger Koni threaded shaft. It seems to Me just about everyone is selling camber plates now adays. SCCA Group EP requires I do not cut into the stock strut mounting surface, and only allows for strictly “bolt-in” camber adjustment. Silvermine seems to sell the right option, as it seems the others require cutting. Great price too! https://www.silverminemotors.com/240z-260z-280z-camber-plates-bolt-in-lowering-kit I have also read some of the most experienced folks on here seem to have good things to say about the stock isolators. Lowering the vehicle height with the coilovers is going to give me more negative camber, but if I recall correctly the Z came stock with more positive camber anyways. What y’all think? Should I give the stock isolators a shot, and see how she does on alignment? If y’all think the camber will be unsatisfactory, Should I go with the silvermine camber plate or do you recommend another option? thanks again for all your help! This place is a wealth of information. -
Drum brakes for a racing application
AydinZ71 replied to AydinZ71's topic in Brakes, Wheels, Suspension and Chassis
On an unrelated note, my GC coilovers and Koni race shocks are here! Getting to work this weekend. It’s incredible how the instructions can be so poor for such a sophisticated product 😂😂 I found some YouTube videos to help. -
Drum brakes for a racing application
AydinZ71 replied to AydinZ71's topic in Brakes, Wheels, Suspension and Chassis
Thanks so much for all your help! I can answer a few questions that you asked, and I copy-pasted the SCCA rule book for braking at the bottom. - I will be entering the car into group EP road racing, or sell the car to another driver for that intent. The way i purchased the car, it would not have been up-to-snuff, so my goal is to prepare the car to have the "bones" it needs to be tuned into a competitive vehicle. I may never race it myself, as I seem to enjoy the restoration/research. My day job is as an ME, so I naturally gravitate to the technical challenge. - According to the rule book, I have to keep the stock front caliper. They allow alt. ferrous material but the dimensions must remain the same. Therefore, no vented front rotor for me. The car is currently equipped with cross drilled rotors, but this seems like an unacceptable upgrade given OEM was not drilled. I am really glad I asked yall! I fell like there is a reflexive notion to automatically go disk in the rear. If I am reading your responses right, having the right shoes in the rear for a road race could keep the drums usable. Especially if the front caliper/rotor combo must remain. The car does not currently have a hand brake, but I am eying the hydraulic one sold by arizonazcar. I will spend more time looking in the FAQ's. You two obviously have a ton of experience so this was very helpful. I will look into Greg as well! Unless i read something different, it seems like the way to go will be primarily upgrading the pads in the front and rear with R-4, or RD-4 Porterfield shoes and pads. The RD-4 seems to have a better bite at lower temperatures, which might be useful for my occasional drives on Angeles Crest Highway (I live a mile from the portal). "Brakes Level 1 and 2 a. Stock calipers must be retained. Cars fitted with integral hat brake rotors can convert to a two piece design hat and brake rotor. The alternate design hat must be made of ferrous or aluminum material. Alternate discs can be used, but must be made of ferrous material. Alternate drums can be used, but must be made of a ferrous or aluminum material. Alternate discs and drums must be the stock diameter, width and design. Brake rotors can not be cross drilled or slotted unless fitted as stock. b. Cars fitted with rear drum brakes, can convert to rear disc brakes. When converting from rear drum brakes to rear disc brakes: 1. Rear brake rotors can be no larger in diameter than the largest permitted front brake rotor. Rear brake rotors must be solid and made of a ferrous material. Rear brake rotors can not be cross drilled or slotted. 2. Rear brake rotor hats can be made of a ferrous or aluminum material. 3. Rear calipers and mounting brackets are unrestricted but must be made of a ferrous or aluminum material. The standard and alternate brake listings on a vehicle’s specification line, does not prohibit a car that was fitted with rear drum brakes as stock from converting to rear disc brakes under this rule." -
Hi all! I have been doing some research on drum vs. disk since my expertise is not in braking or suspension. I purchase it as an SCCA group EP race car, and I am restoring it for the past 4 months (it was in rough shape). For the purpose of this discussion, I am specifically talking about the rear brakes since the fronts already have disks. From what I read, it clear drums are cheaper than disks but are much more inferior in handling heat with consistent high duty-cycle use. I also see some sources stating they are lighter, but this was not specific to an S30 chassis. The spec. line from the SCCA rule book does allow for disks in the rear: "(R) 258 or 269 Solid Disc. Discs and calipers from 280-ZX." I am trying to determine if I should keep the car with drum brakes in the rear, of if it is worth the weight and expense of upgrading to the specific disks allowed by SCCA. The car already has a front/rear proportioning valve installed. If I keep the drums, I would be looking into adding my own modifications to improve cooling. Welding-in thin steel sheet metal on the rear side of the drum dust shield, as well as other cooling fins on the cast steel hub assembly itself. Would love to hear your input!
-
I might be wrong, but I also recall the shorter stroke on a stock L24 contributes to better reliability at higher rpm’s? Typical high-rpm engines run larger bore and shorter stroke for that reason. Less rotational inertia? once you start modifying crank, rods, bearings, Bolts, etc. then the L24-L28 trade off probably diminishes.
-
That’s awesome!! What did all the electronics cost you if you don’t mind my asking? I’m confident on the mechanical portion, but I have no grasp of the electronics cost. BMW ecu’s scare me 😂 as a former BMW owner
-
You know that smile is gonna last for a while that was the same feeling I had when I finally got my L28et started in my 71’. Apologies if I missed it in your thread, but what are you using for timing and fuel management? Stock ECU or independent?
-
Very impressive. I bet she will sound amazing!
-
Steel Datsun used for transverse link mounts?
AydinZ71 replied to 280Z-LS3's topic in Fabrication / Welding
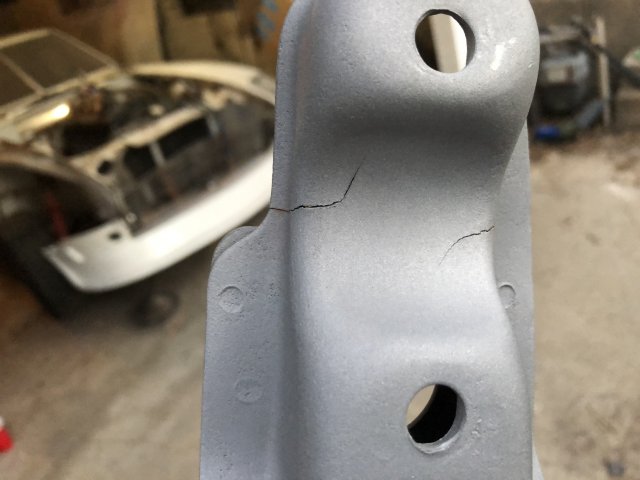
just to be clear, you are referring to the two rear cross members that mount the rear control arms to the body? I believe the transverse link mount is the technical term, but just wanted to be sure. the front one, I just recently stitch welded. I also repaired a crack that literally ran down the collar that is in contact with bushing. I used a .023 Carbon steel MIG welding wire with 25-75gas. I had no problem welding. The fusion on the crack repair was such that you can’t see any hint of a weld or crack, so I know the metallurgy worked. feel free to take a picture of the specific segment of the part you had trouble cutting so we can be sure we are discussing the same. IMG_4858.MOV IMG_4859.MOV -
Looks like I have cut springs... what now?
AydinZ71 replied to AydinZ71's topic in Brakes, Wheels, Suspension and Chassis
Thanks again so much! have an awsome week everyone! Koni 8610 1437RACE stuts and Ground Control weld-on coilover kit with 300/350 spring rates purchased! -
Looks like I have cut springs... what now?
AydinZ71 replied to AydinZ71's topic in Brakes, Wheels, Suspension and Chassis
AH! OK! well that's wonderful news. While I have you, what is your opinion of best value for a weld-on solution? It looks like ground control and TTT are near the same price. -
Looks like I have cut springs... what now?
AydinZ71 replied to AydinZ71's topic in Brakes, Wheels, Suspension and Chassis
Thank you for both of your responses! I currently have the OEM insulators, and no bump stops. By current, I mean what I disassembled recently based on what the previous owner installed. Here is the excerpt from the SCCA EP rule book: “Spacers and threaded sleeves with adjustable spring seats can be used with coil springs. Coil- over threaded body shocks/struts are permitted if coil-over shocks/struts were fitted as stock.“ if I read this correctly, it doesn’t seem I can use an alternate spring perch, but I seems I may be able to thread the OEM perch? I might need to call on Monday just to be sure I understand. I agree that if I can get down to the 2.5” dimension, the options seem to open up big time. Also, definitely targeting a 300/350 spring rate. I was concerned about running the Koni’s temporarily with the cut springs, but if bottoming-out is the main concern I think I will be OK if I get some bump stops in there. If I can find a group EP compliant spring solution, il just toss the cut springs all together. I just need to get the car to a handful of places in the meantime: body guy to hammer-dolly, Dyno to tune the new head when it’s back from the machine shop. The things I’m not skilled or equipped enough to do myself. -
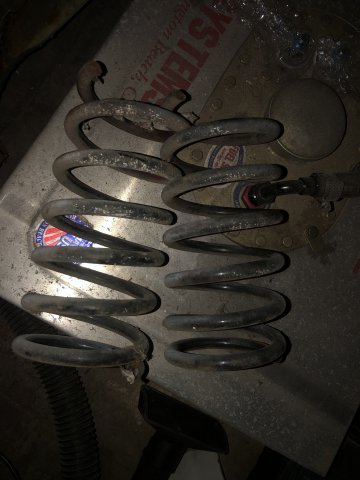
Hi all! Suspension NOOB here. thanks again for your help selecting struts (Koni 8610 1437RACE). Quick context: I’m restoring a SCCA Group EP race car I purchased about 5 months ago. It looks like the previous owner cut thier OEM springs from the original 10 turns to what looks like 6 turns. The car sits very low, but only occasionally scrapes on the exhaust U bolts. I think slightly over-dampening should help eliminate the scraping on bumps, on the street, and I shouldn’t have any issues on the track. Questions: 1) is there a possibility the cut springs may damage the brand new struts? I have not experienced any issues with bottoming out. 2) any idea what the new spring constant could be? I have tried researching but there is a lot of conflicting guidance out there. I’m struggling to find a stiff racing spring for the stock perches. I can not run coil overs in this race class, but I am allowed to thread the stock perch for adjustability if necessary. I’m thinking of running the cut springs for the time being. The ride is a little soft for a race car, but it is equipped with very stiff roll bars which do compensate in turns. My biggest concern is damaging the expensive new struts.
-
hello. I am looking for hood torsion rods. do you happen to have those for sale?
-
yeah 😕 I had to fab the bottom part myself with 18-gauge stock. I think 19 or 20 is the right gauge for this part, but nothing wrong with a little more steel.
-
Bummer thanks man! I’m glad I checked before I purchased. Looks like this is one of the few that do not work with stock input flanges.
-
PS: this is for the SCCA car to keep it group EP. The L28et 71' will still be getting Wlad's super 8.8 swap.
