Gollum
-
Posts
3202 -
Joined
-
Last visited
-
Days Won
18
Content Type
Profiles
Forums
Blogs
Events
Gallery
Downloads
Store
Everything posted by Gollum
-
And there ARE people who have made 400hp on factory pistons, let alone higher end aftermarket cast pistons. Just can't over-rev it too much and keep it out of any detonation. Tunes kill turbo engines faster than any parts or lack thereof.
-
Home Built Z 'Full video build'
Gollum replied to Home Built by Jeff's topic in S30 Series - 240z, 260z, 280z
Also stated in the YouTube comment, I love speed bleeders. But what I didn't mention, is that you could/should use them for clutch bleeding too. Makes emergency roadside clutch bleeding far more likely to be successful. -
Some good points made so far. I'll just add that 20mpg is possible with any size V8, provided you can get it running lean enough in the cruise MAP/RPM range of utilization. This is much harder with a carburetor and wet manifold. Port injection EFI does wonders in this realm. And obviously general rules of MPG apply. Going 65 instead of 80 is a far simpler way of gaining 2-4mpg than swapping cams. I've seen LS swapped 240z's knocking back 30mpg highway btw... That .5 OD and modern EFI does wonders.
-
For what it's worth I think my crank timing is 15 and I couldn't do a distributor sync at 19 degrees locked as the engine didn't want to idle down there. I bumped it to be 20 (locked) and it was much easier to get started and synced. Put the size wherever it needs to be to get it running before bothering about perfection. As for fuel, it sounds lean. Give it more VE in the idle area and see what happens (go up by like 20% to be sure you're going past what's necessary, which should prove that you're lean). Also, try not to trust a wideband when you can't get a stable idle. Even with sequential and a perfect idle it can still be difficult to get a reliable AFR reading. Generally it's better to be too rich than lean if you're running batch fire, but most engines are also much happier to idle at 12:1 than 15.5:1. You'll also know if you have too much fuel because more throttle makes it rev readily since there's already excess fuel looking for air. That said, if you're ignition is too far off, it'll never idle, which is why I mentioned just getting the timing in the ballpark regardless of what the timing light says.
-
That's machine+material on 3dhubs.com They do printing, CNC, and injection molding. That above price is a CNC job of course.
-
I've said it more verbosely in other threads, but times are changing and I don't know what the final solution is. But there's always been a double edged sword in every forum where asking people to search just halts discussion which could potentially foster growth on a topic. Eventually you've had conversations around 90% of what people ask, and there isn't enough left to hold enough interest to keep a community going. Facebook is the antithesis of this problem. People ask a question, and people answer because there's no real capability to search back through history, so the same conversations get repeated like groundhogs day. Most projects people are following are either on instagram, youtube, or facebook. Those same people may post to forums, but it's generally because it offers at least a cleaner space to discuss things than social media comments. That said, there needs to be something in between that I have yet to see pulled off. Where useful data can to collated and consolidated, into something maybe resembling a wiki, but open discussion can happen in a more social media style format where people are encouraged to share what they're up to and follow people's stories, which generally have little to contribute to technical documentation. Social media was never intended to replace documentation, but the main value we've all had for this forum is the documentation that comes out of the hard work we pour into our projects. Where would the L community be without TimZ and JeffP? But where would that information get documented if they only ever shared their insights on facebook? But conversely, what are we all going to continue talking about in order to keep traffic up if we've written 5 million words of technical documentation and just link people to reference pages anytime a question gets asked? There's a balance somewhere, I just don't know what it looks like yet.
-
Yeah... that hilariously doesn't solve the main problem, which is the sub on the hub side. That's what people break. I actually don't know that I've ever see an axle that replaces break, though I don't pretend to be any authority on that.
-
Jhm is right. The stub axles can go long before the diff. I'd also point out that driveline angle kills the stub axles in short order. The famous pic of jnjdragracing doing a wheel stand on a R200 is a bit misleading. If you dig through those posts you'll see that he was really peticular about making sure ride height was set properly so the car would squat to level axles under launch, and did a great job setting the car up. If you can minimize transient squat and lift by running stiff springs and don't lower the car much at all, you'll likely be okay for a long time. Otherwise you're better off finding a shop that can make you custom one piece CV shafts end to end to minimize chance of breakage, but that's certainly not a minimal cost.
-
I'm starting to be curious how light 240z doors are. My gutted '75 doors seem very light to me. Majority of the door weight is in glass and window mechansims (which I ditched).
-
Where's the Like/ThumbsUp button for this post?! But seriously, the flat tops will give you better quench (make sure they're deck-proud like stock and you're running OEM or fel-pro gasket and measure that quench!) and with programmable EFI there's no reason not to. Fuel quality in the 70's and even 80's sucked. Batches were really inconsistent, and most refineries had little programmed automation in their process to ensure consistency. When you combine that with the fact that most cars were running distributors with only a few varying curves it becomes obvious why compression ratios were kept low. The chambers were slower designs, and they couldn't pull timing around peak torque without making it difficult to add timing back in afterwards. Today, we can easily fine tune these knock prone regions and prevent knock scenarios. We also have much better fuel we can tune around and rely on the consistency being there. I won't stock you from going forged pistons, but what power levels are we aiming for here? If the mid 300's is as far as you're ever going, then factory slugs are fine as long as you don't detonate under elevated boost, at which point if you SEVERELY detonate under boost at high RPM you're screwed even with forged pistons. The forged slugs will just give a bit more window to find mild knock if you're chasing every last HP. And definitely spring for a decent turbo. I have nothing against the cheap ebay turbos, but if you care about response and overall experience, the new turbos are hard to beat. I'd be looking at the G-550 or EFR 7064-B with the .83 AR T3 housing. Both have show to be a capable 400+whp turbo with minimal lag and very responsive linear response instead of hard walls of boost response. Also, imo I really like my MS3X, but i'm not fond of the D37 connector. I'd go with a MS3 gold box or potentially a different platform like the EMU Black if I was doing it over again.
-
I got kinda tired of googling conversion charts or asking google and then having to compensate for atmospheric relevance. So here yall go: KPA To Others for Automotive Usage https://docs.google.com/spreadsheets/d/1hU1ShmrXwQqji-X-jzcNFayHBo7YALdC8okz5SE_HIo
-
How much you plan on saving by going this route? Seems cost unproductive in the long run. If you're trying to save every penny then go with speeduino or microsquirt. As to more directly answering your question, the NA Z31 parts would be hard to use out of the box and you'll spend a good amount of time getting it to run right. The tune on the turbo z31 would be a far better starting point, but I can still guantee that things like spool response and torque curve won't be near as good as having a modern programmable ECU.
-
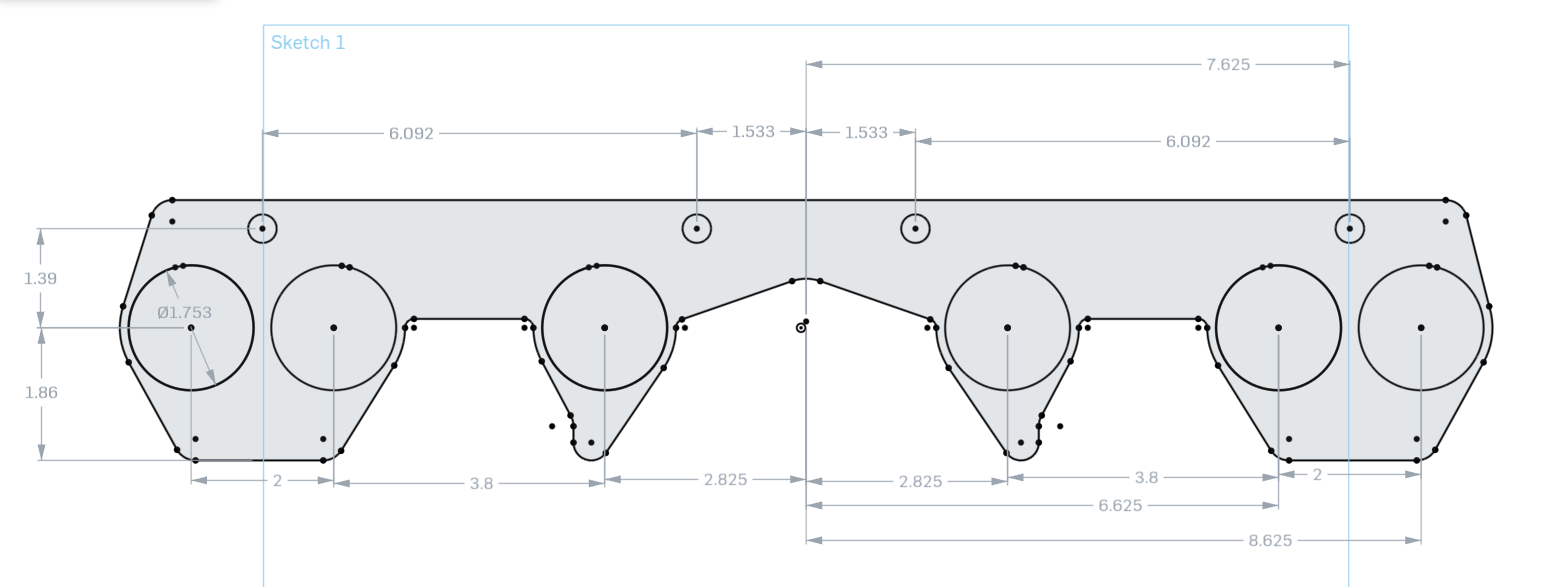
And because I was curious on what it'd cost to get the whole thing CNC'ed

-
Side note, ballpark to get a basic flat sheet/bar stock in .5" thickness, cut from online vendors ranges from $190-260 for 6061-T6. If you find someone local who can water jet or laser cut .5" stock, you can likely bring your own aluminum and have it cut for a reasonable price.
-
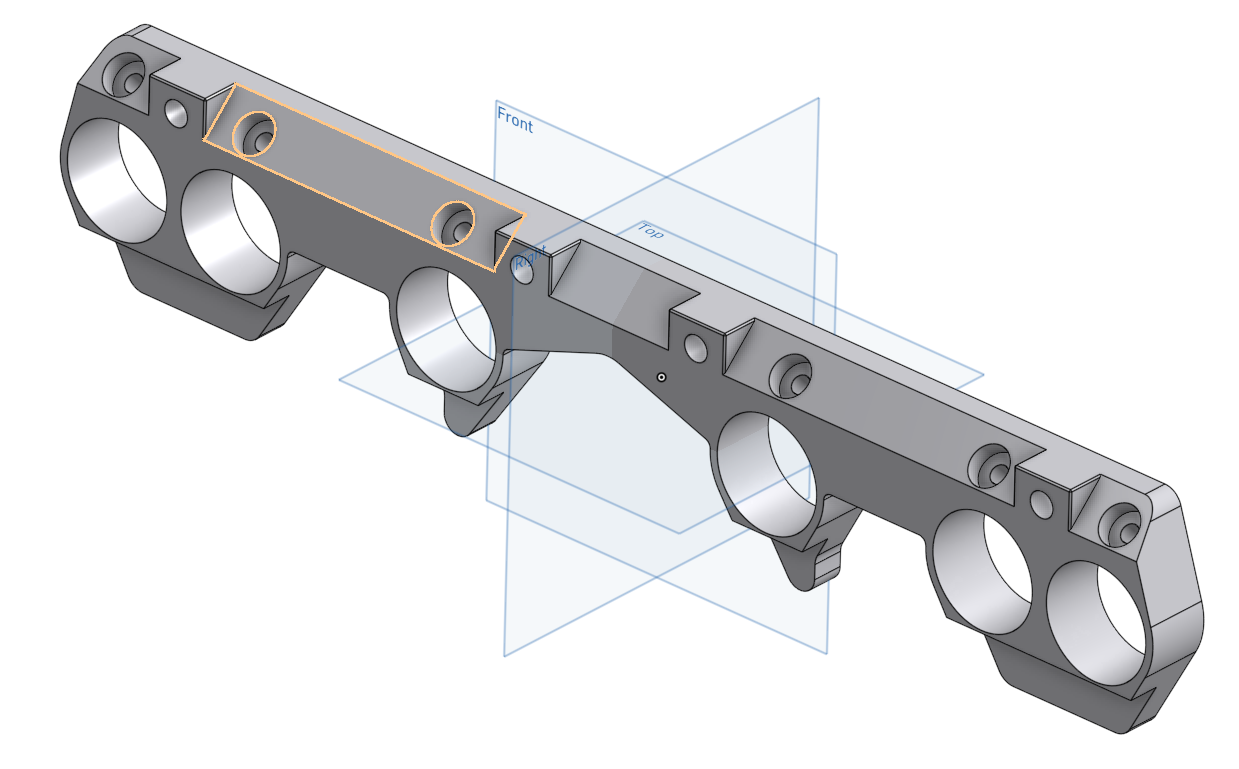
Onshape Import of Solidworks document, fork and modify! The Open Source way. https://cad.onshape.com/documents/62ec8d4c1b6a326b006e0e4f/w/829e4a2841936f5429ec421d/e/db10d8b7ab8801d4d61a16c5 Note that this is based off of Ron Tyler's flange he made (or had made?) which is spec'ed to the tube he used witch had a 1.5ID for the port size, with a centerline raised, so that the floor of that 1.5 landed on the stock port floor. If you wanted to use stock diameter runners, you'd want to move the centerline down. More/most ideal would be to undersize the hole, then bolt it to your head and match it. Hope that helps you out.
-
Seems there's at least a couple people who went for an android based CAN bus dash solution, which I find interesting considering all the dedicated race dash devices appear to be MCU based, not MPU based (think arduino not raspberry, no real OS just compiled code that direct acts upon the hardware). http://www.valvers.com/open-hardware/projects/android-dash/ (pretty stale) https://blog.arduino.cc/2016/05/31/maker-installs-an-android-tablet-in-his-cars-dashboard/ (less stale) And I think I knew this in the back of my mind somewhere, but RealDash is likely the smoothest bet to adding an extra IO box and using with with MS2 data for a dash: http://realdash.net/manuals/realdash_can.php But of course, you're running an Pi already, and want to use it's ADC built in. Sadly, I haven't found any way to grab non-Megasquirt data into tunerstudio dashboards. I'm sure it's a potential feature Phil could write in considering the work already done to grab other sensor data in shadowdash, but again, I haven't see success of what you're looking for. This is also why I've been so on the fence about what to do about dash hardware/app. I've decided for my own project for that now I'll be using shadowdash on my main phone and deal with the limitations of MS3X inputs.
-
You're fairly limited on extra inputs with MS2. I'm running MS3X and still finding myself wishing for more ADC inputs. That said, there's two spare ADC on the MS2 3.0/3.57 setup on JS4/5. These would work for extra inputs like oil pressure and fuel level, but a typical resistance value like the OEM fuel sender or oil pressure will require a pull up resistor from TPSRev 5V, and the resistance curve. You only get one custom sensor curve, otherwise your fuel level/oil pressure would have to use the same curve of another sensor, like MAP, CLT, MAT, EGO. Since the nissan oil pressure likely doesn't use the same temp/resistance curve, I'm opting for a linear pressure sensor which allows trivial calibration, and you can run a custom linear calibration on each custom input. That said, mine are in the mail. Should have them installed this weekend hopefully. These are the units I went with. https://www.ebay.com/itm/202353428547 Keep in mind for oil pressure you'll need a 1/8 BSPT to NPT adapter. What I ordered: https://www.amazon.com/gp/product/B00NWZ3TUI As an aside, this seems to be a common topic and the answer people wish existed was "use CAN bus for extra IO". Except I can't find a single working example of MS2 getting extra INPUTS from CAN bus. I can find lots of gauge products with extra IO that operate on canbus that claim megasquirt compatibility, but when you read their user docs they say the extra inputs are for MS3+ only. Now, if you were running a pure CAN Bus based display (haven't looked into viable CAN->Android dash solutions yet, honestly hadn't crossed my mind until just now) then a separate GPIO->CAN controller could broadcast data long with MS2 and you could get all that data available to the dash. A simple adruino would fit that bill nicely, and give you piles of extra IO to work with. You just wouldn't be able to do anything with it inside the MS2 ECU, which also means you need logging at the dash side, or separately on the arduino itself.
-
Definitely more foraging than forging. I'm not regretting having megasquirt, but I'd definitely make a different choice the second time around. That said, today was a pretty product low key garage day. I now have my flex fuel sensor installed though my wiring isn't final (just wanted to make sure it works). Also got my new IAT bung welded on. Tomorrow I think I'm going to make a run to the parts store so I can sort out my vacuum lines a bit better, as well as maybe find some steel tube to allow me to add my new bypass valve. I also spent some time working on my accel enrichment curve and now it's much more responsive with throttle stabs. Not perfect, but I need my VE table to be more solid before I fuss much more. And in case you didn't see it elsewhere: I was thinking I'd just cut the whole thing out, but I don't want to grind around down there too much with the tank in place, but then I realized I can just drill out the spot welds. Might tackle that tomorrow. We'll see. I know eventually, possibly next winter, I'll be installing a fuel cell so anything I do now is just temporary until I have a final floor placement with a cell in place. A small side note: Though goof off is primarily acetone, it's definitely FAR better at removing dynamat TAR. By a lot. It's also only $2/gal more at my local Lowes.
-
Yup
-
Looking back again there's less aero than my memory was serving me. He's running block plates along with radiator ducting with a tube frame radiator support. Not sure that's all that heavy. I thought it was running a full belly pan and more. I need to get my car weighed soon...
-
IMO something else was going on with Mike's weight figures. There's other light 280z weights, even later years. I poured over Mike's build to find the weight when he first posted his results and the only conclusion I could come to without seeing the car myself is that not enough of the car was cut out in lieu of the cage and chassis stiffening installed. Mike also had a lot more work and weight put into aero than most which is definitely worth something that's often overlooked.
-
Whoa, that's impressive. Gives me a goal to shoot for. What was your fuel tank level at? 👏
-
Seems like threads should require moving to the FAQ by a mod though... But yeah, the post was curious. Seemed almost spam-like. "Dude, your answer is in your question".
-
Luxury Daily restomod 280z Questions, Help?!
Gollum replied to Pnemerishin's topic in Fabrication / Welding
Well, here's an effort to guide/assist. What you want isn't impossible, and the compromises will only be found as you make progress. You don't really made a decision on a compromise before you start, so the key is to just start. You have a S30 you like. Does it have rust in the floor? Start there. Once you know floors are solid, adding an extra layer of underbody coating is easy as parts can all stay on. Removing interior to do inside with lizard skin and/or a mat can be done relatively easy in a weekend unless you want to remove the dash (not a bad idea, just not required for a first pass attempt imo). Tear down the doors to get those lined in something to deaden the sound (well placed dynamat works well here, just don't go crazy as 100% coverage usually just adds weight more than it reduces noise, you're just trying to kill resonance). This would also be a good time to add power windows if going that route. Also while you're looking at the doors, make sure you have door rubber in good condition, as this is a huge source of road noise. Also looking at seals, the hatch seal likely needs attention too. If you want to go a little crazy, the rear wheel well covers don't shield you much from the road noise. Adding some dynamat to the rear arches is good, but I'd also construct a secondary cover behind the rear panels that go between the wheels and tail lights, as that area picks up a lot of noise from under the car and transmits it into the cabin area. The interior panels alone do hardly anything to block that noise. While on the noise subject, don't forget that added padding/carpet thickness will also help greatly. Once these first pass noise items are done (which are also semi-affordable in the grand scheme) I'd focus on the more mechanical things you can do that don't require major downtime/parts removal. 90% of people seem to LOWER their car, and increase spring rates not just to prevent bottoming out, but reduce body roll and provide a more sporty feel. Ironically, race cars do the opposite. They run as light of a spring as they need for a given track condition, then drop the height until the scrape. They use as much travel as they can get, leaving nothing unused. To give you a more luxurious ride, off the shelf coilovers will be the opposite direction in many ways, as the dampers will have much more aggressive bound resistance. You likely want softer bound damping, with close to factory rebound, with mildly softer springs. As long as you don't add 400lbs over factory, and you don't lower it, that should be fine, but also give you a lot smoother ride. I'd also run factory size roll bars, not larger, and run them with as minimal preload as possible semi-loose with rubber bushings, not poly. And on that note. replace all your bushings, and use OEM rubber. Another item high on "feel" list imo is braking. Like steering, modern cars brake very differently. An oversized booster and master cylinder should go a long way to providing a softer pedal that acts more aggressively, not requiring as much take up travel as factory. Vented front disks wouldn't be a bad idea either, since you're already taking suspension apart. Also, in case it wasn't obvious, run a quiet tire. This means it won't be the highest performance tire, but a quiet tire goes a long way in improving road noise as well as generally softening some driving dynamics. For power steering, I'd go for the common electric assist setup. It's far simpler from an mechanical perspective as you don't need to find a powered rack and fabricate mounts for it, or find a pump and a way to put it on a given engine. And as for engines, you're not asking for too much at all. But first step, on the interim period, is putting a better muffler on your current setup. Get something that'll quiet your engine down to a whisper, then other noises will be easier to track down and reduce. But the first engine that comes to mind is the new 2.3 mustang ecoboost with the ten speed auto. It'd be a little trick to install as you'd most definitely need the factory ECU and solve the security requirements, but it's not impossible. But it'd be far quieter, make significantly more power, and have a transmissions that FEELS like a luxury car by comparison. Oh, and it should easily get you 30-35 highway mpg. Speaking of MPG... Better aero will actually help noise. Use headlight covers. Block off as much of the airflow AROUND the radiator as possible. Get a seal between the radiator and the support, add a seal on top of the radiator core support between the hood. Build a belly pan for the engine bay. Reducing this airflow into and through the engine bay will reduce wind noise that ends up getting heard through the firewall. At some point, you'll end up being able to hear wind noise around the mirrors. Get aerodynamic mirrors. Also, make a rear pan might be beneficial from an aero noise perspective as well. Sharp edges like the rear panel below the bumper will catch air and create noise. Same goes for the underside of the floorpan. While making a 5 piece belly pan might not have documented downforce figures, I'm quite sure you can end up reducing a fair bit of road noise, and it's not very expensive from a materials side, just a lot of time and energy. Also, once noise levels are low, I'd do testing with tape on items like the drip rails to see what else is making noise at high speed something as simple as the inlets on the cowl panel might be making a lot more noise than you realize, but don't hear in the car's current trim. At the end of the day, all of this comes down to "start with the obvious" and work your way around the problem. Don't assume you need to cut the body apart and put it on top of a E36 in order to achieve your goals. A S30 CAN be quiet at speed. It can also drive REALLY nice when done right. Also remember that these cars didn't rattle, slam, and pop from the factory. A lot of your current noise is just "restoration" work that needs to be done. -
Luxury Daily restomod 280z Questions, Help?!
Gollum replied to Pnemerishin's topic in Fabrication / Welding
Because I'm evil. https://www.cargurus.com/Cars/inventorylisting/viewDetailsFilterViewInventoryListing.action?sourceContext=carGurusHomePage_false_0&entitySelectingHelper.selectedEntity=d2209&entitySelectingHelper.selectedEntity2=&zip=95696#listing=224779223