ezzzzzzz
-
Posts
970 -
Joined
-
Last visited
Content Type
Profiles
Forums
Blogs
Events
Gallery
Downloads
Store
Everything posted by ezzzzzzz
-

Wheel Show! Post your pics of you wheels
ezzzzzzz replied to k3werra's topic in Brakes, Wheels, Suspension and Chassis
Those wheels look great. I have given them consideration. I think I'm going with old skool Halibrand knock-off style from Vintage or Team III for my 240Z. Either way, it will be in the $2400 range (I hate spending that kind of money on wheels). I don't want spacers and little or nothing is produced that doesn't have a +25mm to +45mm offset. -
The 90.5 will do for your 88 bore.
-
...............BRAINS...............yummy!
-
I appreciate their knowledge. If put up against 200+ car manufacturers that do incorporate fresh air then I think VA is taking the easy way out. Certainly, it's easier to control humidity within an enclosed space. If it was the best way then why would all of the manufacturers go through the engineering and costs to include it? It wasn't as if it was terribly hard to make the changes in my 240Z. Should I find it to be unacceptable I'll just leave the vent closed to outside air.
-
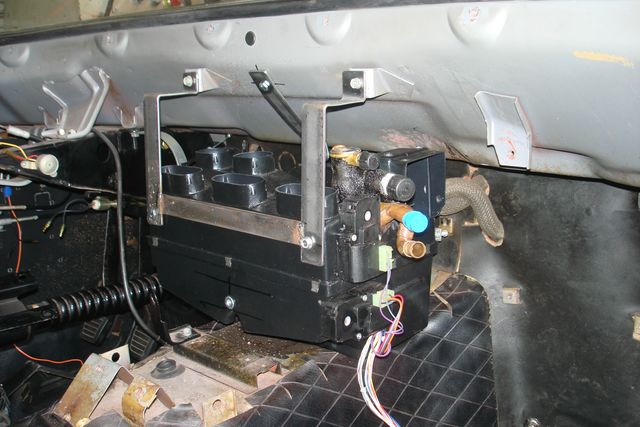
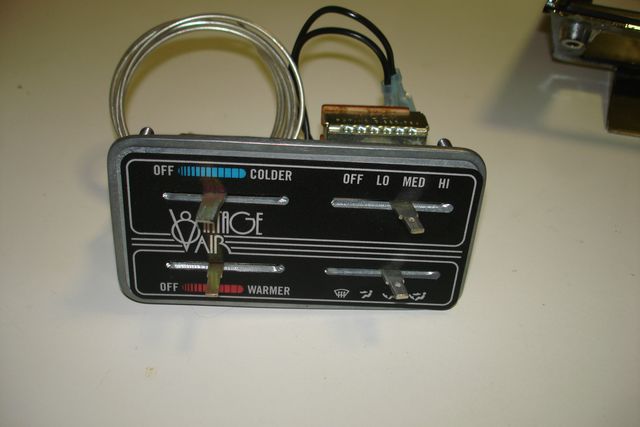
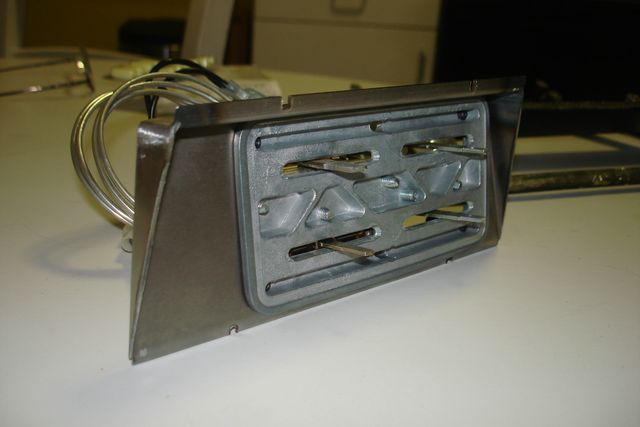
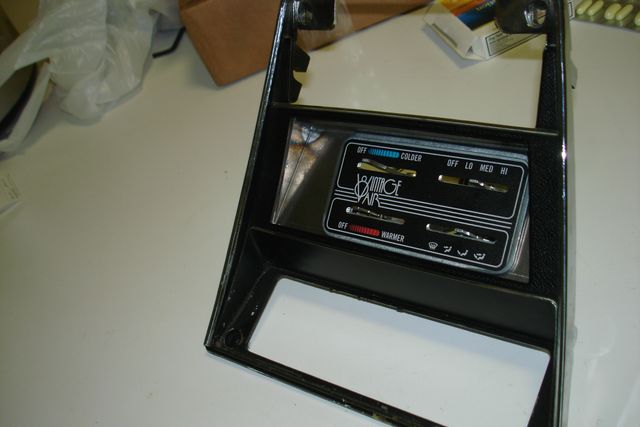
Here's the start of a Vintage Air Gen II compact installation. I was not satisfied with just recirculated air. A little bit of ingenuity and I'll now have the option of cabin or fresh air. You can see that I changed the fan housing to move it 2" to the passenger side. The fresh air intake had to be opened to align with the cowl opening and the outlet was changed too. A honda fan motor is also being used to add air volume. The evaporator case will be wrapped in damplifier before final install to reduce associated noise levels. The tunnel and cowl were both slightly modified with a hammer to fit the unit. The other pictures show the control panel fitted into a panel I had made. It replaces the stock illuminated control panel. The area to left of the controls will hold a push/pull lever to open/close the air vent in the fan housing. I'm also modding the VA control panel to add more lighting as theirs is less than favorable.

-
You should try http://www.dimequarterly.tierranet.com or any 510/610 forum. Datsport in AU will sell you one and it ships reasonably cheap.
-
I'd have to say side to side across the front and back seams of the floorpan. You'll get the most bang for the buck reducing torsional twist although a cage is where true strength lies IMHO. There are spot weld drills that would make a better hole for welding than grinding a slot.
-
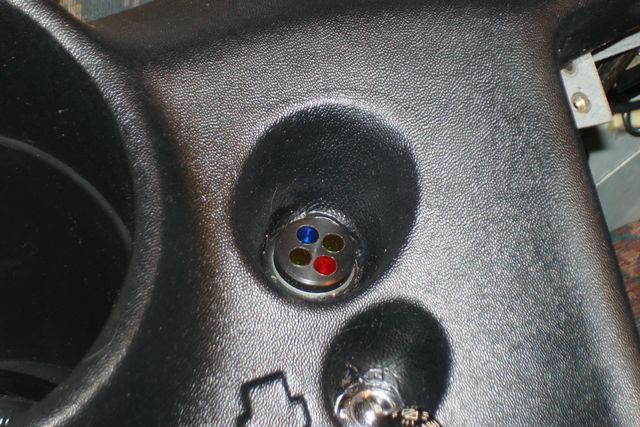
I got the standard blue. The cobalt seemed a bit too dark to my liking. As for the turn/high/brake lights I had considered using something like the old PRND21 indicator found on the column of old cars/trucks. Nothing I found was flat. Since my oil pressure gauge is going on the steering column cover between to gauges I had to come up with something else. The idea of mounting lights in the speedo/tach housing has been done by someone here. I didn't care for the look personally and thought it would also reflect off the gauge faces awkwardly...but that's just me. My pod is not everyone's cup of tea but it is in a location where it's easily seen and discernable. I like the idea of the NZeder's but it kills the only lighting of the controls in the earlier 240Z. I did look at installing LEDs in the gauge faces. These gauges are well made and have the stepper motor circuit boards directly behind faces. Modifying for lights would have been tedious and would void the warranty.
-
In it's simpliest form Nigel has it correct. Instead of going into a long disertation here I'd suggest googling rod/bore ratio and bore/stroke ratio.
-
I'm using L20B rods (145.9mm long) and custom JE pistons. Oh, I'm also using the LD28 block and crank. 1.75 rod/stroke ratio and 1.02 stroke/bore ratio. The displacement is still roughly 2.8.
-
Even, I have a complete set, unopened. If you want to pay shipping and $20 it's yours. I purchased two sets a while back but only use one.
-
I need a late 240Z heater control bezel (illuminated panel) in very good condition. No chrome chipped or missing. The heater controls aren't needed.
-
Are you talking about lash pads or the butterfly springs used to keep the rockers on the adjusters? Aftermarket retainers for our L28 will accept a Nissan lash pad (keeper). That's the only way to adjust for proper wipe against the camshaft lobe.
-
WD-40 will keep rust at bay. Drain oil/coolant as best you can. Spray it and bag it to keep crap out. I'm assuming you're going to rebuild properly? If not, I'd be inclined to clear all passages prior to reassembly. WD-40 tends to coagulate over time (fish oil based) so I'd clean it off prior to assembly.
-
What is too much cam for stock valve springs?
ezzzzzzz replied to ezzzzzzz's topic in Nissan L6 Forum
Damn, John, I have a hard time keeping the checkbook balanced. I don't think I'd be inclined to keep a count of high revs counts until they reached 25 hours. I rarely see revs that high anyhow as I don't race and prefer my driver's license and low insurance rates over a bicycle or skateboard...LOL. -
What is too much cam for stock valve springs?
ezzzzzzz replied to ezzzzzzz's topic in Nissan L6 Forum
Thanks Paul, I had no intention of using the old springs anyway. Ron Iskendarian spoke with me this evening about the build, the vehicle usage and expectations. He suggested a particular regrind of a Nissan cam. It will be in the .480+ range. I knew stock springs would never hold up to that. New springs will come with the cam. One more step to completing a long and costly project. The LS1 conversion would have been much more effective power/cost but I love the sound of a straight 6 winding up! -
Blue72, having worked around machinery most of my life I'd like to point out a possible unsafe habit. It might have been for the photo op only but you should never leave the chuck key in the machinery (lathe, mill, drill, etc). The simpliest mistake could have devastating results to equipment and/or persons. Seen it done and it isn't pretty. That goes for anyone in here.
-
I'm going with a re-grind for my SC'd L28 project (it's the LD28 block/crank/P90 combo). Drivability is very important to me. I've had the 500 hp V8's and they're fun but not for daily driving. I've talked to Jerry at Schneider, Jon at Delta and Ron at Isky. All are recommending cams with 225 to 230 duration at .050 and .460 to .464 lift and 112 lobe separation. It isn't confirmed but I think these are assymetrical profiles. With mild boost of about 6-8 psi I hope to achieve 250 to 300 hp (that could be a dream). Back to the question at hand. Crane has a set of springs close to stock seated/open pressures. Isky are a jump up to 130 for seat/280 opened. I don't want to overload the valve train if it's not needed. Input?
-
Crane is Allison repackaged. They bought them out years back. Maybe it's heat soak. Where is the control box located? You might spray some compressed air over it when it doesn't start to see if that 'cures' it. You could find a later stock electronic distributor or just replace the control box. MSD is great when it runs. I had failures with their products back in my early years of Camaros and small blocks. Others did too.
-
A spool gun is the only way to go. Using the standard mig gun off the welder is result in a lot of bird-caging and frustration. I speak from experience!
-
I started my secondskin installation yesterday. The quality of these products is unmistakable once you have them in hand. I've covered most of the back end so far. The spare tire well has a double layer in the bottom. The wider flat area to the right of the spare tire well has an extra layer too. They seemed to produce the most noise when tapped. I covered 100% of these areas and much of the strut towers and the wheelwells (about 80% of dampifier and luxuryliner). The rear quarters were treated to about 70% (secondskin recommends 60% before returns are diminished). The biggest effect came when I laid down the luxuryliner material in the trunk area. That made a huge difference even in the ambient noise as I worked. I even applied some damplifier to the back of the plastic panels. Tonight I'll pull the seats out and start the install up front. The added weight will be in the 100 lb range. Somewhere I read that bandaids should also be included. I didn't notice any cuts until I started removing the adhesive on my fingers with acetone...holy crap...that burned! It looks like I was digging in a jar of razor blades.
-
Braze them up and file them flat. It's low temp so warpage shouldn't be a problem. That's what I'd do anyway.
-
We know that the difference in ID of the Z31 and S30 front hub seal is about .070". Cutting the outer dust lip off the Z31 seal will ease installation onto the spindle. While this arrangement works it also places excess pressure against the spindle surface. Add grease and road grit and you now have grinding paste. Over time, abeit maybe a long time, you will wear a groove into the spindle surface. I have considered machining the Z31 hub to remove the original hub lip that holds the seal, machine further out and deeper and press fit a new machined ring that would allow for the S30 seal to be used. Am I just being anal here or I'm I onto something worthwhile?
-
Subaru Rack Size Compared to Stock Z Rack
ezzzzzzz replied to tonycharger72's topic in Brakes, Wheels, Suspension and Chassis
Well, I can only speak for myself with this conversion. I measured a spare 240Z rack against the STI rack (not the housing, not the whole assembly but just the actual rack). There was a difference between the two (the Suby was longer at the tie rod pivot points). This rack material is very hard. I had a machine shop cut .5" off each end. The hole was drilled deeper and tapped further to use the S80 tie rods without having to cut those shorter. I did this to ease tie rod replacement later on. The slots for the locking tabs were also machined into the rack. NOTE: This machine work placed the pivot in the S80 tie rods at the original location of the stock tie rods. I can only speak for the 240Z rack and the Suby rack I used. There is likely to be differences between years and models of both makes. Unlike others, I didn't give a crap about the overall length as the S80 tie rods allowed for appropriate adjustment with plenty of thread. I know I'm missing something here as it's been nearly a year since I started that project. Heidt's PS gear is race oriented. I was referring to OEM production parts. I should have made myself clearer. Yes, there are newer systems that provide variable pressure that is speed dependent. It becomes complex and expensive I'm sure. It also is probably computer controlled. The boundaries are endless for modification and modernization. I have found that compromise works well for me. It comes down to $$$. To a point, many improvements can be made. After that, the return becomes expontentially smaller. I'll post some photos tonight of my setup on the bench. -
Here are two more photos showing the pod installed.