NewZed
-
Posts
6700 -
Joined
-
Last visited
-
Days Won
72
Content Type
Profiles
Forums
Blogs
Events
Gallery
Downloads
Store
Everything posted by NewZed
-
That's the lower right. Condensers are typically only problems if they short to ground. Meter it.
-
Apparently, light bulbs go dim over time, before the filament breaks and they quit working. Plus, some of the instruments have more than one bulb. If one goes, the gauge will be very dim. Proper bulbs are hard to find but probably your best bet. If you want to check the potentiometer you could just measure resistance through the circuit. If you can get the connector off.
-
Sometimes it's best to stop thinking/guessing and just take a measurement, so you know something. Measure voltage at the alternator T plug with the key on. S and L terminals at the wire harness ends. No voltage, no function.
-
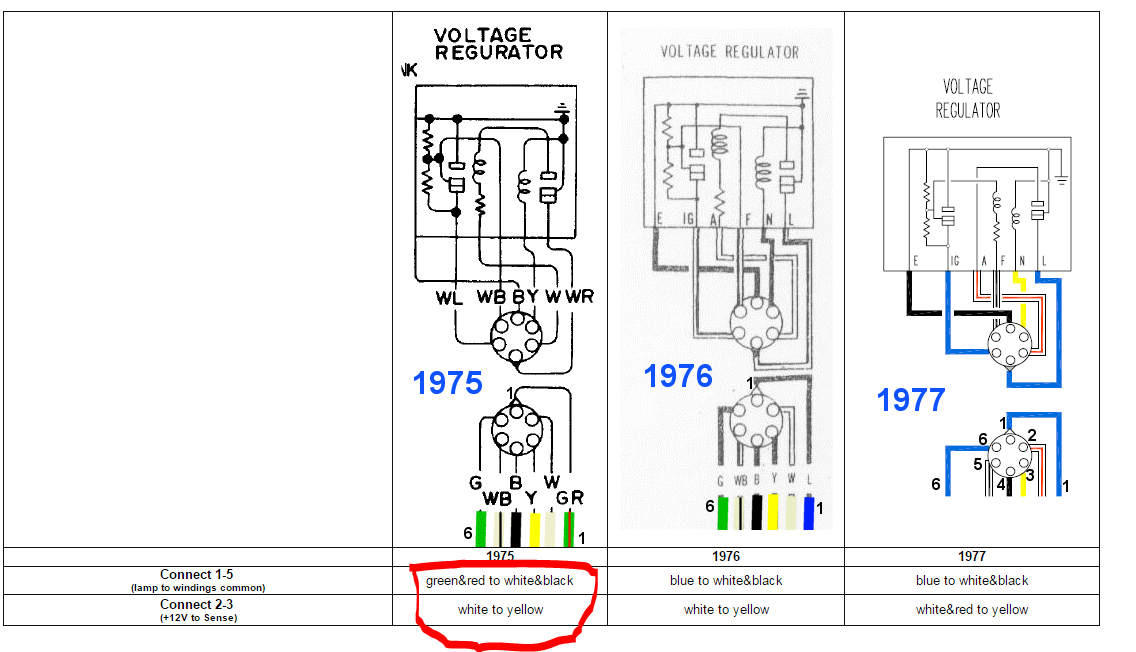
Give a better description of what you have connected to what. The internally regulated alternators are pretty simple, they just need battery power to the :"L" wire, usually supplied by the charge "L"amp, and the S wire needs to be connected to the battery and/or other loads to sense voltage. No L and the alternator won't charge, no S and it won't regulate. There are other issues to deal with related to the car wiring, but that's all that the alternator needs. The atlanticz diagram works well. You might be looking at too many things. The atlanticz doesn't have white/red and white/black joined. Try it, then use a meter or test light to verify power at the alternator plug.

-
Which damper? Where's the post?
-
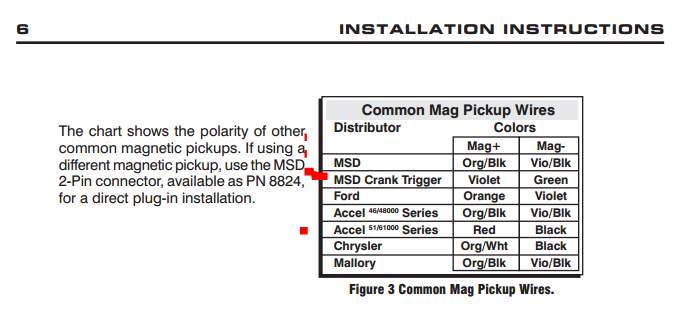
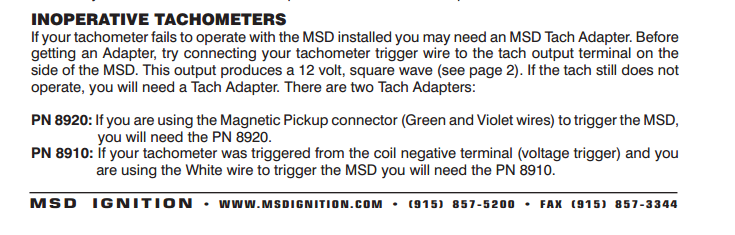
If I recall right, the problem with using MSD on the 280Z EFI is that the ECU doesn't handle the multiple sparks. So you might get spark, but no injection. There's probably a way around it but I don't know what it is. When you say it won't ignite, do you mean there's no spark, or just the engine won't start? And are you using the stock 77 EFI control system? According to the instructions you should connect the red wire from the 280Z distributor to the violet 6AL wire and the green 280Z wire to green 6AL, for a magnetic pickup, to get spark. but this may not give injection if the ECU doesn't get its signal. If I was trying what you are I'd connect the tach output wire on the side of the MSD to the blue wire that runs to Pin 1, and the tachometer (copied the relevant text below). That should/might give the right single trigger to the ECU, if not the tach also. You might find that you need to split the blue wire apart from the ECU the tach to get them to work. Just guessing. http://www.msdignition.com/uploadedFiles/MSDIgnitioncom/Products/Ignitions/6420_instructions.pdf
-
Are you getting the rest of the parts too?
-
The one that people tend to miss is the vinyl covered cardboard panel on the inside/ The latch hole isn't sealed so fumes can enter the hatch frame and get in through the panel opening.
-
I don't know this person, and he might be jingoistic, and it's Arizona ZCar, not Clifford, and it's a 450 Carter, not the recommended 390 Holley. But, might be worth an e-mail. http://seattle.craigslist.org/sno/pts/5367761434.html
-
Pretty vague. Receipts would be nice. An amateur installing new parts might be worse than nobody installing no parts. Fixing the interior will cost a lot. Make a list of the parts you'll need to get it like you want it and see how much those parts cost. It's a worn Z car with bad paint, no bumpers, no carpet, and trashed interior. You'll spend a ton on numerous small parts to make it decent. On he other hand, if you're looking for something to work on, there's lots of work there.
-
A few basics seem off here. Looks like your dial indicator probe is sitting on the threads, and the shaft itself, alone, may not be what determines if the flanges run true. When the axles and companion are bolted together things may be different. Along with the bearing play. Probably best to measure an assembled set. 100 mph doesn't really have anything to do with 512 whp. You can get there with 150 probably. Just saying, traction and torque cause different problems from high speed spinning. Is the adaptor plate the same one that Miles shows in his link. The Modern Motorsport 280ZXT adapter? (Note to mods - I thought that I had posted on this earlier with a comment about quality. If I did, and offended, please let me know. I thought it was innocuous and relevant. But maybe there's some sensitivity. Or maybe I never hit Add Reply. Not sure).
-
Bought a used Car with MS - 1 v3.0, need help identifying proto mess
NewZed replied to tolerate's topic in MegaSquirt
Should have said so. Why leave this question if you already know? Trust the information and move on, eventually you'll find something that's not right. -
1973 240z 280ZX Alternator Mystery Plugs
NewZed replied to Dat73z's topic in Ignition and Electrical
Should have taken pictures before you installed it. Did a piece of paper come with it, in the box, with information on it? The blue wire is probably the P terminal, not used for most applications. The rebuilders just put the extra stuff on to reduce SKU's. The condenser is just for electrical noise. Probably shown in the 240Z wiring diagrams. You should keep it. It was probably attached to the back of the alternator. -
Bought a used Car with MS - 1 v3.0, need help identifying proto mess
NewZed replied to tolerate's topic in MegaSquirt
I still get lost in the MS1, MS2, MS3, MS3X, MSPNP, Microsquirt, V2.2, V3.0, V3.57, daughter card, stuff. But, it seems like, maybe, this link has some useful information for you. Found it with Google. http://www.diyautotune.com/tech_articles/megasquirt_injector_driver_troubleshooting.htm -
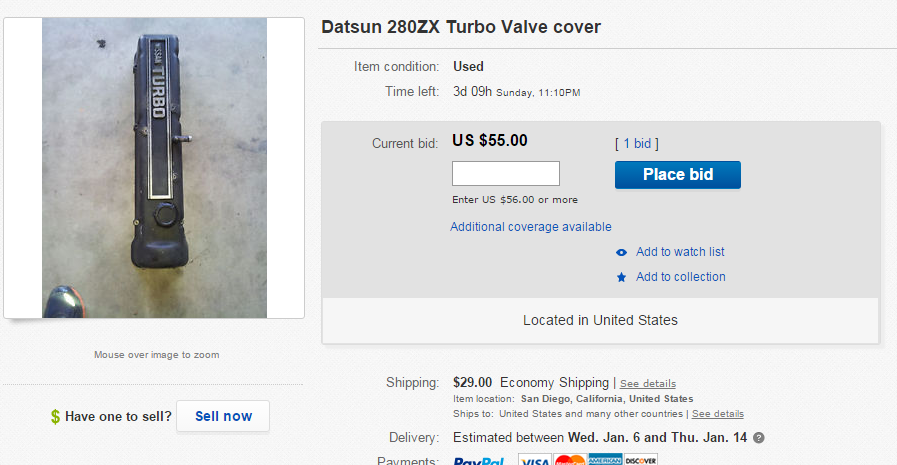
http://www.ebay.com/itm/Datsun-280ZX-Turbo-Valve-cover-/221979658773?hash=item33af04ca15:g:1a0AAOSwJcZWgN-u&vxp=mtr
-
Undoing aluminum valve cover warpage
NewZed replied to seattlejester's topic in Fabrication / Welding
Make a fixture. A flat piece of metal, some holes, a tap. You'll either find that it pulls down easily or there's no freaking way. Or just stick it on the head, torque the bolts lightly and see what happens. I tried this technique on a cylinder head and was surprised at how easily the warpage pulled down. Made me wonder about all of the effort spent making heads flat. You're just trying to stop some oil from leaking out and air from leaking in. -
You've kind of killed your own thread before it could start - "(not a debate guys)" debate: a formal discussion on a particular topic in a public meeting or legislative assembly, in which opposing arguments are put forward.
-
Weird pertronix d2000 ignition module issue
NewZed replied to beaniam's topic in Ignition and Electrical
Never mind. Thought you were using the ECCS. You should post in a Megasquirt forum. http://forums.hybridz.org/forum/34-megasquirt/ -
Match the fuses or go a little higher. There are two separate plugs to the dual relay, if you wanted to replace just half/one. Here's a potential source - http://www.datsunstore.com/relay-fuel-injection-7577-fuel-pump-p-735.html
-
Twin cam head for the L6 from Derek at Datsunworks
NewZed replied to Derek's topic in Nissan L6 Forum
I did blend my sequentials. Was trying to figure out why FricFrac was talking about "sequential" ignition and got messed up. I assume it was as opposed to wasted spark, but there must be a more clear term for it. "Normal" ignition, maybe? Single coil, wasted spark, coil-on-plug? Even wasted spark is sequential where it matters so that doesn't seem like a distinction.. If ignition timing is based off of crankshaft position, as an indirect measure of piston position, and if lash in the system is important to be accurate, why would a cam sensor be better than a crank-mounted sensor, or even a distributor? Both of the latter two have lash inherent. Focusing on ignition alone, no cam timing control, or injection. Just the timing of the spark. That's accuracy, having the sensor tied to the crankshaft, no chain or gear lash to deal with. Precision might require an optical device, the more signals the better. So, an optical device on the damper pulley seems like the ticket. For most accurate ignition timing, regardless of coils. Just trying to break it down to the basics. There are many combinations a person could put together. Anyway, as Derek pointed out, the buyer can put whatever system on that they want. -
Twin cam head for the L6 from Derek at Datsunworks
NewZed replied to Derek's topic in Nissan L6 Forum
Isn't comparing "wasted spark" to "sequential" the wrong comparison? It should be wasted spark versus coil-on-plug (COP). Tried to find a simple internet reference but everyone compares wasted to sequential. But it seems like you should be able to run wasted spark in sequential mode. You only get half coil capacity (as noted above). Maybe EDIS doesn't do sequential. Sequential goes away in most systems above a certain failry low RPM number anyway. It's mostly an emissions fix, isn't it? And it seems like the "trigger" is where the precision and accuracy are generated. The 360 little holes are for that purpose. -
Your cylinder pressure numbers are above turbocharged engine spec., standard, and above both NA and turbo spec., low. Maintenance chapter, S.D.S. There's a lot of variability between tools and techniques but yous don't look terrible. Might be worthwhile to do a little more detective work before spending. Good luck.
-
Not to mix your threads and forums but didn't you say that you were going to get it running and drive it for a while before tearing things apart. You're not even sure what you have. You're going to end up with an empty wallet and a pile of parts.
-
Your issue isn't the threaded portion of the spring perch on the tube, it's the piston in the damper assembly. The shaft in the shock.. As you move the spring perch up you extend the shock. A good shock design will maintain enough contact at full extension to be okay (I think, I'm not an expert in shock design). Besides that the shock/damper should only see small side loads. It's mostly along for the ride and the control arm is what handles side loads. The strut controls the up and down. If you set the perch too high, the shock will "top out" over depressions in the road. Lots of topping out isn't good for a shock absorber. .Run one all the way up and see how much travel the shock has, then you'll know how much you have left when you set the spring perch.
-
Who is "as tore"? https://zcardepot.com/exterior/bumper