NewZed
Members-
Posts
6700 -
Joined
-
Last visited
-
Days Won
72
Content Type
Profiles
Forums
Blogs
Events
Gallery
Downloads
Store
Everything posted by NewZed
-
Blue dog setbacks, now the head, need pointers
NewZed replied to Kevkev5162's topic in 6 Cylinder Z Forums
Cylinder pressure will give you clue about compression ratio. -
Get the numbers from the engine block (cast-in above the driver's side engine mount - N42, F54) and head (N42, N47, P79, P90). List the parts the engine rebuilder installed (flat-top or dished pistons). Described the injectors (color and numbers, if you plan to keep them or just for fun). You might have a 78 NA motor with turbo parts added. You listed all of the bolt-on parts but none of the ones critical to being a turbo engine.
-
Twin cam head for the L6 from Derek at Datsunworks
NewZed replied to Derek's topic in Nissan L6 Forum
The voice of reason in my head is wondering if knowing it works wouldn't be worthwhile before spending too much effort on appearance. Only posting to support that tiny voice that you must be hearing in your own head... -
Sounds like the axle clips are not in!!! You can see them if you look in the hole. They're needed.
-
Pretty sure that KYB and Tokico use different gland nuts. Look at what they do and you might find a way to make your stock nuts work. I had pondered the differences when I installed my KYB's. A piece of thin wall pipe cut to size maybe. The nut centers the shock in the strut tube, and clamps it to the bottom of the tube. Use something around the top of the shock to center it, and washers on top to get the proper clamping force. Threads showing when tight.
-
I thought that most people just got the clip started in the hole then used something like a deepwell socket to keep it square while they tapped it in.
-
All I'm really saying is to for Joe, or zcardepot, or DSS, to say this. And this is just a single point. I asked about materials to zcardepot in a different thread and he answered. But, before I asked, his was just another "kit" from an unknown person who may or may not know what they're doing. Like Senza Pari, or Datsun Parts Limited (aka California Datsun). The same questions keep coming up and we, the forum members, all answer them in terms of what "should be". Just pick the middle and you'll be fine. But the guys making the parts just make a list of parts, some pictures, and a horsepower rating. At least DSS took out the crazy stuff from their ad copy. Just trying to clarify some things. Surprisingly difficult to do.
-
You've only tried the 39 spline hub axles from MM/CFJ, not the whole kit. I'm just looking for the most basic confirmation like "this assemblage of parts, the kit, fits in to an unmodified S30 body and suspension and functions properly". Selling five kits and not receiving any complaints isn't much. We all know about the binding problem if they're too long, and pulling the axles out of the diff if they're too short. If they require adjustable rear arms, that's fine, just say so. And I'm just offering advice to the guys that sell the products, on how to sell more. But, on the other hand, when people get on the forum and say horsepower rating is their main criterion for choosing a product, you can't blame the manufacturers for their ad copy. Even DSS talks torque in their online articles but puts "1000 horsepower" in the ad copy. Who needs "1000 horsepower" for an R180 application (the first link in Post #1)? That's absurd. But pretty funny if you think about it. Here's something interesting though - the 1000 HP part of the original DSS link is gone. People are watching these forums and responding. Which is good. Eventually we'll see descriptions like "end-to-end (flange-to-flange) driveshaft length allows installation in all S30 platforms (240Z to 280Z) with no binding or shaft-pulling. 930 race, cage and bearings use XXXX material, with heat treatment designed for racing or high-performance street usage. The cages will explode in a drag-racing application". Something like that. I'm just a guy who reads these things, realizes they make little sense or are missing the point, and asks questions. On here mainly for the discussion right now. Joe seems like a good guy but I don't think that he's a car guy. Probably a very capable machinist and businessman making parts exactly to specification, like the best machinists do. We need to get him the right specs., and help him describe what he's selling so people will buy and be happy with what they get. Everyone wins.
-
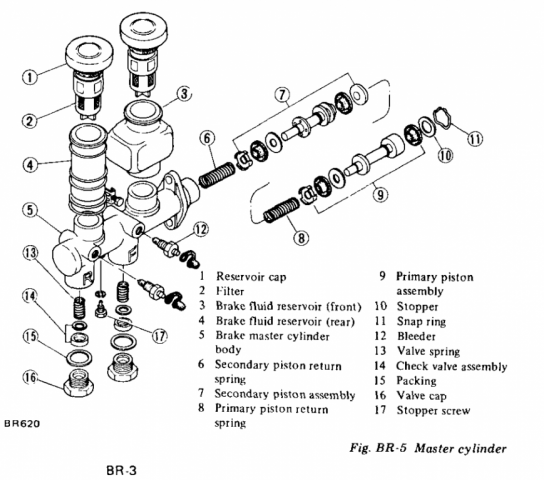
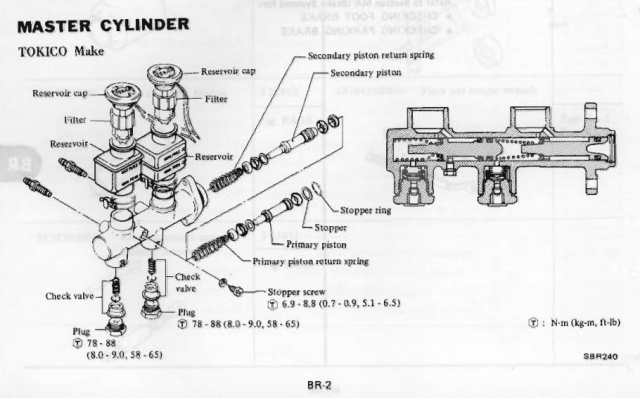
I wonder why Nissan puts check valves in the MC outlets of their four disc cars, if they're only needed for drum brakes. Maybe not needed, but offer some small benefit? A mystery.
-
These axle conversations never satisfy. Weird how the endless loop continues, never really adding much. At least this round has led to the knowledge that there are nine CFJ kits out there somewhere, five for one of the S30 bodies (narrrow 240Z or wide 280Z?). Maybe one of those people will drop by and offer some real-world insight. Also, zcardepot has reported some of his manufacturing process in a different thread. Of course, some questions remain unanswered. Apparently he'll be putting together and installing a kit soon though so might have some feedback. Some progress is being made. The company that makes good parts, fills the knowledge void, and can add a feeling of security (real or not) to a purchase with numbers and results will probably win the battle. Many threads out there from people asking questions then moving on to something else when there are no answers. Anybody know what material the stock flanges are made of and their heat-treatment?
-
Oops. Didn't follow my own advice... My mistake. 39 spline axles? Plus, one's for the R200 and the other the R180.
-
Now I really feel ignorant. 1976 shows a check valve also. I have check valves. I wonder if instead of removing these check valves, they should just be replaced with a lower force (pressure?) valve. 2 and 10 lbs seem to be the options. Might be a fine detail, but if they've been using them in all models, they would seem to have some benefit. Opinions seem to vary though - https://www.mico.com/sites/default/files/document-pdfs/81001017Residual%20Pressure%20Valve.pdf I feel smarter now. Good luck dreco.
-
Just noticed that the MC I showed appears to have residual pressure valves, aka "check valves". I need to "upgrade" my brakes so I can learn more stuff.
-
Found a few things. Interesting. Seems likely for dreco. Carry on. http://www.mbmbrakeboosters.com/index.php?option=com_content&view=category&layout=blog&id=8&Itemid=16 http://www.championtrailers.com/content/remove-residual-valve-instructions.pdf http://www.freeasestudyguides.com/residual-check-valve.html
-
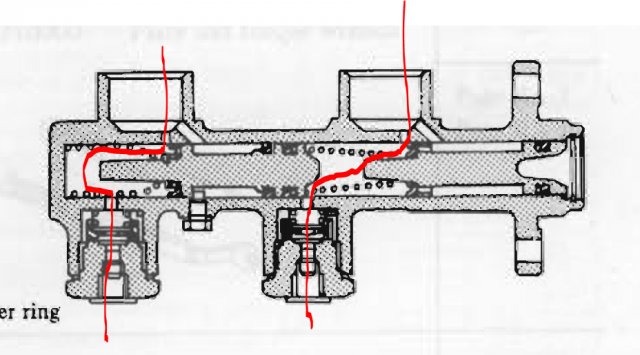
Miles, how do these residual pressure valves work and what is their purpose? Just trying to learn something. Are they spring-loaded check valves, that release back to the reservoir at some set pressure? Seems like an odd thing, maybe meant to work with certain parts.
-
-
When the rod in the MC is back to its proper starting position it's impossible to hold any pressure in the hydraulic system. The formerly pressurized system is completely open to the atmosphere. Unless the cap on the reservoir is sealed and has all vent holes blocked. It's just the way they're designed. You can see it in the drawings. Unless, apparently, you have one of the special ones described above.
-
The rod from the pedal to the booster, in the cabin, might be too long. Not allowing fluid back in to reservoir. It's been discussed many times if you want to search around. "Sticking brakes", "brakes won't release", etc. If this was the case, pulling the clevis pin on the brake pedal should release the pads without opening the bleed valves. If it's the booster, then loosening the MC from the booster should do the same. A quick check of the mechanical pieces.
-
Only posted because the general vagueness around this topic is fascinating. Horsepower numbers, buzz words, lack of specifics. The driveshaft shop at least has some informative discussion on their web site. Hard to tell who's making what and who knows what they're doing.
-
Beats your guy by 200. http://www.modern-motorsports.com/datsun-240z-280z-complete-cv-axle-conversion.html
-
Twin cam head for the L6 from Derek at Datsunworks
NewZed replied to Derek's topic in Nissan L6 Forum
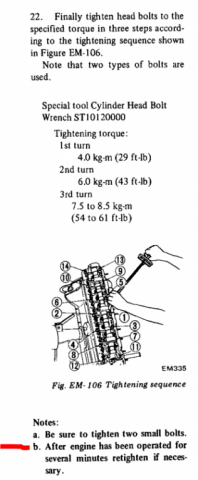
One could argue about how warm an engine is after a "few minutes". You can see a possibility for mis-interpretation though. -
I would get in to the details. You're looking for something big but it's probably something small. Could just be a vacuum leak at a carb gasket. Spend some time understanding what's really happening. You said it backfires through the carbs when you rev it, but you also said " I did get it to run the other day long enough" implying that it won't even idle. Won't idle and won't rev are two different things. If you're using an E12-80 module use a coil that has specs. close to a ZX. Like ~ 1.0 ohms primary circuit resistance. Be careful with your cam swaps and lash adjustments. The cams don't tolerate certain things and will wipe a cam lobe pretty rapidly. Backfiring through the intake can also be a sign of a wiped exhaust lobe. Make sure that your lobes are still lobes, and not cylinders.
- 10 replies
-
Back at ya. What is your idle ignition timing? What is your mechanical advance curve, approximately? Is your camshaft installed so that lobes open and close the valves at the appropriate times? You're swapping parts, but don't seem to be setting them up to function properly. Timing is more than everything with an engine. Could also just be running lean. That causes intake backfire also.
- 10 replies
-
1. The electrical circuit that controls the lights. 2. Timing: ignition and cam.
- 10 replies


