NewZed
-
Posts
6700 -
Joined
-
Last visited
-
Days Won
72
Content Type
Profiles
Forums
Blogs
Events
Gallery
Downloads
Store
Everything posted by NewZed
-
Bot
-
"brakes" How about eBay or craigslist (or whatever the Canada version is) or a wrecking yard? Just get some beat-up used aluminum wheels. .
-
Question about a new down pipe for a 86 300zx Turbo Edition
NewZed replied to MemVol's topic in Z31 Series - 300ZX
Ironically, I was hoping that you would leave that one. It's a good example of what's going on these days and it didn't seem to have any hidden links in it. Now my post is hanging out in thin air. I would bet that whoever is creating the posts is watching to see the responses. They're using various forums to fine-tune the AI. Seeing if they can get a pseudo-conversation going. We're being used as beta-testers. -
That Gorilla glue might not be resistant to hot ethylene glycol and water. That is the inlet to the water pump so if it lets go that plug might get sucked in under certain conditions. You could boil it in a coolant blend since it's off and see what happens. Also, even though it's on the suction side it's still under pressure. Not really sure what the balance between suction and pressure would be at that area at certain times. So even though the gap is filled the bond between the metal and the glue or the rubber and the glue might not be strong enough to withstand it. Probably 10 psi +/-. Stuff to think about. Automotive applications are tough on materials. Since the hose fits on the outside, you could tap the inside and use a threaded metal plug without ruining the part for future use as an inlet. One possibility if the Gorilla glue doesn't make it. Good luck. https://www.gorillatough.com/product/original-gorilla-glue/

-
Should be in the groove inside the side gear. Drawing below. 280ZXT's did not come with LSD. They have to have a 300ZXT LSD long nose R200 swapped in or an aftermarket LSD, like Quaife, installed in the R200 case. Not clear what you're working with. There are also 1988 300ZX viscous LSD's that use different length axles. And later 300ZX short nose viscous LSD's that also use different axles, but with the clip installed on the axle, not inside the side gear. Here, "circular clip*". From the 1989 FSM.
-
The new axles probably a have square edge on the circlip groove when there should be a small chamfer.
-
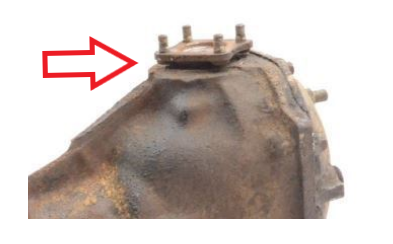
I borrowed this image from an eBay ad. I stuck the chisel end where the arrow points and wedged the axle out by the flange by tapping the chisel in to the gap. Can't remember how the ZX CV's look there. But I do remember using a long punch through a diff to knock out an axle from the other side in a shortnose R200. It was a viscous diff though and was open through the center. I think you'd have to remove the center shaft on yours to do that. That's the other option where you would have to remove the cover and take the shaft out so that you could get a punch through there.
-
Probably the circlip jammed in there somehow. An outer groove and an inner groove and a small space in between that is supposed to be too small for the circlip. Even with the diff cover off you'll probably still have to use brute force to get it out. What would you take apart to get to the circlip? I've used an oiled cold chisel as a ramp (wedge is a better word) to pop out the R200 short axles. Might work for CV axles.
-
Call girls. https://forums.hybridz.org/profile/58792-mayabansal11/
-
This one was predictable. No link on the profile, they just waited and posted. https://forums.hybridz.org/topic/133634-home-food-delivery-in-bangalore/#comment-1237805
-
https://forums.hybridz.org/profile/58784-sanganeri-bed-sheets/
-
This one at least has a Z in the web link. Maybe the AI is learning. No posts, just a sign up and a web link. https://forums.hybridz.org/profile/58780-northlandz/
-
There has to be a better way to screen these scammers out. They're just signing up to get their web links on the site. Not really clear where things are supposed to go from there. https://forums.hybridz.org/profile/58772-slotgacor02/ https://forums.hybridz.org/profile/58771-daftarratuslot88/ https://forums.hybridz.org/profile/58770-coeducation/ https://forums.hybridz.org/profile/58773-1sboslot030/ https://forums.hybridz.org/profile/58776-petir33slot/ https://forums.hybridz.org/profile/58777-lienanhtuan1986/ https://forums.hybridz.org/profile/58778-dadelhi/
-
Your description already seemed "advanced level". Kind of seemed like you had everything covered. I do notice though that there's nothing there about crank or cam sensors or distributor. How are you controlling ignition timing and injection? Batch injection and wasted spark don't need to know #1 compression, but you still need a trigger to control ignition timing. Not familiar with Speeduino. https://speeduino.com/home/
-
I saw it for a about a day also. I'd guess that SuperDan renewed it and we're back to normal.
-
Just post FOR SALE on the main forum. You'll get more eyes anyway. Who can complain?
-
More. https://forums.hybridz.org/profile/58749-rnc-cleaning-services/ https://forums.hybridz.org/profile/58748-jacobhudson/ https://forums.hybridz.org/profile/58753-texaspremierlighting/ https://forums.hybridz.org/profile/58750-flexyvo/
-
A couple of new ones with web links. https://forums.hybridz.org/profile/58743-banana-backwoods/ This one also posted some spam. https://forums.hybridz.org/profile/58742-michaeljohns12/
-
This might be an old thing but many new "members" are putting web links in their Profiles as Contact Information. These three have joined within the last couple of days. https://forums.hybridz.org/profile/58739-alileyla986/ https://forums.hybridz.org/profile/58740-kats-botanicals/ https://forums.hybridz.org/profile/58741-brazilian-hair-wigs/
-
If you're on a computer, hovering your cursor over the flat line will cause the cursor arrow to turn in to the link selection "hand" and the link location will show up in the lower left corner of the page.
-
The latest. NY. One post. This one has something hidden in the flat line under the post. Shows up when pasted though. dynamonsworld.com
-
This one is just weird. Doesn't know that the topic is a rim, not a car.
-
This one is extensive, but still pretty wrong. If anyone is actually not a bot feel free to reply with words that make sense.
-
Here's another. They all seem to choose New York as location.
-
Just for fun I'm collecting these posts from new "members" with strange names, only one post, and comments that have odd grammar and seem pointless. Here's the first. "It" quoted one of my old posts.