

73ZCAR
-
Posts
153 -
Joined
-
Last visited
Content Type
Profiles
Forums
Blogs
Events
Gallery
Downloads
Store
Everything posted by 73ZCAR
-
I think Courtesy Nissan in Texas can get them for you. Just google them, and then call.
-
Hey, C.B. You can do this without pulling the front cover but it is a P.I.T.A. Please read entire post before attempting this procedure. 1. Make note of and mark cam gear location on cam. I use something like whiteout. Just mark the cam pin and the hole it is in, If the gear is in the stock location the #1 on the cam gear will be at about the 2:45 position, at T.D.C.. The top bright link on the chain should coincide with this #1.(there are 2 bright links on the chain) 2. If the cam gear and bright link are not in the position noted above then remove all rockers and lash pads at this time to facilitate movement of crank without valve damage.(make sure all valves are closed before movement of crank!!!) (If doing this ziploc baggies are reccomended, mark cyl.#'s and int.-exh. on each bag.) 3. Remove harmonic damper, remove front seal carefully. (if you do you can reuse it), remove oil slinger,noting it's orientation. 4. Using a flashlight, and a mirror if you have to, look for a small hole (2-3mm) on the small crank timing gear. If timed correctly it should be at about the 3:00 position at T.D.C., and the second bright link should be on it also. 5.If the above is not timed correctly,remove the dist cap, and with the whiteout mark the rotor and its orientation on the dist. body. (AFTER REMOVING ALL ROCKERS) ((and while holding the dist./oil pump drive gear on the nose of the crank in place)THIS IS IMPORTANT)saves time later 6. Rotate the motor until the bright link lines up with the small hole on the crank and it is on the right side of the motor at the 3:00 position.( you may have to rotate the motor up to 6 times for this to happen) Both bright links should be on the right side of the motor with 42 links from one bright link to the other. 7. With the small hole and the bright link on the crank aligned, and both links on the right side W/appx. 42 links between them, wedge the chain in place with the customary tool. then remove the bolt from the cam gear. Pull the cam gear from the nose of the cam and realign the bright link and the #1 back up, resetting the cam timing. Replace bolt and retorque. (for those of you with homemade wedges you must be able to insert the chain wedge and remove it with the cam gear in place) 8. Make sure that the dist/oil pump drive gear has not moved from its correct position up against the crank, check the marks you made on the dist. body and the rotor to make sure nothing moved. If it didn't move reassemble. (don't forget the oil slinger) 9. If it did, then grasp the rotor and turn it to push the gear out. Rotate the dist./gear until your marks on the dist. and rotor lign up, using the rotor to pull the gear back in place and check alignment. lign them up and then reassemble (don't forget the oil slinger) (don't forget the chain wedge) Hope this helps. Mike.
-
Chewie, I'm VERY interested in your ideas/progress on this. I have a 73 that is giving me all kinds of problems now; Blown alternators (3 in the last 6 months). Guages stopped working after a very expensive trip to a shop to find out why the car would not run when fully warned up. (I later figured out it was a bad HEI module) Wipers stopped working now that we finally got some rain after 143 straight days of none at all. Blown fuse at IGN/FLASHERS, No flashers or turn signals. And to top it all off tonite I stopped to get some ice cream and gas at the QT about a half mile from home and she wouldn't start back up, sooo the alternator is not charging the battery. Again! As I was walking back to the QT from my place with jumper cables, I seriously thought about either doing a completely new harness OR parting the car out. Consider yourself fortunate that you have NONE of the origional wiring. The insulation was not top quality and the connectors are crap. I was thinking of doing my own thing, as the painless harness is a bit pricey. I have yet to sit down with a pen and paper and scribble out a schem.,then figure out how much for all the extra stuff like relays, switches and such. Please photograph your progress if you can. Well gotta crash now G'nite all. Mike
-
Davy, As I said before, They Look Fantastic. The armrests would be nice molded in but are certainly not mandatory. Anyone with a little skill, some wood, fiberglass mat and epoxy can add them later and get exactly what they want. I'm excited to see the speaker locations though as I have no tunes in my car. Please PM me when you get down to business on these. Excellent work on bringing this gents talent/craftsmanship to the Z community BTW. Thanks, Mike.
-
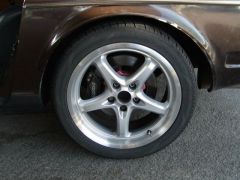
OUCH, Nope, You'll love the brakes, I have daves 4 piston 5 lug conversion W/coilovers at all 4 corners and they ROCK. http://album.hybridz.org/showphoto.php?photo=6441&cat=500&ppuser=14594 Just be careful you dont flatspot those nice new tires you got there. (I speak from experience) What flares are those? The wheels are killer BTW. Mike.
-
Chewie, I think that airdam is a fiberglass one from MSA. I have one just like it on my car. The # for mine was, 50-1401 $139.00 in the current catalog.
-
Man! I never thought I would say this but.... I wish I lived in Kentucky. LOL What a great offer for the z community on that end of the country though. Mike.
-
Davyz, They look fantastic. Are you going to intergrate armrests as well? If so I'll take a pair. Mike.
-
Uhhhhm? Fried distributor? Mike.
-
Damn, another wrecked Z. Sorry to hear of your loss V. I have a 73 also. Hows the drivers side door? I need one with a good window regulator bad! Also need good wiper motor, and how much for the CV axles? Thanks in advance, Mike. Oh Yeah and the Momo wheel and adapter too.
-
Cy, That's BEAUTIFUL!! Almost makes me want to cry. Very nice interior. I even like the color. Mike.
-
Hey, Scottie . A guy on the forum here named Clifton did the 7m swap and he is making over 500hp with his. Mike. BTW, what are the advantages of the 1jz motor over the 7m?
-
Hey driftin, The singles I think. I dig the hood, without the small vents in the front though. Mike.
-
Looks like those could use a trip to the bead blaster before the rebuild. Mike.
-
WHAT? $65.99 for a Kuhneutson valve? I found one last week for $36.99! Good price on muffler bearings though. LOL!! Mike.
-
Helix, Do you have one of these? If so where did you get it, and how much? Mike.
-
Why not just use the whole head? N42 has bigger valves as well as a bumpier cam. Mike.
-
Hi, trwebb26. I have a little trick I use for the cable problem. Got a soldering iron? Use it and some solder to tin about 1" of the cable, about a half inch on either side of the cut you want to make. If you have a bench grinder use it to cut the cable and deburr the severed end. Mike.
-
I think I want to mill my P90 head for my N/A turbo How Much?
73ZCAR replied to big-phil's topic in Turbo / Supercharger
Phil, Why do you want to mill the P-90? If it's straight you should leave it alone. from what is listed in your sig. it looks to me like you need; Bigger Injectors. Stand alone fuel management. An intecooler without those plastic thingies on the sides. A Bigger Turbo. BIG EXHAUST. In that order. Then you will need forged pistons for the short block you will be building for that tasty head. Just my .02 Mike. -
Iron cylinder block = rust in cooling system. Help!
73ZCAR replied to EMWHYR0HEN's topic in Miscellaneous Tech
EM, I was having all sorts of problems with my cooling system. Rusty coolant no matter how I mixed A.F. and water. Radiators getting eaten from the inside out. Sealing problems. White crust at the cap. ETC.... The problem? Electrolysis. To see if you have a similar problem start the car with the cap off the radiator, use a multimeter set to volts and check the voltage between the NEG. terminal and the coolant. If you see any more than 0.1 VOLTS you have a problem. The soloution for me was a new ground strap between the NEG. connection at the starter and the body at the firewall. I just used another battery ground cable with two eye ends that I got from Auto Zone. No more problems. Try the test. Mike. -
I need another one of these. CSA or MULLINS from australia.
73ZCAR posted a gallery image in Members Albums
 Tried to take a corner too fast and slammed a curb.
 -

-

-
Oh, man you're done .... Get ready to have a complete blast! And make your local parts supplier rich! LOL! Mike.
-
Great pics Pete. As the Dr. stated pics from around the valves in the "bowl" areas could be very helpful also. thanks, Mike.