
1 tuff z
-
Posts
1917 -
Joined
-
Last visited
-
Days Won
12
Content Type
Profiles
Forums
Blogs
Events
Gallery
Downloads
Store
Everything posted by 1 tuff z
-
i have a pair of the stainless/chrome nissan oem s30 fender mirrors, new in boxes. $340 + shipping. i can provide pics if you'd like.
-
 i would be interested also, like to see the prototype and best estimate on price prior to firm commitment though.
 -
FEELER: Z-Series LED Tail Light Conversion
1 tuff z replied to BADMAB's topic in S30 Series - 240z, 260z, 280z
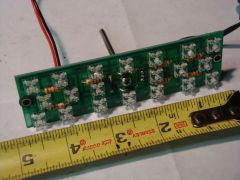
some images...[no rust, dirt or other comments!] the basic led pc board front view same board, other side, ground and lead wires attached. notice also how i kinked the green ground and the knot in the power lead led boards mounted in housing, back side view led boards mounted in housing, front view, no lens vimeo video shows comparison between led and left [incandescent] lights My link to vimeo video here's my attempt at install directions...feel free to cut, paste and improve or otherwise. LED wiring: Red: high intensity (brake/turn light) Black: low intensity (running/tail light) Green: ground S30 wiring: Green : high intensity (brake/turn/hazard light) Green w/white: low intensity (running/tail light) Black: ground Removal process • Remove license plate light, taillight exterior metal surround panels, interior plastic trim panel and tailights. • Suggest you take a pic of where the plugs go and or create a wiring diagram to remember what goes where. • Break off the pin that sticks through the middle of the taillight housing [center rear] then soak taillights for 10-15 minutes in hot water [after removing wiriing] to soften adhesive and allow separation of lens & housing [give them a slight torsional twist will help when done soaking]. Unpack LED components and begin assembly. Here are some things i did to make it easier for me. • Remove 3 nuts and rubber grommet from each LED circuit board, attach read plug to the lead to LED cb, install terminated geen ground wire [i kinked each one so they didn’t get pinched when installing the LED cb into the housing] to stud, secure with non-locking nut. I also “knotted†the LED lead [knot approximately same length as stud] so the lead would not pull away from the LED cb. • Install the LED cb into the housing, slide the rubber grommet in place then nut, ground wire and nyloc. Rotate the grommet to achieve optimal position of the LED cb in the housing. Finger tighten the nut holding the grommet and tighten the nyloc to secure the ground. I found that by over tightening the nut it can render some of the led’s temporarily inoperative, if you find this, simply back off the nut • Remember, LED cb wires; red is for brake, turns and hazards, black for parking/taillights, green is ground. You can use the provided cool wire nuts, your own or solder and heat shrink if desired. Initially suggest you just use what is provided until you determine how you’ll ‘arrange’ the lighting pattern • You can arrange or design your tails the way you desire. Example-stock layout, all 3 brake or turn or whatever. Some think more is better, others want stock layout. It’s your z so whatever you want. • Test, install lenses either by softening the old adhesive [heat gun or such] or remove completely and use silicone or other suitable. • Install completed lights and trim panels • Done, time to go cruise and show those new tails! hopefully i'll have some time to finish both the wiring, left side and lens attachment in the coming week and shoot another video-this time at night for better contrast. still not decided whether i'll configure for the oe look or something different... -
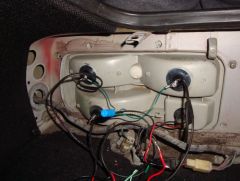
From the album: LED taillight conversion
no comments about the over spray, dust, dirt or rust... -
led taillight conversion and details
-
-
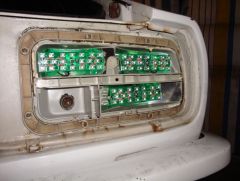
From the album: LED taillight conversion
led pc board mounted in stock light housing -
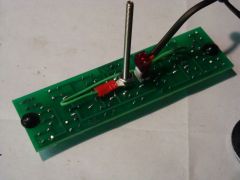
From the album: LED taillight conversion
also shows how i kinked or folded neatly the ground wire and notice the 'knot' in the led power leads-to help prevent damage to the led board in case the lead is pulled accidently -
From the album: LED taillight conversion
-
FEELER: Z-Series LED Tail Light Conversion
1 tuff z replied to BADMAB's topic in S30 Series - 240z, 260z, 280z
i just received the kit for my 73 240z and hope to get some pics and video posted by this weekend. been jonesing to get them in but other 'stuff' keeps getting in the way [work, family, work, etc]. i will try to post video of both led and stock [incandescent] lights side by side as well some images of the led's and install... -
Where do I find a single-groove crank pulley?
1 tuff z replied to barteet's topic in Nissan L6 Forum
as far as i knew the only oem single groove crank pulley nissan supplied was for the non-us market [second groove used to drive the emissions-air pump]. i sourced one from portugal last year after searching for a year or two. not inexpensive... -
if...nothing else, you had fun!
-
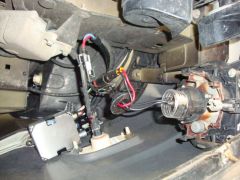
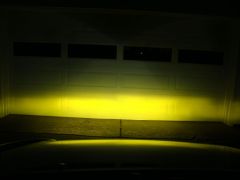
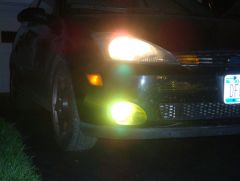
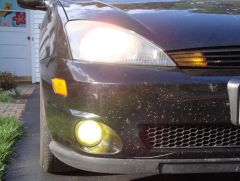
From the album: focus svt
-
![hid fogs & headlights [non hid]](https://forums.hybridz.org/uploads/1282654153/sml_gallery_176_825_342321.jpg)
From the album: focus svt
-
From the album: focus svt
-
From the album: focus svt
-
From the album: focus svt
-
Think I have what you need. Pm me your number and I,ll call.
-
what year z?
-
FEELER: Z-Series LED Tail Light Conversion
1 tuff z replied to BADMAB's topic in S30 Series - 240z, 260z, 280z
here is a link to his website... http://bad-mab.com/z -
FEELER: Z-Series LED Tail Light Conversion
1 tuff z replied to BADMAB's topic in S30 Series - 240z, 260z, 280z
pm sent! -
derek, pulled a spare pair i have in my inventory, 72 & 73 vintage. only difference i see is a small 'notch' above the dead pedal, about 1 1/2" long and 1/8" up into the panel, absent on the right or passenger panel.
-
luggage riser trim 240z and map light wiring harness grommet
1 tuff z replied to philipl's topic in Parts Wanted
phil, i have what you need. shoot me a pm. also, suggest you update your sig with location. d -
my brother just arrived in yokosuka. we talked on skype last evening, he'll be there for 2 years. told me he looked but did not see any z's yet, but would keep his eyes open. love to have him bring something back for me but don't know where to start [regs, etc] or where to look? also considered heading there for a week myself while he's still there...i believe this will be his last overseas tour of his career then back stateside, couple more years and retire. he'll pin on the colonel bird monday.
-
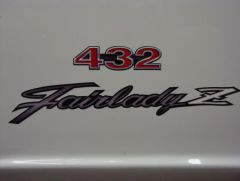
From the album: Z Vinyl Emblems
this shows the vinyl decals; 432 and fairladyz on the fender of my z... -
ZG fender mirrors! where to find, having trouble.
1 tuff z replied to shika805's topic in Body Kits & Paint
you looking for the chrome/stainless or black? i have the chrome/ss new in the box-shoot me an email; one_tuffz@yahoo