socorob
-
Posts
1144 -
Joined
-
Last visited
-
Days Won
10
Content Type
Profiles
Forums
Blogs
Events
Gallery
Downloads
Store
Everything posted by socorob
-

Time for the 5.3 to get some more power
socorob replied to mattd428's topic in Gen III & IV Chevy V8Z Tech Board
Antisquat is how much the rear end rises(good for traction) and squat is how much the rear end squats (bad for traction) in a straight axle car. It has a good bit to do with the differences in lengths of the bottom arms vs the top arms, among other things. Drag racers usually go for a high antisquat number to maximize traction. There are some calculators online to figure it out so you can move the arms around as much as you're able to package in the vehicle to get closer to the best setup for your goal. Handling guys try to get it as close to 0 so there is as little weight transfer back there as they can get. -
row52 showed none for me but pullapart shows 5 70-83, but only 1 is an s30.
-
http://forums.hybridz.org/topic/114545-s30s-in-junkyards/?do=findComment&comment=1072628 I put a link to 2 yards with searches but there wasn't much interest. I always check the couple yards within 2 hours drive from me. I got some good stuff for cheap and even went with a battery sawsall and got me some good patch panels that actually fit.
-
Can you post a photo showing how much space there is between the wires and header?
-
I haven't installed mine yet but the guy from JTR said I needed to use the LS2 90 degree plug wires with the headers. Can anyone confirm this?
-
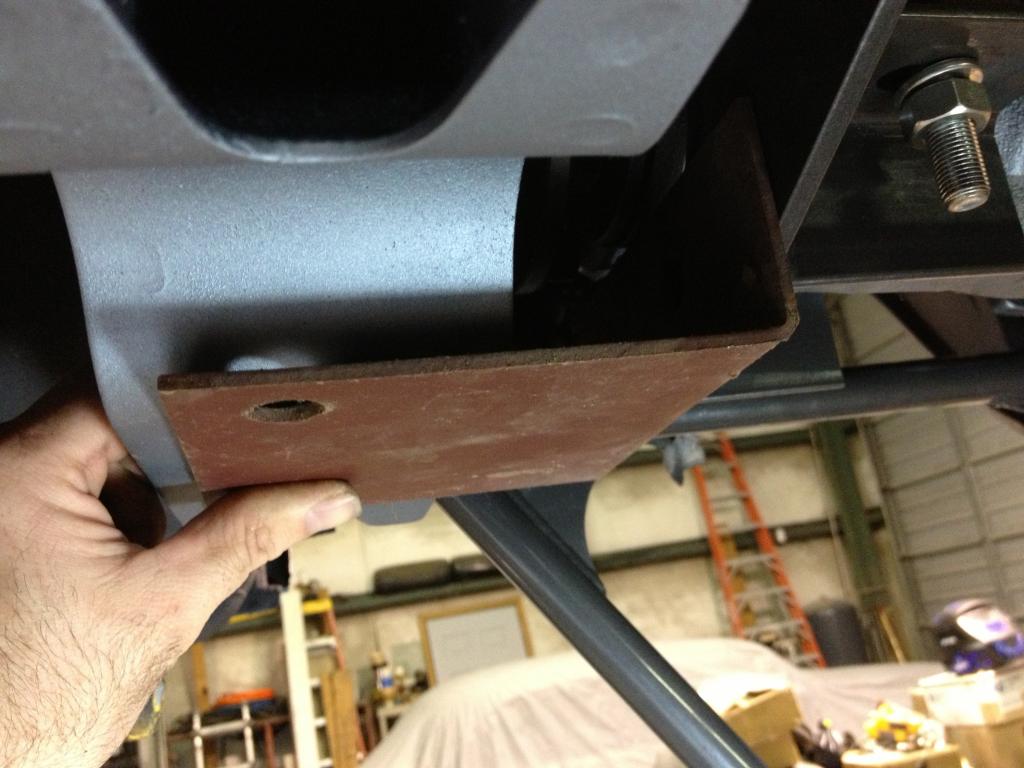
I'm assuming the problem with the mount is the front of the diff wants to lift up under power. The sides of the mounts aren't too substantial. This is what I was thinking would help keep it down. Anyone see any problems with this before I cut the piece out? It will be bolted to the jacking plate holes in bottom of the crossmember there and I will drill 2 holes in the mount to have it all bolt on. I will probably weld an angle gusset or 2 to keep it from being able to bend.

-
Need help chosing stainless screen for radiator protector
socorob replied to RebekahsZ's topic in Fabrication / Welding
http://www.sfxperformance.com/catalog/Exterior~Styling/Grille~Material/page_1.htm http://customcargrill.com/ http://www.autodirectsave.com/Body-Kit-Mesh-Grille-C9.aspx http://www.marketworks.com/StoreFrontProfiles/default.aspx?sfid=56674 http://www.customcargrills.com/Custom-Grill-Mesh.asp -
Need help chosing stainless screen for radiator protector
socorob replied to RebekahsZ's topic in Fabrication / Welding
So would you opt for the big hole or the little hole? -
Thanks everyone. My plan is to take a piece of angle and bolt it to the bottom of the crossmember that holds the front of the a arms on. I was thinking g to use the 2 bolts that held that heavy plate (for jacking I assume?) and using those to mount the bottom of the "L" and have it go toward the back of the car and turn up under the diff and bolt or weld it to the back side of the mount. It would be simple and add a lot more that the diff would need to twist before anything moves. Do y'all think it would be ok to drill 2 holes in te mount under the diff, say 5/16 or 3/8?
-
Should Mat Farah feature this skyline swapped Z on tuned?
socorob replied to Atozone Tonine's topic in Non Tech Board
I think it says more about the guys character who is telling people his Datsun is a Ferrari. -
Finally finished the bottom prep. I rust shielded it, sanded it, lizard skin sound then heat. It came out pretty good for my first try at it. Now I'm on to the fun part... Making my pile of stuff lighter every day while the datsun gets heavier.
-
So was it determined that the long tubes wouldn't work with JCI mounts?
-
Do you need to use a rising rate fpr with the turbo?
-
Never said anyone was evil, no idea where you pulled that out of. I was just saying Most people don't realize Hagerty is for a collector/show car, not a car that someone means to actually drive.
-
LS/T56/240z Project Mentor Wanted
socorob replied to RebekahsZ's topic in S30 Series - 240z, 260z, 280z
I need to order flares soon and trying to decide which ones to go with. I like the BAMF but my friends 10 + month wait for his kinda doesn't give me a good feeling about buying those. -
Its been 3 years since I switched from them, so maybe they changed to not lose customers. Several LBC guys were dropping them like flies when that happened. My policy specifically said that in it, even though the agent on the phone said i could drive it to work sometimes, etc. Apparently the "dude on the phone said it was ok to drive it to work sometimes" argument didn't work out in court for that guy when his contract said differently.
-
LS1, T5 6 what speedometer are you using
socorob replied to PLATA's topic in Gen III & IV Chevy V8Z Tech Board
I second just fixing what you have. Send the abbot box in for testing and if its not that it can only be a couple things. it would be harder to change a gauge out when its not really necessary, unless its your original speedometer that's bad, which I'm sure you can find one to replace that too. -
Read your policy very carefully. It states the above limitations very clearly. The agents always tell everyone it's ok to drive it other times but that's not what you sign in writing. They will usually cover minor things outside their rules but a few years ago someone on a British car forums neighbor got into a bad accident with injuries ad hagerty used it as an out because the guy was on his way home from work.
-
With hagerty you're not allowed to drive your car except to car shows, auto shop and parades ONLY. I switched to American Collectors as they allow you to drive the car more. I chose the 7500 miles a year plan with an agreed value of 17,000 on my last car. It was 300 something a year. While I'm doing my swap I switched what was left of my old policy to the Datsun with the lowest mileage package and they refunded me $27.
-
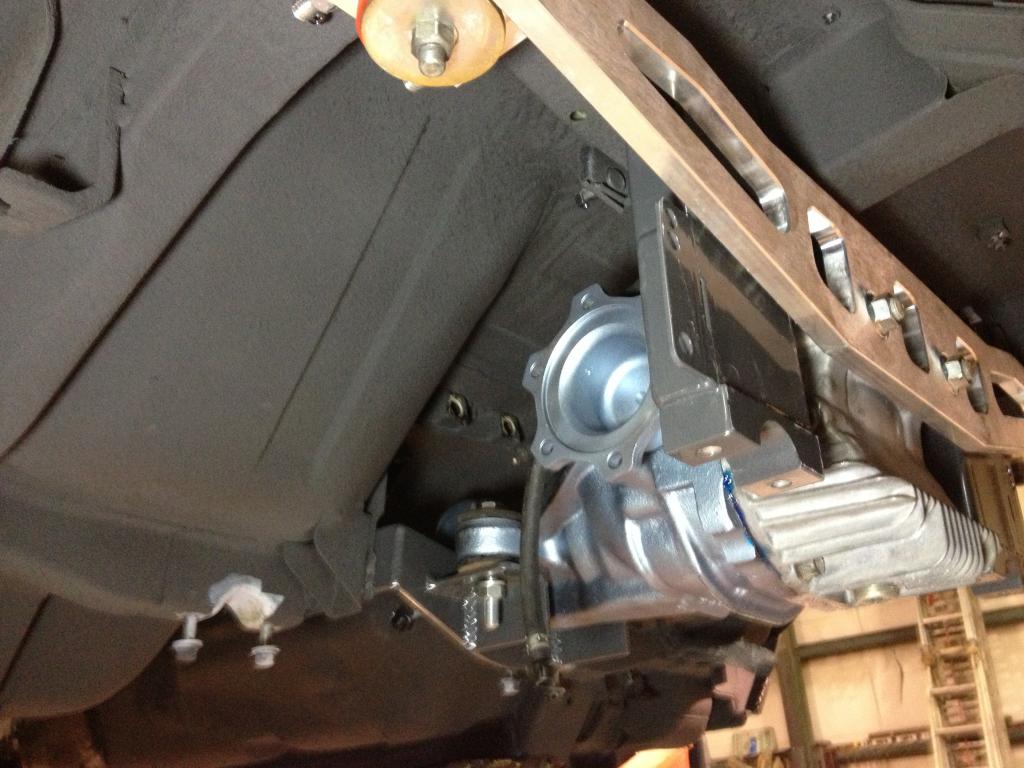
Thanks. I was looking at how to do that this weekend. I was thinking about doing something like that on the back side but trying to figure out how to bolt it on so the diff could be easier to remove if needed. Do you have a better view of the front side from the rear?
-
Check the tubes?
-
Is this wheel safe to use?
socorob replied to AdreView's topic in Brakes, Wheels, Suspension and Chassis
As morbias called them unilug they were made to fit 2 different bolt spacings. Basically a universal wheel. The wheels on my Z have the same slots. -
Is this wheel safe to use?
socorob replied to AdreView's topic in Brakes, Wheels, Suspension and Chassis
Are you sure they are drilled? I have seen a few sets like that over the years, and I doubt anyone would be able to drill a hole that accurately that close to another hole at home. I think some wheels used to come like that. -
My Abbott speed box not working
socorob replied to PLATA's topic in Gen III & IV Chevy V8Z Tech Board
Check out the group buy on speedhuts. -
S30 Inner Tie Rod Replacement?
socorob replied to Ben280's topic in Brakes, Wheels, Suspension and Chassis
Someone posted a link to O'reillys that showed that they had it on their website a few weeks ago.