cgsheen
-
Posts
676 -
Joined
-
Last visited
-
Days Won
9
Content Type
Profiles
Forums
Blogs
Events
Gallery
Downloads
Store
Everything posted by cgsheen
-
Engine block getting 12 volts
cgsheen replied to Leeroy's topic in Trouble Shooting / General Engine
http://www.nicoclub.com/datsun-service-manuals You need the Factory Service Manuals and wiring diagrams for both of your cars - 280Z and 1982-1983 280ZX. Then make sure you understand that turbo swap wiring diagram. -
My advice is - don't fuss with the stock harness. You'll spend hours of your life that you'll wish you had back at some point and eventually move on to a better engine management system anyway. My advice has been to do that from the beginning - put your time and effort into a system that will grow with you. MS is not a bad choice.
-
All the receiver/dryer needs is a 1/4" NPT female thread port to screw the switch into. (This port also can be anywhere after the condenser in the liquid line - it doesn't have to be in the receiver, it's just more convenient. (that means a fitting could be silver-soldered into the 3/8 copper tubing)) I've bought a few dryers in the past that have 2 extra threaded ports which could stay capped off or have the cap (plug) removed for a switch installation.
-
Firstly, it's not actually a low pressure switch. It's on the liquid (high pressure) line of the A/C system and it is in fact a high-pressure switch. It breaks the electrical circuit to the compressor if the liquid line pressure is too high. There is no "low pressure" protection in these early Z factory systems. Secondly, I know you'd love to just put in a stock replacement that won't require any modification - after all, then it's just "un-bolt one and bolt another one in" - but you're not likely to find a stock replacement. I've been that route... You're probably going to need to find a replacement that will still be available years from now and re-do at least part of the liquid line routing to fit the new one. There are multiple products available that you could substitute that also have provisions (ports) for your threaded pressure switch. The liquid lines are made from standard refrigeration tubing and use standard flare fittings. Coming from a plumbing and HVAC background, this is pretty simple stuff for me. I can understand that it can be daunting for some though. Still, any refrigeration shop worth their salt (or HVAC tech as a side job) should be able to handle the liquid line modification. Completely new copper refrigeration tubing can be easily formed and flared to fit the new part... And possibly re-forming (bending) the existing tubing could be all that's required.
-
Ya... Didn't help... My 1974 260Z has the original A/C hard lines - all "flare" type fittings. They didn't use "o" rings for the engine bay connections. 1975 and 1976 280Z's were the same. I converted mine to 134a before I put it on the road after the turbo swap - 8 years ago. I didn't make any other changes to the stock A/C system. No "o" rings, didn't need "o" rings in any of the liquid lines or suction lines. The only "o" rings you'll find in the stock system during those years are in the compressor and expansion valve. Being an old-school plumber, I've always preferred a flare connection as a seal over the "o" ring connections they introduced with the ZX series...
-
?????
-
Can't remove quarter glass from frame.....help please.
cgsheen replied to Ken Smith's topic in S30 Series - 240z, 260z, 280z
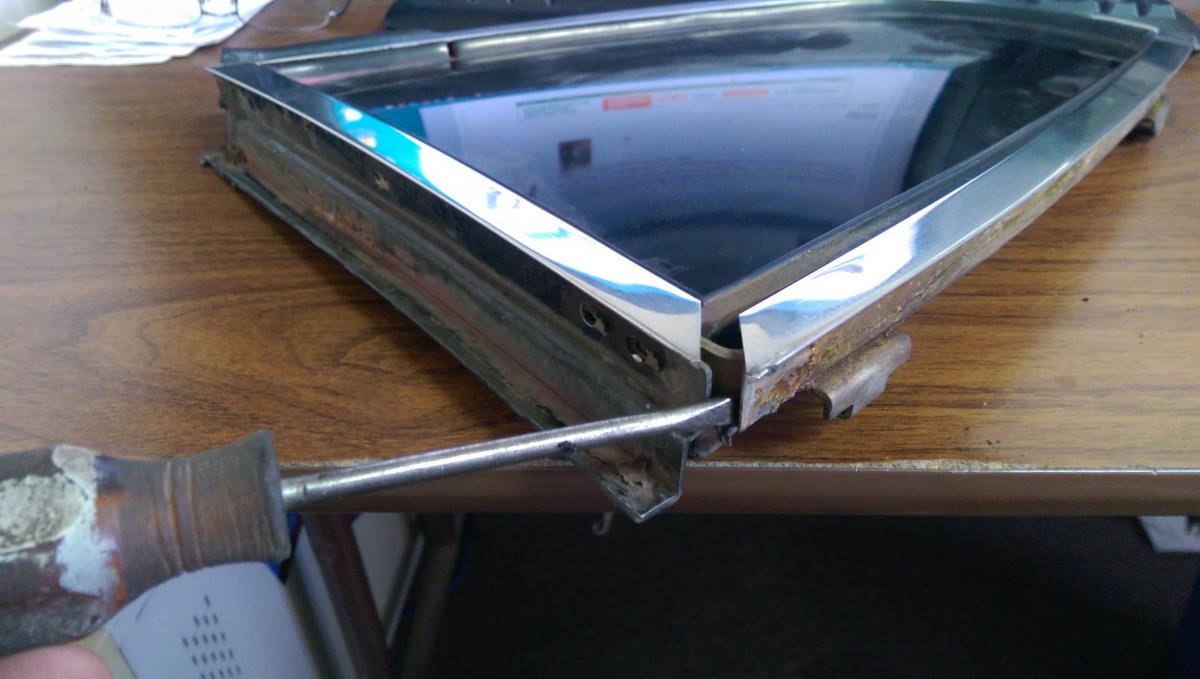
I start with the top front corner - it's pretty easy to pry up a little. If you have to, try tapping here to get the top rear moving up and out. What it looks like with the top of the frame off... Then gently pry the rest of the window & gasket out of the bottom of the frame. You can cut the rubber if it's stubborn. Be careful of the glass. Mask it if you need to. Don't damage the bottom corner of the frame - it's held together with another spot-welded bracket. This window also had rock-hard gasket that chipped off in pieces - didn't cut too easily. Just be patient...
-
Can't get glass out of quarter window 280Z
cgsheen replied to Ken Smith's topic in Z31 Series - 300ZX
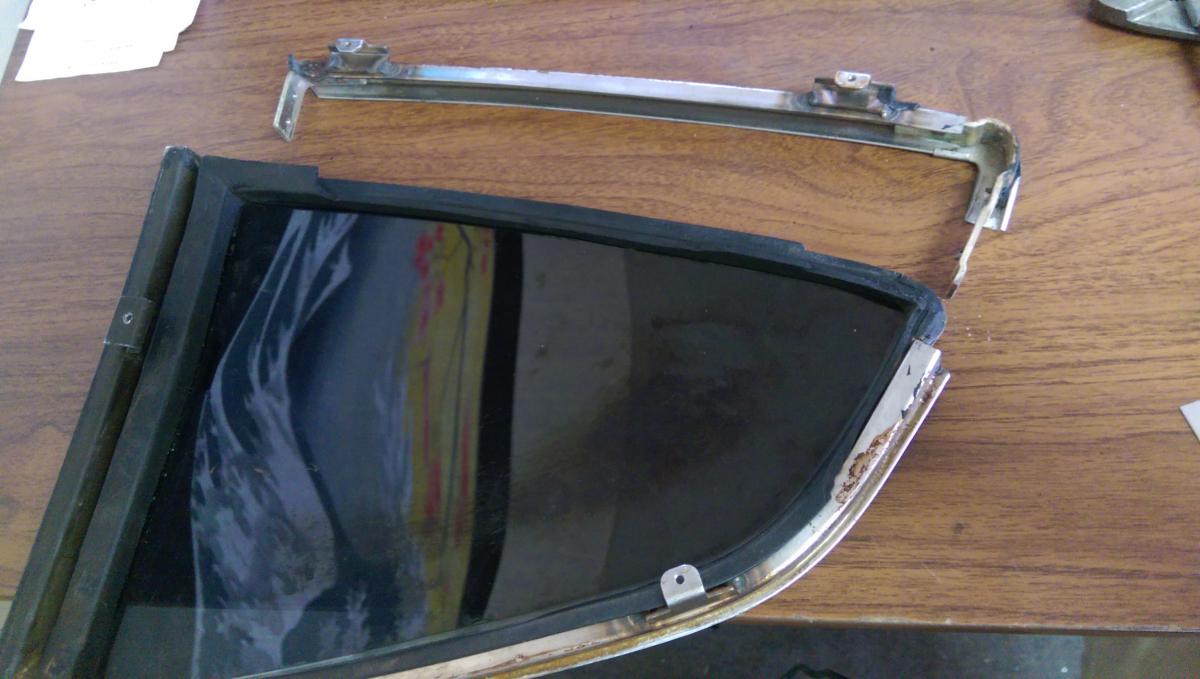
We'll need pics. The frame is in two pieces and there are 2 "L" shaped brackets in opposite corners. Each bracket has one leg spotwelded to the frame and one leg with 2 screws in it. The screws are relatively close together. Make sure you got the screws out of the forward bracket (and not just the vertical trim piece) - usually they're covered with goo... The brackets are steel and tend to rust and expand, that coupled with the hardening of the rubber can make disassembly difficult. edit: And... I just noticed this is in a Z31 thread... -
The USA Z's had available factory installed A/C as an option starting in 1974. Most of us here in Arizona have A/C working in our Z cars. They work very well with the replacement R-12 refrigerant or converted to R-134a. The engine and A/C components aren't the thing that hamper the efficiency of the system - it's the dash duct work and blower design... To overcome the poor duct design somewhat, we use better blowers like the Kia blower swap (my personal choice) or the Honda Civic blower swap...
-
(Oh, "wing" = "fender". At first I was scratching my head about "reinforcing the front wing"... I got the "boot", "bonnet", "propeller shaft" and etc. when I had the Midget and TR6 in my younger years, but never knew "wing" until later in life. Sorry - that popped into my head when I finally saw your location. Many of us Yankees won't equate wing with fender...)
-
Little Heartbroken about perfect swap that never was..
cgsheen replied to ericp501's topic in Nissan L6 Forum
+1 -
If you're going to refurbish the entire hinge(s), completely removing them is probably the only way. Otherwise I'd advise against removing the hinge from the body. We learned early on that it can be a pain to realign the doors if you remove the hinge from the body. Plus, it's pretty much a two man job. Since then, we only pull the door off the hinge and leave the hinge on the body. But, we're not refurbing the hinges, just doing the body work on the doors (plus painting the jambs and hinges body color)... However, if there's a way to accomplish what you need to do on that detent roller with the fender & door off and the hinge still on the body, that's the way I would do it.
-
what to do? re: window rubber on door chrome
cgsheen replied to scooterhulk's topic in S30 Series - 240z, 260z, 280z
I didn't find or use staples... Hence the " " around "staples". Stiff wire of an appropriate size to go through the holes - cut and bent to facilitate it's use as "staples". I considered some type of adhesive as well. However, after I finished, the squeegee was held in place very well and there's little force would cause it to become dislodged in normal usage. I don't think the rubber would ever detach as long as the "staples" are in place. Plus, I thought about adhesive and the next time it has to be done. It will be much easier not to fight adhesive and clean adhesive off parts should it need to be redone. -
CAS is "toast", but you have "clean startup and idle"? I seriously doubt that... The L28ET CAS gives the ECU it's RPM signal. Without it, the ECU will never know the engine is spinning and will never apply spark or injector pulse. The CAS doesn't just "sorta work". I had an intermittent fall out issue with my stock CAS years ago, drove me nuts. Turned out to be a bad solder connection on one of the 4 spades. But, it didn't ever cause a poor running condition - it shut the engine down completely when the ECU lost the CAS signal. Normally I could restart either immediately or after a bit of cool-down. Took me a while to get that one figured out and after I resoldered the spades, never had the problem again.
-
240z 3-piece valance fitment
cgsheen replied to GreenBanana's topic in S30 Series - 240z, 260z, 280z
This valance piece doesn't look right at all. The Z Car valance attaches to the fender at two points on the top rear of the valance. The valance piece in the pic hardly has room for one bolt!
-
240z 3-piece valance fitment
cgsheen replied to GreenBanana's topic in S30 Series - 240z, 260z, 280z
No, the 1975 280Z "Museum Car" that we had in here had 240-260'ish style valances. Not exactly the same, because they were "deeper" I think for the lower radiator core support. Maybe the late 260's were also this way - (I'll check Patrick's next time he's at the shop). My early 260's were the same as the 240's. My Son's 1976 280Z has the "bulbous" valance pieces that look nothing like the earlies. We don't get many late 280's (77-78) in here though. Maybe I'll have to drag them all out and take pictures of the years that I do have... -
240z 3-piece valance fitment
cgsheen replied to GreenBanana's topic in S30 Series - 240z, 260z, 280z
1976 (01/76) 280Z 1973 (07/73) 240Z 1971 240Z (this car is from Switzerland) Series 1 - 1970 240Z These are all cars I currently have in the shop and I am certain that the 1976 and 1973 fenders are original to the car. I believe the 1971 (Swiss) is original to the car but I haven't verified. The 1970 - I have no idea if that fender is original. I also have a couple of 1972's here but I didn't bother taking pictures because the fenders are all the same. I don't have any "late" Z's (77-78). I also have several valences here - including the Swiss "no cutout for turn signal lense" pieces. (Switzerland apparently didn't allow turn signals under the bumper. The turn signals on this car were mounted on top of the front bumper.)
-
You mean they screwed the strut cartridge out of the adapter tubes? That's standard procedure when you're welding the adapter tubes to the hubs... There is not really an "original position" for a fully adjustable coilover set like McKinney's. They're designed to give you inches of adjustment range from near stock to pretty low. Start by screwing the strut cartridge in 2" on each corner and see how it sits. When it's back on the ground roll it back and forth a bit to settle it a bit. You'll almost undoubtedly want to re-adjust your ride height from there. And, after you've driven it for a few weeks or months, you may need to adjust your ride-height again.
-
Yup...
-
Actually, Idaho Falls is the same way - much drier than most people would think. And to the West is pretty much high-desert. It's the Snake River that keeps it watered...
-
OR, the factory A/C from a 260Z!
-
+1 What part of Idaho, OP? I grew up in Idaho Falls. I think it's a little odd to find a mostly rust free 260Z chassis in a field in Idaho, but if you have, you've found a Gem! For the Z nuts back East and in the mid-West that's a unicorn. But, not because of the number or the year. I'm one of the oddballs that thinks the 260 is the best of both worlds - as long as it's engine swapped... But in the end, a low-rust chassis of ANY year is worth saving and passing on to someone that needs it.
-
Get a new one from Nissan. Brand new and much better quality than the originals - the plastic is much thicker, especially in key breakage areas. They also have a choke lever slot if you need one with a plug that goes in it if you don't...
-
-
what to do? re: window rubber on door chrome
cgsheen replied to scooterhulk's topic in S30 Series - 240z, 260z, 280z
Ya, but you're not going to like it... The original staples are pretty tough - stainless or hardened steel. They had to be to punch through the stainless molding and metal backing plate. I tried to unbend them with the thought of maybe re-using the original staples. wrong... They are extremely difficult to straighten and many just break while you're struggling to do so. I ended up cutting off the curled end of the staples with my dremel cutting wheel so I could remove them. At this point you really need a pneumatic stapler to reassemble. I don't - so I used the existing holes and fashioned my own "staples" to put the new rubber strips on the metal framework. Definitely not as awesome as the original fasteners, but I can always re-do them at any point should they not hold.