clarkspeed
-
Posts
877 -
Joined
-
Last visited
-
Days Won
47
Content Type
Profiles
Forums
Blogs
Events
Gallery
Downloads
Store
Everything posted by clarkspeed
-
 Wow I just watched an episode of Car Fix on Motortrend TV. They were tearing down a Tesla Model 3 for transplant into a 60's Cougar. Motors, batteries, dash, and all. Amazing watching them take that thing apart and seeing all the subsystems. That battery pack alone is a engineering feat. Not for the the timid or inexperienced. Electrical safety is a serious concern. I can see a future in electrification of vintages vehicles, it is so tempting to have that power/torque. But motor swap from a Tesla would not be the easiest path!
 -
240z SCCA vintage race car, restoration
clarkspeed replied to AydinZ71's topic in S30 Series - 240z, 260z, 280z
That is where it should go. Everyone usually mounts the cell at deck height which never made sense to me. Then you have to separate it from passenger with a big ass box or bulkhead design. Drop it down a little and you not only lower center of gravity, but your metal cover solution becomes so simple. I like to cover the hole with an aluminum or steel plate and then put a small 10x10 or so electrical box right over the filler cap. -
IMSA GTU vintage racer build
clarkspeed replied to clarkspeed's topic in S30 Series - 240z, 260z, 280z
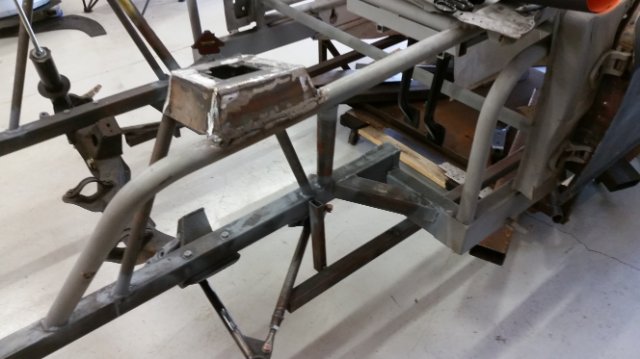
First up I needed to revise the front end. The car was originally designed with a V8 in mind and had a cross member designed to hold one. I know that I will be eventually running a L6, so after a lot of thought, I decided to run the standard Z car cross-member. This would save some time and I knew with a little modification it could be used for most of the things I want to do. It also allowed me to set the standard Z car front suspension pickup points without too much trouble. But it was still not easy. I had to also relocate the 2x2 square tubing to mimic the Z car frame rails. So essentially the bottom of the 2x2 channel is located in the same location as the stock frame rails, (note this is a critical measuring datum, I will discuss later). To accomplish I had to level the entire tub, which was welded down to a 0.100” steel plate sitting on the shop floor. I used strings tied to the chassis points outlined in the shop manual. I don’t have any early photos of setting it up but you can see the final result in these 2 pictures. I was not really happy with the way the 2x2s tied in with the 2x4 square coming out of the tub. To get the correct height, they ended up sitting right on top and I really didn’t want to tear into the 2x4’s or relocate those. It just seems like a frontal impact would drive that front clip right into my lap. I added a 2x2 brace and a doubler plate to the weld joint. I still plan to add a crush zone in front of the radiator in the future. You can also see the 2 square tubing rails that are tac welded and located at floor depth and width of the rear measure point located behind the seats. Next I will post about the strut towers and control arm pick up points.
-
IMSA GTU vintage racer build
clarkspeed replied to clarkspeed's topic in S30 Series - 240z, 260z, 280z
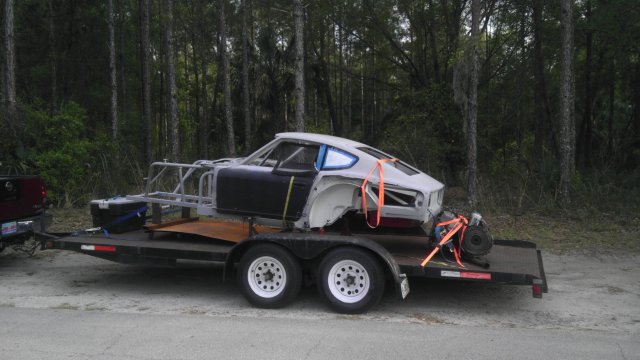
I finally found the picture of me hauling the shell home after purchase. This picture was dated 3/30/13. I guess it sat around in the corner of the shop for a little longer than I thought! Anyway judging by the dates on my pictures, I worked a little bit on it in 2014, and quite a bit in 2015 just before we bought the other car. Then it sat mostly until 2017 when I put it in the rotisserie. But between racing and keeping up the other car, I didn't really get back into it until 2019.
-
IMSA GTU vintage racer build
clarkspeed replied to clarkspeed's topic in S30 Series - 240z, 260z, 280z
Sounds like I must know you from somewhere. I was good friends with Mike. I live in Thornton Park, but my garage is at a private residence in Oviedo. I haven't been on track since before Covid, so I am getting very itchy. Yea, time and money. I either have one of the other, never both. I hope to do some vintage racing later in the year. -
IMSA GTU vintage racer build
clarkspeed replied to clarkspeed's topic in S30 Series - 240z, 260z, 280z
I believe IMSA went to tube frame in 82 or 83. SVRA rules allow standard tub with tube frame extensions in GTU class which covers FIA rules through 84. Wheelbase must remain the same. I am also trying to keep the car legal for SCCA GT3 class at least with minor modifications. It is a huge project, but luckily I am already a good 2 years into it. I wanted to organize and document it so starting this thread will force me to review all the photos, organize them, and hide the stuff I had to rebuild 3 times. More importantly I wanted to show some of the special stuff I did to make it one of a kind. Every step of the process has brought unique challenges. I can't tell you how many nights I have laid in bed and planned what I would do next and how I would do it. And of course I didn't want to start a thread and then dump it off for another project. Which is exactly what happened when we bought the ITS car and restored it to the Bob Leitzinger tribute car I have now. That required putting this thing on hold for a year. And I have had numerous opportunities to start some other projects, but for the most part I have stayed focused on this thing for some time now and can actually see the end coming. -
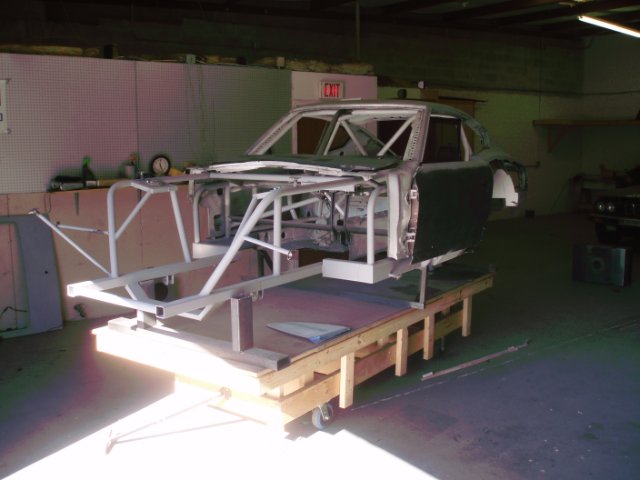
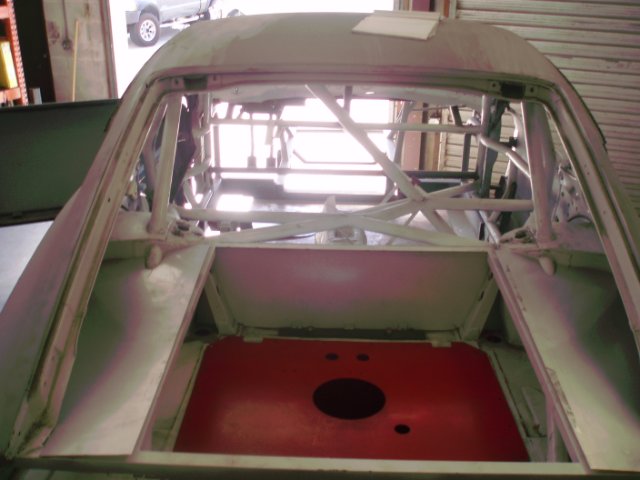
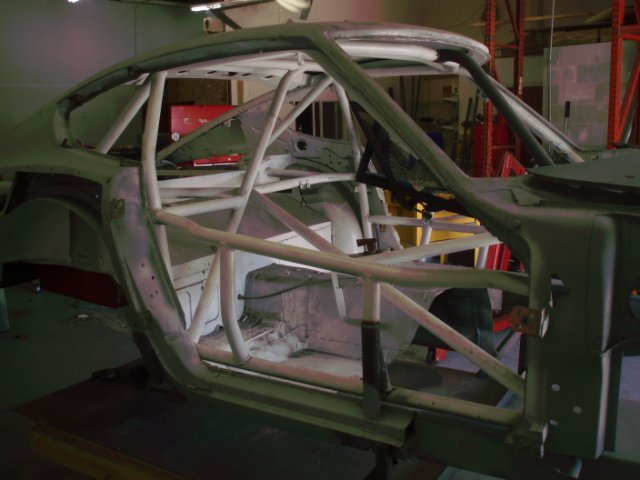
I have meaning to start up this thread for long time. In the past 10+ years I have learned quite a bit about building and racing early Z cars. So I decided to take all my knowledge and build the "ultimate" racing Z. But of course that is a relative term. More precisely, an early Z that is built loosely to the IMSA GTU rules of 1978 and legal for vintage racing. This actually allows quite a bit of modification, so my attempt is to apply lessons learned from 40 years of racing into a car than can compete with muscle cars from the late 60's. Both HSR and SVRA group the GTU cars in with typical 60's early Trans Am V8 American monsters. So handling and cornering speeds are critical because HP is a losing fight. I have a pretty good idea where I want to be in terms of performance, so power to weight is priority #1. I doubt a Z can ever be the dominate car in this class, but hopefully it can be competitive with the guys that are build to the rule book. A 800Hp 180mph Duntov Corvette is just another animal all together. With that in mind, I have become obsessed with weight. The shell I started with weighed 500 lbs, and I took some more out of that. I would love to come in at 1800 or 1900 lbs dry, but time will tell. There is a 3L limit to this class, and I am confident I can get 300+HP to the wheels based on previous builds. However, the engine is the last thing I will be working on. I have a library of photos from what I have already completed and have a goal of finishing all this up in the next 12 months. I am starting out this post with pictures of the shell I started with. It was built up by Chris Leone in Orlando does race car prep for a living and builds a pretty mean cage. He was going to build a V8 based car and ran out of desire. I had originally bought the wide body kit he had for this car and have since sold it and decided to go with an unusual kit I purchased from a dude in Tampa. Anyway, he offered it to me for a very reasonable price at a time when I did not have the money. He also had it for sale on Hybrid forums. Some kid in Daytona ended up buying it and drug it up there without really knowing what it would take to finish it. Months later I saw the kid had it listed on Craigslist for the same price he paid. I ended up buying it for more than I could have paid Chris earlier, but also got an engine and tranny thrown with the purchase. It is actually a fairly early 70 240 and I will post the info when I can dig it up again. I think most of its history is just rust. Even the small amount of original car that is left has multiple patch panels welded in. I guess it goes to show no matter how bad the rust is, you can still build up a race car. Needless to say, this car is not a project for the timid. It needed practically everything but the cage. But so far nothing has really thrown me off yet.
-
Plates around bell-housing - racing application
clarkspeed replied to AydinZ71's topic in S30 Series - 240z, 260z, 280z
More common in drag racing but a good safety measure IF the engine is moved back so far that the flywheel is in line with your feet on the pedals. I've never seen that mod before and not sure you can move it back that far. -
Vors wheels (specifically TR3): opinions?
clarkspeed replied to Michael's topic in Brakes, Wheels, Suspension and Chassis
I could be wrong, and would need to check the math, but I think all that matters is center of the wheel contact patch in relation to the ball joint for wheel rate, scrub, etc. The spacer really doesn't know it is not part of the wheel. Adding spacers does create some crazy stresses around those studs, would not want one to loosen up. I would use ARP fasteners if possible and locktite the inner hub set. I'm waiting on someone to poo poo on this but it seems quite feasible to me. Miatas have multiple 15x8 wheels in 12-13 lb range. Add a 3lb spacer and you still have a decent package. You could even balance them together. Is a studed BC adapter spacer less safe than a simple flat spacer? -
Vors wheels (specifically TR3): opinions?
clarkspeed replied to Michael's topic in Brakes, Wheels, Suspension and Chassis
Most of the Miata wheels I have looked at are +25 offset, 15x8/9/10. Konig Dekagram good example. Adaptitusa.com has the spacers in 1.5" which would allow a 15x8 no problem. Maybe a 9? I've seen racers run some damn wide spacers under their wheels to get more track width so I don't see this as being that much different. Probably does add 2 or 3 lbs to the weight. -
Vors wheels (specifically TR3): opinions?
clarkspeed replied to Michael's topic in Brakes, Wheels, Suspension and Chassis
Anyone consider running Miata wheels with an an adapter plate? Seems like it would work. -
Vors wheels (specifically TR3): opinions?
clarkspeed replied to Michael's topic in Brakes, Wheels, Suspension and Chassis
It seems most wheels and virtually all single piece cast wheels, including all OEM's, Ford, Chevy, Mercedes, BMW, etc. source their wheels from China. But when BMW sells you a wheel, the design has been analyzed, materials specified, raw materials and forgings tested, traceability certs provided, and onsite quality is verified. So it's not really a question of where they were made, but how they were made and who is going to stand behind them. -
Vors wheels (specifically TR3): opinions?
clarkspeed replied to Michael's topic in Brakes, Wheels, Suspension and Chassis
I messaged them, they responded in a few hours. They are made in China. -
Vors wheels (specifically TR3): opinions?
clarkspeed replied to Michael's topic in Brakes, Wheels, Suspension and Chassis
Definitely an interesting selection of sizes and offsets. Their company description is super cheesy: "Rivet Nuts on a Polished Lip is our style.". They are not flow formed like the Konig's but It says they are JWL rated which should make them ok for street use, but you never know. Personally I don't care where they are made as long as they use correct alloys. I searched around but not much chatter about these. Usually with a lightweight wheel like this the Miata and endurance racing guys will snap them up. It seems this is a relatively new company, so I guess it depends if they want to sell a lot of wheels and then disappear, or they are in it for the long run. The website and dealer network leans toward the former. -
My custom rear suspension redesign
clarkspeed replied to clarkspeed's topic in Brakes, Wheels, Suspension and Chassis
The only place I have ever had issues with heat is in the gas pedal area. In think I burned some shoes one time. I just add roughly a 10 x 24 strip starting where the tunnel narrows down. Usually does the trick. I have burned my hands on the shifter before, but since I always have gloves on I never worried about it. -
My custom rear suspension redesign
clarkspeed replied to clarkspeed's topic in Brakes, Wheels, Suspension and Chassis
Good question. Especially since my tunnel is 40 thow aluminum sheet. Years ago I bought some insulation off Ebay that was aluminum on 1 side and roughly 1/4 thick adhesive foam on the other. I used it in 2 cars and it worked well, was cheap, and stuck permanently. Even let pipes ride on it. Now I am trying to find more of it. The DEI stuff works well but is expensive and there are others. I intend to handle the heat with panel insulation, but will add pipe insulation if I need more. The ex ITS car I race now had the entire driver area covered in some kind of insulation mat before I bought it. It was too hard to take out so I just painted over the shiny silver surface. The paint has held up well. I suppose the car is cooler, but I cant tell in Florida. -
My custom rear suspension redesign
clarkspeed replied to clarkspeed's topic in Brakes, Wheels, Suspension and Chassis
Those look nice. I looked at something very similar with the brackets flipped to raise the pivot points. What size are those inner rod ends? -
My custom rear suspension redesign
clarkspeed replied to clarkspeed's topic in Brakes, Wheels, Suspension and Chassis
No big ass bolts. I always wanted to center drill those things to lighten anyway. Yes the cradle is there to prevent fore and aft movement. It's kind of light, I could beef that up a little. Oh this car will be plenty low. I notched the cross bar above the diff to raise it up higher. The exhaust loops over the tranny, down the tunnel on passenger side, then cuts across for a side exit in the rocker panel below the passenger door handle. I'm starting to gather my photos to start a build thread when I realized I didnt have any of the rear suspension work. -
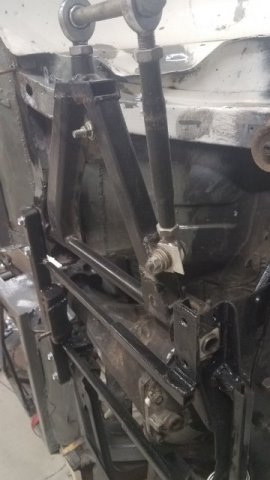
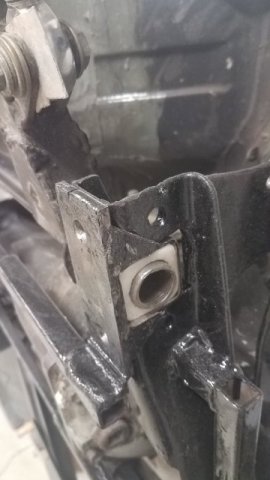
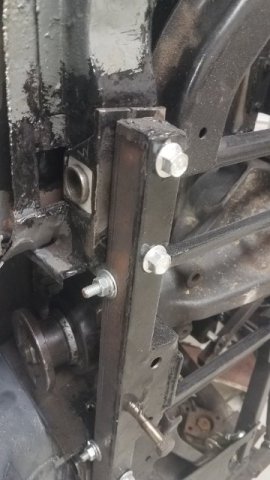
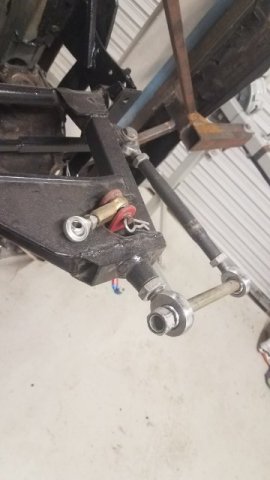
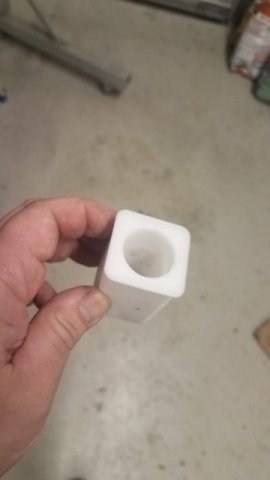
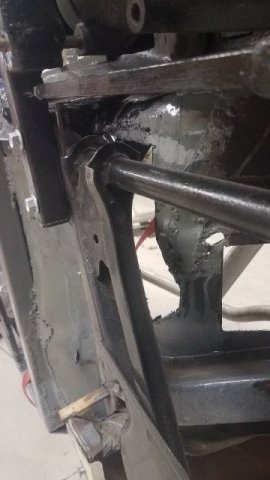
Here are a few pics of my redesign of the pick up points on the rear control arms. I thought about this for such a long time before going this direction. This car I am building is going to be dropped a large amount and I really wanted to bring the roll centers back up and also make them adjustable if possible My design goals were to use the modified control arms I built a few years ago and avoid adding any additional weight. Less weight even better. Of course one possibility would be to add a tube to the bottom of the rear upright, but I didn't like adding unsprung weight and no way to make that adjustable. I just didn't like the Arizona Z solution either because that would require a different control arm and more rod ends. Rather than modifying the control arm I decided to keep the 1" diameter shaft and designed my own bearings and bearing holders. The bearing material is Delrin (acetal) that I 3d printed but you could also machine a set of these very easily using bar stock. The bearing holders are 1-1/2" square tubing with a welded flange. This required chopping up the existing bearing holders and adding some more support. This mod raises the inner pivot point up roughly 0.8". I can be brought back down using shims under the bearing holders. In the highest position, the control arm interferes with the floor panels behind the rear seats. So I cut a little bit of that out also. Along with the bearing holders I designed by own forward cross member that holds the bearing plates down and also hard mounts to the differential.
-
I think this is the first time I went through your entire thread. And I have to say you have done it right. I am more into road race now, but if I were building an FP car today I would follow a similar path. Personally I believe lowering both sprung and unsprung weight is the key. I really like your brake and wheel setup. The only disadvantage you have is not using an early 240 shell to start with. But you have almost compensated for that. I am familiar with the John Thomas car and really his only advantage is the weight, a strong Rebello engine, and most of all, his extraterrestrial driving. He runs like 30 or 40 lbs ballast in passenger floorboard. Keep tuning and improving!
-
Ditching the distributor. Racing application.
clarkspeed replied to AydinZ71's topic in Ignition and Electrical
The standard for 30+years is the electromotive stand alone. I believe the megajolt is similar but open source and there are some others out there for use with carbs. All the EFI systems have multiple ignition solutions built in. -
You will need to install dedicated sensors and hardware to read them. Like an Innovate or simiar.
-
Circle Track Sway Bar
clarkspeed replied to JMortensen's topic in Brakes, Wheels, Suspension and Chassis
Yes, I was looking at this and not a lot of shocks fit into the required form factor. Pretty much needs to fit inside 2" DOM tubing with 0.188 wall which has 1.624 ID. Over 2" OD and you lose ability to run 2-1/2 springs. Kind of rules out most adjustable shocks. Are the 36 Bilstein racer rebuildable? I know their 46 have an abundance of valves, shims. and tools available and plenty of instruction on how to do it yourself. -
Circle Track Sway Bar
clarkspeed replied to JMortensen's topic in Brakes, Wheels, Suspension and Chassis
I know we are getting off the original topic, but I have another crazy idea. I was reading some old posts and saw one by JohnC that described converting a monotube shock to an inverted strut. So I started thinking about this. I don't see why you could not replace the strut tube with something of appropriate diameter and use some Delrin for the shock body to slide against. Sounds easy but of course alignment and tolerances would be critical and possibly some polishing. You could probably even add a seal to keep the bearings clean. I googled around and could not find any references to doing this. But you can find plenty of cut-a-way drawings of inverted strut designs. -
Suspension Setup Gurus....help...
clarkspeed replied to Ironhead's topic in Brakes, Wheels, Suspension and Chassis
I always keep a few shims in the tool box to correct brake run out. It has always worked for me, but I use the stock hubs also.