Namor
-
Posts
206 -
Joined
-
Last visited
-
Days Won
2
Content Type
Profiles
Forums
Blogs
Events
Gallery
Downloads
Store
Everything posted by Namor
-
Lowering the steering rack
Namor replied to grannyknot's topic in Brakes, Wheels, Suspension and Chassis
Essentially it will be like you lowered your car 2.75" as far as your steering geometry is concerned. I think you are going to have bumpsteer unless you do something to correct for it. There are already Roll-Center Adjusters on the market (aka bumpsteer spacers) that drop the steering knuckle to help restore the stock geometry after lowering to minimize bumpsteer. I think they make them up to around 1.5" thick and you might be able to get some thicker ones if you have clearance with your wheels. I know my swastika style wheels definitely wouldn't have the clearance for anything that thick. -
The only pressure that really matters is the pressure at the intake valves. In order for that pressure to be as high as possible, you need to minimize the pressure drop (aka head loss) through the system. This would lead you to believe that bigger is always better, but you are balancing it with minimizing turbo lag and having to pressurize a large volume. Besides, pressure and velocity aren't linked the way you are talking about anyway. Physics (more specifically Bernoulli's equation) says that if you make the pipe size smaller, velocity goes up but pressure at that point goes down.
-
If you are having trouble getting down the bare metal, then the paint was doing it's job. From the pictures, the shell looks like it is in pretty good shape. I would fix the problem areas and paint over anything that is still in good shape.
-
Wow. You need to get over yourself. Someone asked for clarification and you were an ******* to them, so people politely let you know that they interpreted it the same way and you continue to insult everyone else involved. Half of good communication is sending a clear message, and you aren't as good at it as you think because this is far from the first time I've seen it happen.
-
I read it the same as you. All clear now though.
-
I used a Carter 4070, the only thing I don't like about it is the terminal connections.
-
Do NOT ship to anything other than a paypal authorized address. If you do, paypal isn't going to help you any.
-
I had a similar situation, I was leaning out at high load and it was noisy as hell. I ended up running a low pressure fuel pump to feed the walbro. It got significantly quieter, no more fuel starvation and I even measured the current draw for both pumps and the total electrical load was lower than the walbro by itself.
-
Deciding to sell or store my 280?
Namor replied to afbrian13's topic in S30 Series - 240z, 260z, 280z
With the rise in popularity of Z-cars recently, and your sentimental attachment to it I would say go for the storage route. If you want to store in a trailer to simplify things, don't ignore the fact that you can sell the trailer when you get back to recoup some of the money if necessary. Or you end up with a good 24ft car trailer. -
More blinker nonsense.. Any advise?
Namor replied to Grg1987's topic in S30 Series - 240z, 260z, 280z
Alright, since half of your lights are working on each switch, you know the power supplied to the switches is good. Personally, I would just unplug each switch and jumper the appropriate wires to manually activate the left and then right turn signals. If you can't manually cause the lights to activate, then there is a problem elsewhere. For the turn signal switch, unplug it and do the following: Jumpering the black/white to green/red should make your left turn signals operate, which you know work. Jumpering the black/white to green/black should make your right turn signals operate. If they work now, you know your turn signal switch isn't working. If they still don't work, then your problem is elsewhere, and I'd say check the resistance of the wiring between the switches for the green/black wire. For the hazard switch, unplug it and do the following: Jumpering the green/blue to green/black should make your right turn signals operate. Jumpering the green/blue to green/red should make your left turn signals operate. Same deal as before except your right turn signals should definitely come on, since you know they work via the hazard switch. If the lefts now work, you know the hazard switch is the problem. If not, then again check the resistance of the wiring between the switches except this time, you care about the green/red wire. -
More blinker nonsense.. Any advise?
Namor replied to Grg1987's topic in S30 Series - 240z, 260z, 280z
Check resistance across these locations. Pin 2 at the Hazard Switch ----> Pin 10 at the Turn Signal Stalk. Should be Green w/ Red stripe at both locations Pin 3 at the Hazard Switch ----> Pin 11 at the Turn Signal Stalk. Should be Green w/ Black stripe at both locations You should get low resistance across both of those. Ideally 0 ohms. I have a feeling that you won't get that though. If that is the case, then there is a break in the line somewhere and you will just have to find it. -
More blinker nonsense.. Any advise?
Namor replied to Grg1987's topic in S30 Series - 240z, 260z, 280z
Do the indicators on your tach blink at all? If so, does their blinking match the operation of your actual lights. For example, left indicator blinks with left turn signal but not with hazard, right turn signal indicator blinks with hazard but not with turn signal. -
rear toe out of wack.
Namor replied to rickyellow zee's topic in Brakes, Wheels, Suspension and Chassis
If you are toed out 2mm on one side, and toed in 2mm on the other side...your total toe in the rear is 0, its just your thrust angle that is off. But really, I don't think you can be certain that your measurements weren't off by 2mm. Personally, I wouldn't worry about it and I definitely wouldn't go and try to correct it by buying off center bushings. -
hooking up stock 280zx knock sensor to megasquirt
Namor replied to supernova_6969's topic in Miscellaneous Tech
On mine I have IAT, Coolant, TPS, MAP, and Fuel Pressure sensor. Essentially you want every sensor you can to use the sensor return, unless there is a problem with doing that. As for why to not ground to the block, I can't get a real technical answer because I didn't build my ECU and I haven't analyzed the circuit diagrams but if the 5vref is referenced to the 'sensor return' and not the megasquirt ground, there could be variations in supply voltage if referenced to the engine block. The real reason I have done mine this way is because that is the way that megasquirt says it should be done. -
hooking up stock 280zx knock sensor to megasquirt
Namor replied to supernova_6969's topic in Miscellaneous Tech
You really should have some way of monitoring the amplitude and frequency of knock as you induce it. As for grounding, I would be careful with grounding your O2 sensor to the same location as all other sensors unless you can wire the internal heater up completely separate. My Innovate LC-2 only has a single ground connection, and when wired to the sensor return it would cause all the other sensors to fluctuate even with the car off. -
hooking up stock 280zx knock sensor to megasquirt
Namor replied to supernova_6969's topic in Miscellaneous Tech
Yeah, the 'sensor return' is essentially an isolated ground within megasquirt solely for the purpose of acting as ground for different sensors. It keeps noise from large loads like fans, fuel pumps, etc from affecting sensor readings. I had a constantly fluctuating TPS reading until I realized that my o2 sensor needed to be grounded to the chassis, not the sensor return. -
hooking up stock 280zx knock sensor to megasquirt
Namor replied to supernova_6969's topic in Miscellaneous Tech
There is no positive or negative on the knock sensor, at least there shouldn't be. I hooked up the O-scope ground to one terminal and signal lead to the other terminal, for megasquirt you will likely be grounding one terminal to sensor return and the other to whatever input you decide to use. You can do the same for testing with a multimeter. Red lead to one terminal, black to the other. The O-scope I use is a DIY one. instructions here http://makezine.com/projects/sound-card-oscilloscope/ It's not the greatest, but as you can see, it gets the job done for what I need and it was cheap. -
hooking up stock 280zx knock sensor to megasquirt
Namor replied to supernova_6969's topic in Miscellaneous Tech
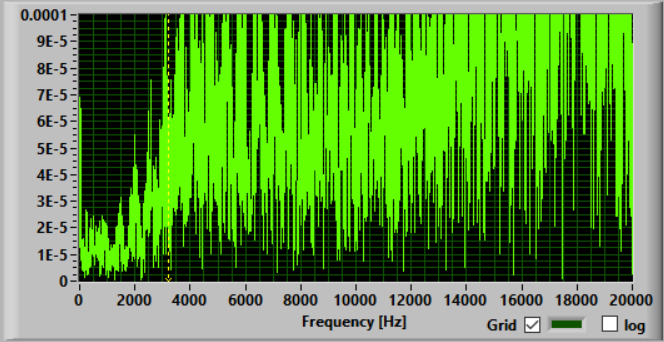
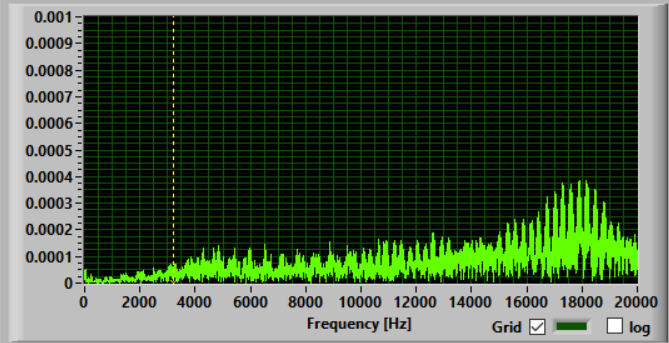
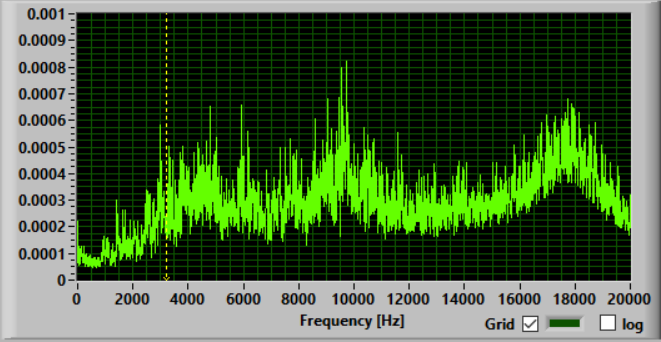
For the test, I just hooked the test leads directly to it, no external voltage necessary. Piezoelectric knock sensors are their own source, the vibration of the crystal generates a voltage. You should only have to ground 1 of the leads (probably to sensor return) and hook the other up to the signal wire and then it would all be setup and testing inside of tunerstudio. Actual knock would probably be louder, but also you need to figure out where the peak is so you can ignore everything else. This was done with the engine off, but I just did a little further testing and here is what I found. This is what it looks like idling around 900-950 rpm on the same scale I used before Idle with scale change of x10 Rev to probably around 2500 RPM While idling and revving it is noisy enough that you can indeed use a multimeter to test. Just hook up to the two connections, set to AC Voltage and rev the engine a bit. You should see the value jump and follow engine speed/noise. I saw mine go from like 30-40 mV up to 90mV when revving.
-
hooking up stock 280zx knock sensor to megasquirt
Namor replied to supernova_6969's topic in Miscellaneous Tech
Actually, I tested mine today because I was curious and will probably head down this road in the future. Tested with a DIY soundcard Oscilloscope, hooked the two leads up and tapped the block with a hammer and this is what the response was. So then I hooked the leads up to a multimeter and tried tapping with a hammer to see the response. It wouldn't register at all, the signal is just too small.
-
CONFIRMED L28 with RB25 Flywheel and 350Z Clutch
Namor replied to 83turbo280zx's topic in Nissan L6 Forum
That doesn't mean the 71b wasn't designed with the 225mm clutch in mind. They could have created the 240mm clutch specifically to fit in the 71b bellhousing to prevent from having to change both the transmission and clutch for the 2+2. Just looking at the T-5 vs 71b, the bellhousing looks a lot larger. -
CONFIRMED L28 with RB25 Flywheel and 350Z Clutch
Namor replied to 83turbo280zx's topic in Nissan L6 Forum
I'm in for one. Clutch needs to be replaced, but have been waiting and reading to figure out the best option for me and as long as it clears (or can be made to clear) the T-5 bellhousing then this seems to be it. -
hooking up stock 280zx knock sensor to megasquirt
Namor replied to supernova_6969's topic in Miscellaneous Tech
Causing knock at low load shouldn't hurt the engine. You really need to do it to find out the actual frequency that your engine produces when knock is present so that you can properly set up the bandpass filter to eliminate noise. However, I believe you can calculate a rough estimate using bore size. Knock sensors are essentially a microphone attached to the block, so tap on the block with something metal near the sensor. You might be able to measure the output using a multimeter, but if you have access to an oscilloscope, that would be better. -
GC 280Z is now too low.
Namor replied to kerrys914's topic in Brakes, Wheels, Suspension and Chassis
Imagine if the spring was unobstructed by the tophat and you raised the collar 2". The top of the spring would also be raised 2" and therefore, the car raised by two inches. Preload doesn't change this, because the 2.4" of spring compression is from spring free length height, not from the partially compressed state it is in when preloaded. -
I'm not sure where you got that idea, but you are wrong.
-
I had the same problem and I also had to swap the pushrod on my master cylinder.