

mark
-
Posts
1567 -
Joined
-
Last visited
-
Days Won
4
Content Type
Profiles
Forums
Blogs
Events
Gallery
Downloads
Store
Everything posted by mark
-
Yes it's the yellow car.
-
Great job jt1. It really is amazing to watch what John can do with a 35 year old car, sticky tires and that shinny metal tape. Tom, (mayolives) was top 5 Saturday and probably did better Sunday.
-
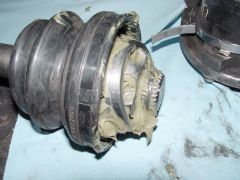
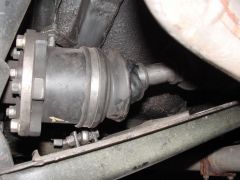
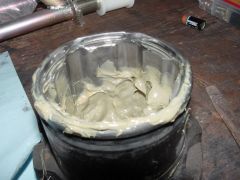
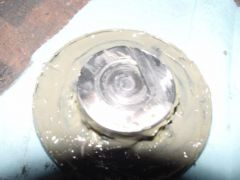
I thought I had this licked. CV came apart at CMP this weekend. I came home and took it apart and this is what I found. That CV boot is twisted. Took the shaft out of the car and pulled the inner CV cap off and checked the axel stop. Note the wear on the axel stop. Lots and Lots of track miles. That circle is worn by the axel beating on the stop. Pulled the outer CV apart. This one was pulled out of the housing and CV bearings were in the boot. Note the wear on the housing It didn't take long to find the problem. WHen I had replaced the CV boots a while back, I had reversed the CV when I assembled it. THis shortened the shaft and allowed enough play to pull the cv out of the housing. Once again, I need a better mechanic. I don't use the wire snap ring that is in the CV housing. I have pulled enough of those out of the CV boots after episodes like this to know they don't prevent this from happening. I'll flip the CV and put it back together. Should be fine.
-
-
-
-
-
If the shaft is a larger diameter than the Q 45 shafts, you could have the shafts cut to the correct length and new splines machined to that shaft. It would then require you to use the armada CV on one end and the Q45 cv on the new end. Just not sure of the diameter of the Q45 stuff. Intersting idea. It would save some cash to do it this way.
-
Is weight a factor?
-
Thanks for the clarification. That makes perfect sense. So if the diff is moved forward to the early 70 car position it may eliminate the need for the custom shaft route that Tom went on his set up. Makes me wish I had kept all those early Z parts.
-
John, Could you provide a little more info on the effect on drive line angles that moving the diff forward would have? I understand the PMOI effect.
-
Top speed at VIR is limited by testicular size. 4th is good to about 140. If I short shift into 5th 150 comes and goes, I'm too busy finding my nuts, braking, down shifting, watching jt1 go by me in the braking zone, and remembering to turn left to check the speedo. Tranny is t56, diff is q45, rear tires 245-40-17's
-
I mounted my 3 quart accusump behind the dash. It has the electric valve and I ran the feed line thru the fire wall with a bulkhead fitting. Slight modifacation to the ventilation system but it still functions. THis is on a street car that also sees alot of track days.
-
Gab, any thought on lowering the out board attachment point on the rear control arm to allow for decent control arm geometry on cars that are extremely low (my track car)
-
When I store the jet ski's and the boat for the winter, I put in fuel stablizer and fog the cyclinders with a spray designed for that. I forget the name but most auto parts stores sell it. It is supposed to stick to the cycliner walls better than oil. It must work. Ski's are 10 years old and motors have never been apart.
-
I think for road course duty, Tom has the set up figured out. The stock axels were a little long. This, along with the reversed CV cages which limit the angle the cv's will function with out binding, were causing the CV's to bind. He had shorter axels made and his problem is solved. I believe something around 7/8 inch shorter. Having had much experience with the Q45 diff conversion on many years of track events, I can tell you I will not do that set up on the next car. The main reason is weight. A clutch lsd in an r200 and Tom's axels with CV's will handle anything I can give it. For the straight line guys, I'll sit back and learn something.
-
LT1 Optispark cap and rotor experience question
mark replied to gvincent's topic in Gen I & II Chevy V8 Tech Board
I said the same thing about a month before my first one failed. Good luck! -
LT1 Optispark cap and rotor experience question
mark replied to gvincent's topic in Gen I & II Chevy V8 Tech Board
I just put the delteq on my Z. I like the fact that it takes the high current out of the opti. However for the cash I paid for it your would think it would have a decent mounting bracket. Thin cheesy stamped aluminum. I'll get to the dyno next week I think and see if there is any HP gain betweet the opti and delteq. Not expecting much but it will be interesting because that is the only change that has been made. -
The slightly disappointing truth about weight.
mark replied to m1noel's topic in Gen I & II Chevy V8 Tech Board
After lifting a t56, I'm not really supprised by the weight gain. Really 180 lbs is not bad. Especially considering the gain in power. Thanks for the post. That kind of exact info about weight gain from the swap is few and far between. -
Also why I signed on this morning
-
Arizona adjustable strut experience
mark replied to blueovalz's topic in Brakes, Wheels, Suspension and Chassis
That makes more sense. If you are measuring from the top of the new threaded tube to the casting to get 7.5 inches, that puts 1.5 inches in the tube and then leaves the 6 inches of threaded tube. We are saying the same thing. I cut my strut tube at 1.25 inches above the forged part on the rear strut. Only about .25 inches difference. Mine are installed and ride height is where I wanted it. I was confused about the amount of strut tube you said you had left. I can't wait to get it on the track. Any input on spring rates and shock settings? Thanks -
Arizona adjustable strut experience
mark replied to blueovalz's topic in Brakes, Wheels, Suspension and Chassis
Good info here. Thanks for posting your experience. I've done the tube and clamp deal on the rears. My thought is to get something to work on the fronts. I have a few ideas that dont involve melted steel. I would like to ask again to be sure that you left 7.5 inches of tube on the rear strut and then welded the threaded collar to that. It should have left about 5 inches of the original Z strut tube between the threaded collar and the weld on threaded tube. Am I correct so far? I set mine up like that and it looked like one of those 70's hot wheel cars with the rear stuck up in the air. Of course our cars are different and I'm shooting for a very low ride height with 17's. I have a wide body kit on the car and I wanted the top of the tires covered by the flaired fenders. One day I'll post a pic. -
1st track day with the Z (home early)
mark replied to lbhsbZ's topic in Gen I & II Chevy V8 Tech Board
JT1 really is a smart guy. I wanted to check a few facts before I responded. My AFR's on the 383 lt1 car are about 12.8 and Jeff Creach (tuner extrodinare) says he will go as rich as 12.1 if the coolant temps are high. I would start there. Good luck. -
Are these the plastic rivits or aluminum. Plastic, pry them up a little and grab with needle nose pliers. If aluminum, use a drill bit, probably 3/16 inch and drill them out.
-
The tail lights are not attached to the pannel. Remove the rivets on the top portion of the pannel under the hatch. Remove the tag and tag light. The pannel is in 3 sections. There are clips on the body that the pannel slides in. Grab and pull, it will come off, be gentle.