zcarnut
-
Posts
820 -
Joined
-
Last visited
-
Days Won
3
Content Type
Profiles
Forums
Blogs
Events
Gallery
Downloads
Store
Everything posted by zcarnut
-

Need quick answer on z31 hubs
zcarnut replied to ezzzzzzz's topic in Brakes, Wheels, Suspension and Chassis
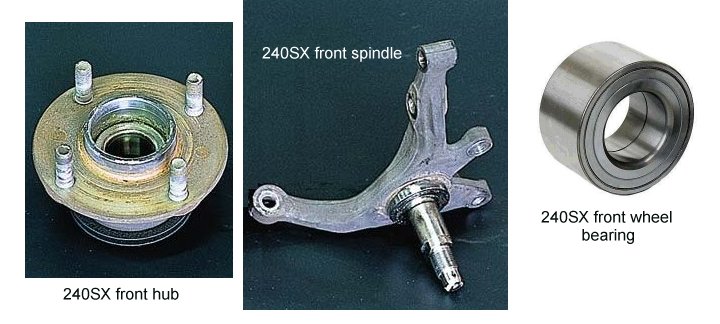
I doubt it. The 1984-88 Z31 used a tapered spindle and different sized inner and outer wheel bearings. The 240SX front hub/spindle/bearings are very different. (Picture courtesy of one of the 240SX forums.)
-
240z/260z front hub difference?
zcarnut replied to Boy from Oz's topic in Brakes, Wheels, Suspension and Chassis
To add to what Terry said, the 260Z/280Z hub was strengthened by removing the scallops and the mounting flange was increased in thickness by 1mm.
-
1. Only use good working calipers. I don’t care if they “just came off a running carâ€. Check the pad wear and I would dissemble them to check for corrosion and to make sure the parking park mechanism (lever) functions. Better yet, buy some re-man calipers. 2. Used rotors are fine to use provided they meet the minimum thickness spec and the minimum run-out spec. If you do not know what these terms mean, or if you lack the tools to measure them, then you have no business working on (much less modifying) brake systems. Excessive run out can be corrected on a brake lathe. Even new rotors (especially the flood of cheap Chinese ones) should be measured before use. 3. The bolts that attach the ZX caliper to the bracket are “specialâ€. They have a large head to help resist the side loading forces incurred during braking. Get some off a junk ZX. 4. Reduce the slack in the parking brake cable by reversing the left and right cable sides (so they crossover in the center). Check for interference with the axles. 5. Make the fluid connection between the flex brake line and the caliper with a short piece of brake tubing with the correct (male) ends. Suggestion: use spare pieces of the “S-shaped†tubing that is used with the front calipers. Be sure to locate this line so it will not flex. #5 is is perhaps the only tricky part of the swap. If you can afford it, then it’s probably better to machine the caliper for a banjo bolt fitting.
-
The inside diameter of the 44155-N3202 bracket opening does not require any modifications to use on the 1970-78 rear strut housing. The 44155-N3202 bracket came from the 1981-82 Maxima. Being a different design than the later (1985-88) Maxima bracket, the ID of the opening is different. I must admit I like using the 44155-N3202 bracket/early ZX caliper swap. I feel that had Nissan designed rear disc brakes for the 240Z, they would have looked very similar. I have been meaning to add this swap info to the "Brake Mod Sticky", but I wanted to include some pics with it.
-
The 44155-N3202 is the early 1st generation Maxima caliper bracket: To use this bracket on the S30 cars requires using the early 280ZX (1979-81) rear caliper along with it’s corresponding rear rotor. Everything lines right up. I have used this combination before on a 240Z. For $10 a bracket, it’s a deal. People complain about the early ZX rear caliper (small pad area, 1960’s vintage Girling inspired “clamshell†design), but I had far fewer problems with the early ZX caliper when compared to the late 280ZX rear caliper (leaks, parking brake issues, etc.)
-
You need to use a pressurized blaster. Pressurized media is much more effective when removing surface containments. 99% of cabinets are siphon fed. They do make pressurized bead blasting cabinets, they just cost more. http://www.kramerindustriesonline.com/blasting-systems/dp-series.htm http://www.abss.com/Blast%20Cabinets.htm http://www.kelcosales.com/html/page2.html I use walnut shells to clean engine internals like removing carbon from pistons ring lands and cleaning carburetors. The best reason to use walnuts is that any trace amounts of walnut shells remaining after cleaning will not damage the engine. Whereas even tiny amounts of glassbeads can be disastrous.
-
PM me with your address and I'll be happy to mail you one.
-
Toyota S13W calipers dimensions
zcarnut replied to Noddle's topic in Brakes, Wheels, Suspension and Chassis
Hey Nigel; Wouldn’t it be more appropriate to use a pic of an actual S13WB caliper?
-
Toyota S13W calipers dimensions
zcarnut replied to Noddle's topic in Brakes, Wheels, Suspension and Chassis
I'm not sure what you exactly want, but I can tell you that the width of the slot is 29.0mm. -
I had the same problem with a Weber TB. I replaced the linkage arm with a new Nissan one and I also replaced the ball with one from Pierce Manifolds, part #700.123 (8mm Ball Stud). http://www.piercemanifolds.com/linkage.htm
-
1. I have seen people re-wire the side marker lamps (the DOT lights) so they are in the turn signal circuit and will "blink" along with the front and rear turn signal lights. 2. What about a switch that would turn off all the rear panel lights? This would make those late night "escape maneuvers†easier. 3. Some extra 12V accessory plugs (cigarette lighter). By the time I plug in my radar detector, XM radio adapter and cell phone charger, the console is very busy.
-
Toyota S13W calipers dimensions
zcarnut replied to Noddle's topic in Brakes, Wheels, Suspension and Chassis
I measure 31.5mm and 112.5mm. -
Toyota vented caliper fitting ?????
zcarnut replied to jvanen's topic in Brakes, Wheels, Suspension and Chassis
If you use the banjo fitting then you should remove the flare insert first. It’s pressed into the caliper. Just screw a stout sheet metal screw into it and pull it out. -
I assume you are talking about the solid Z31 rear 4 and 5 lug rotor. Yes, they have the same offset and diameter. The later Z31’s went to a vented rear rotor (5 lug) with the same diameter, but the offset is a little different (by 3mm).
-
Design principles for custom intake manifold?
zcarnut replied to z1 zonly's topic in Fabrication / Welding
The reference text for years was the book: Scientific Design of Exhaust & Intake Systems (1981) by Philip Smith and John Morrison. http://www.motorbooks.com/Store/ProductDetails_6387.ncm However, a more recent text, Theory of Engine Manifold Design: Wave Action Methods for IC Engines along with its companion volume Design Techniques for Engine Manifolds: Wave Action Methods for IC Engines (1999) both by D. E. Winterbone and Richard J. Pearson, have become the new standards. Unfortunately they appear to be out of print at this time and used copies are selling for several hundred dollars a piece. The following books are more general but do devote a chapter to induction design: Advanced Engine Technology (1995) by Heinz Heisler and Design and Simulation of Four-Stroke Engines (1999) by Gordon Blair There are also some useful websites on intake design: http://www.mne.psu.edu/me415/fall05/SAE/intake.html http://enaf1.tripod.com/teche.html#intake http://www.rickwrench.com/bunchofcalculators.html -
http://www.knfilters.com/Racing/customcarb.htm I sure that there are others. I use the Bayless (I used to have a Fiat) air filter housings with K&N filters with my 40's.
-
This thread reminds me of a car ad I once saw:
-
Which spare tire fits upgraded brakes?
zcarnut replied to Zmanco's topic in Brakes, Wheels, Suspension and Chassis
On my 260Z the stock Z spare wheel will clear the Z31 vented rotor with the wide Toyota caliper setup. I’m not just repeating that statement, I have actually verified it. My spare is 5†wide. The diameter of the spare is not relevant. Besides, people seem to forget that all you really need is a spare tire/wheel that will fit on the rear which usually remains unmodified with regards to brakes. So if you have a flat on a front tire you can move a rear wheel to the front and use the spare at the rear. More of a hassle, but doable. -
Some clarification: The early ZX’s AC compressor used the wide belt like on the 1974-78 Z’s. The power steering pulley was a stamped steel piece that was bolted to the front of the harmonic balancer. They also used the same cast iron mount as the early Z cars. The later ZX’s changed to the thinner belt. According to a Nissan TSB it was done to reduce belt drag. The compressor mount was changed to aluminum when the mount was re-designed for the ZX turbo engine. A mounting boss was added for the crankshaft timing pickup. Nissan then just used the aluminum mount on all the NA ZX’s.
-
The Beck-Arnley 280ZX turbo CV axle boot kits come with new O-rings: [inner] Beck-Arnley # 103-2280 [Outer] Beck-Arnley # 103-2282
-
Yes, the Z31 non-turbo CV axles used a snap-ring in a machined groove to retain the tripod bearings. A much better technique than the S130 CV axles.
-
Do you really think that Nissan invented the SU carburetor? SU stands for Skinner’s Union, a British company who first produced them in 1905. They were widely used on Austin’s, Triumph’s, MG’s, Volvo’s, and even some Saab’s. http://www.sucarburetors.com/
-
Anybody could tell me what is that Datsun model?
zcarnut replied to alexideways's topic in Non Tech Board
It’s a Datsun 410, the predecessor to the 510. Actually this is the later 410 version which was dubbed the 411. More info: http://www.geocities.com/MotorCity/Pit/3823/blue2.html -
Did you prime the oil pump before re-installation? It's a must on the L-series engines. If you did not, then just remove the pump and fill it with oil. Re-install it and repeat your cranking test.
-
The outer boots are fairly simple. But for tips on removing the inner boots you must have missed my post, so to paraphrase: “The CV axle inner joints can be re-built. I have done several sets. The inner boot metal band must be cut off to remove the inner boot. Note: The FSM tells you to cut it in the wrong location! You need to cut the band just over the top of the o-ring groove. This will cause less damage to the tripod housing (which must be re-used). You get a new o-ring in the rebuild kits so you can cut into the old o-ring without worry. To install the new boot I make four pairs of saw cuts (about an inch apart) around the perimeter of the top of the band. These “tabs†are then pressed (or hammered) down, securing the inner boot. The exposed groove is then filled with RTV. It helps to have a hydraulic press to clamp the assembly down while you are bending the tabs. If I ever re-build any more CV axles I will first make a collar on my lathe with a tapered inner surface that fit over the band. Then with a press I hopefully will better able to duplicate the factory method and its appearance.â€