ktm
-
Posts
1725 -
Joined
-
Last visited
-
Days Won
3
Content Type
Profiles
Forums
Blogs
Events
Gallery
Downloads
Store
Everything posted by ktm
-
Same here. I could not figure it out for the life of me and had to come in through forums.hybridz.org as well.
-
I paid $3300 for the body work, new windshield (installed with trim) and paint job. They did not take it down to metal as the car is a driver. I could not justify spending the money to take it all the way down just to have the paint chipped to hell within 5,000 miles. The roads around So Cal eat cars alive. I put 9,000 miles on my car in the past year and you could see it in the paint. Bart, no, John does not paint cars but the shop he recommended was right next door to his place. John took the shot in the parking lot.
-
A total of 3 weeks since I dropped the car off. I had some holes filled (mirror and spoiler related), rust on the lower fender rockers repaired, rear deck below the hatch replaced (some minor rust) and a few other issues taken car of. New front windshield without the blue stripe, etc., etc. I pick up my rear bumper from the chrome shop later this week. It needed minor straightening and a rechrome, but I am too excited to wait to post the pics. The color is Audi Solar Orange. It is a solid color and I went single-stage. I want to be able to repair scratches, chips, etc. myself with a bit of touch up and sanding/polishing. Yes, the Mazda 5 is MY daily driver........ At the paint shop (thanks to John Williams): Home in the driveway:
-
Looks good. I hope my thread helped with your mock-up. I had to clock the turbo slightly to make it fit, but I was also using a T03/04E turbo that required a 1/2-in. spacer. Mocking it up on a pallet is one thing.....wait until it is in the engine. It looks like the tubing going to the inlet and from the outlet will have some clearance issues. I know I posted it before, but look at the top picture (http://forums.hybridz.org/topic/59040-intercooler-piping-routing-under-the-car-pic/). I would ditch the two 45 degree bends in your tubing on the passenger side. Again, look how I handled it. In fluid dynamics, every bend is a loss. Your boost reference is most likely at the manifold, which means that your turbo may be working harder than need be to produce the boost your are seeking. The passenger side tubing was fine, but I had clearance issues on the driver's side. I wound up using a flex coupler on the passenger side (its at the bottom of the "90 - I recall it being more than 90, like a 120") to allow some adjustment when fitting it through the core support. The driver's side used either a 22.5 or 45 degree bend and a 22.5 or 45 degree coupling to the throttle body. I just don't recall at this time. Looks good!
-
Tony's been MIA.....must have been in parts unknown without internet.....or had other reasons now to worry about it!
-
Must not have searched long.....I created a thread specifically about my old setup: http://forums.hybridz.org/topic/59040-intercooler-piping-routing-under-the-car-pic/
-
I was trying to take advantage of the existing orange primary color since I am repainting it orange again to save money as this is a driver. I've opted not to paint it in the scheme posted but rather will most likely go with a solid color and maybe wrap any graphic/stripe.
-
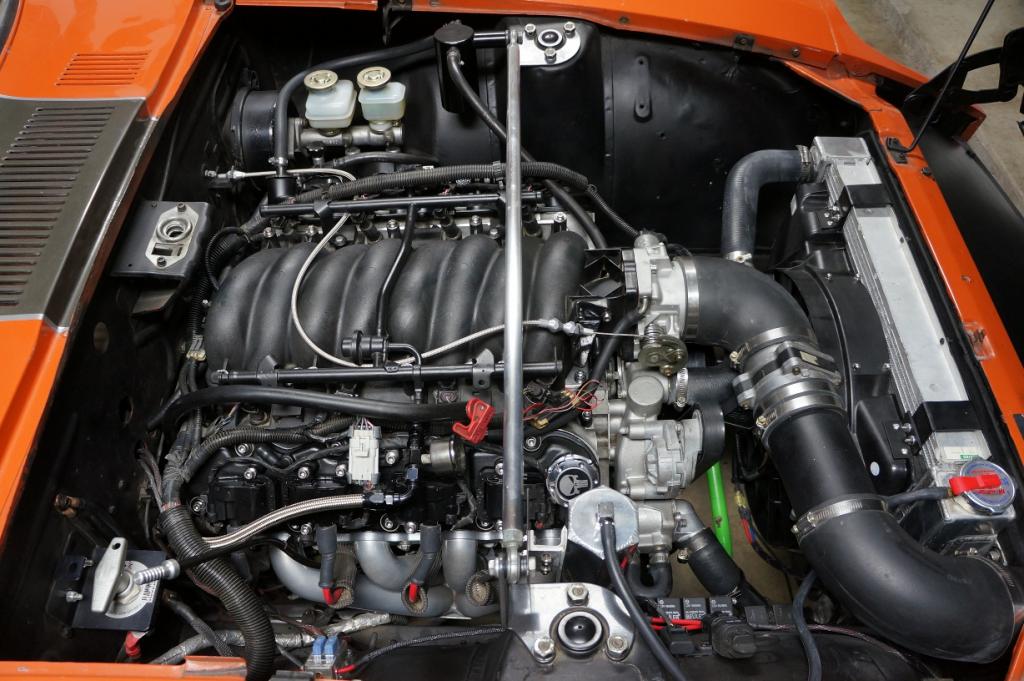
I am finally getting around to painting my LS1 powered 240z. I have really liked the Gulf Ford GT livery from the '60s and am getting it painted in that general scheme. Opinions are sought...... How the car looks now: How I want to paint the car:
-
ls1/ t56 240z, loses power when shifting into 4th gear
ktm replied to Redzee's topic in Gen III & IV Chevy V8Z Tech Board
It's odd that it manifests itself at only the 3rd-4th shift. My car had an issue where if I accelerated brisky or turned left hard, it would lose all power and then get it back. Long story short, the battery cable on the back of the alternator had come loose and would contact the engine mount and create a short. -
The best thing you can do to make driving an S30 safer is to become more situationaly aware yourself. Driving an S30 is like riding a motorcycle (yes, I ride), you can't expect that anyone on the road sees you.
-
I don't. An open diff is cheap. A half-shaft spinning wildly around knocking out brake lines, fuel lines, etc. is a hazard not only to him but others around him. I used my tires as a safety valve. They would spin before putting any serious shock load on the half-shafts. The problem there, though, is that they'd spin when I really did not want them to which led to a few embarrassing situations..
-
Yes, you should be worried about your half-shafts. They were not meant for the kind of torque and shock load that a V8 engine produces from a stop. I don't see how you can grab ok in first on street tires if you are pushing 442 rwhp (per your sig). I have an LS1 in my car and with 245's that have a 340 treadware I can light them up on command from a stop (as in leave smoke at a stop light without revving up to the stock stall). I have a 3.70 LSD in my car as well and after two scary incidences in the past 2 months, after driving the car for 2 years, I finally made the switch to CV's so that I can put stickier rubber under me. I never put anything stickier (like drag radials) on my car because the half-shafts were the weak link.
-
Emergency Electrical Power Shutoff Location
ktm replied to RebekahsZ's topic in Ignition and Electrical
Six-shooter nailed it. You should investigate the sanctioning body you are interested in to determine where and how your switch should be wired up. You should wire it up to the positive, not negative, side of the battery. Wiring it up to the negative side will do nothing for you if you have a short to ground. I installed a Flaming River switch under my hood. I am not racing my car and after a scare where I had a short to ground that fried my entire front light harness from the combo switch to the short (a side marker light) and I had a fire, I installed the disconnect switch on the firewall near where the battery would be. You can see it in the attached photo in the lower right corner.
-
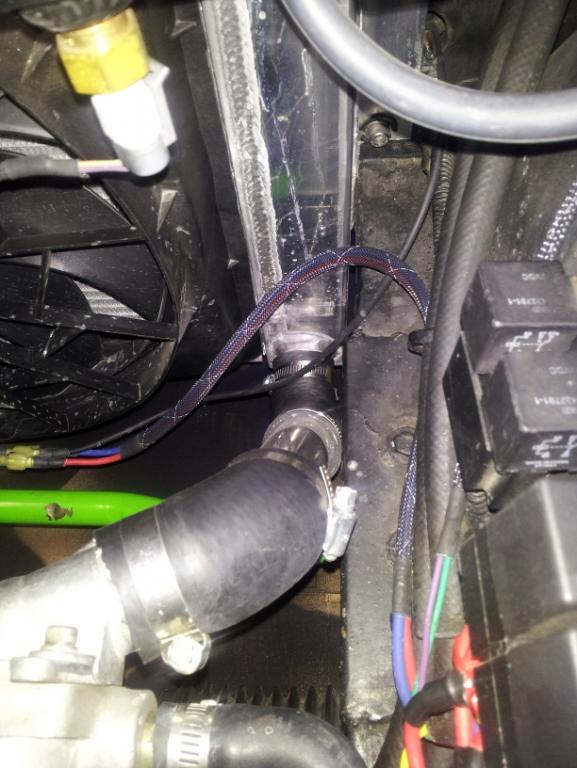
I opted for something a little different for the lower radiator hose. I spent countless hours searching for my answer and tried numerous hoses, but finally settled upon something that is, in my opinion, a lot better than a single hose solution. I went with a straight piece of 1.5-in. diameter aluminum pipe that then uses two angled hose pieces, one coming from my Arizona Z-car aluminum radiator (which is setup like a 280z radiator) and the other connecting to the thermostat body.
-
What do you use in place of your fusible links?
ktm replied to ISPKI's topic in Ignition and Electrical
I went a different route with my setup. I have two 2-fuse maxifuse blocks that each get battery power independently from each other through the disconnect switch which is wire with power not a ground. One block provides power to my fuel pump and stereo, the other block provides power to a supplemental block for the LSx PCM, injectors, coils, etc. and a Painless 12-circuit block that is for the rest of the car. You are right in that people are overloading their circuits which is why I went with a spread approach. -
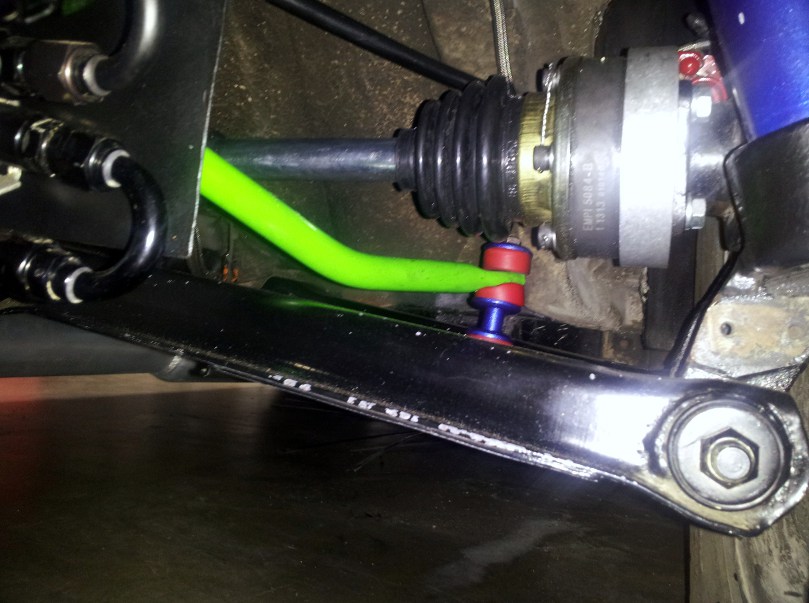
Final follow-up to close out the thread. I finally got everything buttoned back together and took 'er out for a spin. Everything seems to be functioning fine.....for now. I was alarmed by a noxious smell when I stopped to fill up at the gas station, but then remembered that everything was new in the back and that is most likely the source of the smell. My hands are destroyed by the safety wire. When Keith mentioned doing it by hand, that is literally what you have to do at least for the differential side. You may be able to get away with pliers or a safety wire tool on the wheel side, but be prepared to twist wires by hand on the differential side. I've lost skin on my index and pinky fingers. All said, it took me around 2+ hours to run the lock wire. My ST sway bar clears the Wolf Creek CV axles with plenty of room to spare. I know this was/is an issue with other CV swaps (there is a thread here in Hybridz about the issue) and maybe other sway bar options, but for my particular setup they are not even close to touching. I did shorten the endlink by 1/2-in. so that the CV boot would not be pressed against the sway bar in full droop. I've included a picture of the sway bar clearance below. A big thanks to everyone who expeditiously jumped into this thread to help. I was at my wits end when I could not get the CV to install initially. Hell, even Todd responded that he has had similar issues where the damn thing did not want to go in. A few notes about the install that may help someone else in the future: This is not as simple a swap as it appears to be. Yes, everything does fit perfectly and the kit is very well made. However, it doe take more time than you probably are thinking. I thought it was 3 hour job when looking at the kit on the website. After realizing I had to pack the bearings after I got the kit, I added an hour. I was wrong. Plan on a full weekend (8 hours) or one long day if you are single. If you are running a rear sway bar, you'll most likely have to disconnect it from the control arms on both sides to allow the control arm to drop all the way as well as allow the sway bar to fully articulate out of the way. I had to. As Dudeboy stated, you'll want to use a hydraulic jack under the control arm to completely drop it. This means removing the nuts inside the car at the top of the shock tower. Given the stiffness of the CV setup, once you get it attached to the differential and wheel you may experience difficulty getting the insulator back into the shock tower. Don't worry, it'll go, but be prepared to compress the springs however you can to get the studs to clear. The supplied hardware is not metric. Running lockwire is a royal PITA, holy shit that is still an understatement. I must say that I must be imagining things (similar to the butt dyno), but I swear the power transfer is noticeably smoother. Regardless, time will tell on the setup. Hopefully nothing will come loose. I was running the stock half-shafts on my car for 7 years with 3 engines and never had an issue with loose nuts. Then again, my tires always spin which is why I upgraded to CV's so that I can put some stickier rubber under me. I hope this thread helps someone else in the future. Cheers
-
23zed, I like the smoothed look, but dread the work involved should you get in a minor fender bender.
-
First safety wire experience here as well so I am not looking forward to it. I check the CV play and all is good. I shortened the sway bar endlinks by !/2-in. so now in full droop the sway bar does not hit the CV boot. If they are the prettiest and smoothest axles available, why did you change them out for the Z31T setup?
-
Thanks all. I went back out after I posted this and tried a few different things. Long story short, I got everything together and they appear to be correct but I will not know until the morning. I thought it was only going to take me around 2 hours to get everything together (I had already disassembled and greased everything), but 5 hours later I am done. If I knew then what I know now, it is a 2 to 3 hour job, but having to fight my ST sway bar, brake lines, having to drop both control arms so that that sway bar could drop all the way just to do one side, fighting to get my insulator back under the tower, etc., it turned into a small struggle. Keith, I used Blue Locktite on those nuts in conjunction with the lock washers, and torqued them to 50 ft-lbs. Torquing them to 50 ft-lbs was a royal PITA given the tight workspace. Good call on the CV play check. I'll look at that tomorrow. Dudeboy, I was doing just that (hydraulic jack) and it did work wonders, but then I needed the jack on the other side to drop that control arm as well due to my ST sway bar. I tried using my trans jack but it was too tall. I got it all sorted but damn am I sore. Oh, and thanks for the downer Keith. I thought the hard part was over but it sounds like the lock wiring is another fun experience.......
-
I am having one helluva time getting the CV shafts installed on my 1972 240z. I have an R200 CLSD and specified as such to Wolf Creek. The shafts came labeled (R200 left side) so you would think the install would be a snap. Wrong. By left side I am assuming they mean driver side, so I installed the passenger side first. Even after disconnecting the sway bar and dropping the control arm as far as it would go, I can't get the wheel side part of the CV shaft to clear the adapter. It seems to be catching on an 1/8-in. lip for the inner (?) bearings. Anyone have any guidance?
-
heavy85, thank you thank you thank you! I ordered a complete set of the stock covers and installed them on the two middle plug wires on the driver side. I've put around 1000 miles on the car since then and they are not showing any signs of deterioration. I had to slightly oval out one of the covers because I could not get the plug wire to snap onto the plug, but so far so good.
-
Dry cell battery, what should I be looking at spec wise?
ktm replied to BluDestiny's topic in Miscellaneous Tech
I've been running a Deka ETX30L in my LS1 powered Z for 2 years without issue. There is/was a lot of debate about Braille's being re-packaged Deka's due to their similar size, capacity, etc. If you do not drive the car often, though, you will need to keep it on a trickle charger. You can buy the ETX30L for $90ish dollars. -
LS1 Bolt in Motor and Trans mounts from Johns Cars
ktm replied to qwik240z's topic in Gen III & IV Chevy V8Z Tech Board
Admittedly, I was in a bad mood and a bit drunk when I posted. Not a good combination and I regret what I posted. My apologies. Still the kit is good value considering what it may cost someone who cannot weld and would have to take it to a shop to have one fabricated. It does come with the driveshaft as well. -
LS1 Bolt in Motor and Trans mounts from Johns Cars
ktm replied to qwik240z's topic in Gen III & IV Chevy V8Z Tech Board
You did not build it for $10 as the JCI kit also includes a driveshaft which, at a minimum, is $250. Additionally, the JCI kit is coated (I do not know the coating but it looks annodized) whereas yours is most likely raw carbon steel. Your welds most likely look like they have slag over them and are unfinished whereas the JCI kit looks very well made. So, let's not talk smack, eh? -
SoCal: what is the reasonable price to weld 2 baddog frame rails?
ktm replied to 9rider's topic in Fabrication / Welding
Honestly, if they are going to do a good job then the price they quoted is fair. John installed my Bad Dog frame rails and subframe connectors. I was happy I went to John and would gladly pay the price I did. You do not want to do this half-assed because if they do not do a good job, you are basically creating cavities for water to pool under you floor pans.