Miles
-
Posts
2393 -
Joined
-
Last visited
-
Days Won
37
Content Type
Profiles
Forums
Blogs
Events
Gallery
Downloads
Store
Everything posted by Miles
-
Buy the Street Racing Suspensions video from Ztherapy. Shows how to install a complete polyurethane bushing kit. https://ztherapy.com/
-
Here are some really big ones you can look at. https://www.zcar.com/threads/hacksaw-and-energy-suspension-bushing-installation.293838/ https://www.classiczcars.com/forums/topic/12008-rear-control-arm-bushings/ https://www.zdriver.com/forums/240z-260z-280z-brakes-wheels-suspension-chassis-126/rear-control-arm-bushings-9279/
-
Here are some posts from other Z car sites: https://www.zcar.com/threads/hacksaw-and-energy-suspension-bushing-installation.293838/ https://www.classiczcars.com/forums/topic/12008-rear-control-arm-bushings/ https://www.zdriver.com/forums/240z-260z-280z-brakes-wheels-suspension-chassis-126/rear-control-arm-bushings-9279/
-
Searching old posts will set you free. Do a search and then read posts in reverse order. Why because most 240z issues were resolved almost twenty years ago. Think of HybridZ as an encyclopedia. Turn the page......................
-
 Yep. Two of my Wilwood 1 in. MCs leaked internally right out of the box. The third one had damaged bleed screws. I ended up buying a 1979 280ZX MC from Arizona Z Cars.
 -
Wanted: S30 stub axle/companion flange. Or two.
Miles replied to XplosiveLugnut's topic in Parts Wanted
One of the problems with the stock stub axles is the mounting flange can become bent/warped. Not so much of a problem with drum brakes, but drove me nuts after I did the rear disk swap. One caliper got hot and the other caliper was barely warm. I finally set up a dial indicator and measured the face of the flange. Both flanges were warped so they would cause the rotor to rub on the brake pad. I tried having the flanges machined, but it didn't fix the problem. I ended up installing the stub axles from Chequered Flag Racing. No problems since then. I have also had a stock stub axle shaft break where the threads end (common) just pulling away from a stop sign when my Z was all stock. I see that MSA is selling "refurbished" stub axles. -
Wanted: S30 stub axle/companion flange. Or two.
Miles replied to XplosiveLugnut's topic in Parts Wanted
Try Chequered Flag Racing if you can't find good used axles. I had problems with used axles so I caved and bought these: http://www.chequeredflagracing.net/Datsun.html -
I do whenever the car is up on jack stands. Ok so far. I have seen that center mounting bolt pull out of the crossmember and cracked crossmenbers.
-
"Also meant to say in last post will check the stub axle nut torque but wrote "gland nut" by accident." Torquing that nut beyond specs won't help unless the nut has actually loosened up. I torque mine to 180 ft lbs and quit. Be aware that the stock nut is staked down and turning the nut without removing the staked part with a Dremel grinder will destroy the threads on the axle. You can substitute a 280XZ nut which is self locking. The splines in the companion flange (connects half shaft to the axle) can become worn creating some slop, but not a clunk. Lock the wheel and move the half shaft to see if the splines are worn. There is always a bit of play. You should pull the differential and inspect for worn parts. Also check the three nuts (top of tower) for the insulators and the nut that attaches the shock to the insulator. All R180 and R200 differentials were a bit playful even when new and will clunk unless you engage the clutch smoothly. My junk yard R200 has clunked for the last 10 years. Check that the shock has no vertical play which could indicate the wrong shock, missing spacer or loose gland nut. Be careful around the threads that the gland nut screws into. If the threads get screwed up or the tube gets bent in the threaded area you will be looking for a new strut. Note that the spacer is unique to each manufacturers shock. The stock front differential mount flexes. I replaced mine with a solid mount (MSA) 20 years ago. No problems with a SBC 350 or you can do the Taylor mount. Example of cause of clunk in a R200 differential:
-
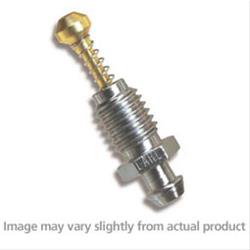
There is still air in the system. Could be the MC. Have to get all of the small bubbles out and be sure you are pushing the piston full stroke. Take your time so the bubbles can form up between bleeds. Speed bleeders installed on the MC help insure that bubbles don't get suck back into the MC. Plug the outlet ports when transferring the MC to the car to prevent fluid leaking out and air getting in. Could be some air in the caliper still. You are very organized and methodical. Just keep at it in a logical step by step way. Don't mean to scare you, but I have stopped using the Wilwood 1 in. MC. I got three bad ones right out of the box. Two leaked internally and the other one had the bleeder screws smashed. That is bad quality control. I am now using a 79 280zx 15/16 MC that I bought from Dave at Arizona Z Cars. Now back to your push rod. If I recall correctly, the push rods came in two lengths. As I mentioned before, measuring from the tip of the push rod to the face of the spacer should be around 14mm to 15mm as a starting place. Too short = long pedal. Too long = brake lock up after 2 or 3 applications due to blocked return port. You mentioned that you added a spacer to the push rod to get the length you need. Not sure what you did, but adding a spacer to the push rod may not be a good idea.
-
Agree with Newzed.
-
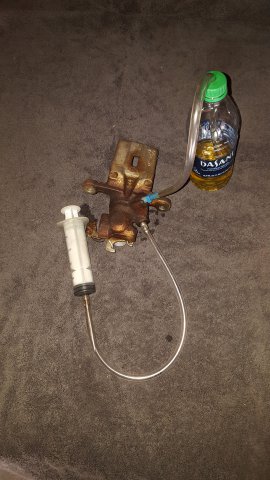
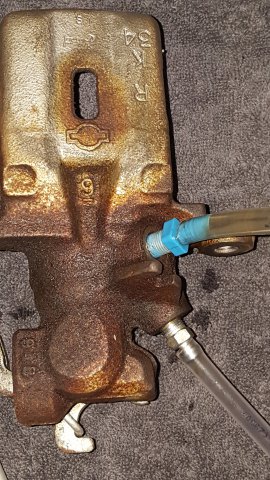
Had to replace the 240SX rear calipers on my 240Z this week. Had a brain fart idea that worked. Bench bleed caliper method: Bench bleed the calipers before installing them: While prepping the new calipers I noticed my MC bench bleeding kit on the bench. The fittings used for the MC will also fit the caliper. I used the fittings/hoses from my MC bench bleeding kit (O'reilley's) plus a huge syringe I found at a grocery store. Connect the syringe with hose to the speed bleeder. Screw in a plastic push-on hose fitting (from a bench bleeding kit) into the inlet of the caliper with a hose to a bottle to catch the fluid. Push fluid into the caliper with the syringe being careful not to push any bubbles in the hose into the caliper. Once the caliper is full, and no bubbles are seen, close the speed bleeder and plug the inlet with a M10 x 1.0 bolt. I was amazed at how much air flowed out of the caliper. It took about three full syringes of fluid to get all of the fine bubbles out. After installing the calipers (see procedure below), and doing one side at a time, it only took three pumps to get a firm pedal for each caliper. Steps: Bench bleed calipers being sure to tighten the speed bleeder and install a M10x1.0 bolt in the caliper inlet when done to keep the caliper sealed. Fill MC reservoir with fluid. Push brake pedal with your hand and block it in place with a stick between the seat and the pedal. This blocks the fluid return port in the MC so fluid will not flow out of the MC. Remove old caliper leaving the flex line attached and hang it from the spring with some wire. This keeps the brake line sealed and prevents any fluid loss while installing the new caliper. Install new caliper and pads. Move the flex line from the old caliper to the new caliper. Since you blocked the return port in the MC there should be almost no fluid drips from the open flex line. Attach hose and catch bottle to the speed bleeder. Open the speed bleeder and pump. The first pump will go to the floor because the piston will move out taking up the slack between the piston and the brake pad/rotor. The second and third pump will firm up the pedal. I just did this this week. It was the quickest brake bleed I have done with Maxima/240SX calipers. No wasted fluid too. MC bleeder kits are available from O'reilley's. They contain a variety of plastic MC outlet fittings, but for some reason only one M10 x 1.0 fitting so I buy two.

-
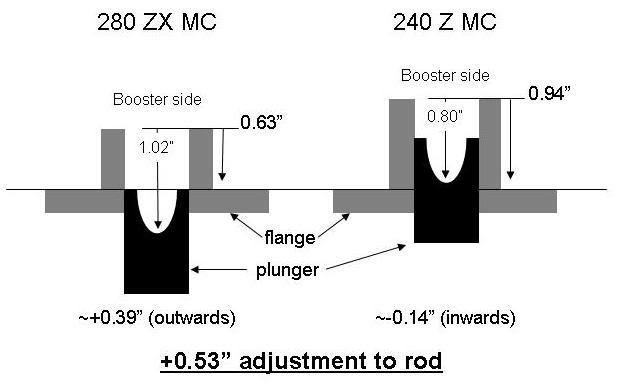
This may be your problem: You wrote: 7. I then removed the spacer and adjusted the push rod to almost touch the master cylinder plunger. The brake pedal still went to the floor with no stopping power. So you adjusted the plunger with the spacer removed? And then you put the spacer back on? That would move the MC away from the push rod by about .75 inch which would increase the gap between the push rod and the MC piston such that the piston would move a small amount if at all. If I recall correctly, for my 280ZX and Wilwood MC I adjusted the tip of the plunger about 14mm/15mm as measured from the face of the spacer. You can also fine tune the push rod once the car is on the road for testing. Just be aware that if you adjust the pushrod out too far you will lock your brakes up because the MC piston gets pushed past the return port in the piston preventing fluid from returning back into the MC from the calipers - kind of like a line lock. Opening the MC bleeders will relieve the pressure. Picture is for using a 280ZX MC, but the math is fairly close for a Wilwood 1 inch MC
-
I have used both the Maxima and 240SX rear calipers on my Z cars. The problem is that the bleeders do not point straight up such that air remains trapped in the cylinder. Wasted lots of time and fluid. Remove caliper with flex line connected method: You can remove the caliper while leaving the flex line connected. Block the piston so it can not move otherwise when you pump the brakes you will just blow the piston out of the cylinder and you will be very very sad. Hold the caliper so the bleeder points up and shake the caliper while your accomplice pumps the brakes. Repeat. Repeat etc. Speed bleeders (type with spring and plug inside or check ball inside) make this job easier. Bench bleed caliper method: You can try what I came up with this week: bench bleed the calipers before installing them. While prepping the new calipers I noticed my MC bench bleeding kit on the bench. The fittings used for the MC will also fit the caliper. I used the fittings/hoses from my MC bench bleeding kit (O'reilley's) plus a huge syringe I found at a grocery store. Connect the syringe with hose to the speed bleeder. Screw in a plastic push-on hose fitting (from a bench bleeding kit) into the inlet of the caliper with a hose to a bottle to catch the fluid. Push fluid into the caliper with the syringe being careful not to push any bubbles in the hose into the caliper. Once the caliper is full, and no bubbles are seen, close the speed bleeder and plug the inlet with a M10 x 1.0 bolt. I was amazed at how much air flowed out of the caliper. It took about three full syringes of fluid to get all of the fine bubbles out. After installing the calipers (see procedure below), and doing one side at a time, it only took three pumps to get a firm pedal for each caliper. Steps: Bench bleed calipers being sure to tighten the speed bleeder and install a M10x1.0 bolt in the caliper inlet when done to keep the caliper sealed. Fill MC reservoir with fluid. Push brake pedal with your hand and block it in place with a stick between the seat and the pedal. This blocks the fluid return port in the MC so fluid will not flow out of the MC. Remove old caliper leaving the flex line attached and hang it from the spring with some wire. This keeps the brake line sealed and prevents any fluid loss while installing the new caliper. Install new caliper and pads. Move the flex line from the old caliper to the new caliper. Since you blocked the return port in the MC there should be almost no fluid drips from the open flex line. Attach hose and catch bottle to the speed bleeder. Open the speed bleeder and pump. The first pump will go to the floor because the piston will move out taking up the slack between the piston and the brake pad/rotor. The second and third pump will firm up the pedal. I just did this this week. It was the quickest brake bleed I have done with Maxima/240SX calipers. No wasted fluid too. MC bleeder kits are available from O'reilley's. They contain a variety of plastic MC outlet fittings, but for some reason only one M10 x 1.0 fitting so I buy two. With your brake set up your brake pedal should feel about stock. I will post some pictures later today.
-
This is what I am using: http://www.chequeredflagracing.net/Datsun.html
-
-
My first 72 240Z was a father and son project. It was an old SBC v8 conversion that was badly done. There were so many conversion/mechanical/electrical issues with the car that we pulled it completely apart. It was worth the effort though. So I bought another 72 240Z and did the V8 conversion. The car had a severe vibration around 70mph. I ended up pulling the drive shaft and took it to a different shop. The shop discovered that the previous shop had welded the shaft off-axis after they cut it. The shop re-cut/welded and balanced the shaft. No more vibration. The JTR manual is not perfect. Over the years I have found mistakes in the manual, but is does get you off to a good start. Glad you found the vibration. A drive line vibration can make it impossible to enjoy a z car. Mine is down due to a carb (Holley) issue and a leaking 240sx rear caliper. Got ten years out of that caliper (Nugeon)
-
Do you have the JTR Datsun V8 conversion manual? It covers all of the issues you are having.
-
delete
-
TechnoToy Tuning is now selling their Micro Big Rear Bake kit. It includes a parking brake function and will fit under most 14 inch wheels. Has anyone purchased the kit? https://technotoytuning.com/nissan/260z/240260280z-micro-rear-big-brake-kit
-
Wilwood proportioning Valve
Miles replied to grannyknot's topic in Brakes, Wheels, Suspension and Chassis
Is this a race car? -
Why do you need to change out the pivot? Why are you using a 1 inch clutch MC? I have used T5 transmissions on two 240z SBC swaps. Stock Camaro clutch MCs were used on both cars. The pivots looked a bit worn, but since they were NLA I just kept them. No problems in 20 years.
-
Wilwood proportioning Valve
Miles replied to grannyknot's topic in Brakes, Wheels, Suspension and Chassis
Some members just gutted the stock PV. Don't know how effective it was though. -
Wilwood proportioning Valve
Miles replied to grannyknot's topic in Brakes, Wheels, Suspension and Chassis
Does not make sense. If high front bias a PV on the rear would make it worse -
Wilwood proportioning Valve
Miles replied to grannyknot's topic in Brakes, Wheels, Suspension and Chassis
I have this set up on my 72 240Z. The front to rear bias is 60% front and 40% rear. A proportioning valve reduces pressure which would make your rear brakes less effective. You absolutely do not need a proportioning valve. So don't install a proportioning valve. My set up includes a 15/16 in 280ZX MC and a 280Z 9 in. dia. booster. Pads are Carbotech AX6. Car is daily driver. Stops like a stock car.