Miles
-
Posts
2393 -
Joined
-
Last visited
-
Days Won
37
Content Type
Profiles
Forums
Blogs
Events
Gallery
Downloads
Store
Everything posted by Miles
-
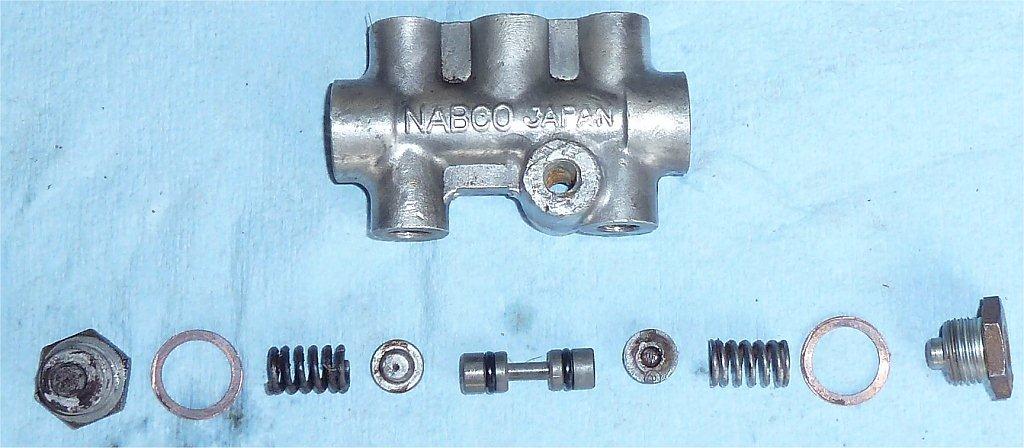
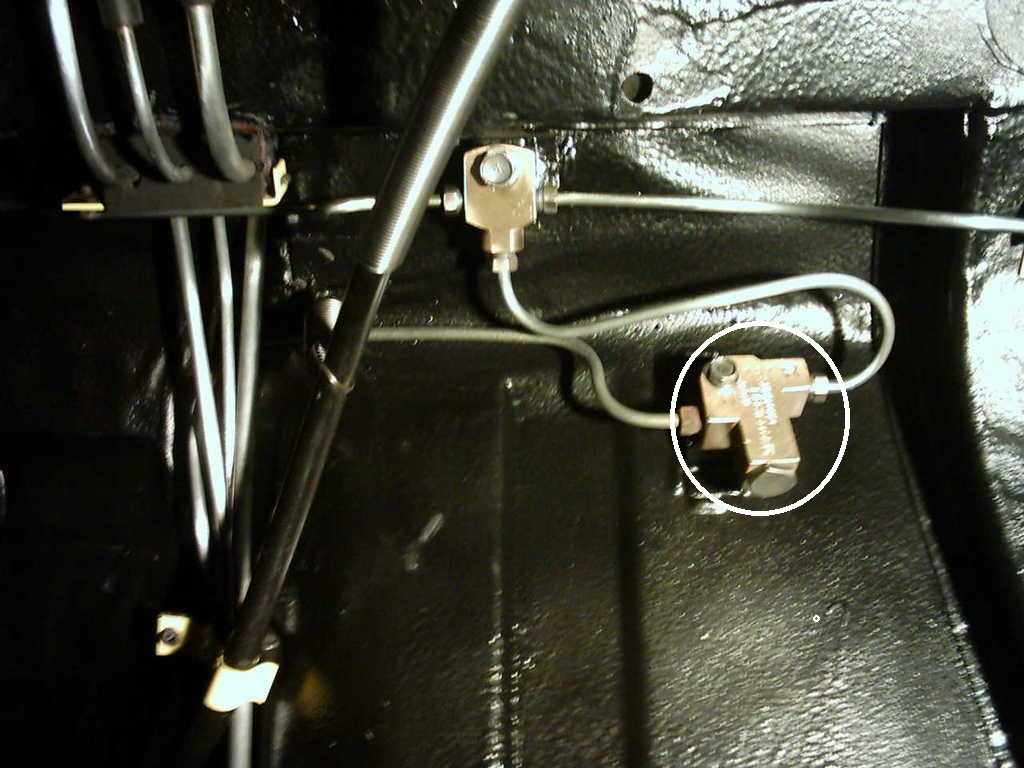
 Attached is a detailed flow chart that I have been using to diagnose rear caliper dragging problems. It seems complete. As a long shot, I have been considering checking out the brake differential pressure switch located under the master cylinder. If you look at the attached pictures it appears that the switch is designed to recenter itself (note springs at each end) once brake pressure is released. I don't see any mechanical feature of the switch that would lock it once it is activated. However, since the switch is over 40 years old the seals may have erroded allowing fluid from the front and rear circuits to leak/mix into the wrong sections of the switch. It may be silted up with dirt as well. Today I am pulling the master cylinder and the brake switch for inspection. If the switch is bad I'll replace it with a 3-way distribution block to connect the front brake lines. The rear brake lines can be joined with a metric union. To test that the return ports in the MC are not blocked I'll use a large syringe and force fluid back through the outlet ports and watch for fluid filling the tanks.
-
Have you looked at the Datsun Parts LLC rear caliper with intregal parking brake?
-
Both the pedal and MC push rod are adjusted real loose. Pulled the check valve when I installed the MC. I am starting to think it is time to recheck the Wilwood master cylinder. In the last three years I have had two Wilwood MCs leak internally. The second one leaked out of the rear seal into the booster with less than 500 miles on it. Are you getting the AZC Wilwood kit with the parking brake?
-
I did that twice today. Once with the PV valve set to full rear and then again with the PV set to max front bias. The wheels still got hot. It is worse if I use the brakes normally. So the pads must be dragging. Even though the pistons glide in and out of the bore easily the seals must be hanging them up just enough to heat up the rotors. I see a lot of complaints about this type of caliper dragging/seizing up on the Nissan 240SX and Maxima websites.
-
Do you mean the proportioning valve? Look in the factory service manual (FSM). You can download from HybridZ.
-
Beerman Yes, the brakes work in a general way, but not impressive either. Rears doing most of the work: I was just thinking the same thing this morning. I am using Hawk HP pads on the front with new rotors, but may not be getting the clamping force for some reason. I never expected the stock front and Maxima rear brake set up would be unbalanced - that is usually a problem when big vented kits are installed on the front. Just looking at the piston surface areas I would expect the balance to around 65% front and 35% rear with this combination. I'll do some test drives with PV set towards the front. Did test drive with PV set to front bias (knob all the way out). No change. Rears still hot.
-
On a hunch, I bought some cheap organic pads and compaired the thickness to the Hawk HPS pads I had installed. The Hawk pads measured 13.62 mm and the cheap pads measured 12.3 mm. With the car on jack stands, the cheap 12.3 mm thick pads allow the rear wheels spin freely with very little drag. The thicker Hawk pads would drag when the wheel was spun and I could hear and feel the pads dragging while coasting. With the cheap 12.3 mm pads the car rolls with no resistance and yet both rear wheels are too hot to touch after only a few miles. I took the car for test ride of about 5 miles and both rear wheels were very hot, but didn't show much rolling resistance. The front wheels were slightly above ambient temperature. Setup: New Wilwood 1 inch MC with residual presure valve removed form rear output port. The MC was bench bled New 280Z booster with push rod adjusted so it is not preloading the MC. System bled with firm pedal. Wilwood PV opened all the way to the rear. The PV was Installed for future brake upgrades e.g, Arizona Z front and rear kits. Stock front brakes. New Maxima rear calipers. Pistons glide in and out during adjustment. The parking brake lever retracts back to its resting position on the stop pin. Bench testing of the parking brake shows the piston moving out when the parking brake lever is moved. New 82-83 280ZX rotors. The 280Zx rotors are 9.906 mm thick as compared to stock Maxima rotors which are 10.16 mm thick. Parking brake cable is not preloaded and is relaxed at the caliper connection. Pistons fully retracted and pads are installed correctly using a caliper piston tool. Slider pins are not binding or show no resistance to movement. I have checked the entire brake system for mechanical and hydraulic problems. Everything appears normal. There is gravity flow and no residual pressure shown at the bleed screws after road test. The only components that I that I have not opened up for inspection is the Wilwood PV and the brake differential pressure switch that is located under the MC. I was thinking of removing both components and reconnecting the brake lines as a test, but since I am not seeing any residual pressure build up and there is good flow at the bleeders that test would be pointless.
-
Go here and buy the video Just SUs: http://www.ztherapy.com/ It will teach you evrything you need to know about SU carbs. They sell SU parts too.
-
Search as there are dozens of posts on how to adapt the Painless kit to the 240Z e.g., how to wire the combo switch etc.
-
That is the one I suspect has the wrong offset or I have a non-typical 240Z strut that moves the bracket outward pushing the piston towards the rotor. So even though the floating caliper is self cenetring, the bracket still has to center the caliper on the rotor.
-
Beerman That floating calipers should be self centering seems logical. By mounting bracket, do you mean the bracket that bolts to the strut or the bracket that the caliper bolts to?
-
I just finished installing 85-88 Maxima rear calipers on my 72 240Z using a mounting bracket from MSA. The pads drag on the rotors. I have completed the hydraulic inspection and there is no hydraulic lock or residual pressure build up that would cause the pads to drag. The calipers are new with pistons that move freely. Both sides drag. I am now looking for mechanical issues such as the parking brake and caliper/rotor fitment that would cause the pads to drag. The parking brake functions normally. Looking at the position of the rotor relative to the caliper shows that the rotor is not centered in the caliper. The gap between the rotor and the caliper is about 1 mm narrower on the inboard side (piston side) of the caliper. The only reason I can see for this is that either the mounting bracket was not machined correctly or there is problem with the pad where the bracket bolts to the 240Z strut. Reading old posts from Ross Corrigan (Modern Motorsports) indicates that the bracket mounting pad on some 240Z struts varied enough that his 240SX brackets would not bolt on. He later modified his brackets to allow for this rare variation in 240Z struts. How critical is it for the rotor to be exactly centered in the caliper? Would putting a 1mm spacer between the hub and rotor hat be safe way to center the rotor in the caliper?
-
Exterior is 350Z Silver Alloy k23.
-
White is going to look dirty. Try gray on gray.
-
Does ANYONE have a kit for a manual and a 350?
Miles replied to yamahondarider's topic in Gen I & II Chevy V8 Tech Board
I used the MSA V8 kit on two 350 SBC T5 trans projects. I prefer it to the JTR kit because the trans mount goes up inside the trans tunnel and allows more flexibility in setting drive shaft angles. The MSA kit is designed for the 700r4 transmission, but also works with the T5 transmission. The JTR kit also has benefits. Search for JTR and MSA kits for details. If you search the forums you will see that there are three popular V8 swap kits for Z cars. Suggestions: Buy the JTR book and read it at least 5 times. Buy a FSM and Haynes repair manuals for your specific car. Download electrical schematics for your car. PDFs are easier to read than those found in books. Buy the book How to Restore Your Dasun Z Car by Wick Humble. It will save you hours of searching. Focus on searching Hybridz for at least 40 hours as 99% of your questions have already been addressed. Make a detailed plan with parts list including cost. Start bookmarking Z car parts suppliers - there are many! Remember these are 40 year old cars and will need restoration to be safe and drivable. Join Classic Z Cars website and search there as well. Become well informed about the swap before asking questions. People will be more inclined to answer informed questions as apposed to the I am too lazy to read/study questions. Have some money. I stopped counting after $12k. Read all of the new member FAQs. Read, study, plan, execute the plan. -
Hawk Brake Pads on Toyota Calipers with Z31 Hubs
Miles replied to socorob's topic in Brakes, Wheels, Suspension and Chassis
I did run into a problem with Hawk pads being too thick when fitting them to a 240SX rear caliper. New stock pads would slip right in. Make sure you have the pistons fully retracted. Do a Google search on the Hawk pad fitment issues. -
Bumping this up to see if anyone has installed the Datsun Parts Wilwood caliper/parking brake kit. If so, any issues? Just got an email from Al at Datsun Parts. The calipers are huge and require a 17 inch wheel.
-
Do you have the spacer block in place between the booster and MC? If not the push rod will be too long. Under the dash verify that the adjustment between the booster and the pedal arm is not adjusted such that it is pushing the MC push rod forward. You need some free play in the brake pedal per the FSM etc. Assuming that you have a 240Z or 280Z booster, the push rod should be close to 14mm to 15mm +/- a few mm (as measured from the spacer block) for the Wilwood 1 inch MC. Test fit the MC while adjusting the push rod. If the MC pushes back when sliding it home on the booster it is too long. If it is too long the brakes will lock up after 2 or 3 stops. When you test drive the car take a wrench with you to release pressure in the MC by opening the MC bleed screws. Note that the push rod can be adjusted with the hard lines to the MC connected. Do not drop the reaction disk inside the booster. Suggest that you set the booster in a vise so the push rod is pointing up, pull the push rod out, take out the reaction disk (rubber puck) and glue it to the base of the push rod with JB weld. Otherwise there is a good chance that you will loose the reaction disk while fooling around with the push rod adjustment. Search on reaction disk for more info.
-
Try socket-head driveshaft bolts. An Allen wrench on the socket makes driveline installation/removal a snap. You may want to have some flanges installed in your exhaust system at logical break points so sections can be dropped out for easy access/removal of driveshaft, transmission, differential, gas tank and etc.
-
google 240Z weatherstrip etc. Topic has been covered 100s of times. Search forums
-
V8 swap help in Columbus, Ohio
Miles replied to PhunkyPhil's topic in Gen III & IV Chevy V8Z Tech Board
5, 4, 3, 2, 1 -
How do I interpret the amp meter
Miles replied to RebekahsZ's topic in S30 Series - 240z, 260z, 280z
My stock SBC starter used to heat soak and would not turn the engine over. I replaced the stock starter with a Hitachi gear reduction starter and never had a problem with starter heat soak again. Adding a voltage gauge can be accomplished with a unit that plugs into the cigarett lighter. The plug-in volt meter I have is as accurate as a reading with a volt meter at the battery terminal. Having both gauges can alert you to developing problems with the battery and charging system. -
http://www.blackdragonauto.com/icatalog/zr/full.aspx?Page=61
-
What make and model car? Add info to your signature line as a minimum.
-
Refer them here: http://forums.hybridz.org/topic/109702-hybridz-is-not-automotive-101/