-
Posts
397 -
Joined
-
Last visited
-
Days Won
4
Content Type
Profiles
Forums
Blogs
Events
Gallery
Downloads
Store
Everything posted by z240
-
Hey Dean, Jim out in Calgary. I have some spare hubs. Drop me a note to z240@shaw.ca and we'll take it from there.
-
SEM Vinyl paint/dyes are very popular and available from body shop suppliers and on-line. Key to having it work well and stay looking great is proper prep and application technique.
-

Stripped nut on steering! How do i fix this?
z240 replied to dpuma8's topic in S30 Series - 240z, 260z, 280z
Before you give up and use the big tools, add lots of spray lube and work that nut on and off, going just a bit more off each time. It may come off if you're very patient. Then its on to power tools and leverage. Unless you have lots of room in that Grant hub to get a dremel cut off blade on the nut, your only real recourse is to do as Miles says and use a BIG ratchet and long handle with your 22mm socket to apply whatever torque is needed to just force it. Just let the steering go hard left to lock the column instead of using the key-in-lock position steering lock. You may shear that pin and cause more trouble. If it comes off, inspect the threads very carefully. NUT and shaft. Get a new nut for sure. At the very least you need a die to clean up the threads you have left. If the threads are only wrecked ABOVE where the nut finally tightens down, then you're good to go. If the threads where the nut seats are bad, you have a tough decision to make. Is there any chance that nut will back itself off 2 years from now when you've long forgotten to check it now and then, and the wheel slips forward off its splines during an emergency and something bad happens? This means a new steering shaft. If you get it loose, and the nut begins to turn freely but is not coming off the shaft, ie the threads are really boogered, then you're stuck with a couple of tough choices. One involves a saws-all and the steering shaft.... Take the column covers off and the switch gear, tuck back all the wiring and decide where to cut. Likely right behind the Grant hub at the base of the splines. This means you need a new steering shaft. Might be wise to remove the steering column from the car and doing this on the bench. Another means deciding to split the Grant hub to get the access you need to then cut the nut off the shaft. This means a new hub, and depending on the threads on the shaft, a new steering shaft. If you put a LOT of torque on the nut to remove it, you may have also damaged those nasty little hard to get u-joints on the engine bay side of the steering shaft (or made the wear/play they already have worse) . See where this is going? -

Steering rack n pinion sticking?
z240 replied to tooquick260's topic in Brakes, Wheels, Suspension and Chassis
The two bushings that hold your rack to the frame may be worn or broken, allowing the rack to move. This problem happened to me when I changed these bushings to polyurethane a long time ago and didn't realize there are two different racks that require a slightly thicker bushing on one side if you have a 280 rack vs a 240 rack. I was happy to find how easy it was to put that bushing in, but then couldn't figure out why doing a left turn left my wheel uncentered left, then doing a right turn left it un-centered right... The rack was shifting enough to cause it. Turns out I had a 280 rack and had put the 240 bushing in. (the bounding flanges on the driver side bushing are slightly further apart on the 280 rack). Have a look, might be your issue. -
No personal direct experience but they've been in business for a LONG time. A member here recently purchased some used items from them and was treated very well. Hopefully others from the Ontario clubs will chime in with more personal experiences
-
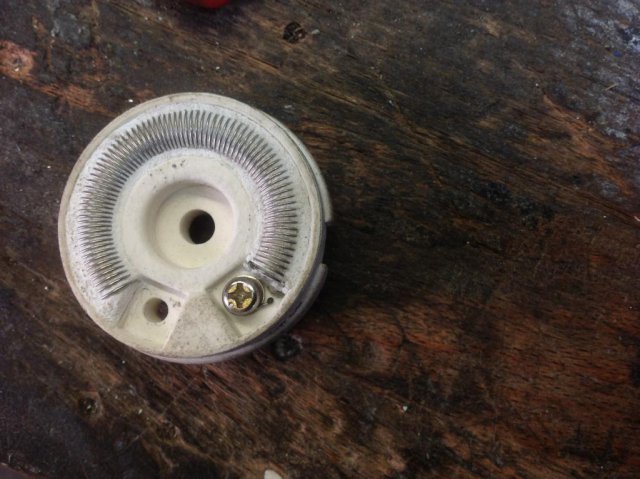
Well, I found the dimmer. Bad news, its fritz'ed too. Good news, I took it apart to find out why and its really obvious. The ends of the resistor coil are melted off the point where they go under the tiny bolts that connect them to the wiring harness. Good new is this is likely repairable. The entire switch comes apart easily. Take yours apart and find out if the problem is same. Maybe its just dirty contacts. To reconnect the ends of those coils, which are embedded in ceramic, will take a bit of creative digging and stuffing new wires under the existing coils, or maybe they can be soldered to. If you can't get yours working, then I'll fix mine and you're welcome to it.
-
Oh oh, stuff like this will happen more and more. Dang it.... I'll go check if I can get sets here and I'll happily send a set down if I can. Easy to get last fall, but I may find what you did. Let you know.
-

Whats the proper bolt setup for fiberglass bumpers?
z240 replied to BitchinZ's topic in Body Kits & Paint
Me thinks the "carriage bolt" is the correct animal to use in this case. Choose one with its "square shoulder under the smooth head" sized to fit into that slot. This prevents it from turning as you tighten the nut behind the bracket on the car that should be accessible. Only trick might be getting the carriage bolt into place in that bracket and holding it there whilst you hang the bumper and get the nut/washer started. Duct tape comes to mind for that. I think most generic chrome bumper bolts are of this construction to fit into a corresponding square hole in a bumper. carriageBolt.bmp -
Ah yes, the dimmer and odo reset knobs side by side. I know I have that one somewhere. Now to find it. $10 bucks + postage outta do it. Send me a note to z240@shaw.ca as a reminder please.
-
I'de go buy a lottery ticket if I was you. Though with that string of luck, you might be just about dry... No way to tell C vs V without yanking an axle at least.
-
Pretty sure the 240 and 260/280 dimmers are quite different in how they mount in the dash, and are not interchangable. If you can post a picture of the one you currently have, it will help finding the right one for you. You have a 260 yes? Have to look tonight, but I think I have one.
-
10 x 1.25 is stock. Get a die and clean up the threads. You are wise to be cautious.
-
The 280 strut towers are taller/higher in the body and would thus be closer together at the top, but I'm not sure there isn't something slightly different in the overall spacing that makes that a bad comparison. The 72 I have handy has 30.5" spacing between the two inner-most studs as a reference.
-

Upper Wiper Cowl / Top Grille Removal
z240 replied to TieFighter88's topic in S30 Series - 240z, 260z, 280z
Nope, you're doing the right thing, just pry harder. First get the front edge where the screws were pryed UP and over the lip that is immediately in front of it, then pull it forward to release the five tabs that are in the slots under the windshield. Nothing fancy there, just flat tabs poked straight in. Good luck. -

Rear Wheel Stub Axle Play - Help Needed
z240 replied to Wheeler's topic in Brakes, Wheels, Suspension and Chassis
Some 240's had a copper washer between the outer flange and the bearing, but this is not a requirement. I was installed for noise absorbtion, not spacing. The copper washer does not fit on the large dia 280 stub splines, so you're not missing anything. Could be just play in the bearings. Axial is not a big deal, radial is. Run and see what happens -

Rear Wheel Stub Axle Play - Help Needed
z240 replied to Wheeler's topic in Brakes, Wheels, Suspension and Chassis
About the only place for play is how the bearings sit in the casting if everything else is tight and new. Are you sure there is no play in the rotor to stub flange connection you're grabbing to test? Take the rotor off and measure the stub axle flange movement and see what happens. Being same on both sides is suspicious. -

260z front bumper parts.. Rubber fill above turn lamps
z240 replied to datsun74z_tn's topic in Parts Wanted
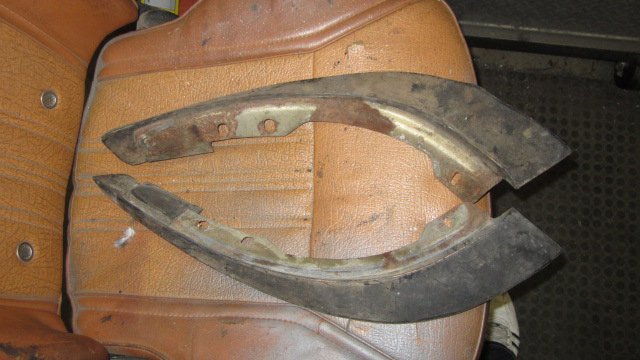
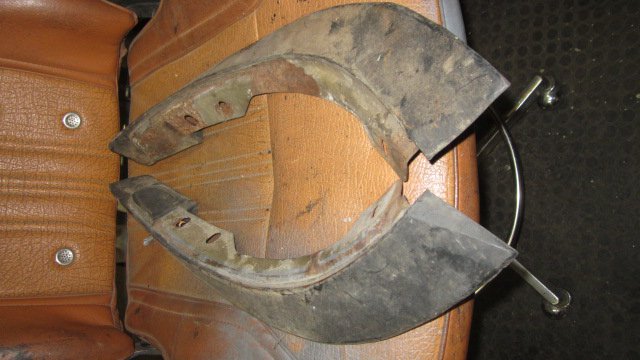
I have what may be 73 or 74 bumper fillers. Fairly sure they are 74. Let me know if these look right. I'de like $30 each + ground postal, likely around $20-25 from here. I'll clean them and send better close ups if you're interested. I have a couple of sets of early 260 front bumpers, with all the rubber bits including the fancy rubber standoffs on the tips that mount them to the body, the rubber filler strip in the center, and the two all-rubber "bumperettes" that mount to the face of the bumper. Let me know if you need any of that stuff. e-mail to z240@shaw.ca is the best way to get to me. Jim -

front strut/spindle assembly
z240 replied to EZpickenZ's topic in Brakes, Wheels, Suspension and Chassis
Just for the sake of completeness, in the 71 FSM, on page BF-3 on the "Standard body dimensions" drawing, the angle is stated as 13 deg 45' Same thing in the 78 FSM. Nice measuring EZ, way better than my 16 deg gauge estimate! The Rear angle for interest sake, is 16 deg 15' -
GW is +12 from light switch, RL gets grounded via the rheostat FSM has a nice diagram of just the Illumination system on page BE16.
-
m1ghtymaxxx : I'm sure I have that relay spare, maybe two. Nothing fun about replacing THAT with regular relays. I think I can beat the $115 MSA pricing. Hows $114.95! No? okay, $5. + postage. Its a long way to there. Drop me a note z240@shaw.ca and we'll get this going. Gotta take care of my brother-on-the-rock!
-
-

front strut/spindle assembly
z240 replied to EZpickenZ's topic in Brakes, Wheels, Suspension and Chassis
how exact do you need? I get 106 deg. using an electronic angle gauge from spindle tip to strut housing -
Modern motor sports is no longer accepting orders due to issues discussed in this thread. Very sad. http://forums.hybridz.org/topic/112867-modern-motorsports-ross-c/?hl=%2Bross+%2Bcorrigan
-
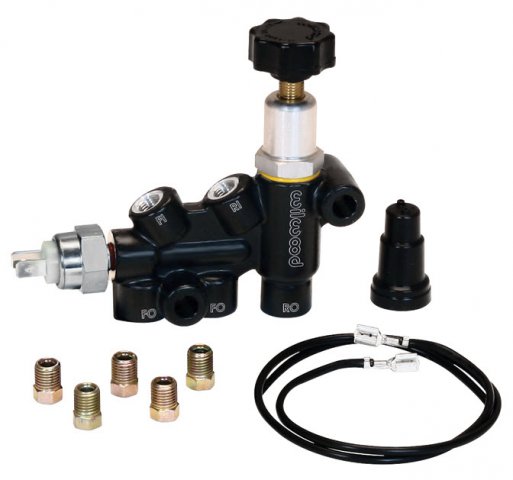
Just found this extremely useful wilwood item while cruising their site looking for the "usual" proportioning valve. http://wilwood.com/MasterCylinders/MasterCylinderProd.aspx?itemno=260-11179 If you're re-doing your entire brake system plumbing, this looks like an excellent starting point. It allows you to replace the stock front/rear prop block on the firewall (73 and later) and the front/rear distribution/warning light block below the master, AND it includes an integral adjustable rear prop valve! And if that's not enough, it has an integral brake light switch! I just went through all this last year. Very tempted to rip it out and do again with this simple do-it-all device.
-
Very nice. Quite impressed by the engineering. Even the two part caliper bracket that is likely cheaper to make in two parts than one. Nothing wrong with that. Love the e-brake system too. No comprimise, all new, and simple. I also like the idea of letting people supply their own rotors and calipers. You don't need to be involved in supplying and moving heavy commonly available parts. I just want the hose, brackets and cable and PN's for the expendables. Fantastic!

