mtnickel
-
Posts
335 -
Joined
-
Last visited
-
Days Won
5
Content Type
Profiles
Forums
Blogs
Events
Gallery
Downloads
Store
Everything posted by mtnickel
-
Ford Super 8.8 irs swap thread. Rear brakes too
mtnickel replied to Invincibleextremes's topic in Drivetrain
Did you look into the effects on the scrub radius of using the front knuckles? Also, wonder if we could also figure out just a diff swap option: 1) use the cradle you're making 2) Perhaps we could have mustang axle just shortened and resplined on one end for the 930 CV. Then 930 to stock stock datsun companions are readily available. https://zcardepot.com/billet-aluminum-axle-adaptors-930-cv-240z-260z-280z.html 3) Driveshaft adapter as you've shown. -
FS: Z31T axle adapter flanges for S30 + R200. Slim design
mtnickel replied to mtnickel's topic in Parts for Sale
I also built a jig to help in welding. It locates the flange on the stock locating ring on your stock companion flange. I can rent it out for shipping costs and security deposit and such, but if you know how to shim something and use a Dial indicator to check runout, may not need it. -
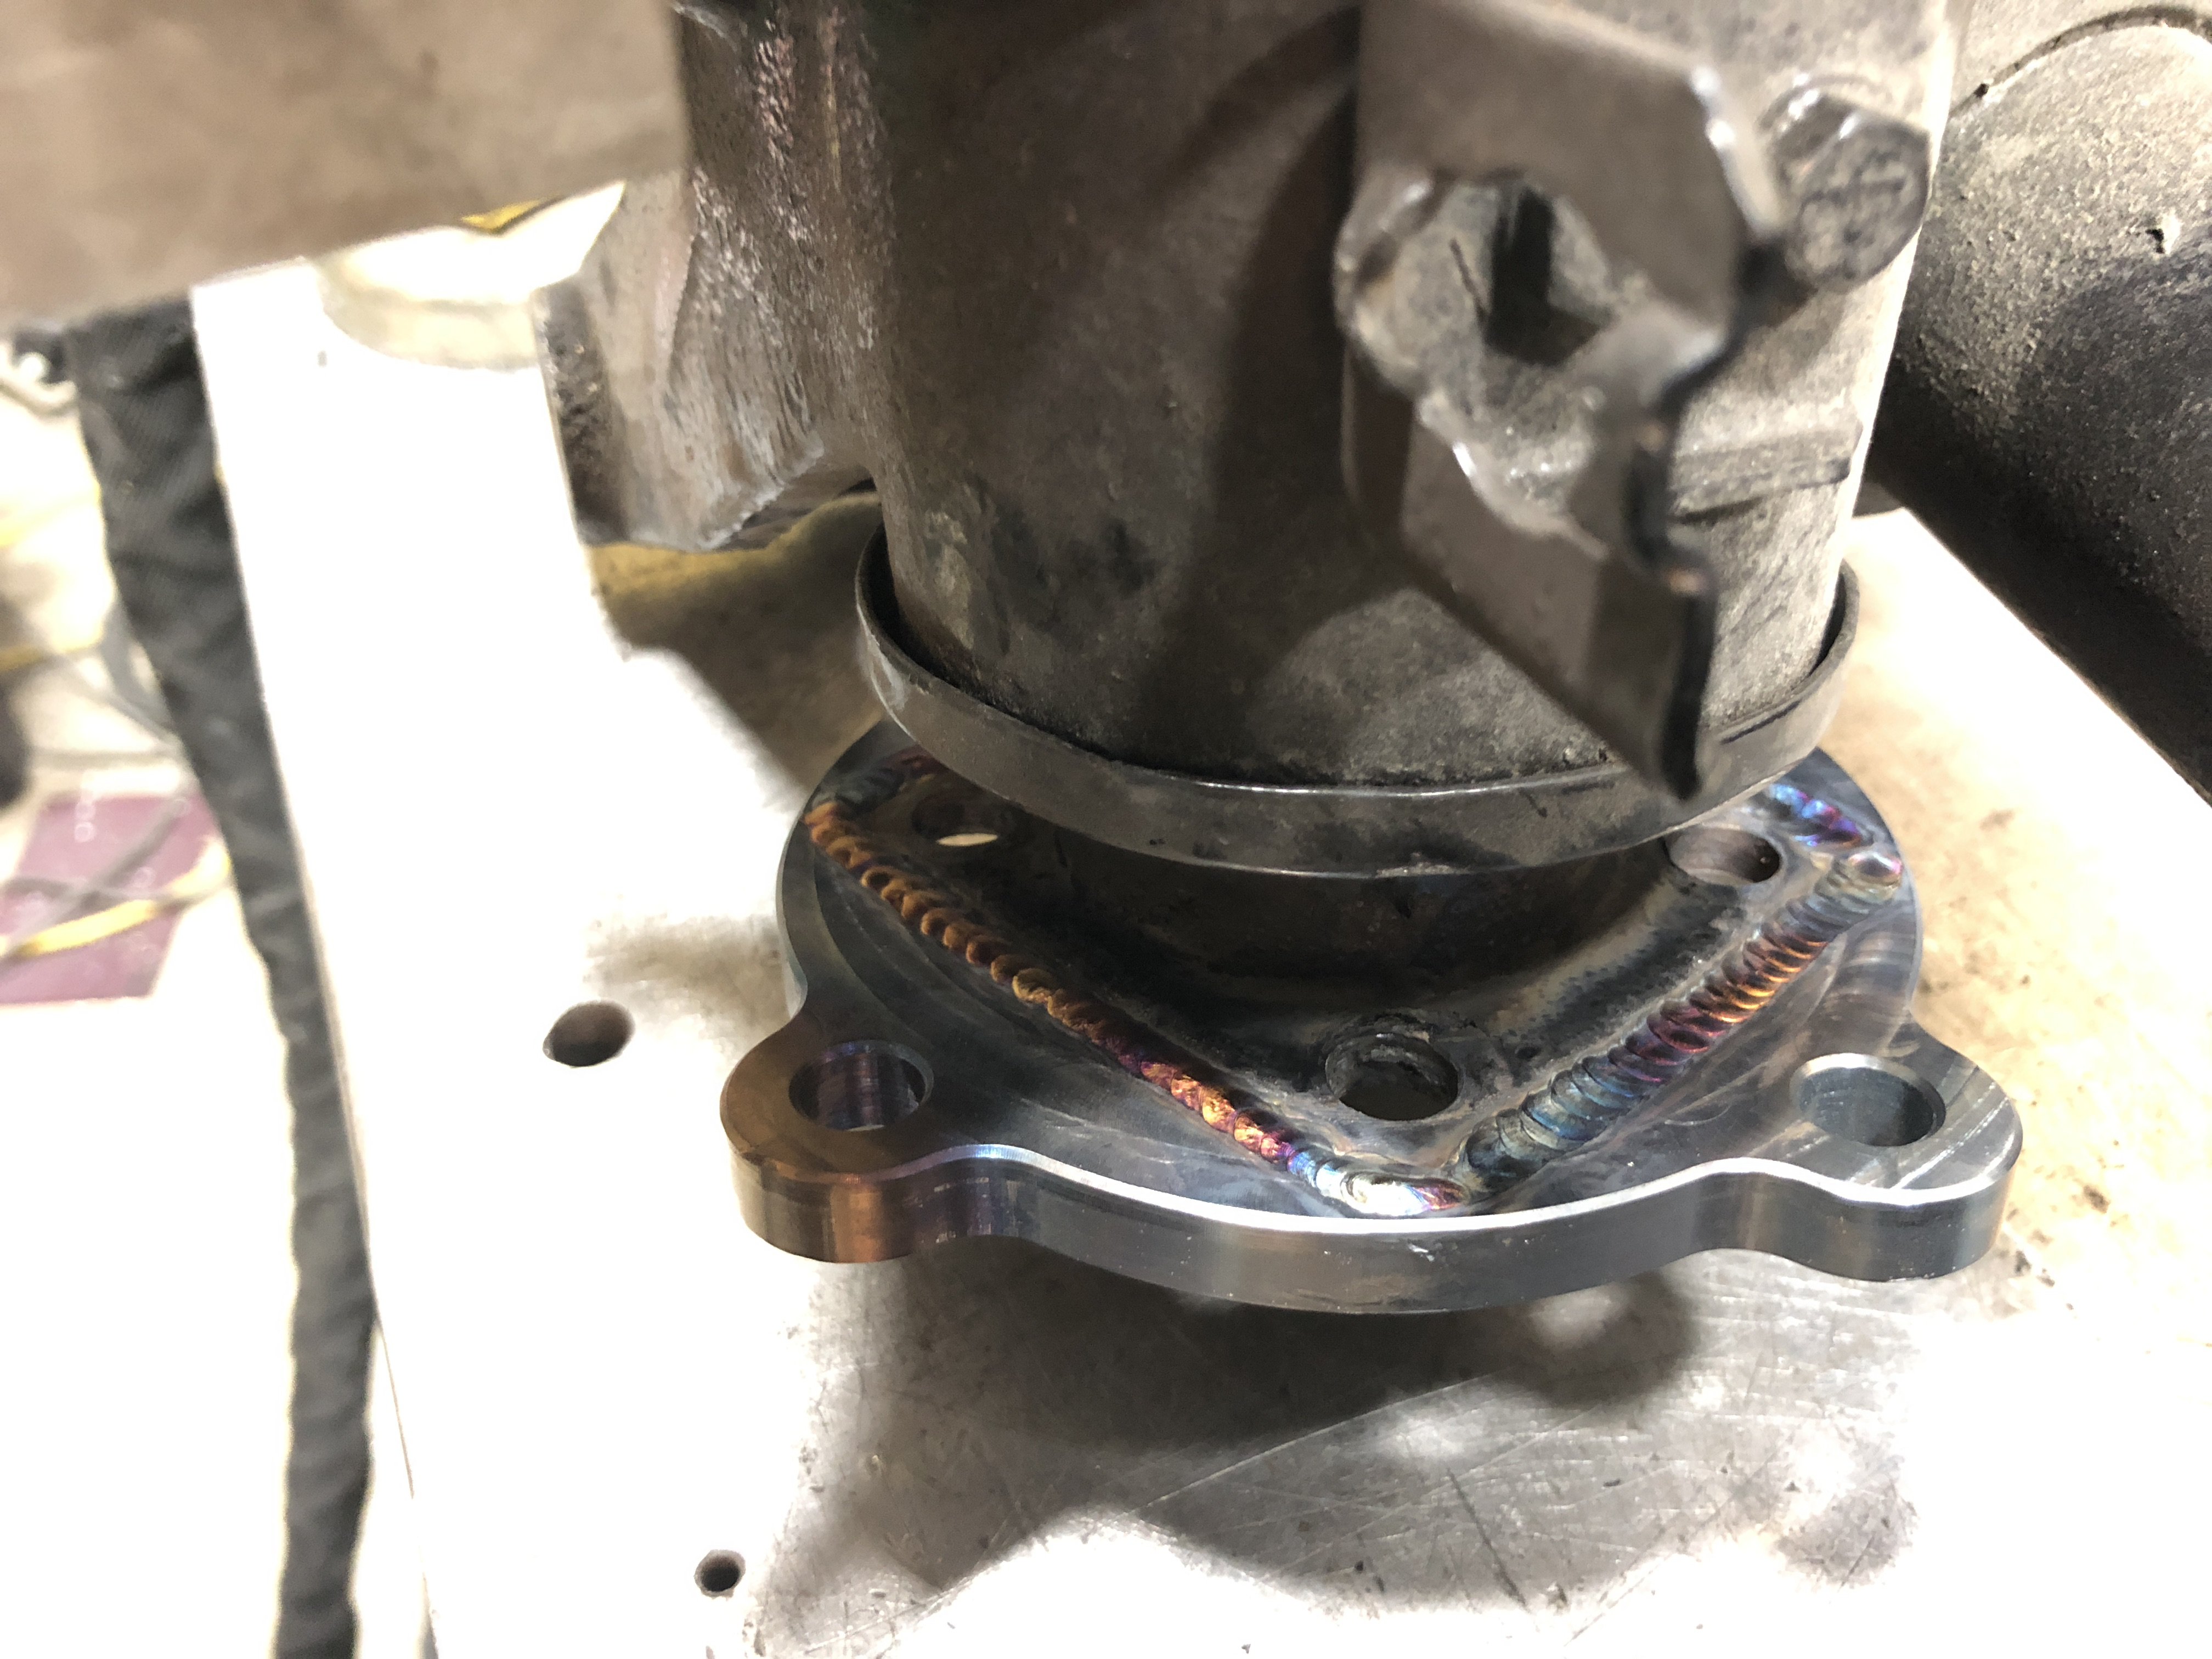
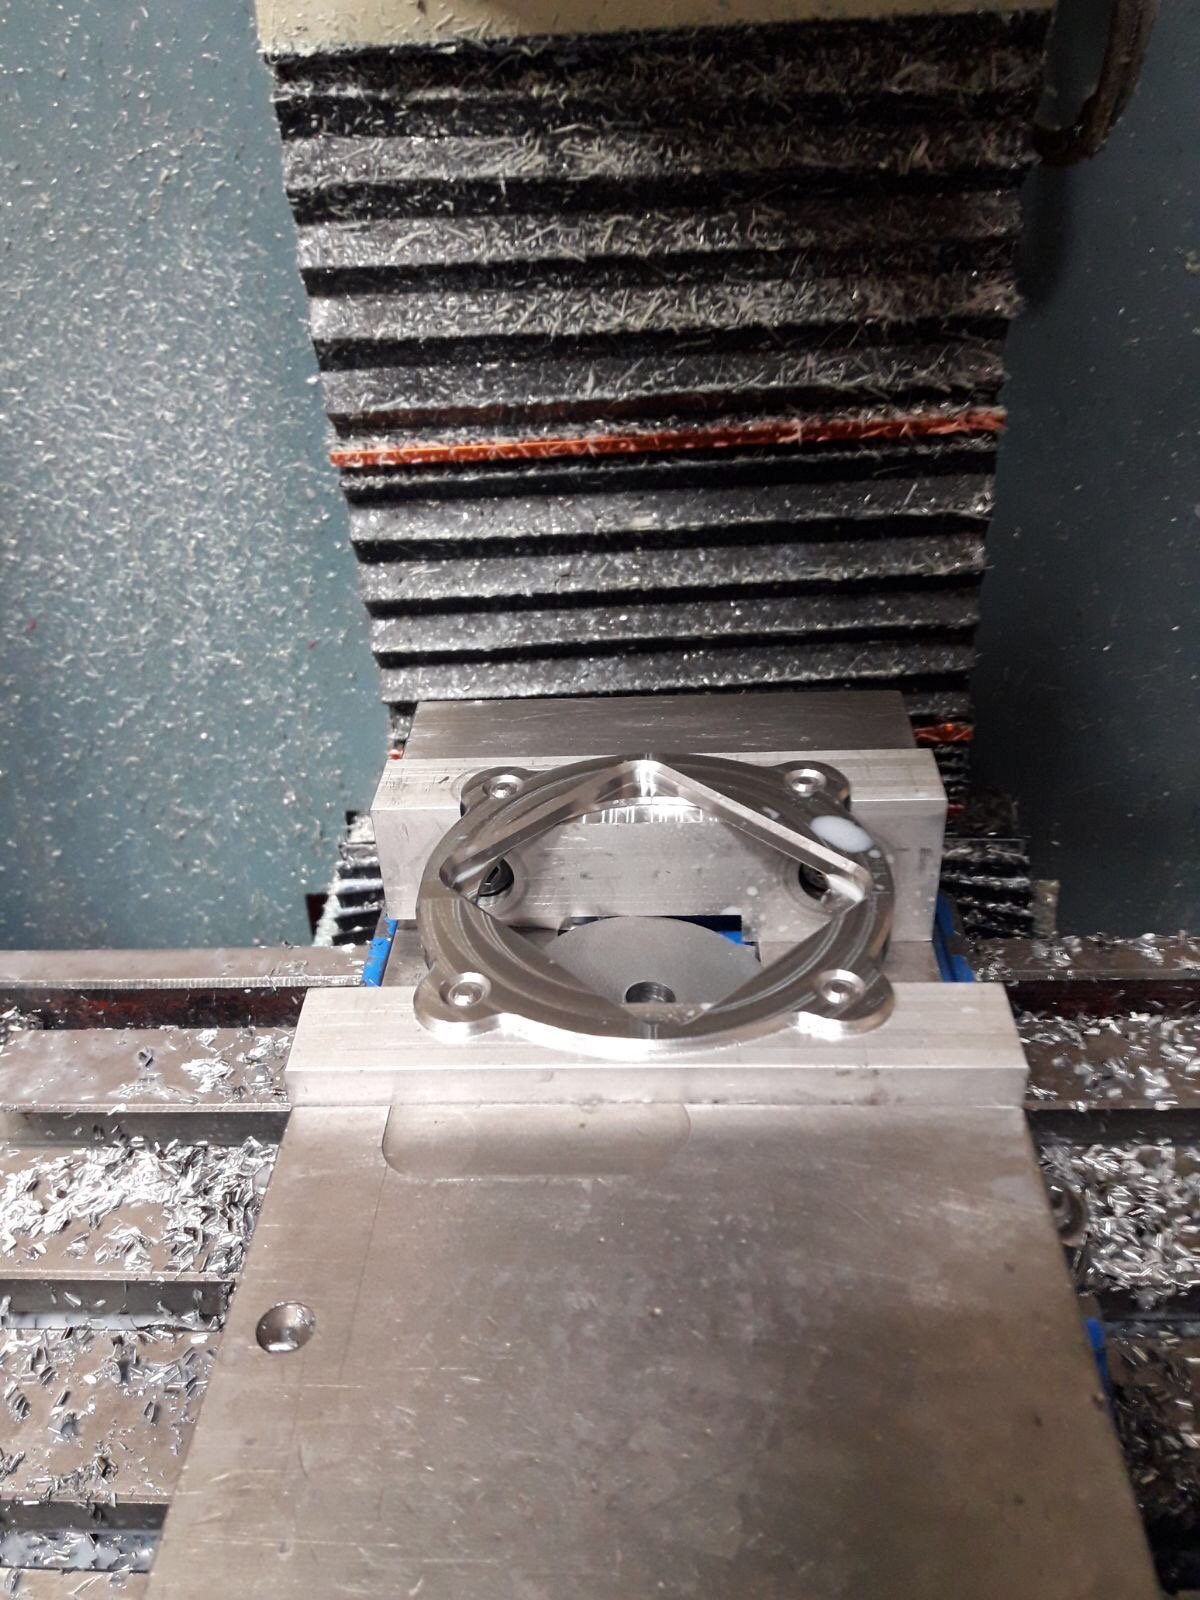
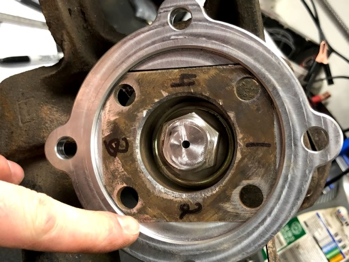
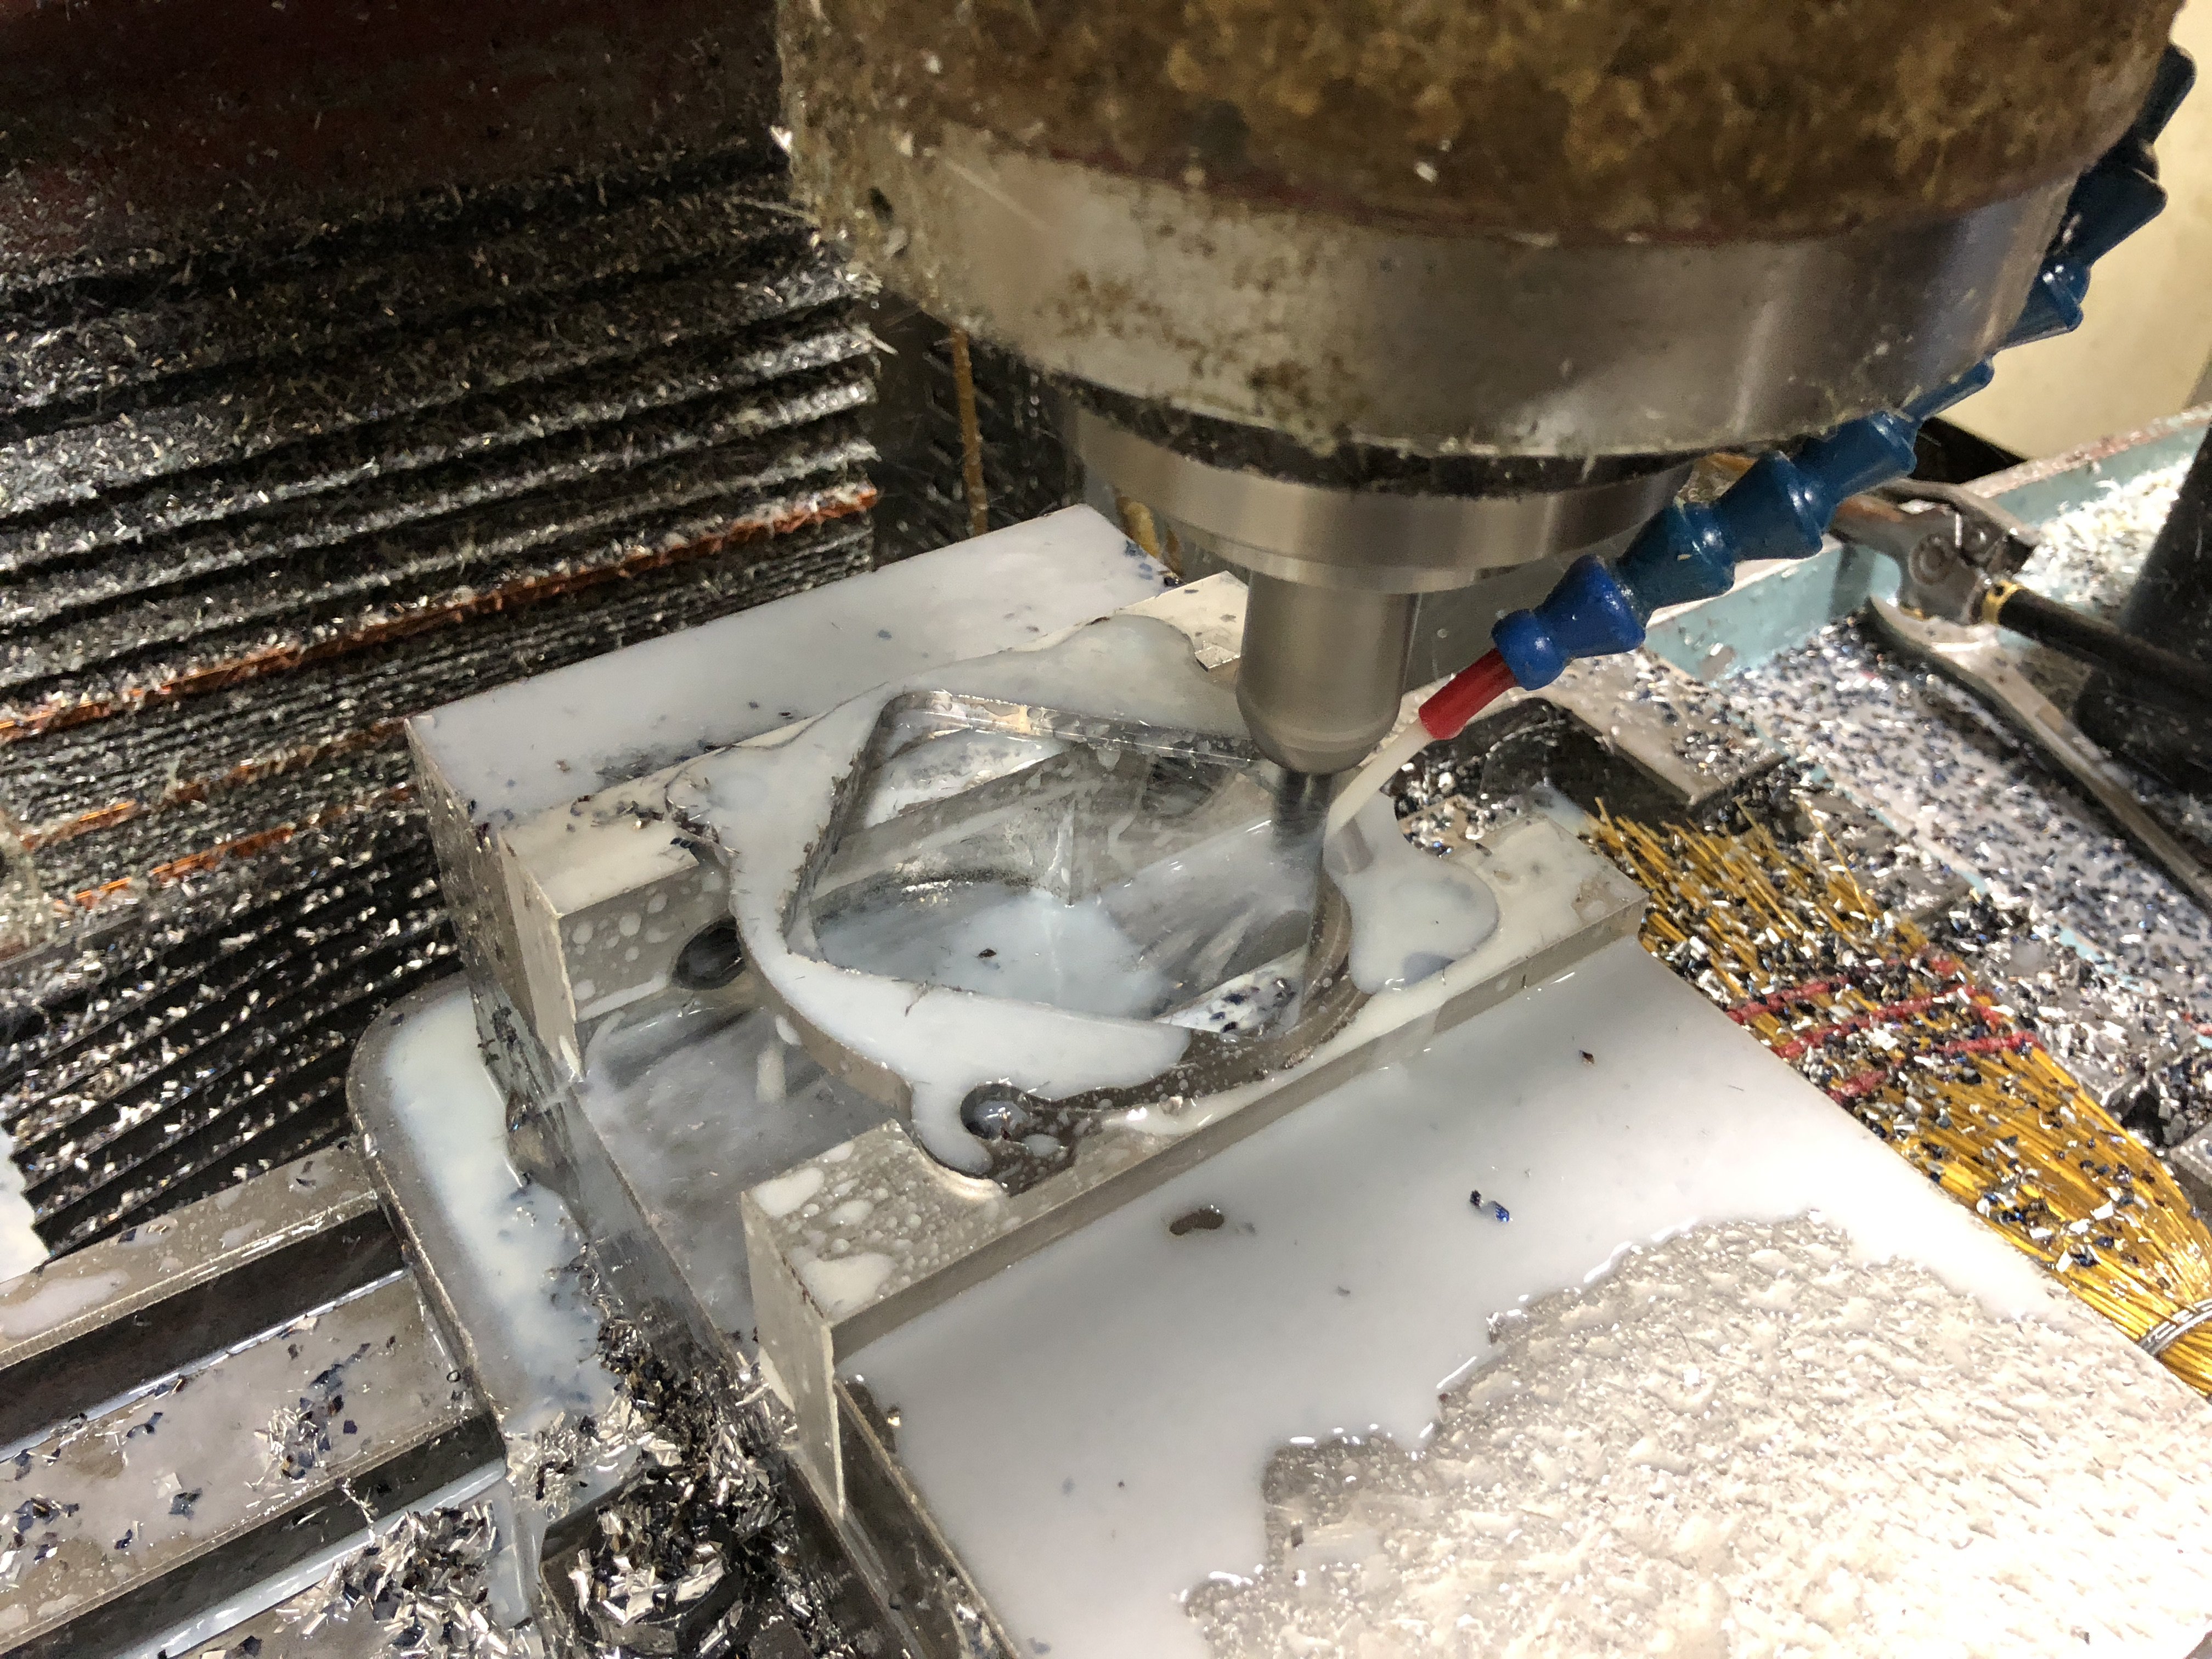
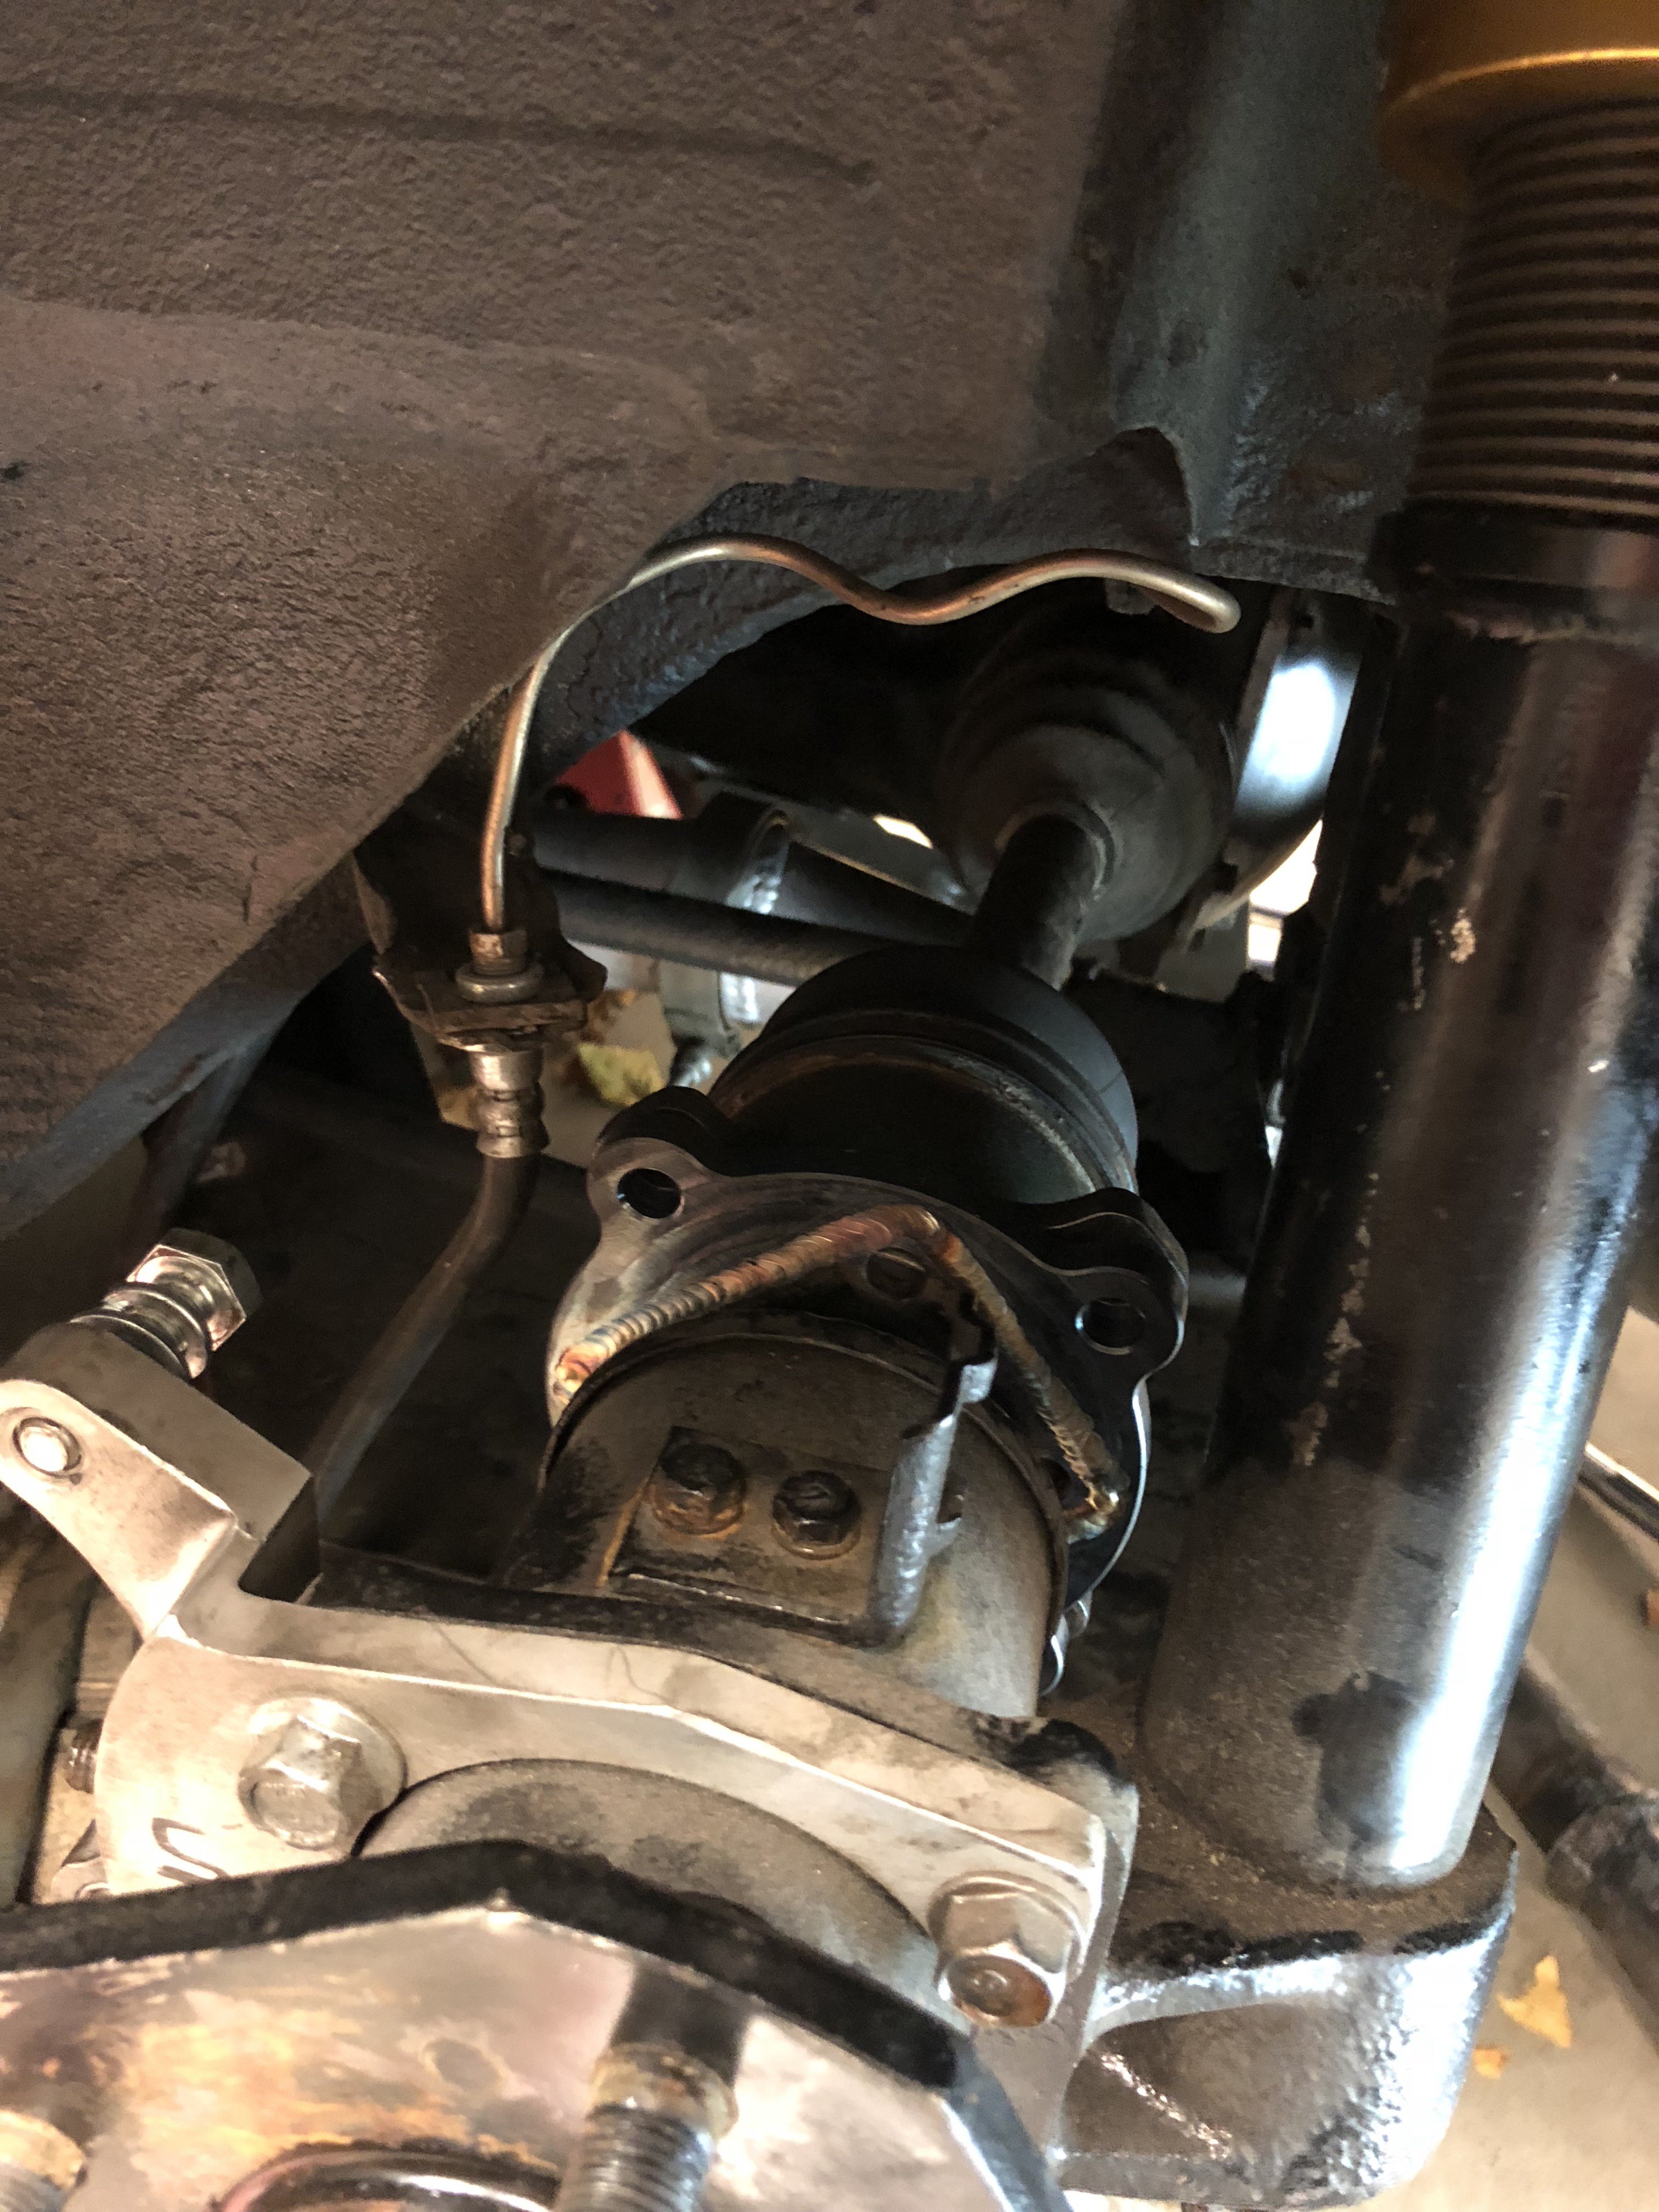
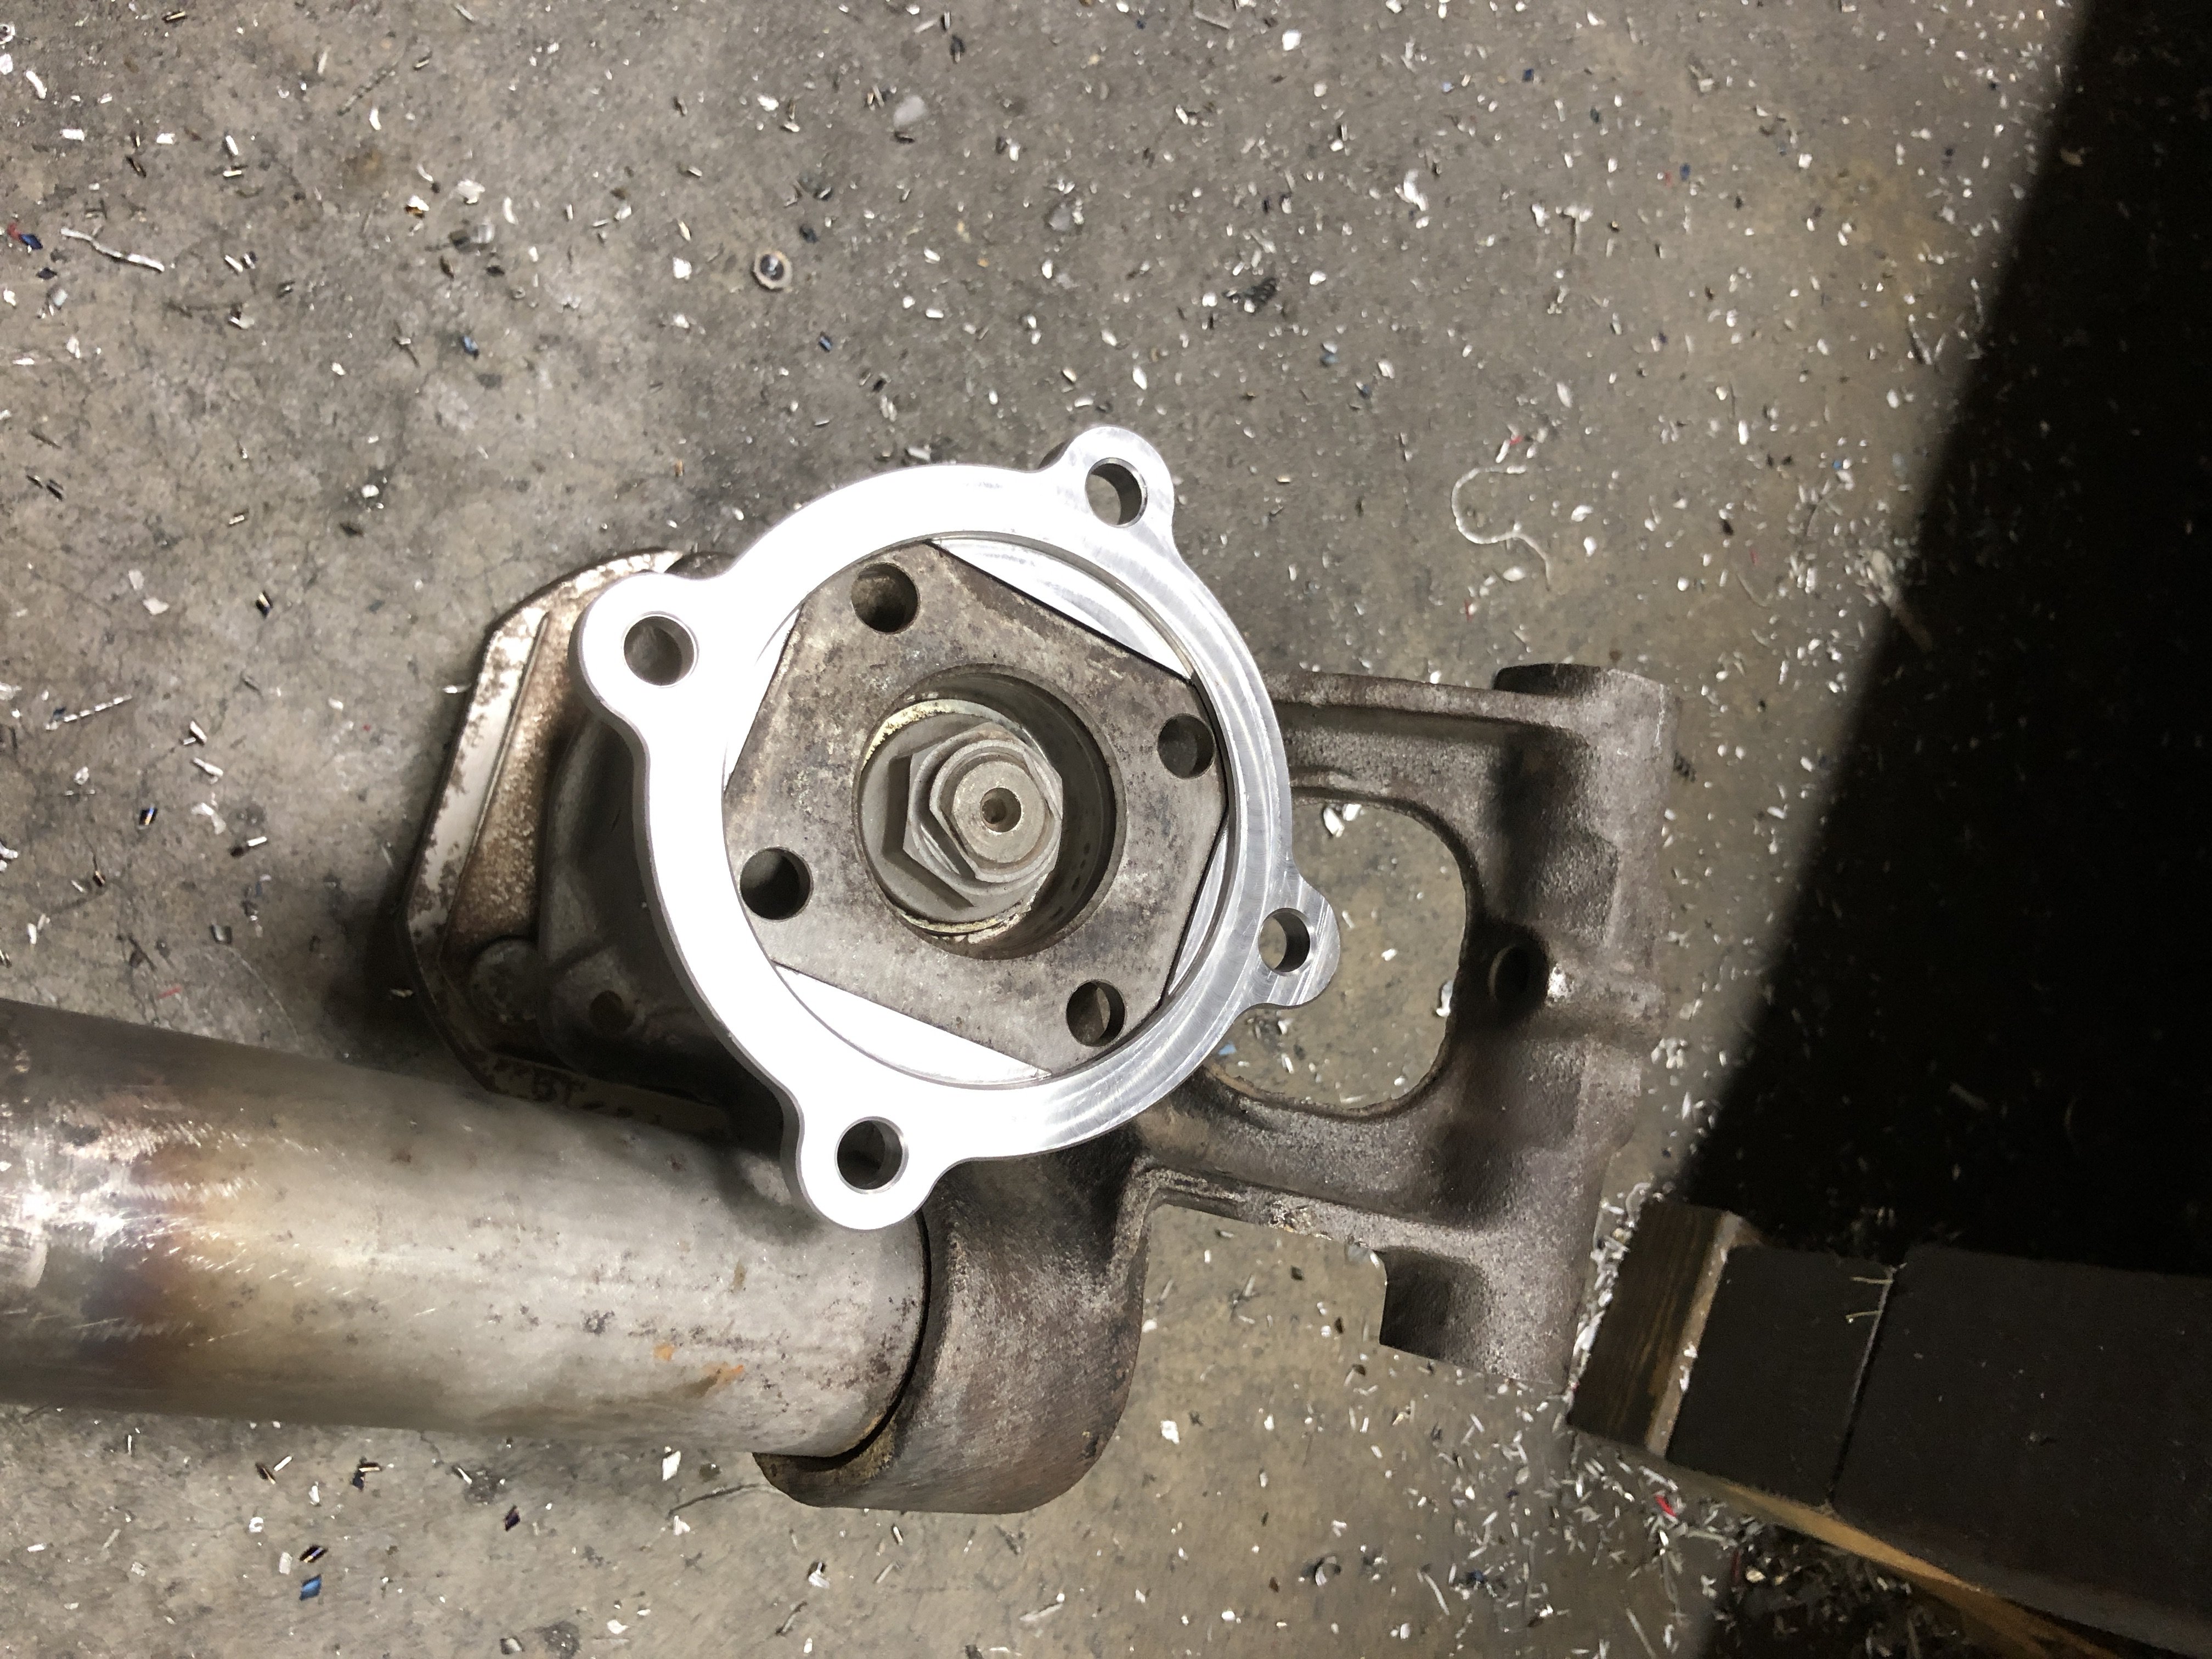
Update June 2021 - sold out. Sorry Had a post about the design process and checking of clearance in the Drivetrain section. Now here's the sale post of the adapters I've made several sets of. Quick Description: Z31T weld on adapter Flanges to fit Z31T CV axles into S30 chassis with the use of an R200. Long Description: They weld onto the outboard axle flange to provide a bolt pattern that will fit Z31 Turbo axles. The axles are NLA but you can find them on forums, craigslist, car-part.com, ebay, etc. They are a very strong axle. It is for an R200 diff, not stock R180. Rockauto has recently has some new style axles. The CV type is tripod which is a little weaker and the axle shaft diameter is fair bit smaller. no idea how much power they will support. 1) They are weld on style. They must be welded by someone with a little experience since you're welding to the stock cast flange. They also must be bolted down if you want the flange to remain flat. They also must be centered into the square relief. The Square flange IS NOT concentric to the rotational axis and it must be shimmed and positioned correctly so that there is minimal runout. *** A JIG is now available to rent that both locates center and keeps the parts flat during the welding process. $20 + shipping to the next user. 2) They require grinding the stub axle nut and shaft between 1/16-1/8" depending on if its 240 or 280 style. Basically enough so that the flange is flat. 3) They still require flipping the cages inside the CV. I've measured that on the Driverside it would be fine (only 2.5mm of clearance) without, but I'd do it anyways. Passenger side is tighter and needs it. 4). Material is mild steel. Paint or powdercoat (if you remove the stock flange to weld) at your own will to prevent corrosion. A jig is available now to center the stock flange to the new flange and hold it during welding. Sets are $200 USD shipped when paid with "friends/family" otherwise I get charged fees. I now just include a jig with all sets shipped (unless you prefer not to have it). It just saves you and/or the welder a lot of leg work to prep for welding. But you need to ship the jig to the next user. This is a link to more info and installation process. https://www.dropbox.com/s/23dj8il5rru20i3/Z31 Turbo CV axle ConversionV4.pdf?dl=0

-
No info on that. By that point you're custom machining the hub, doing a 5 bolt conversion all around, etc. Also finding the z31t stubs would be just as hard, if not more difficult than finding the axles. If you have some to measure, you could probably figure that out pretty quick though.
-
Just need a decent set of oem bolts for my z31t axle swap. I’ve heard they are more like a press fit into the axles and wanting to make sure they’ll work with the adapters I sell.
-
I’ll try to get a FS post up soon.
-
Correct. It’s close on passenger side but fits and can be installed even at full droop where it’s tightest. It would be quite tricky to Center the flanges with the flange in the car. You’d have to remove the stock flange to weld it properly. Ideal to have strut out too so you can rotate it and check for runout before welding.
-
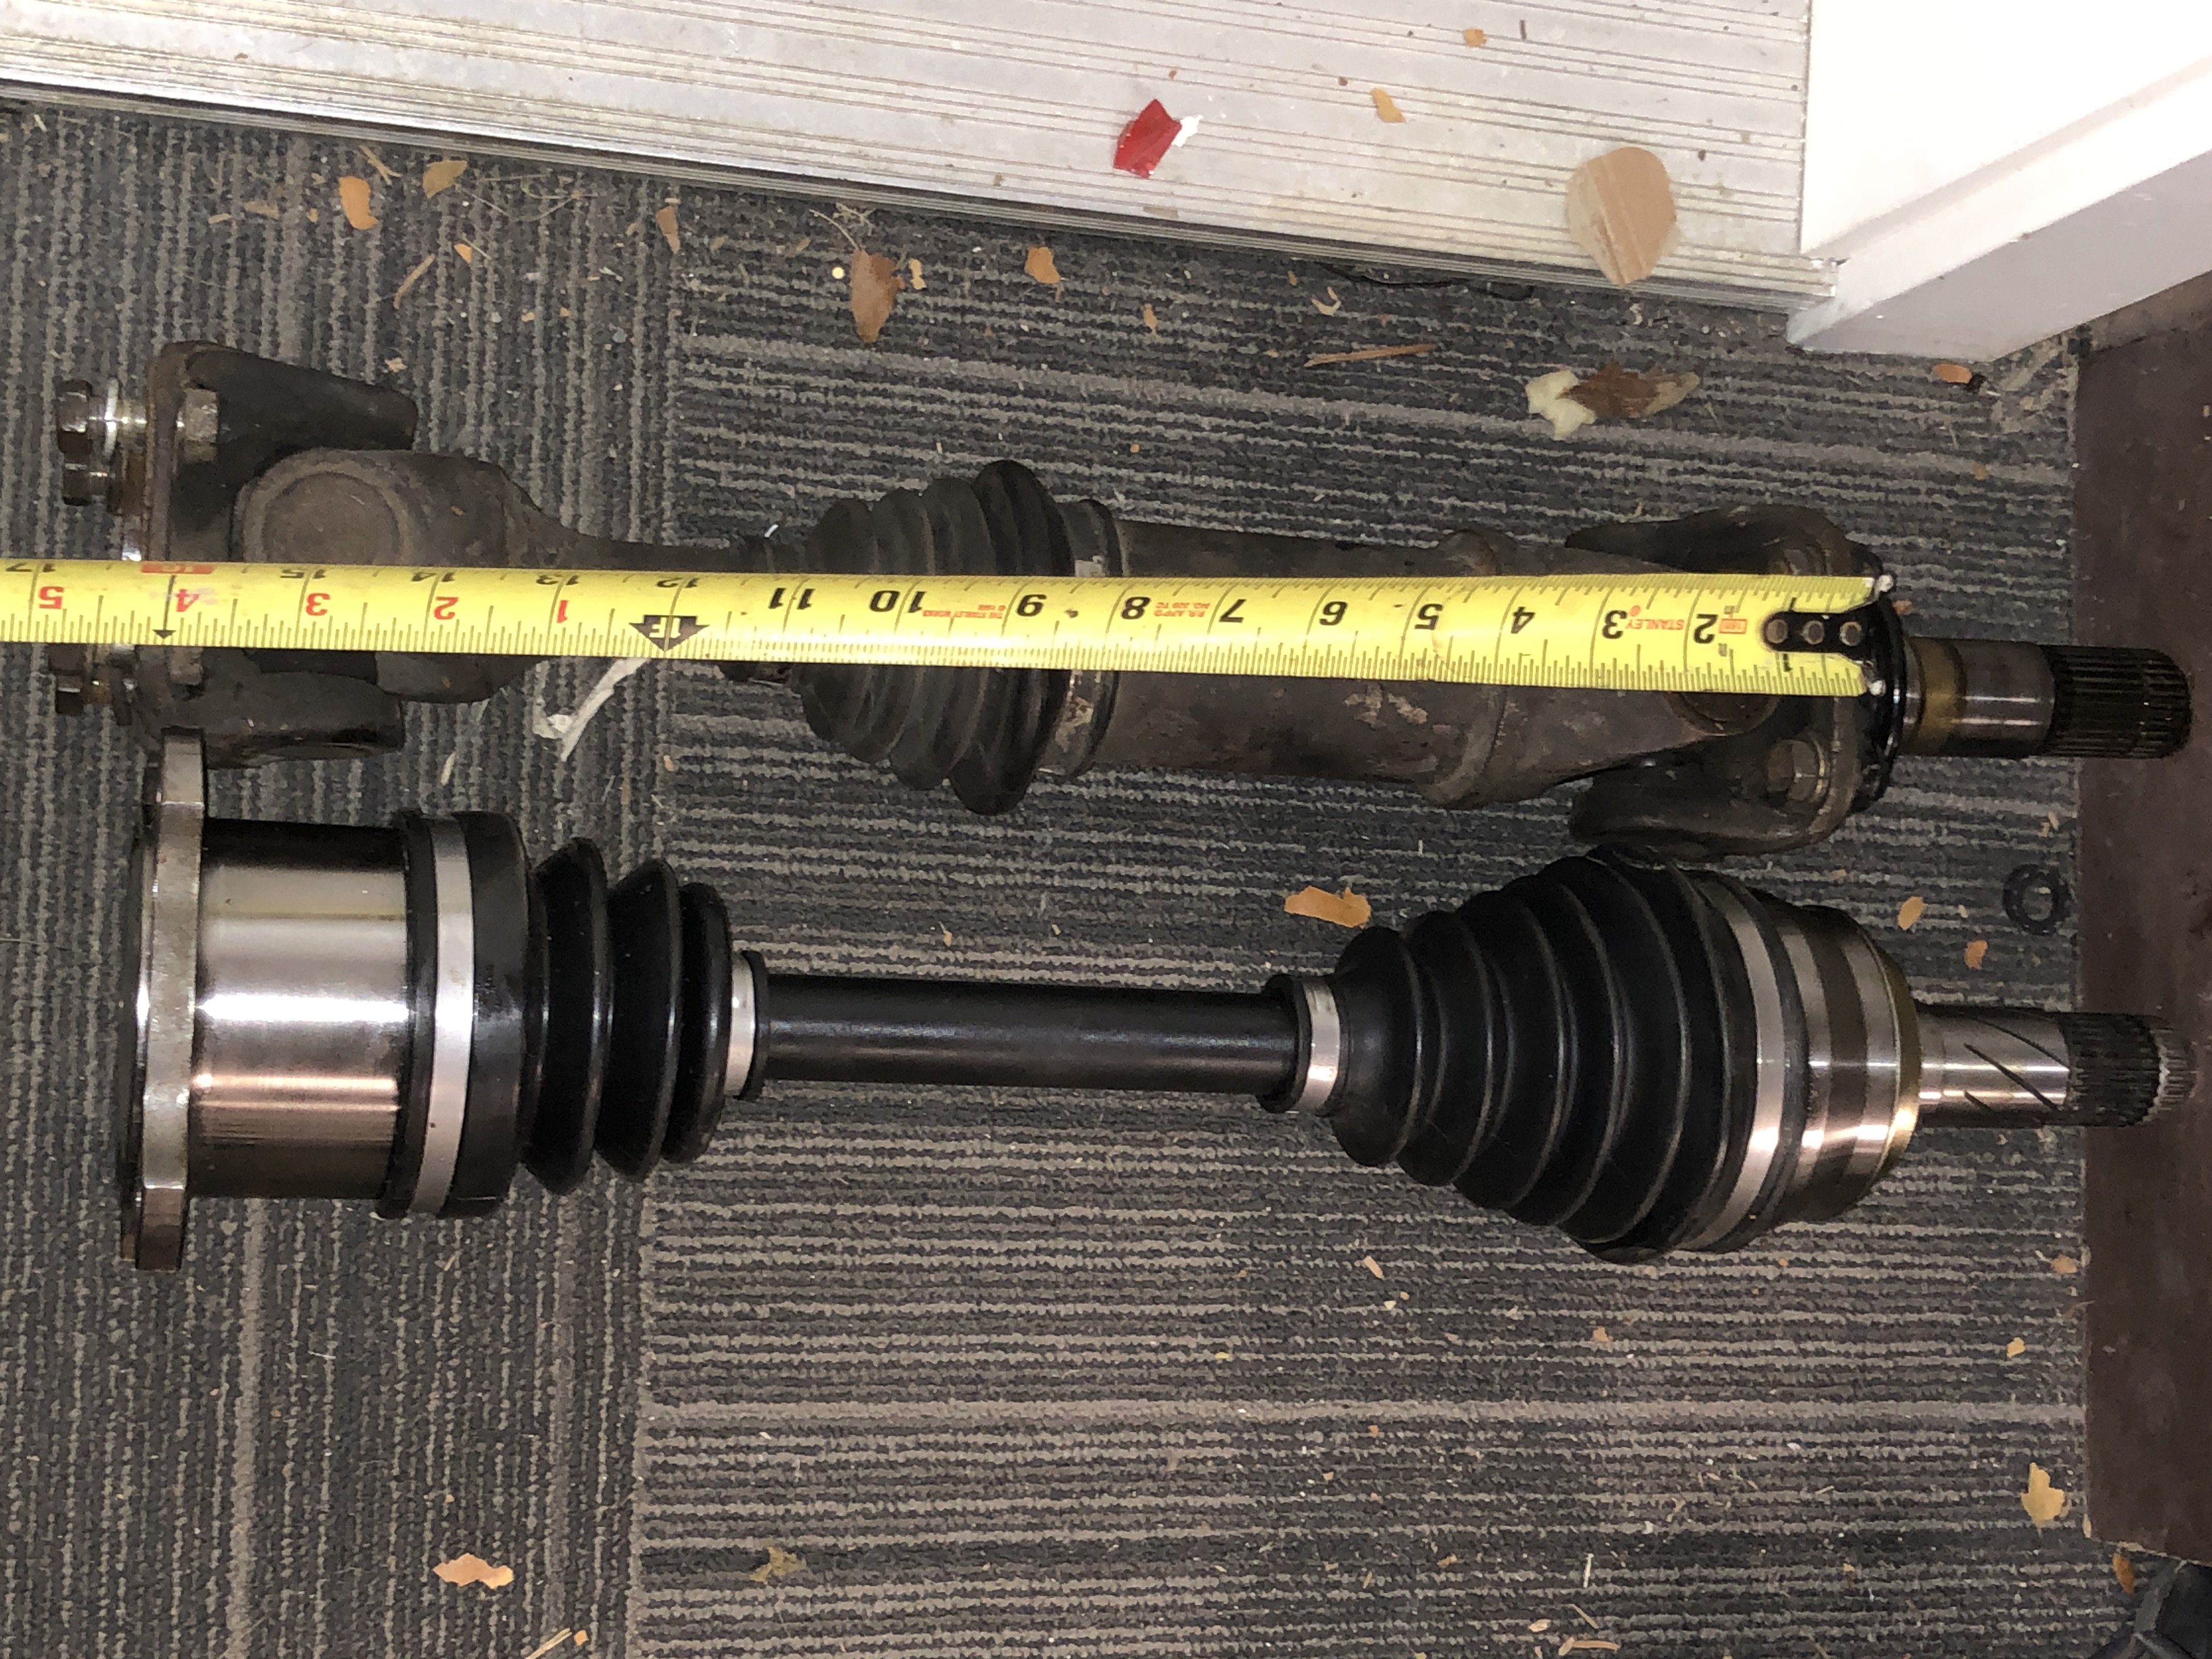
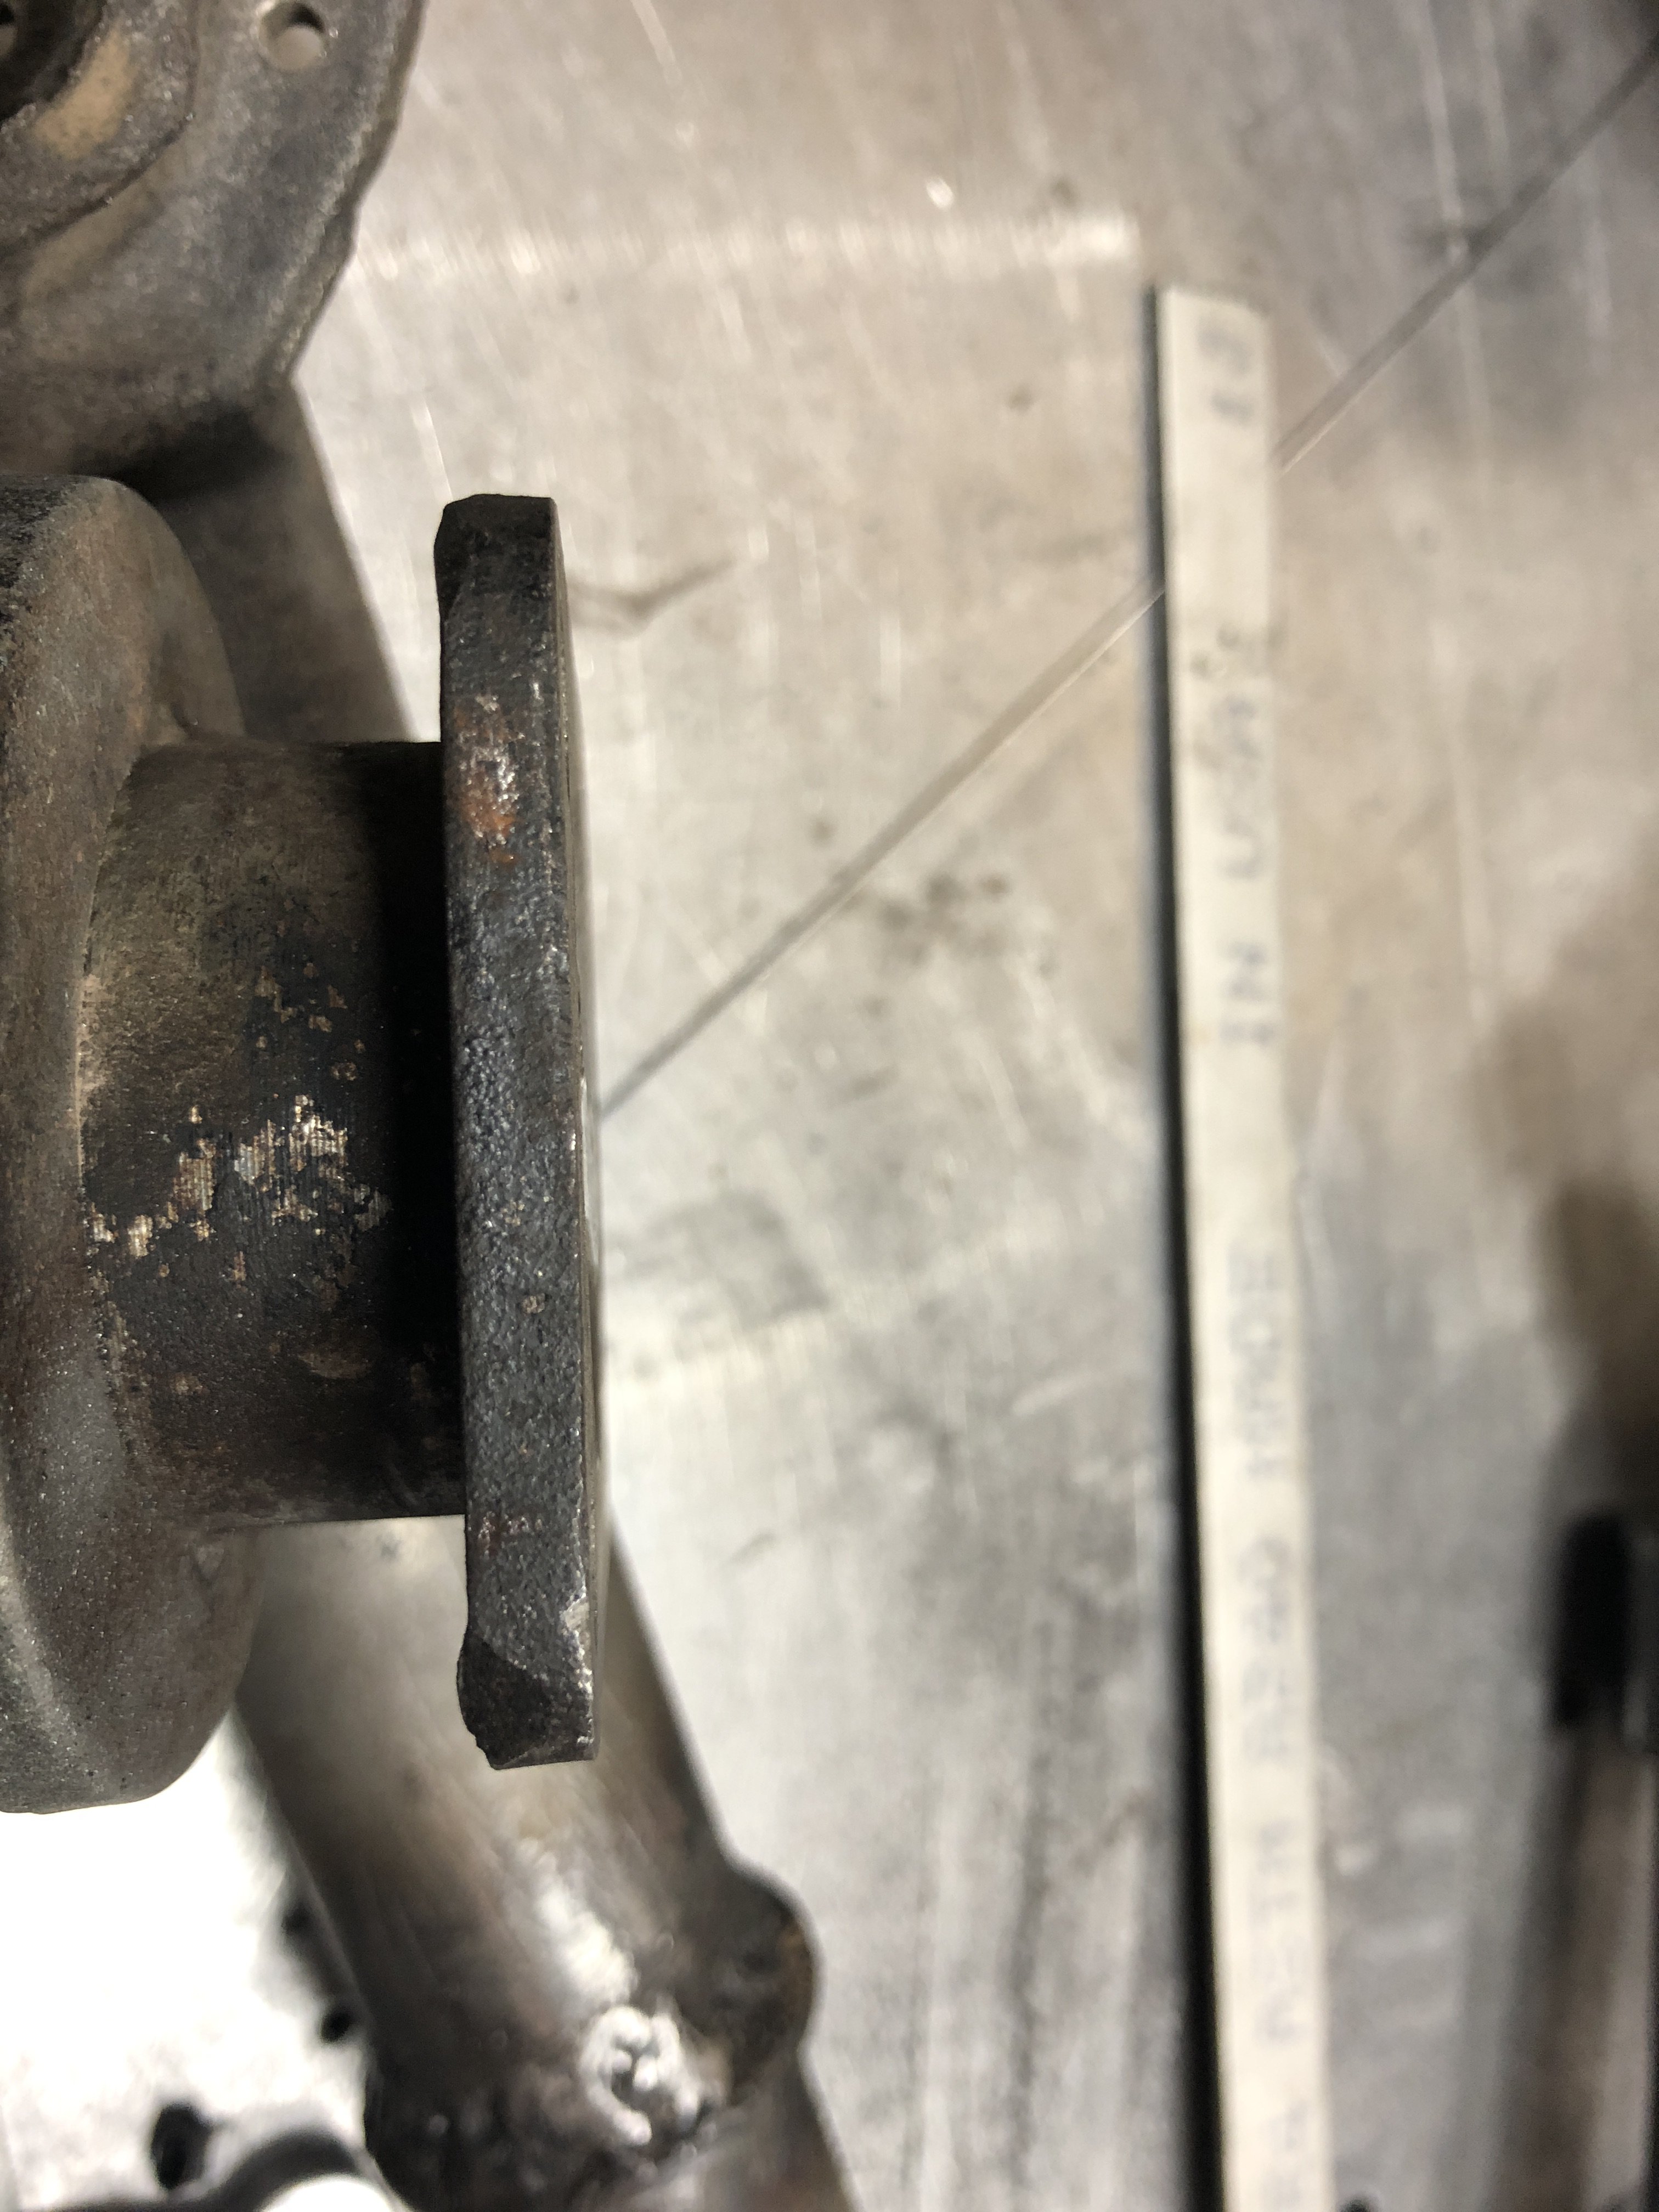
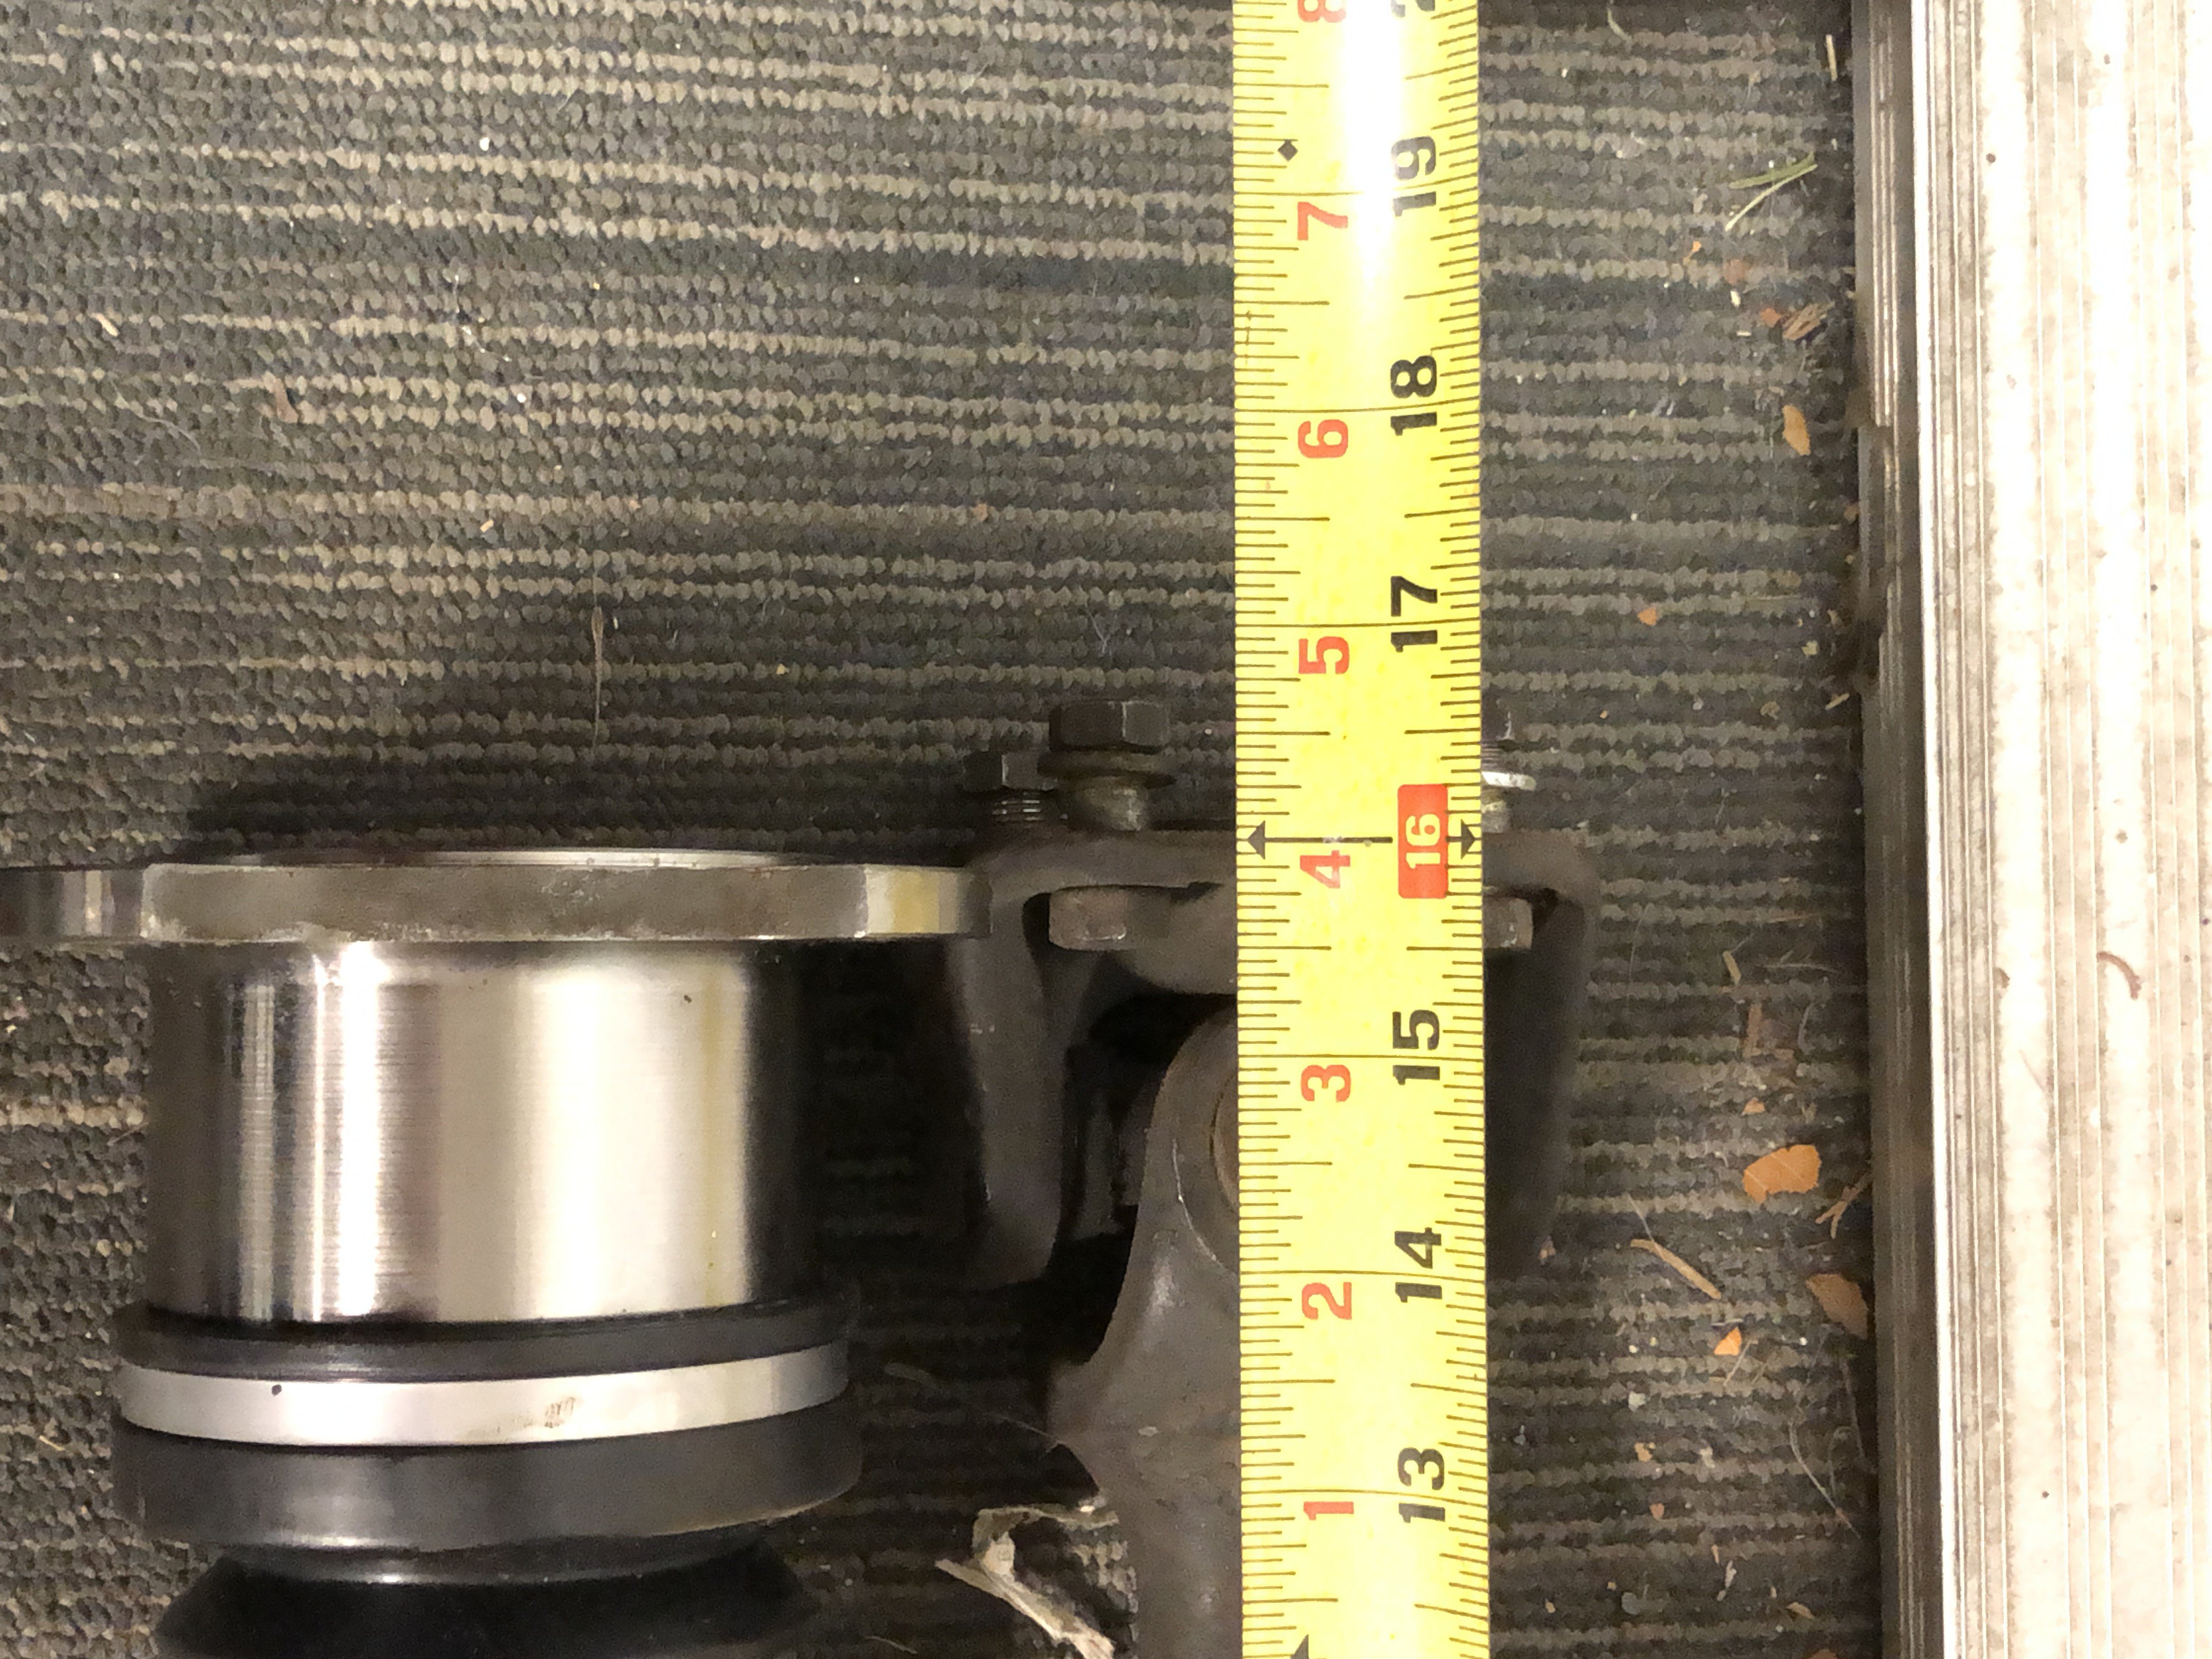
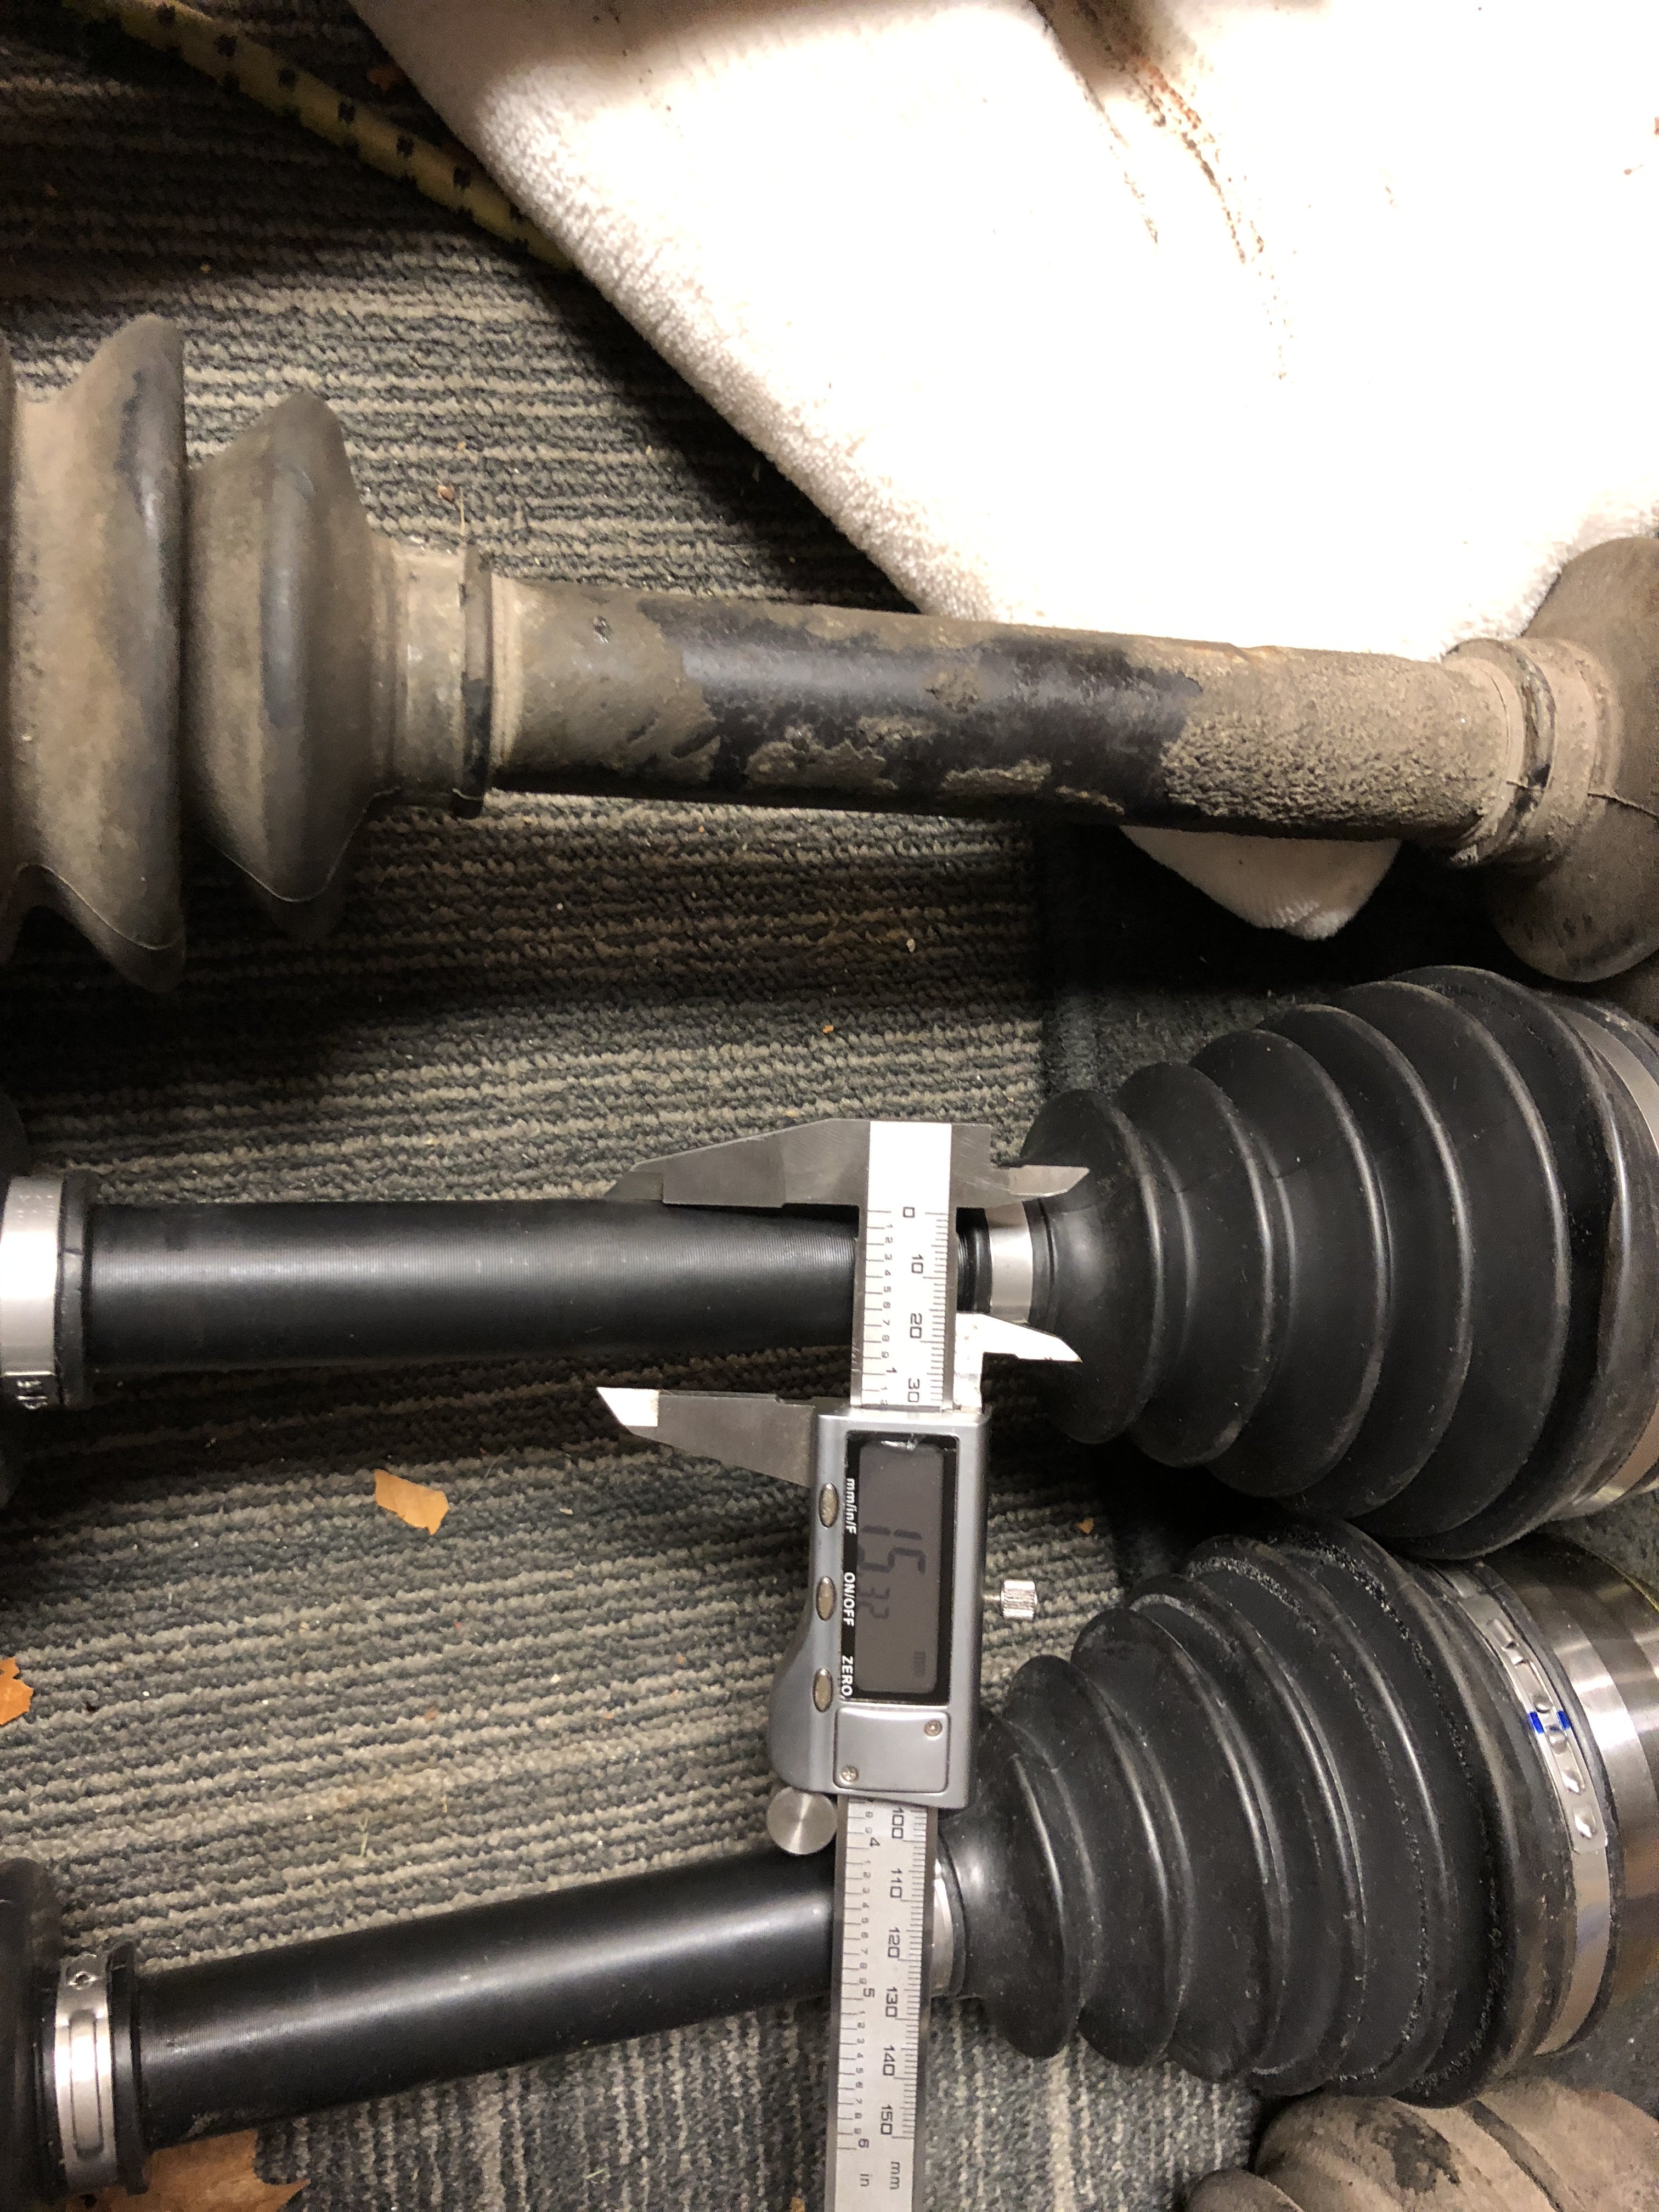
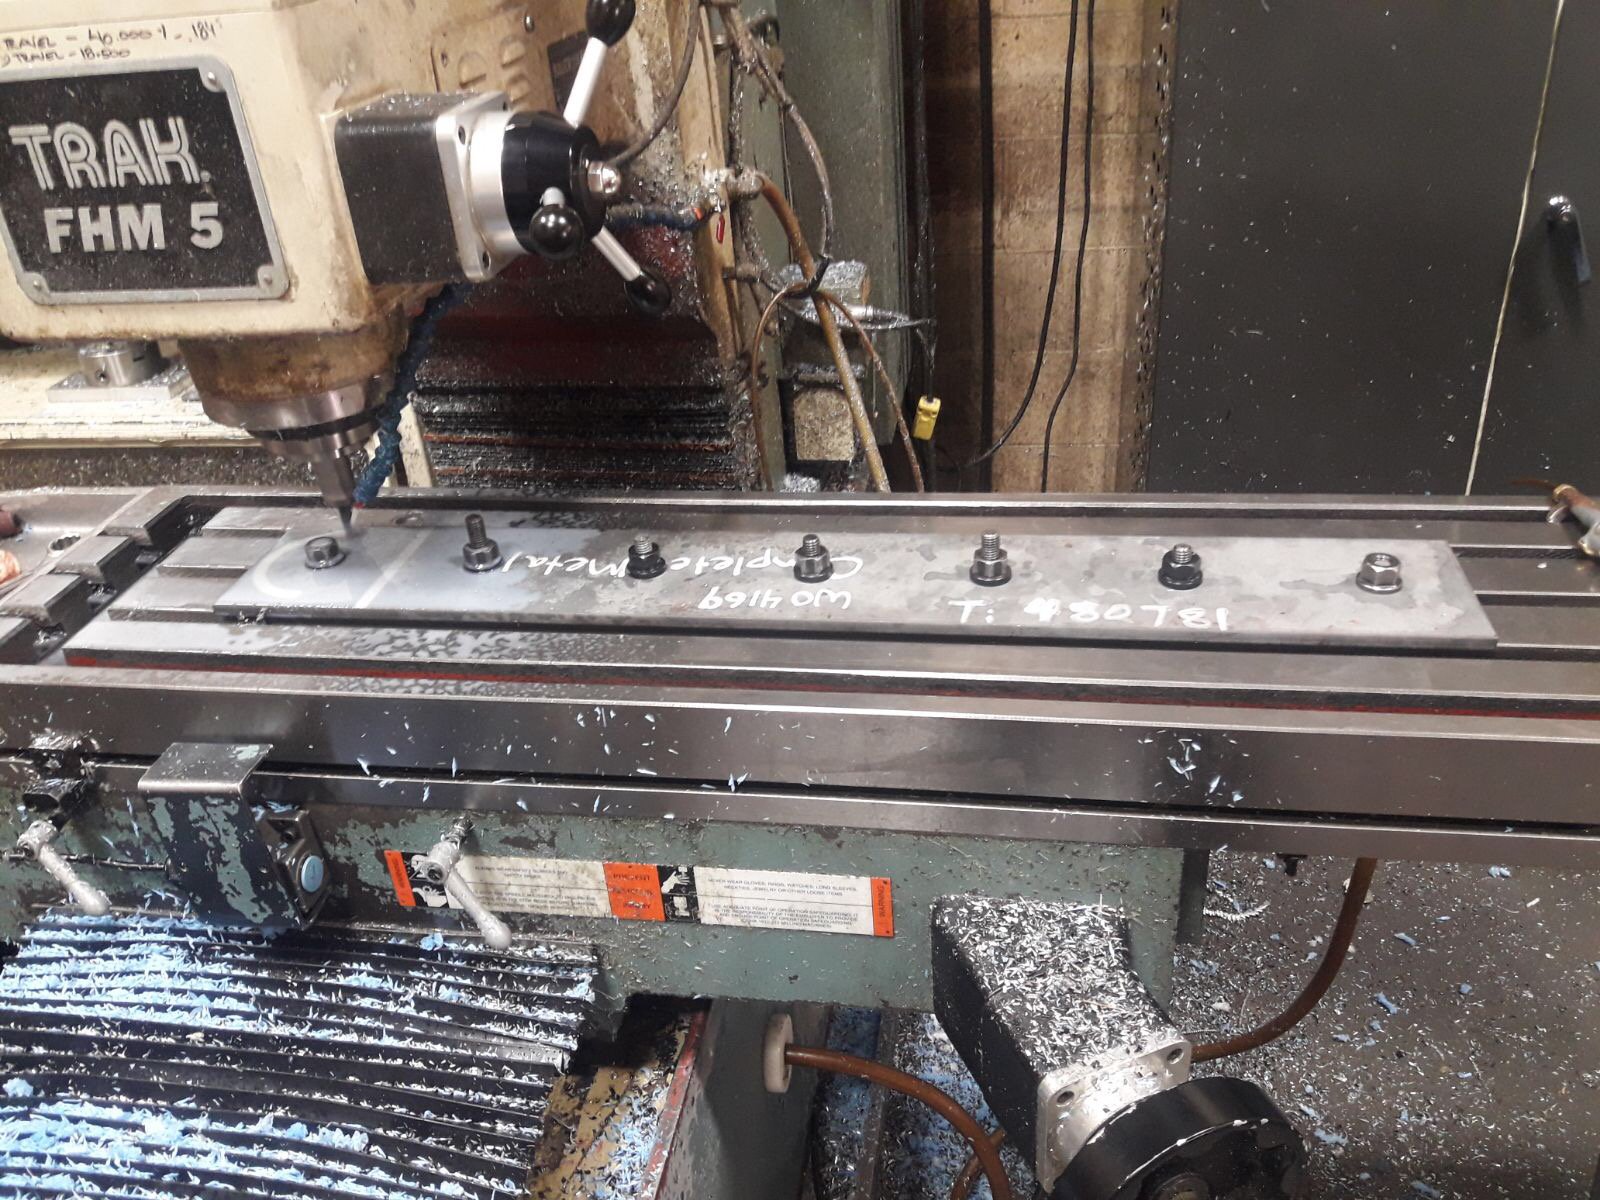
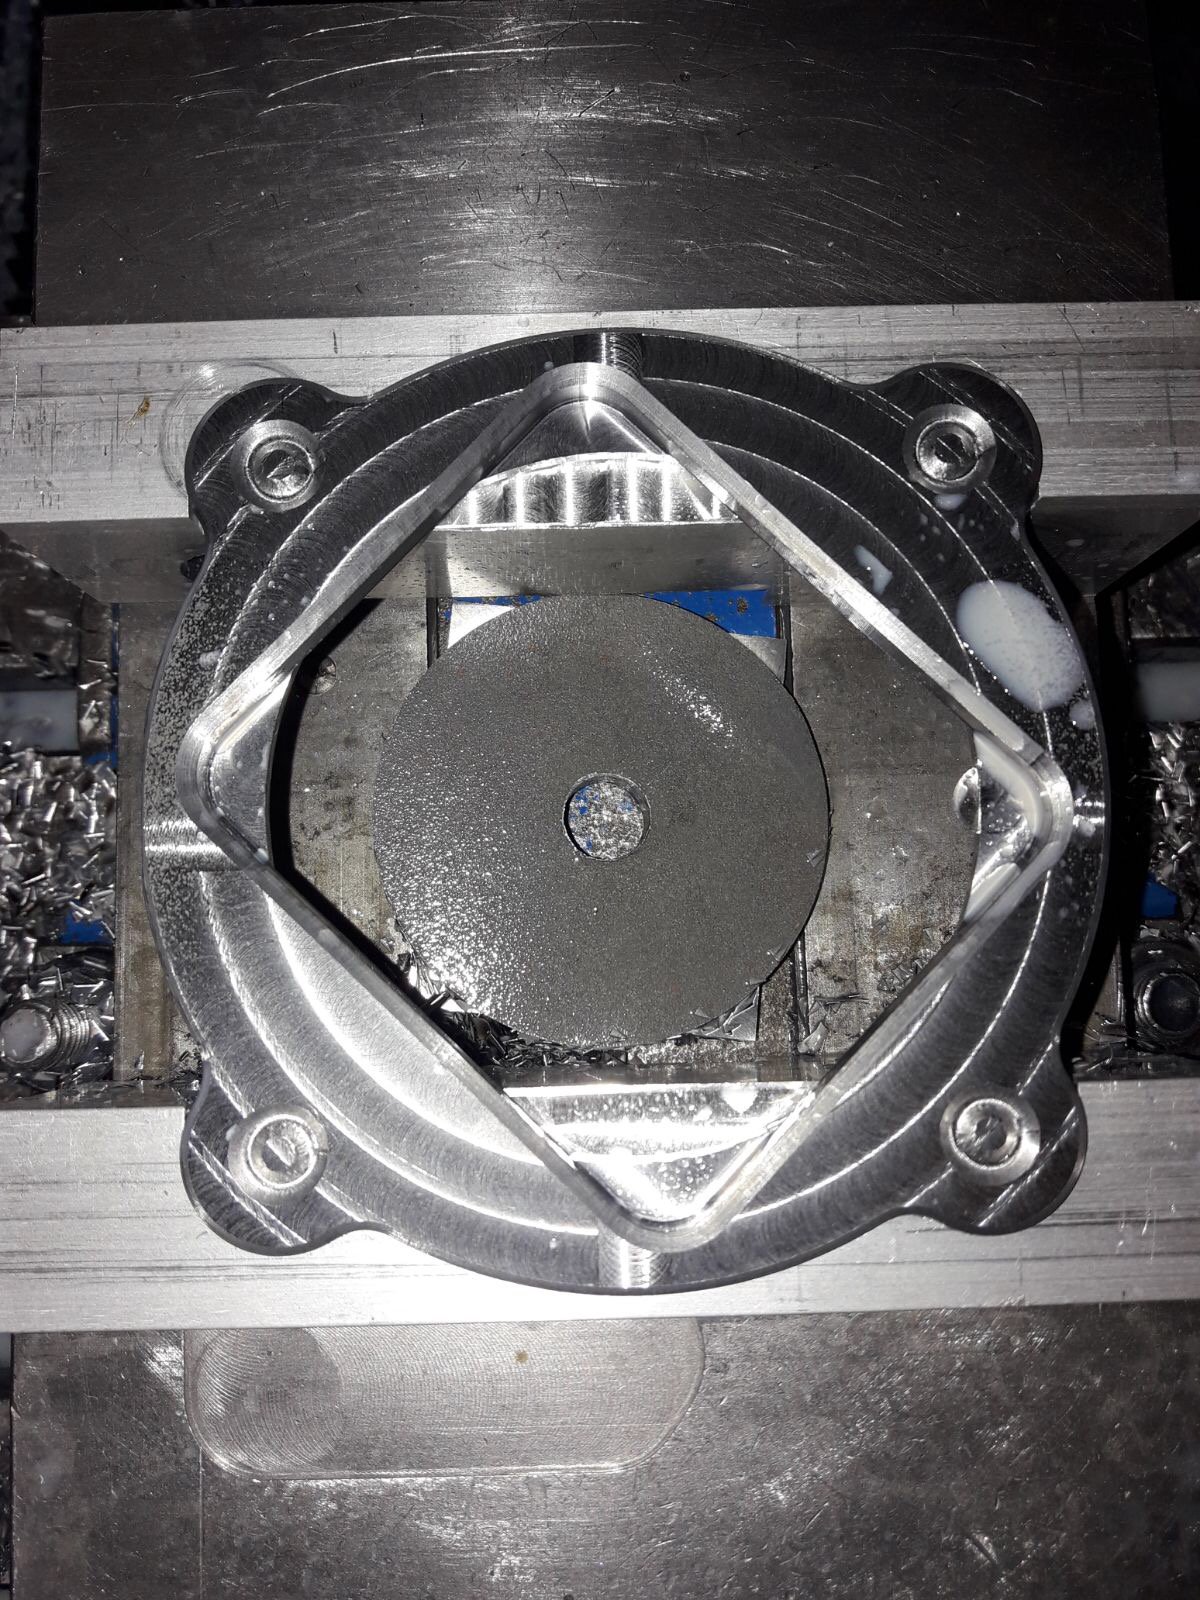
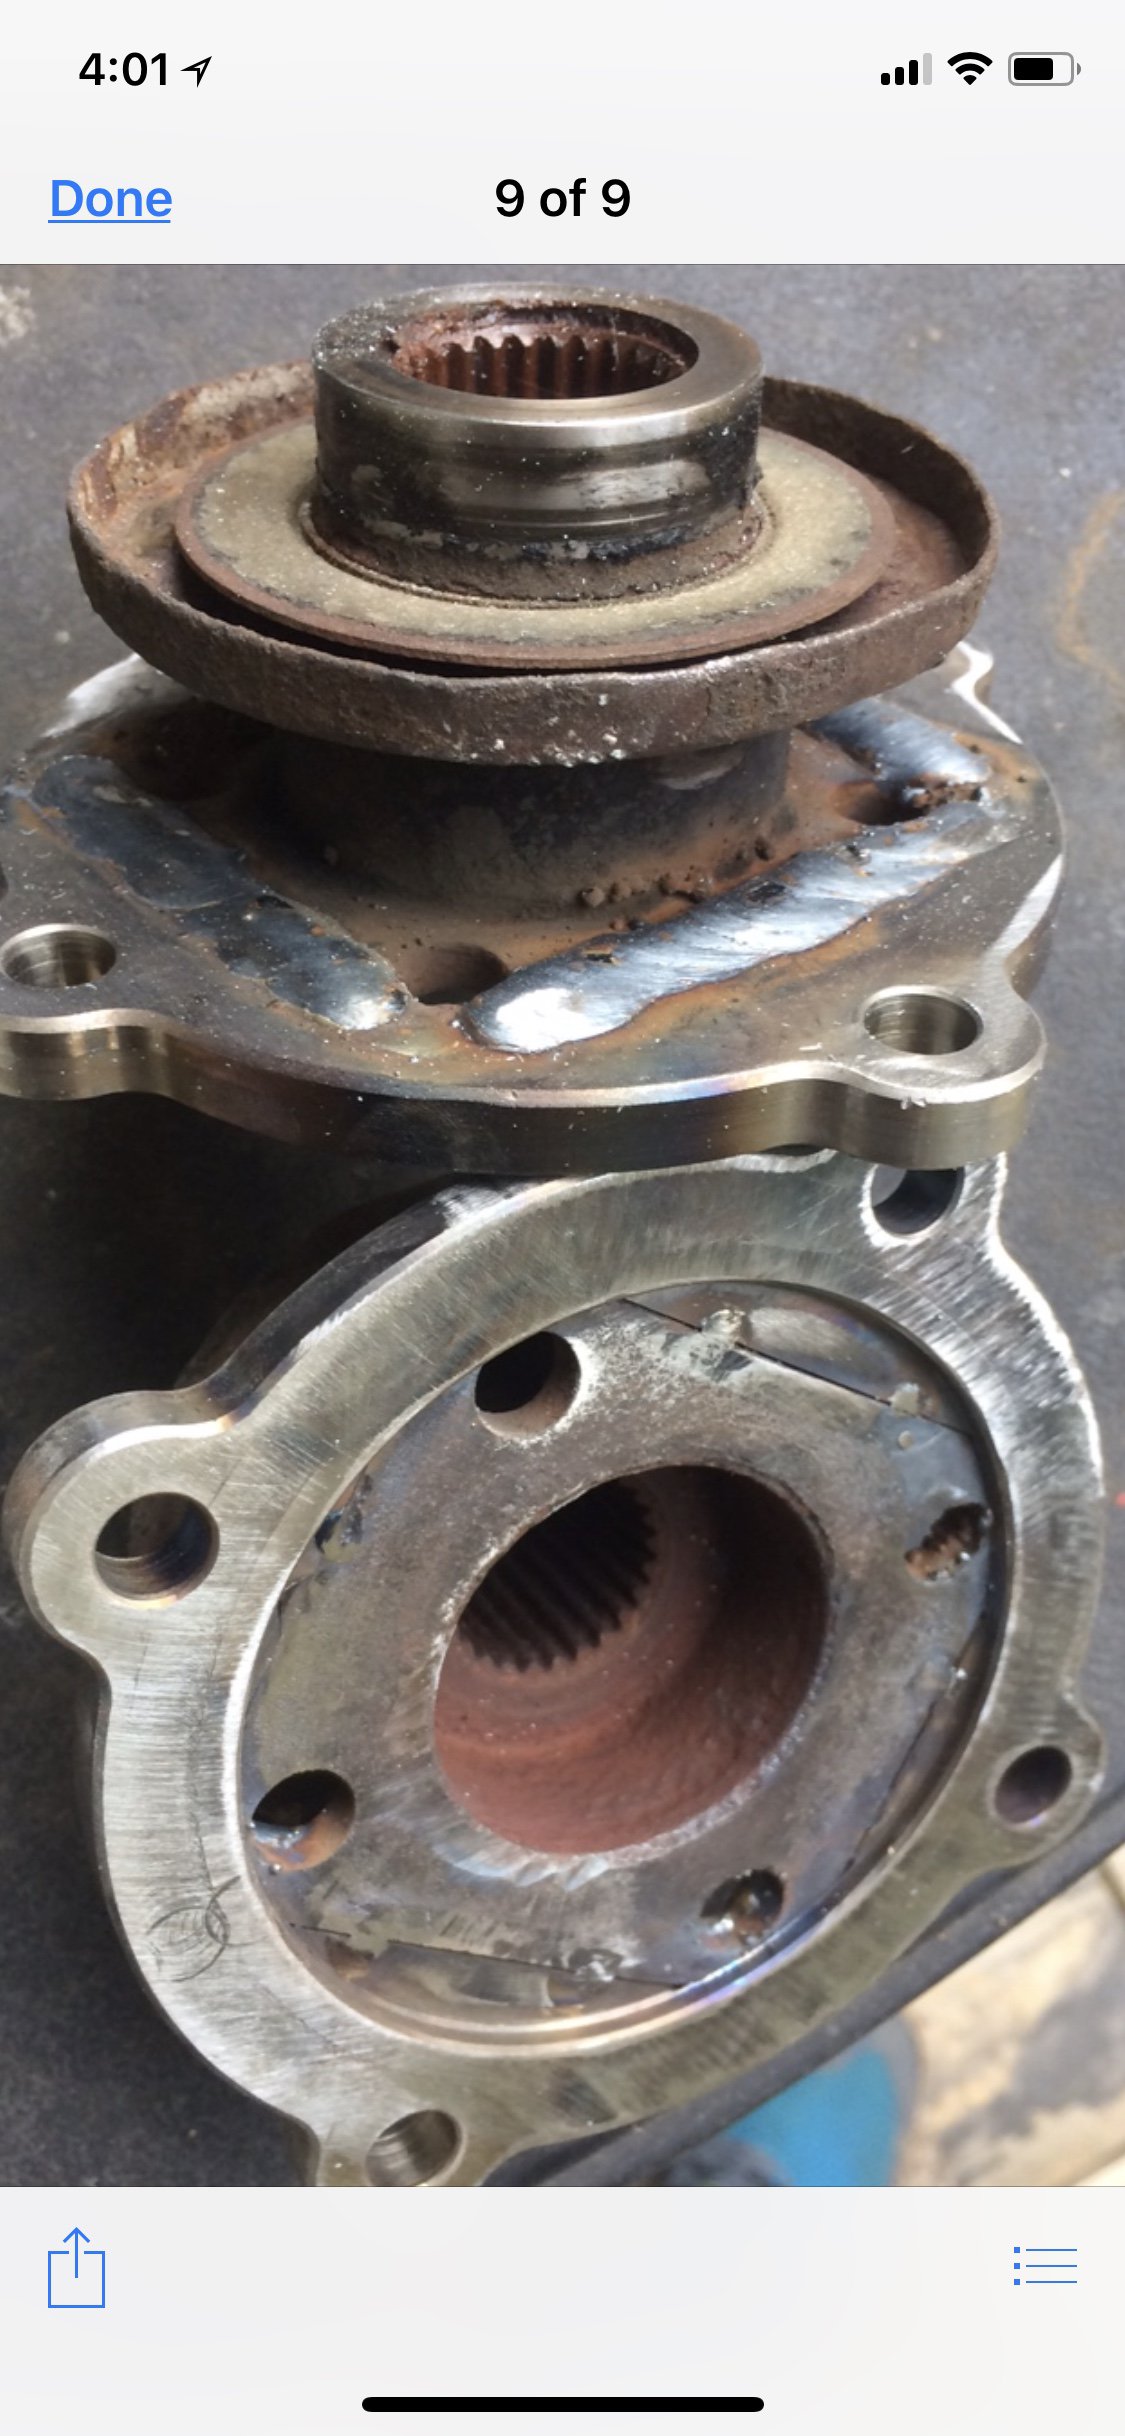
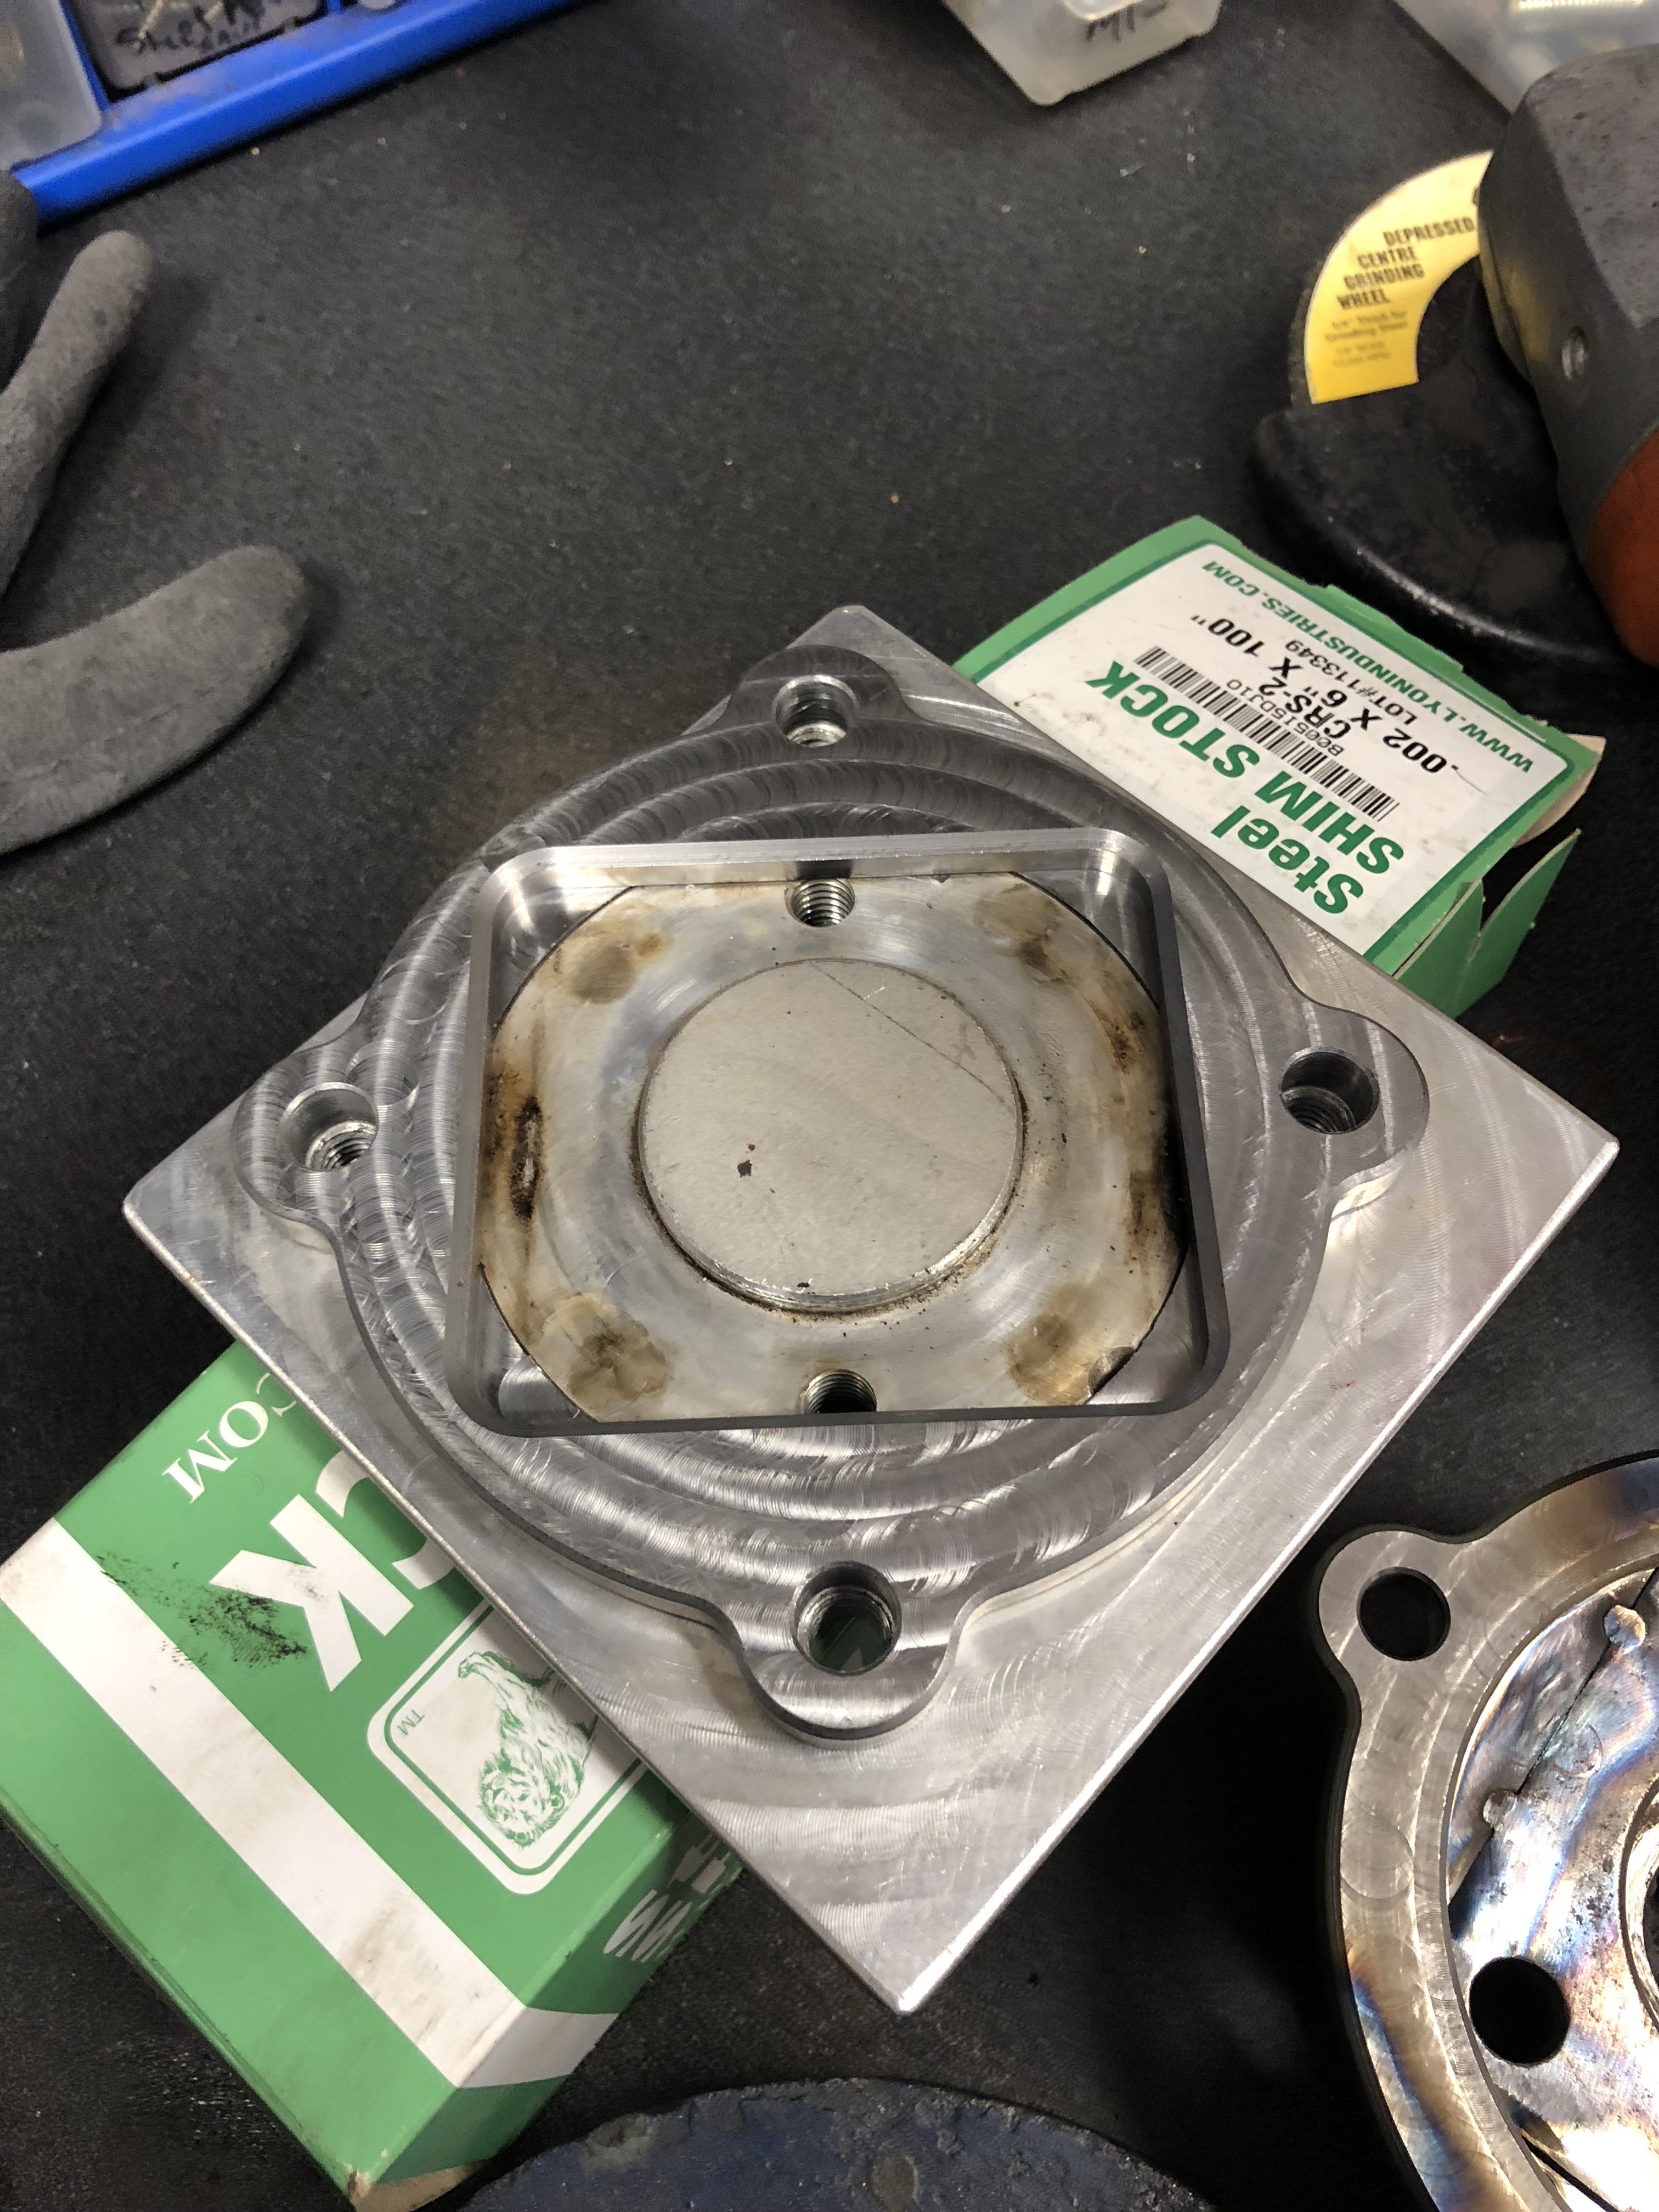
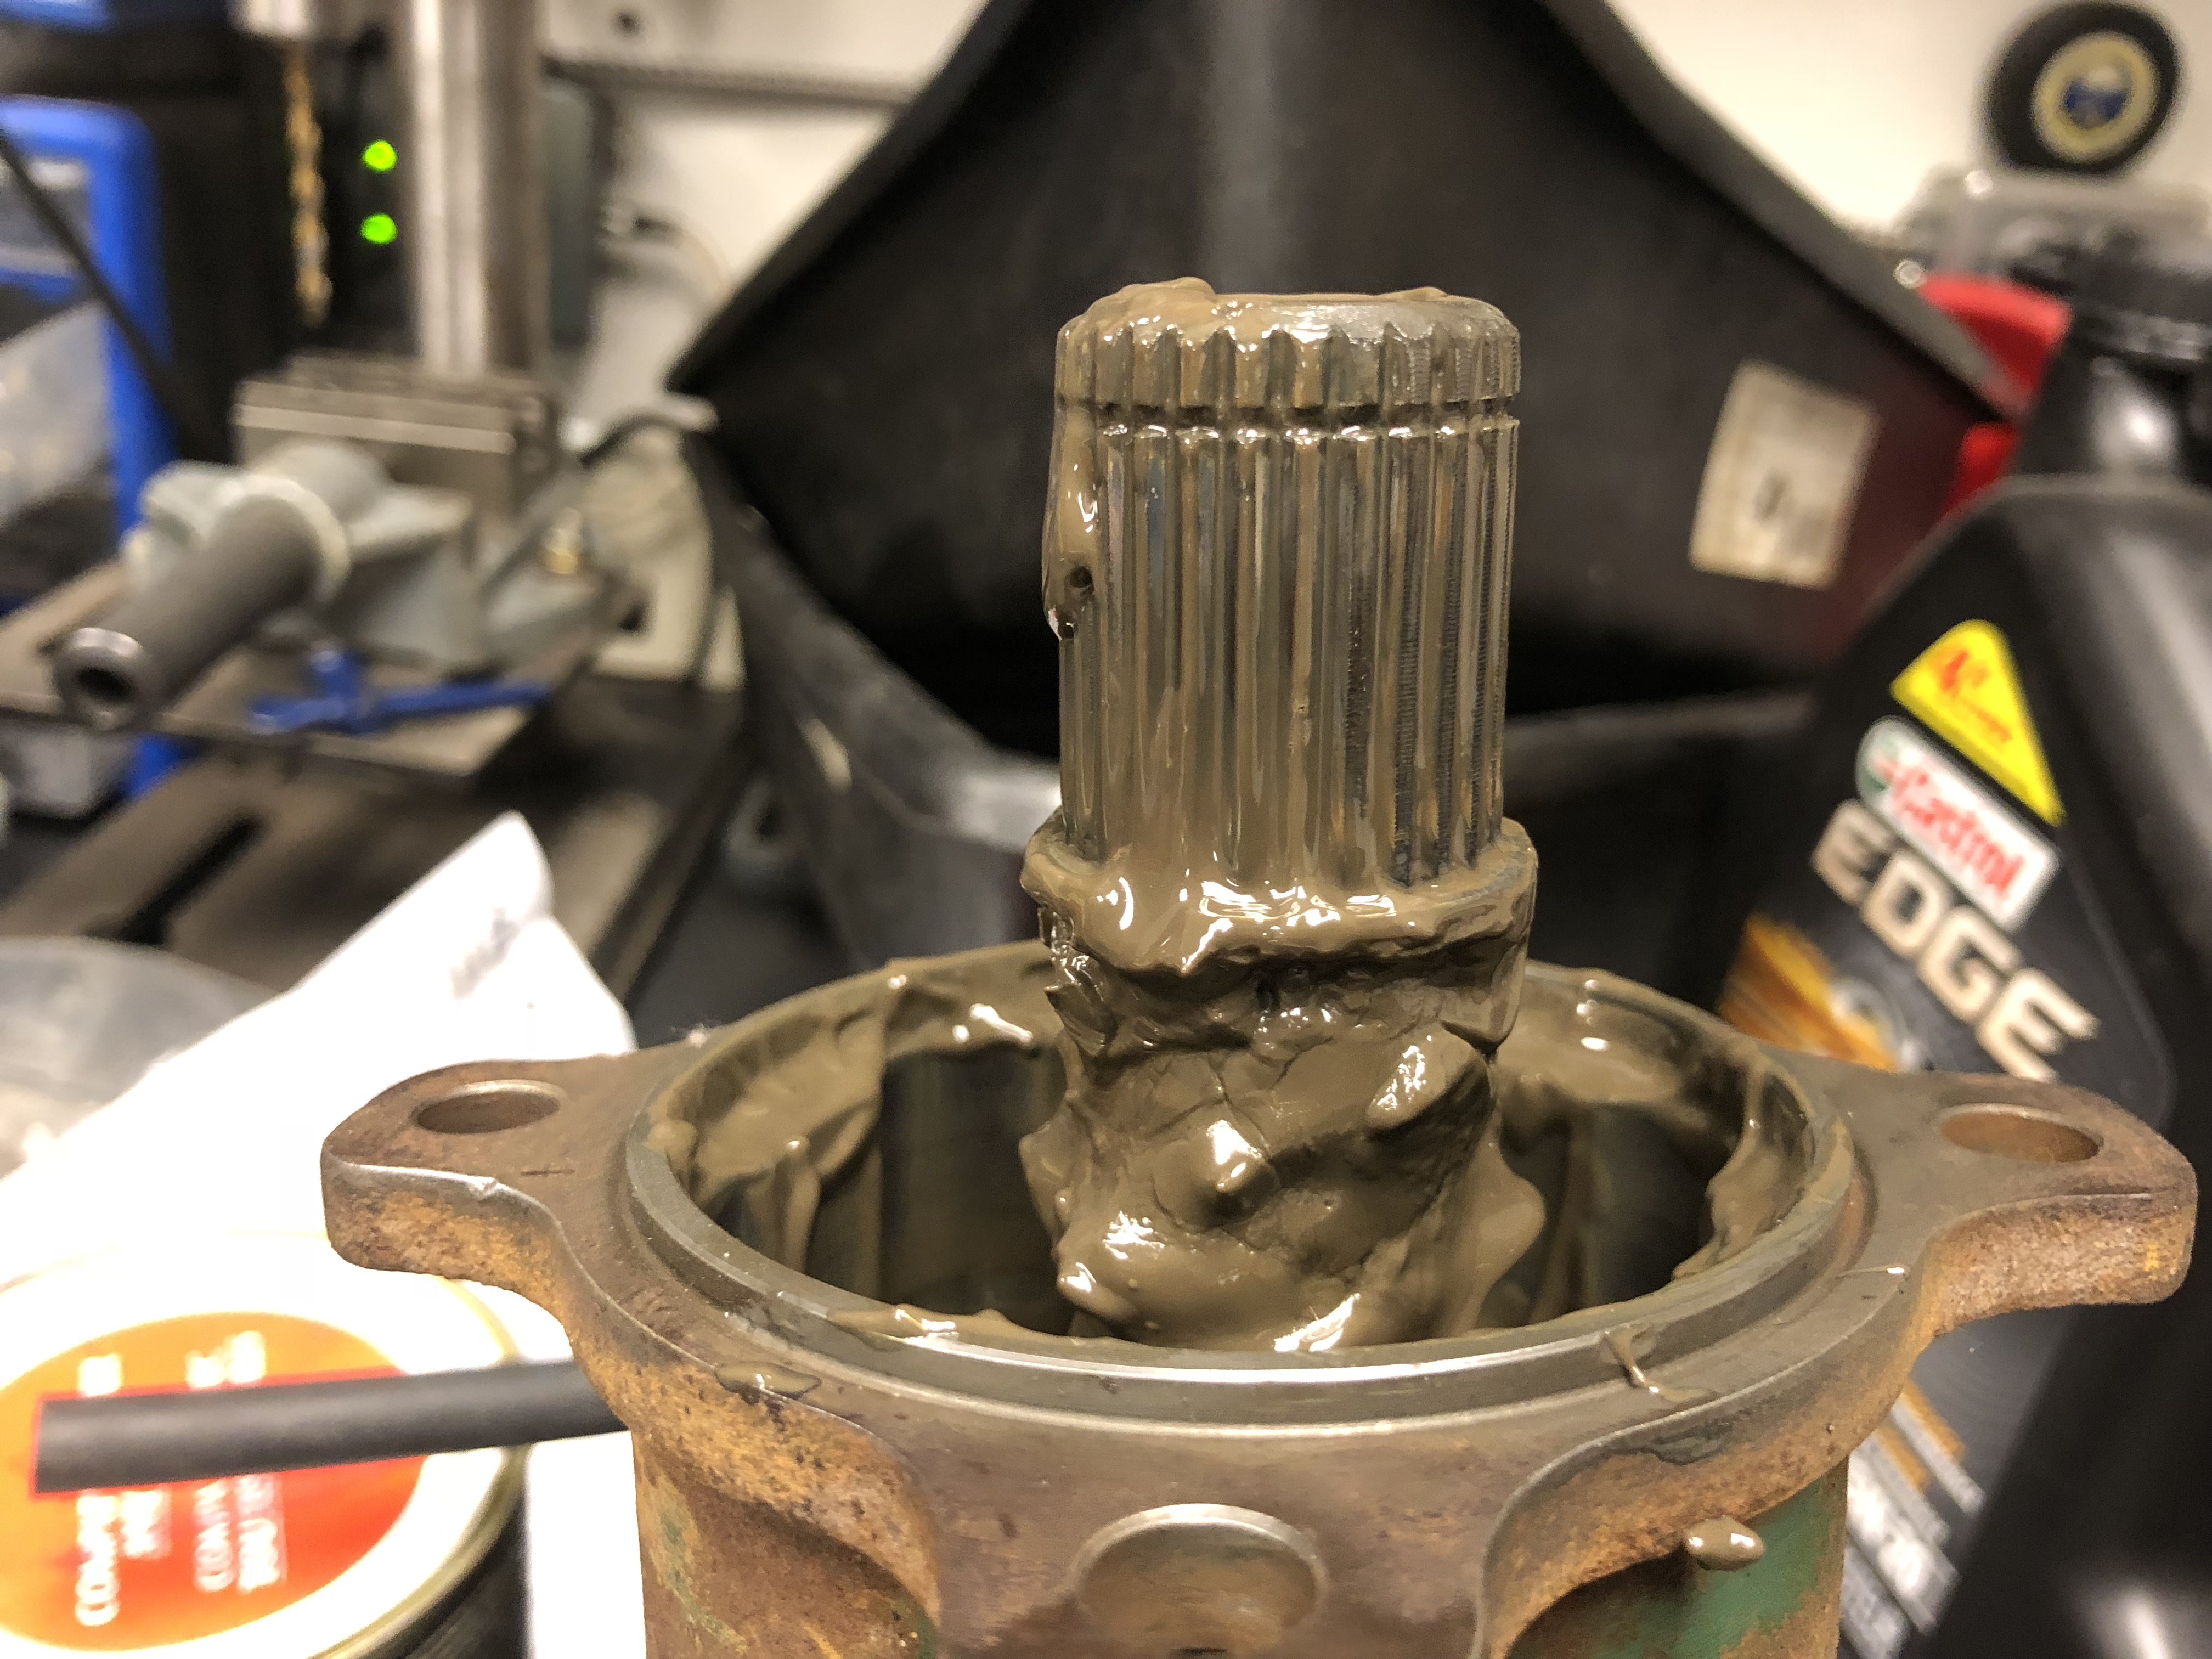
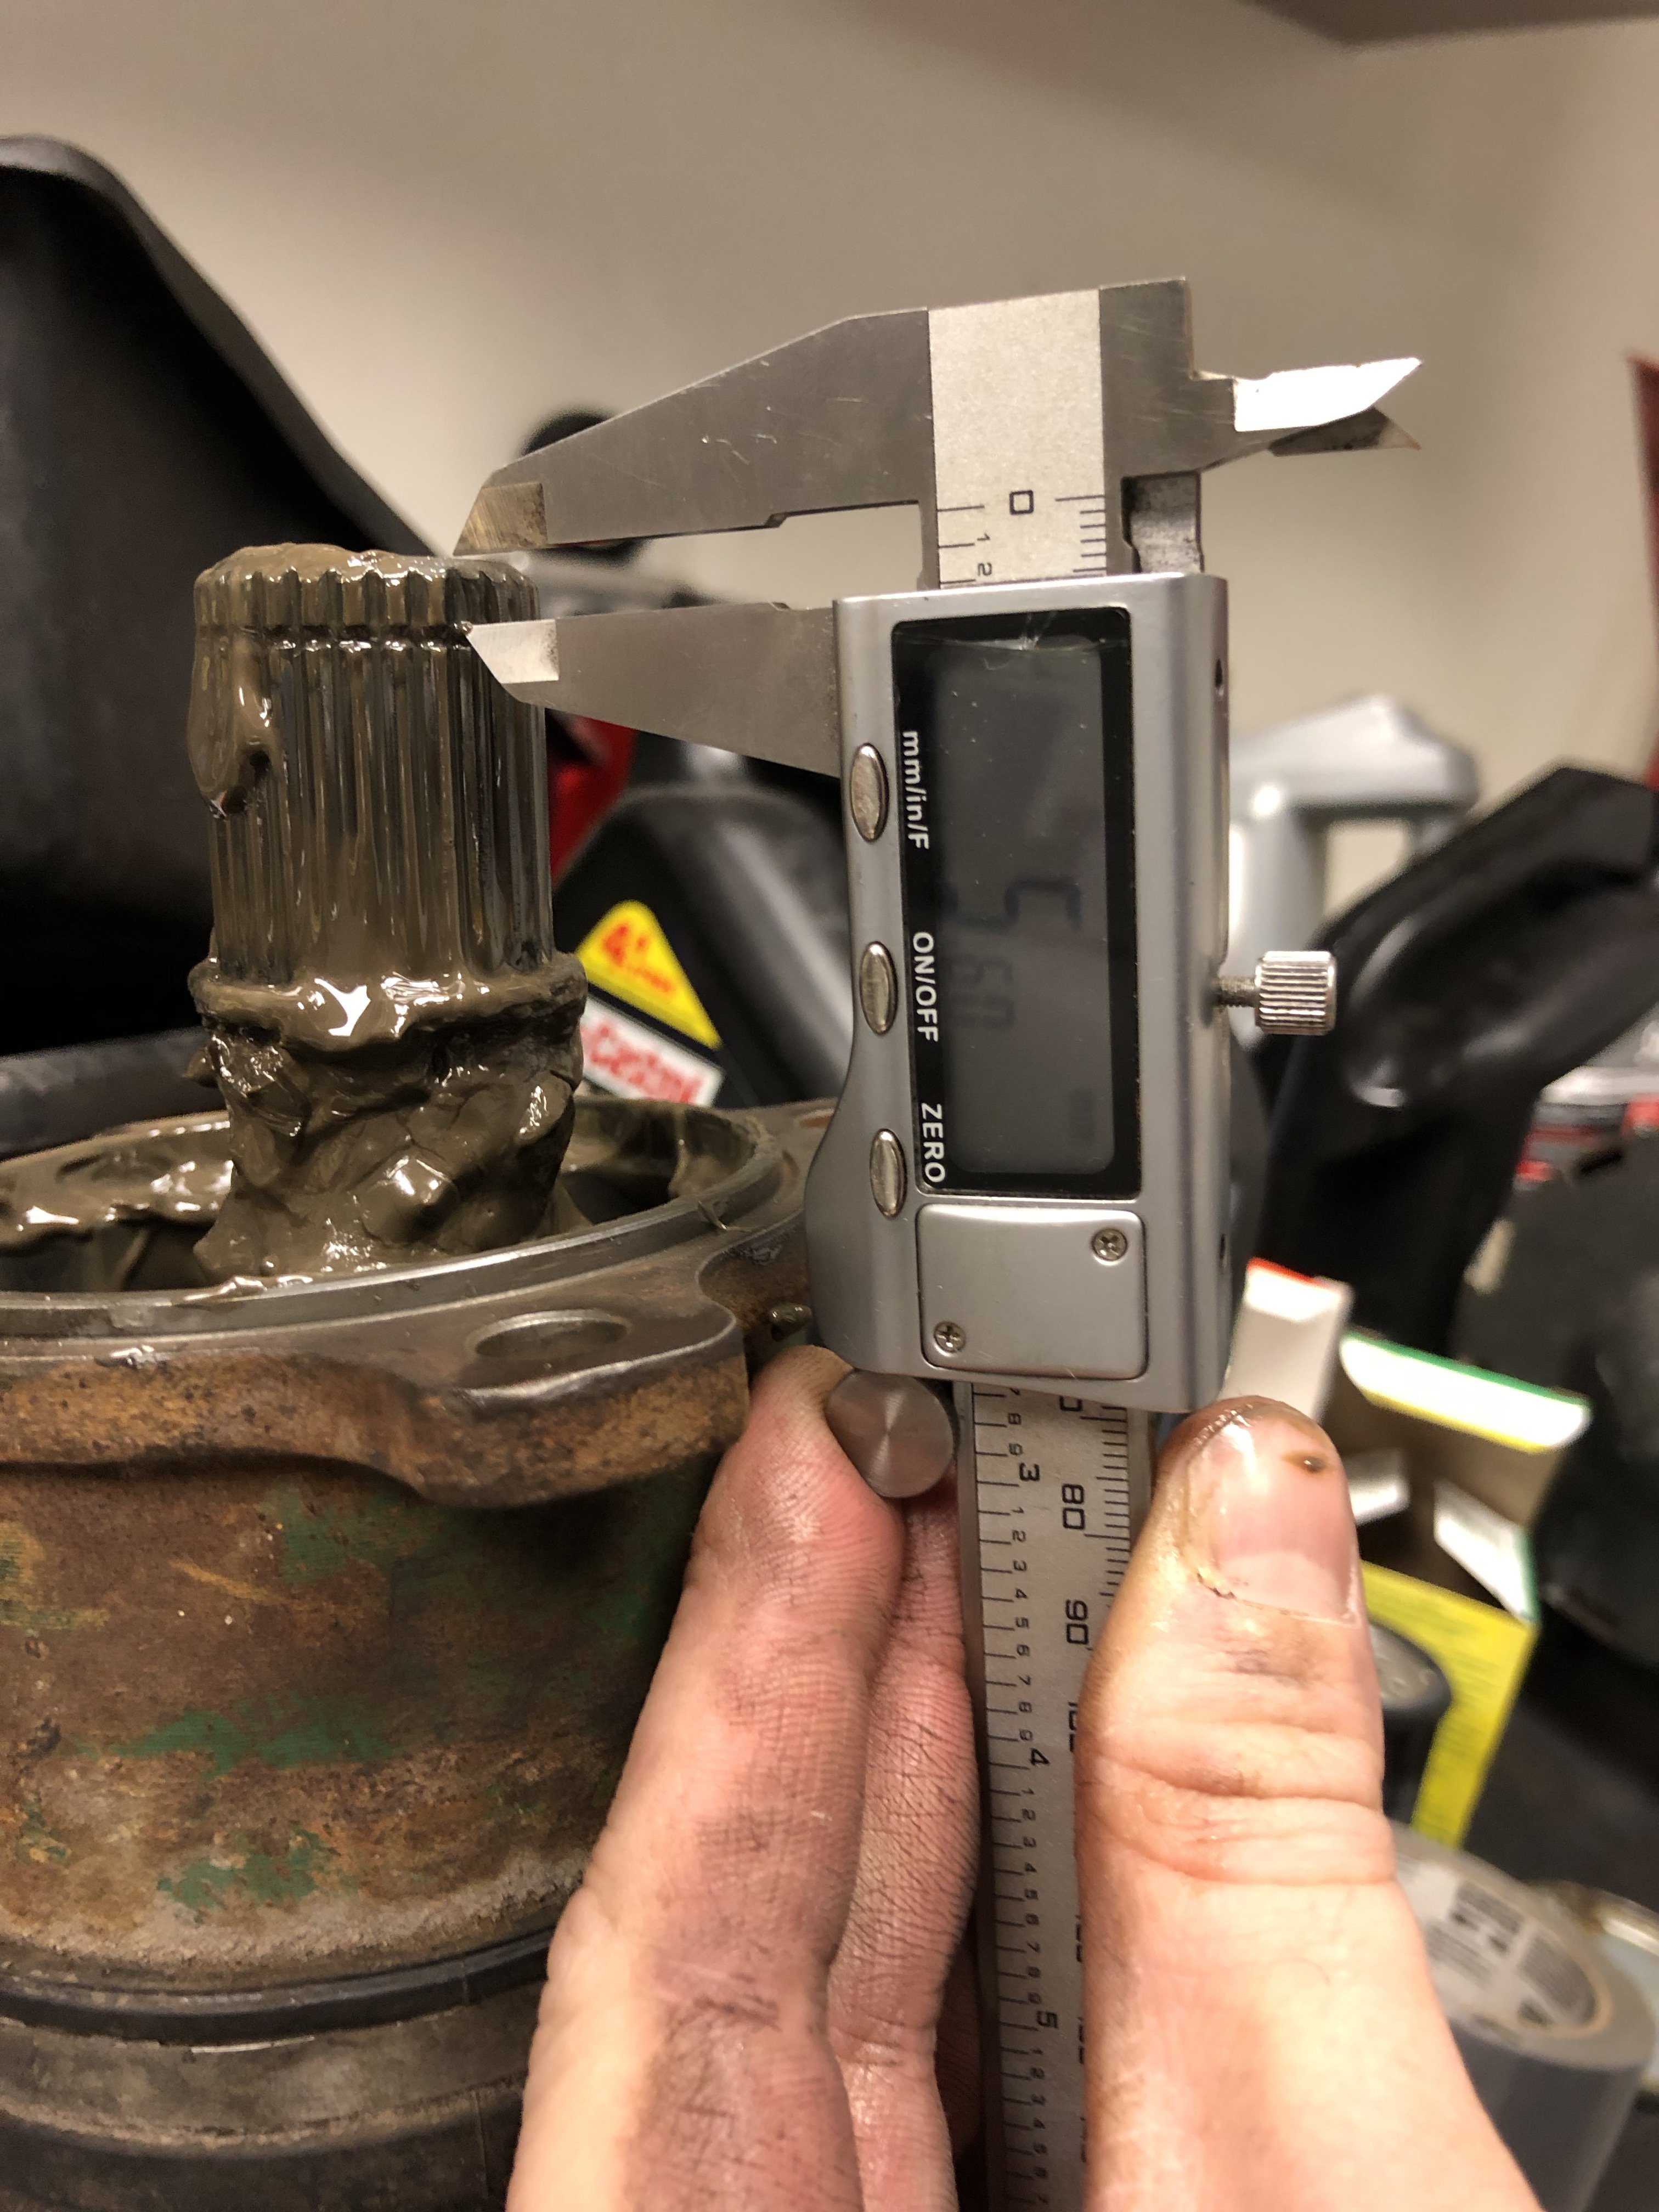
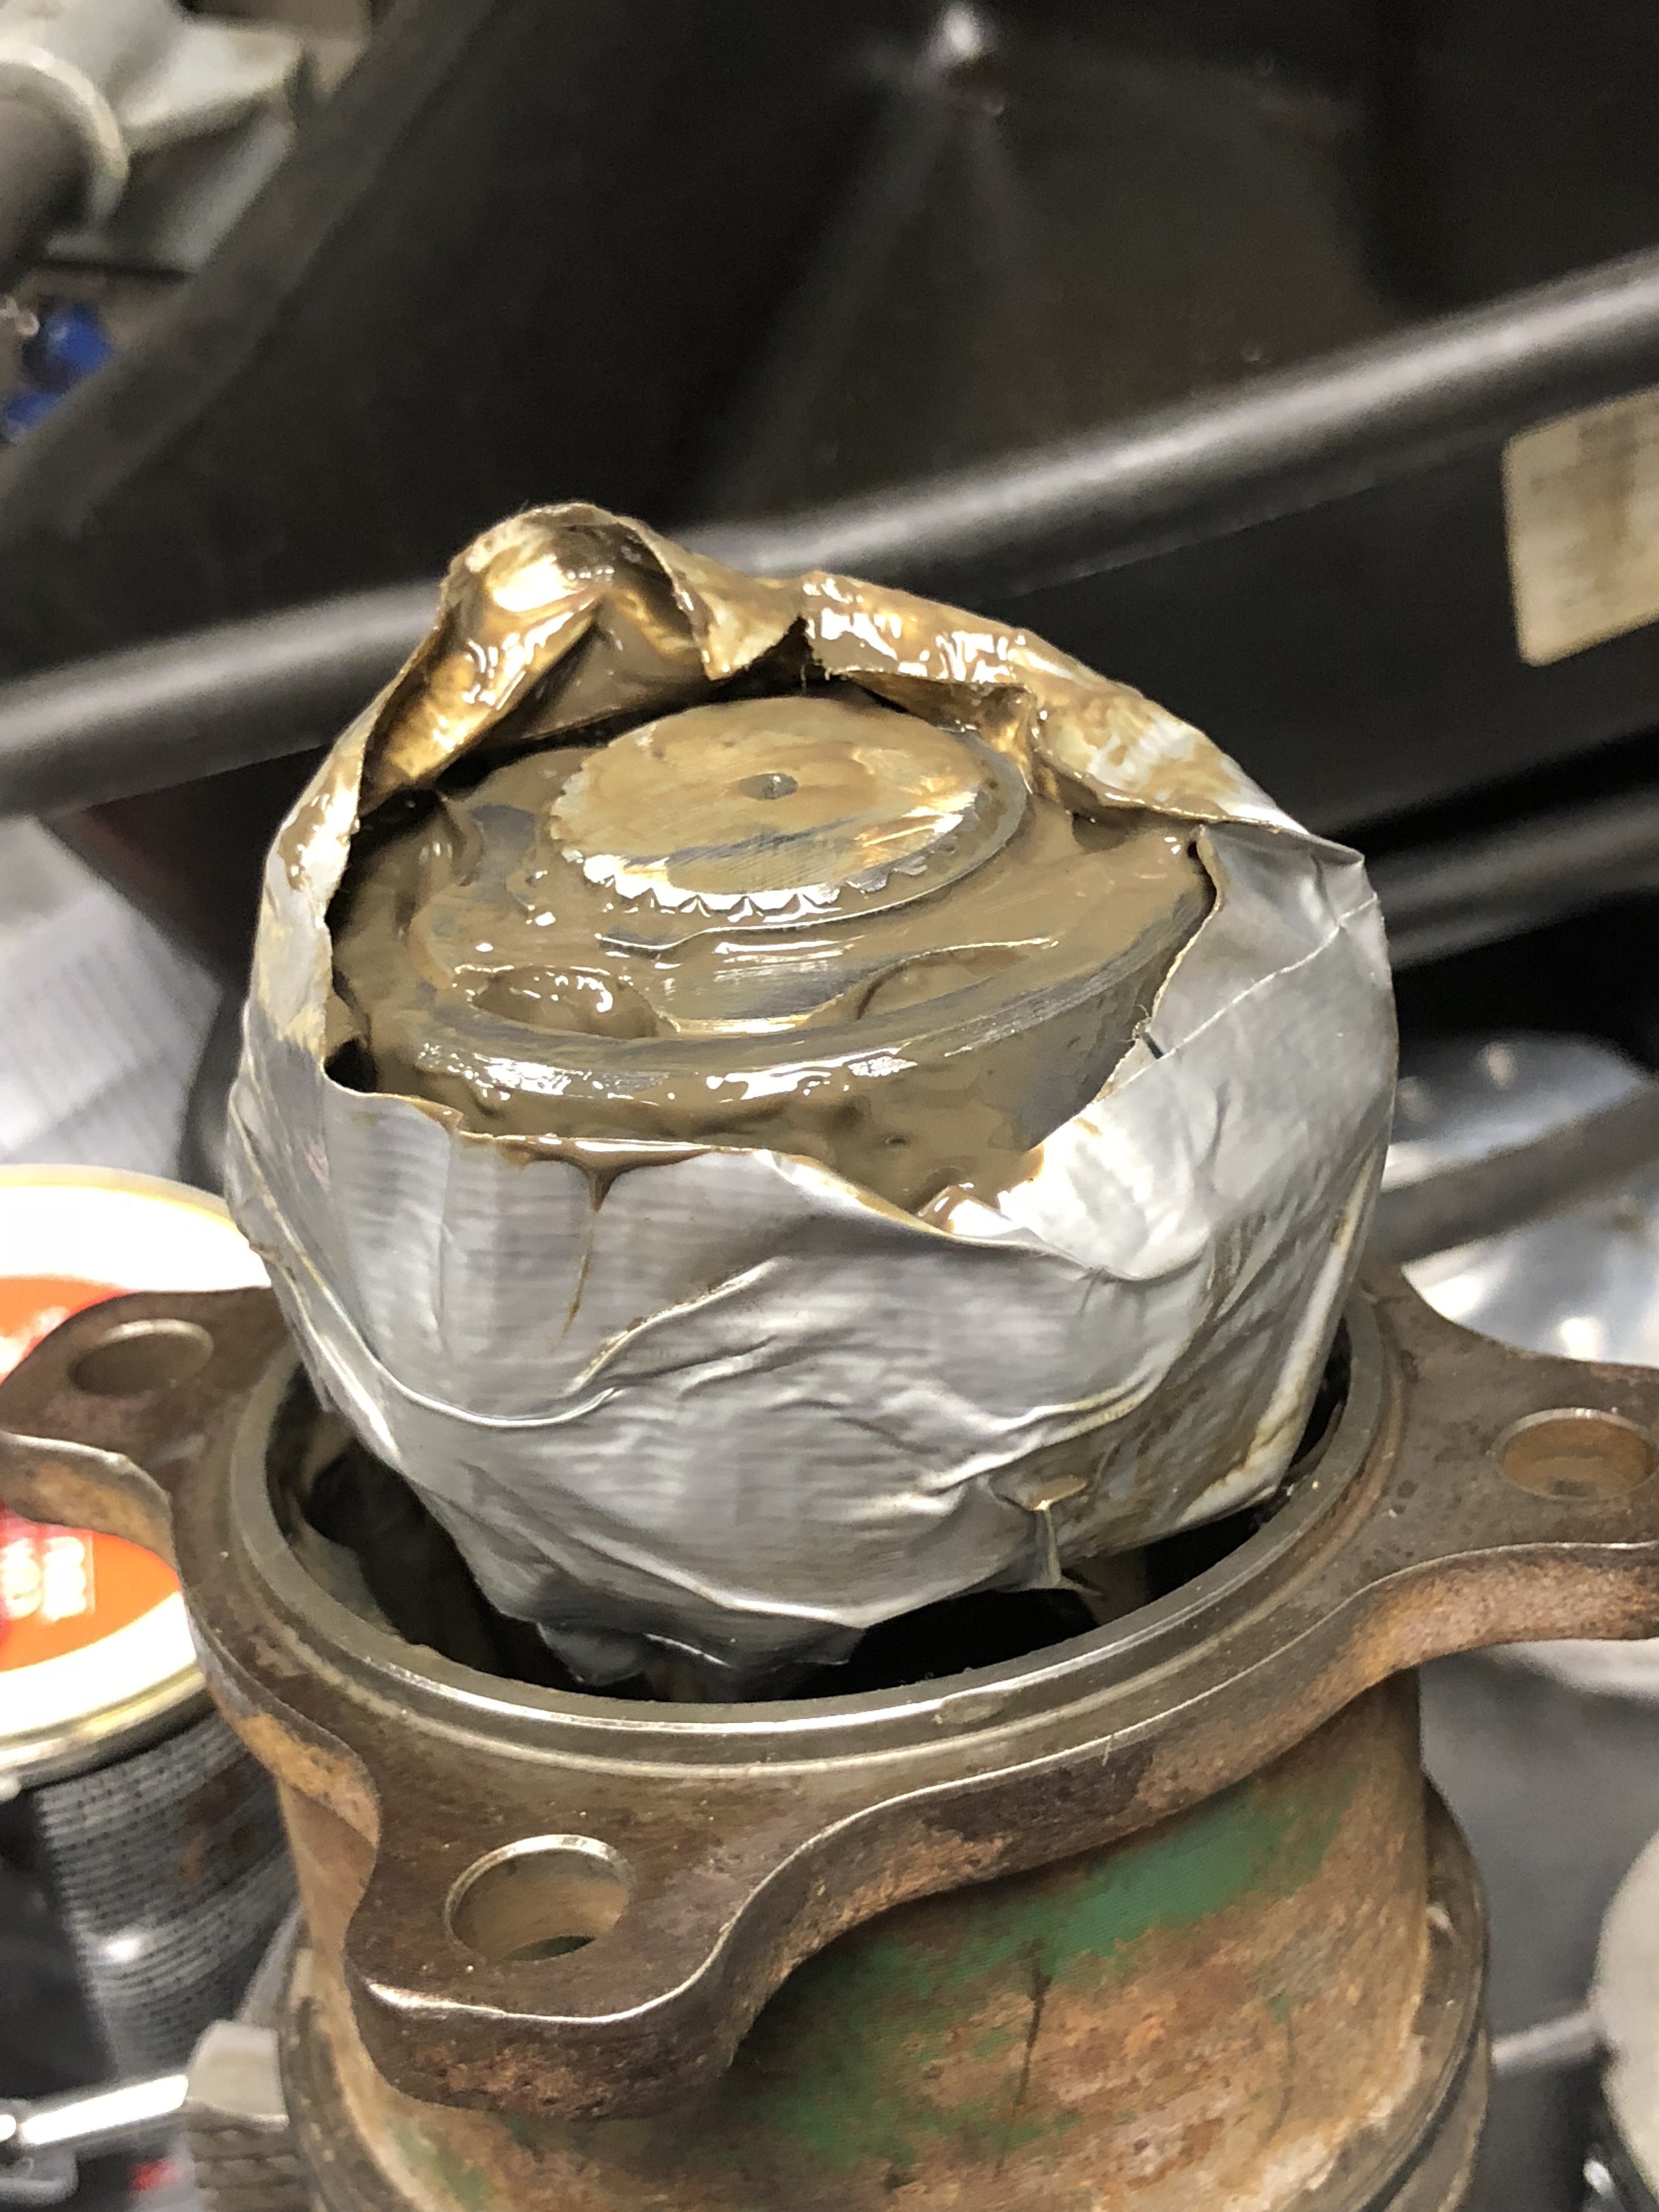
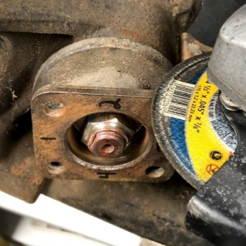
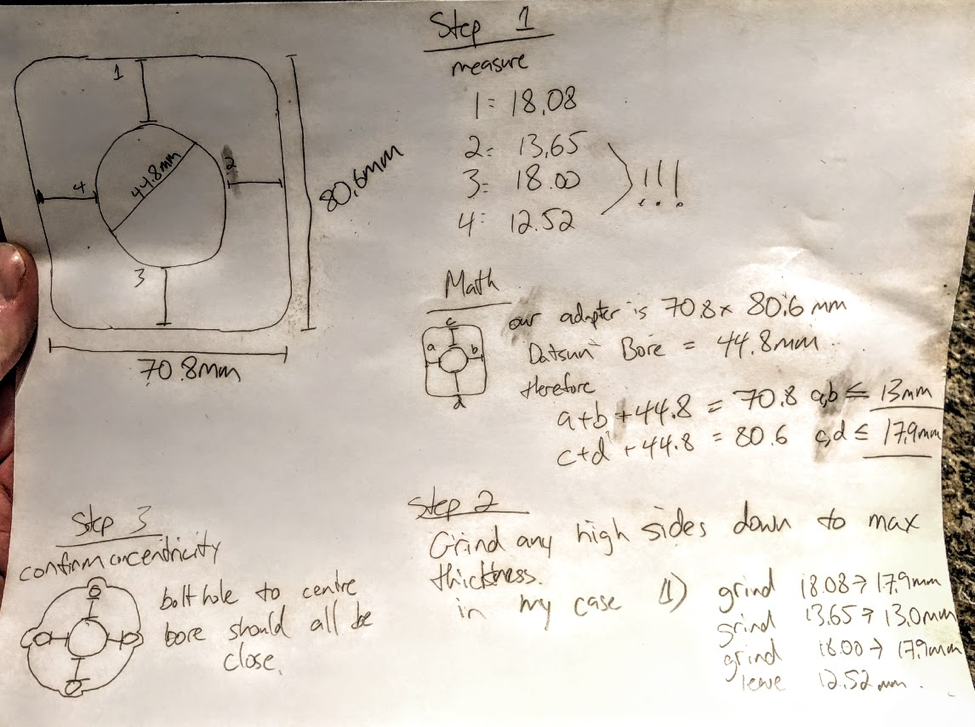
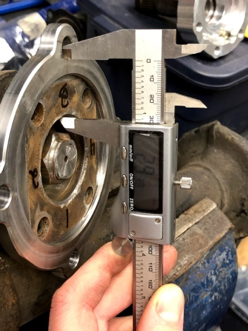
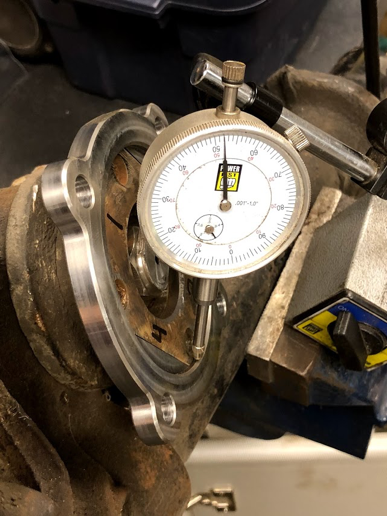
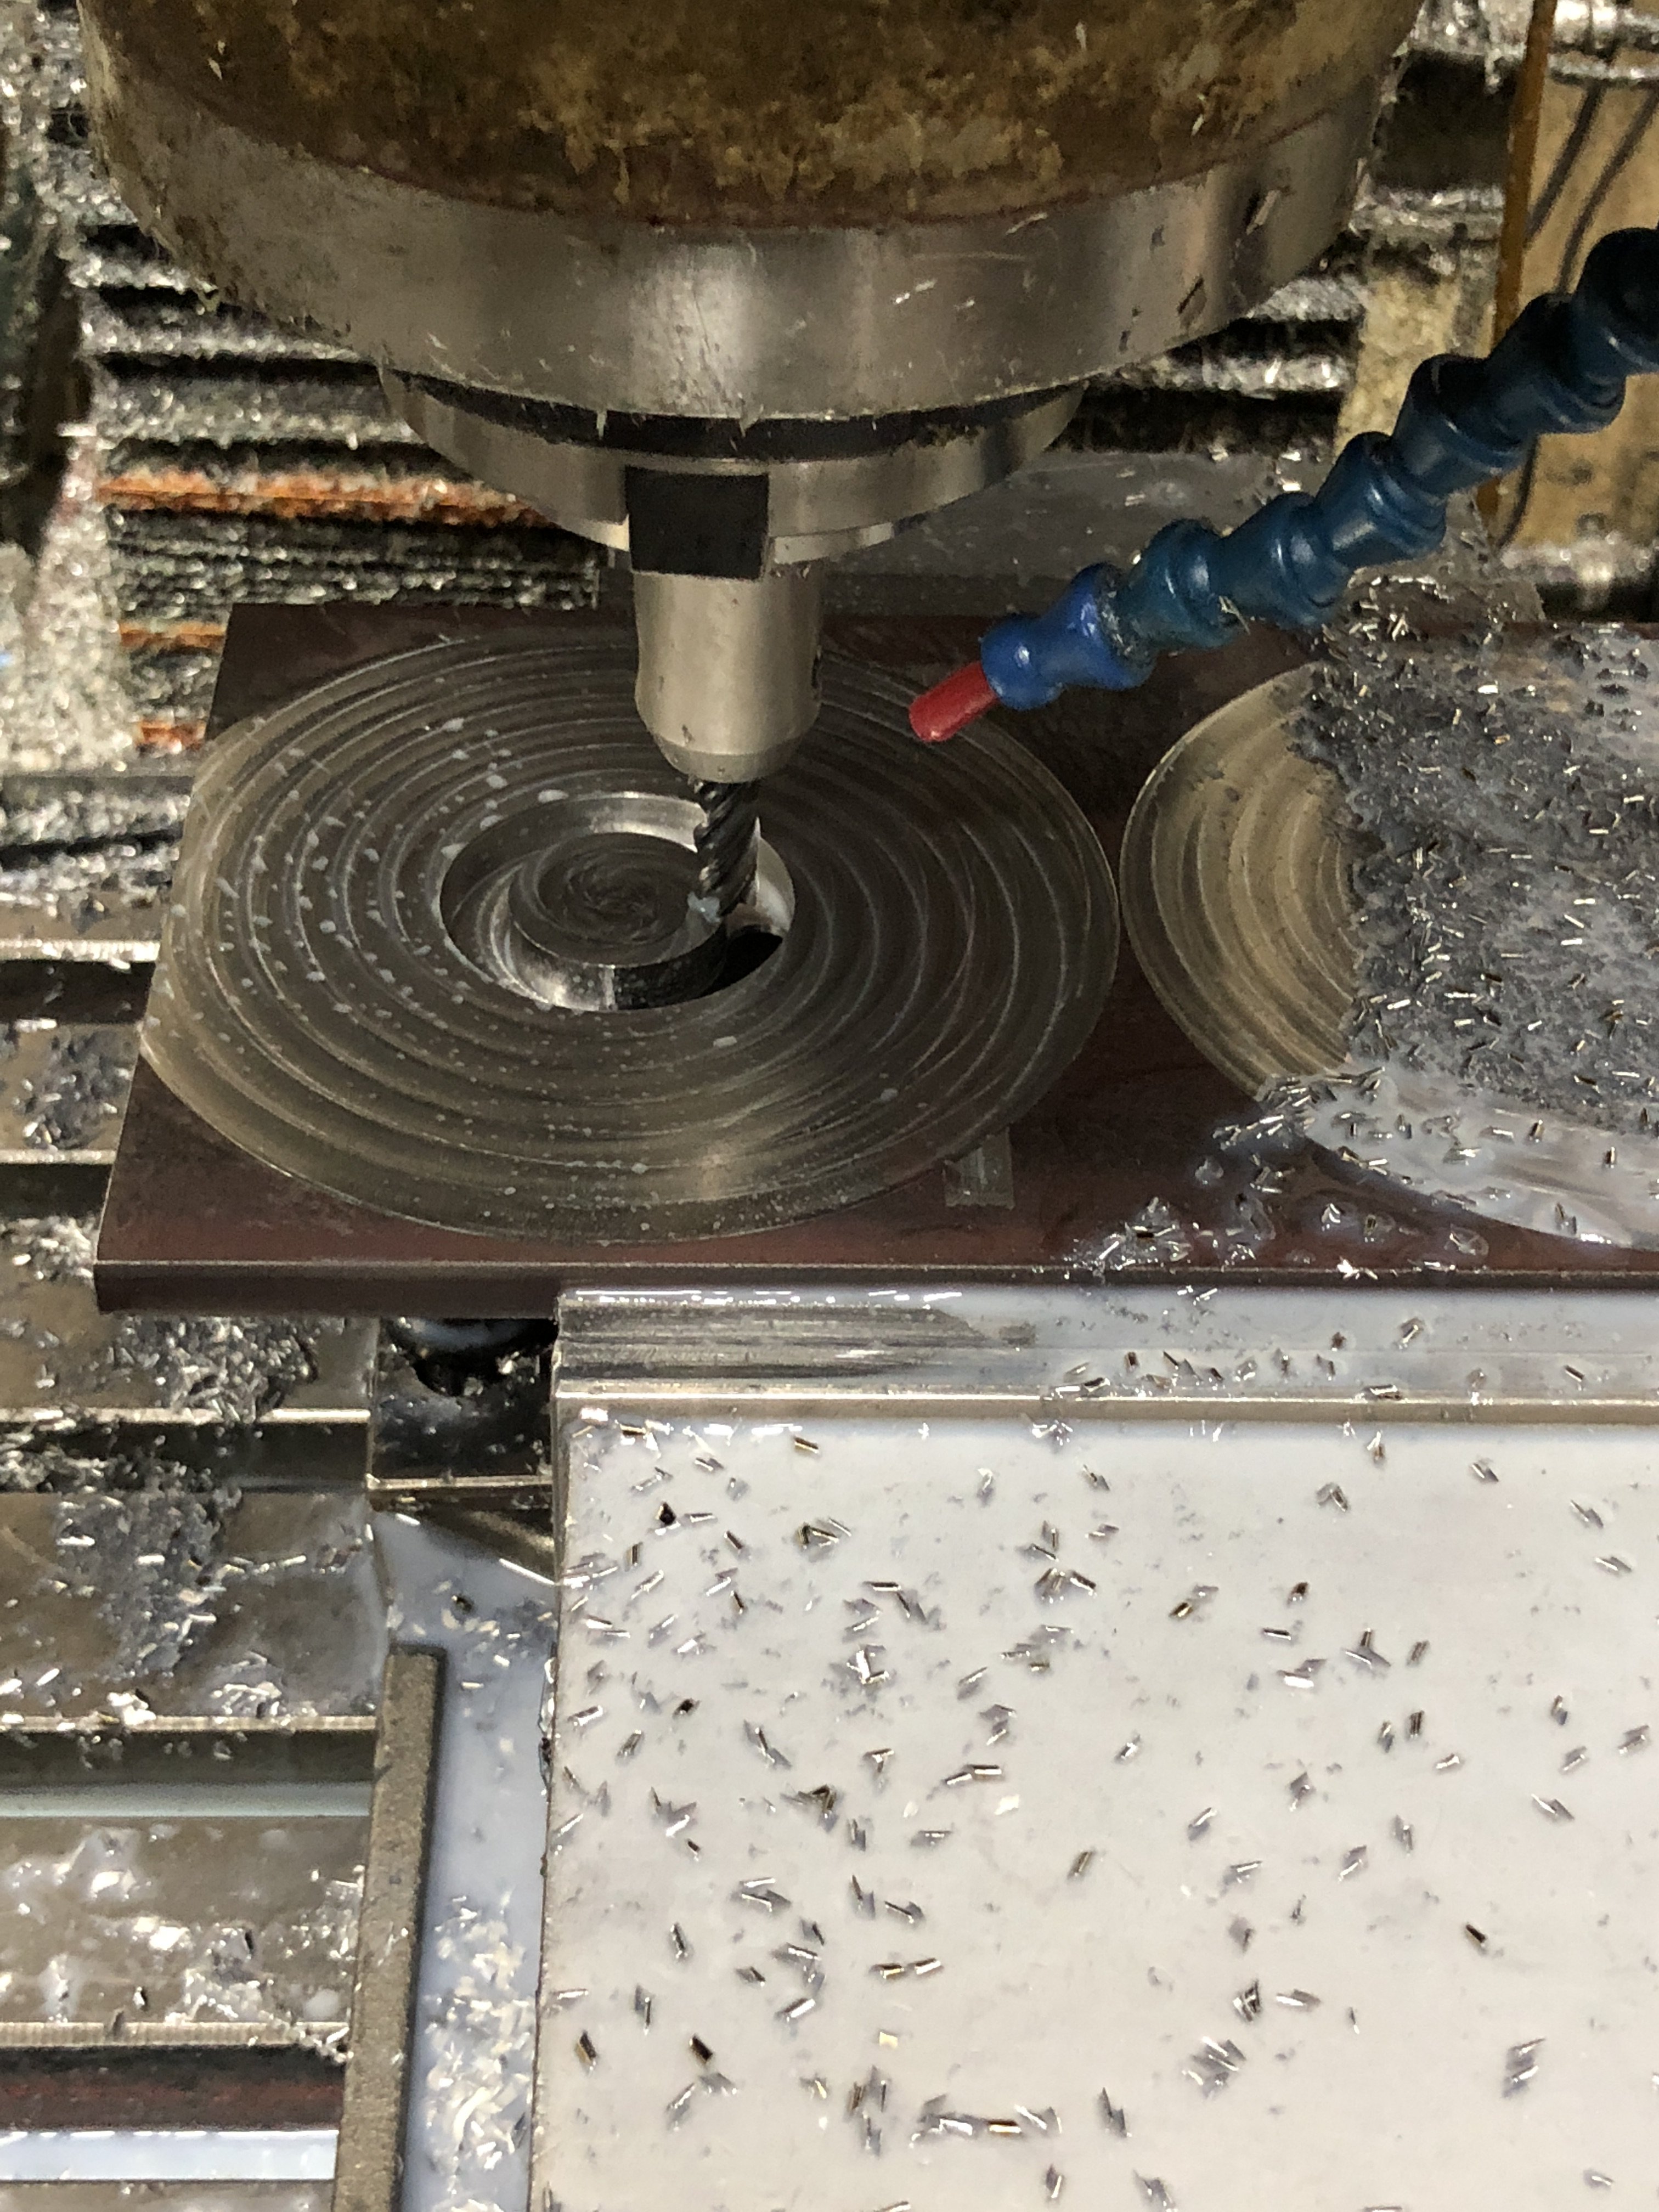
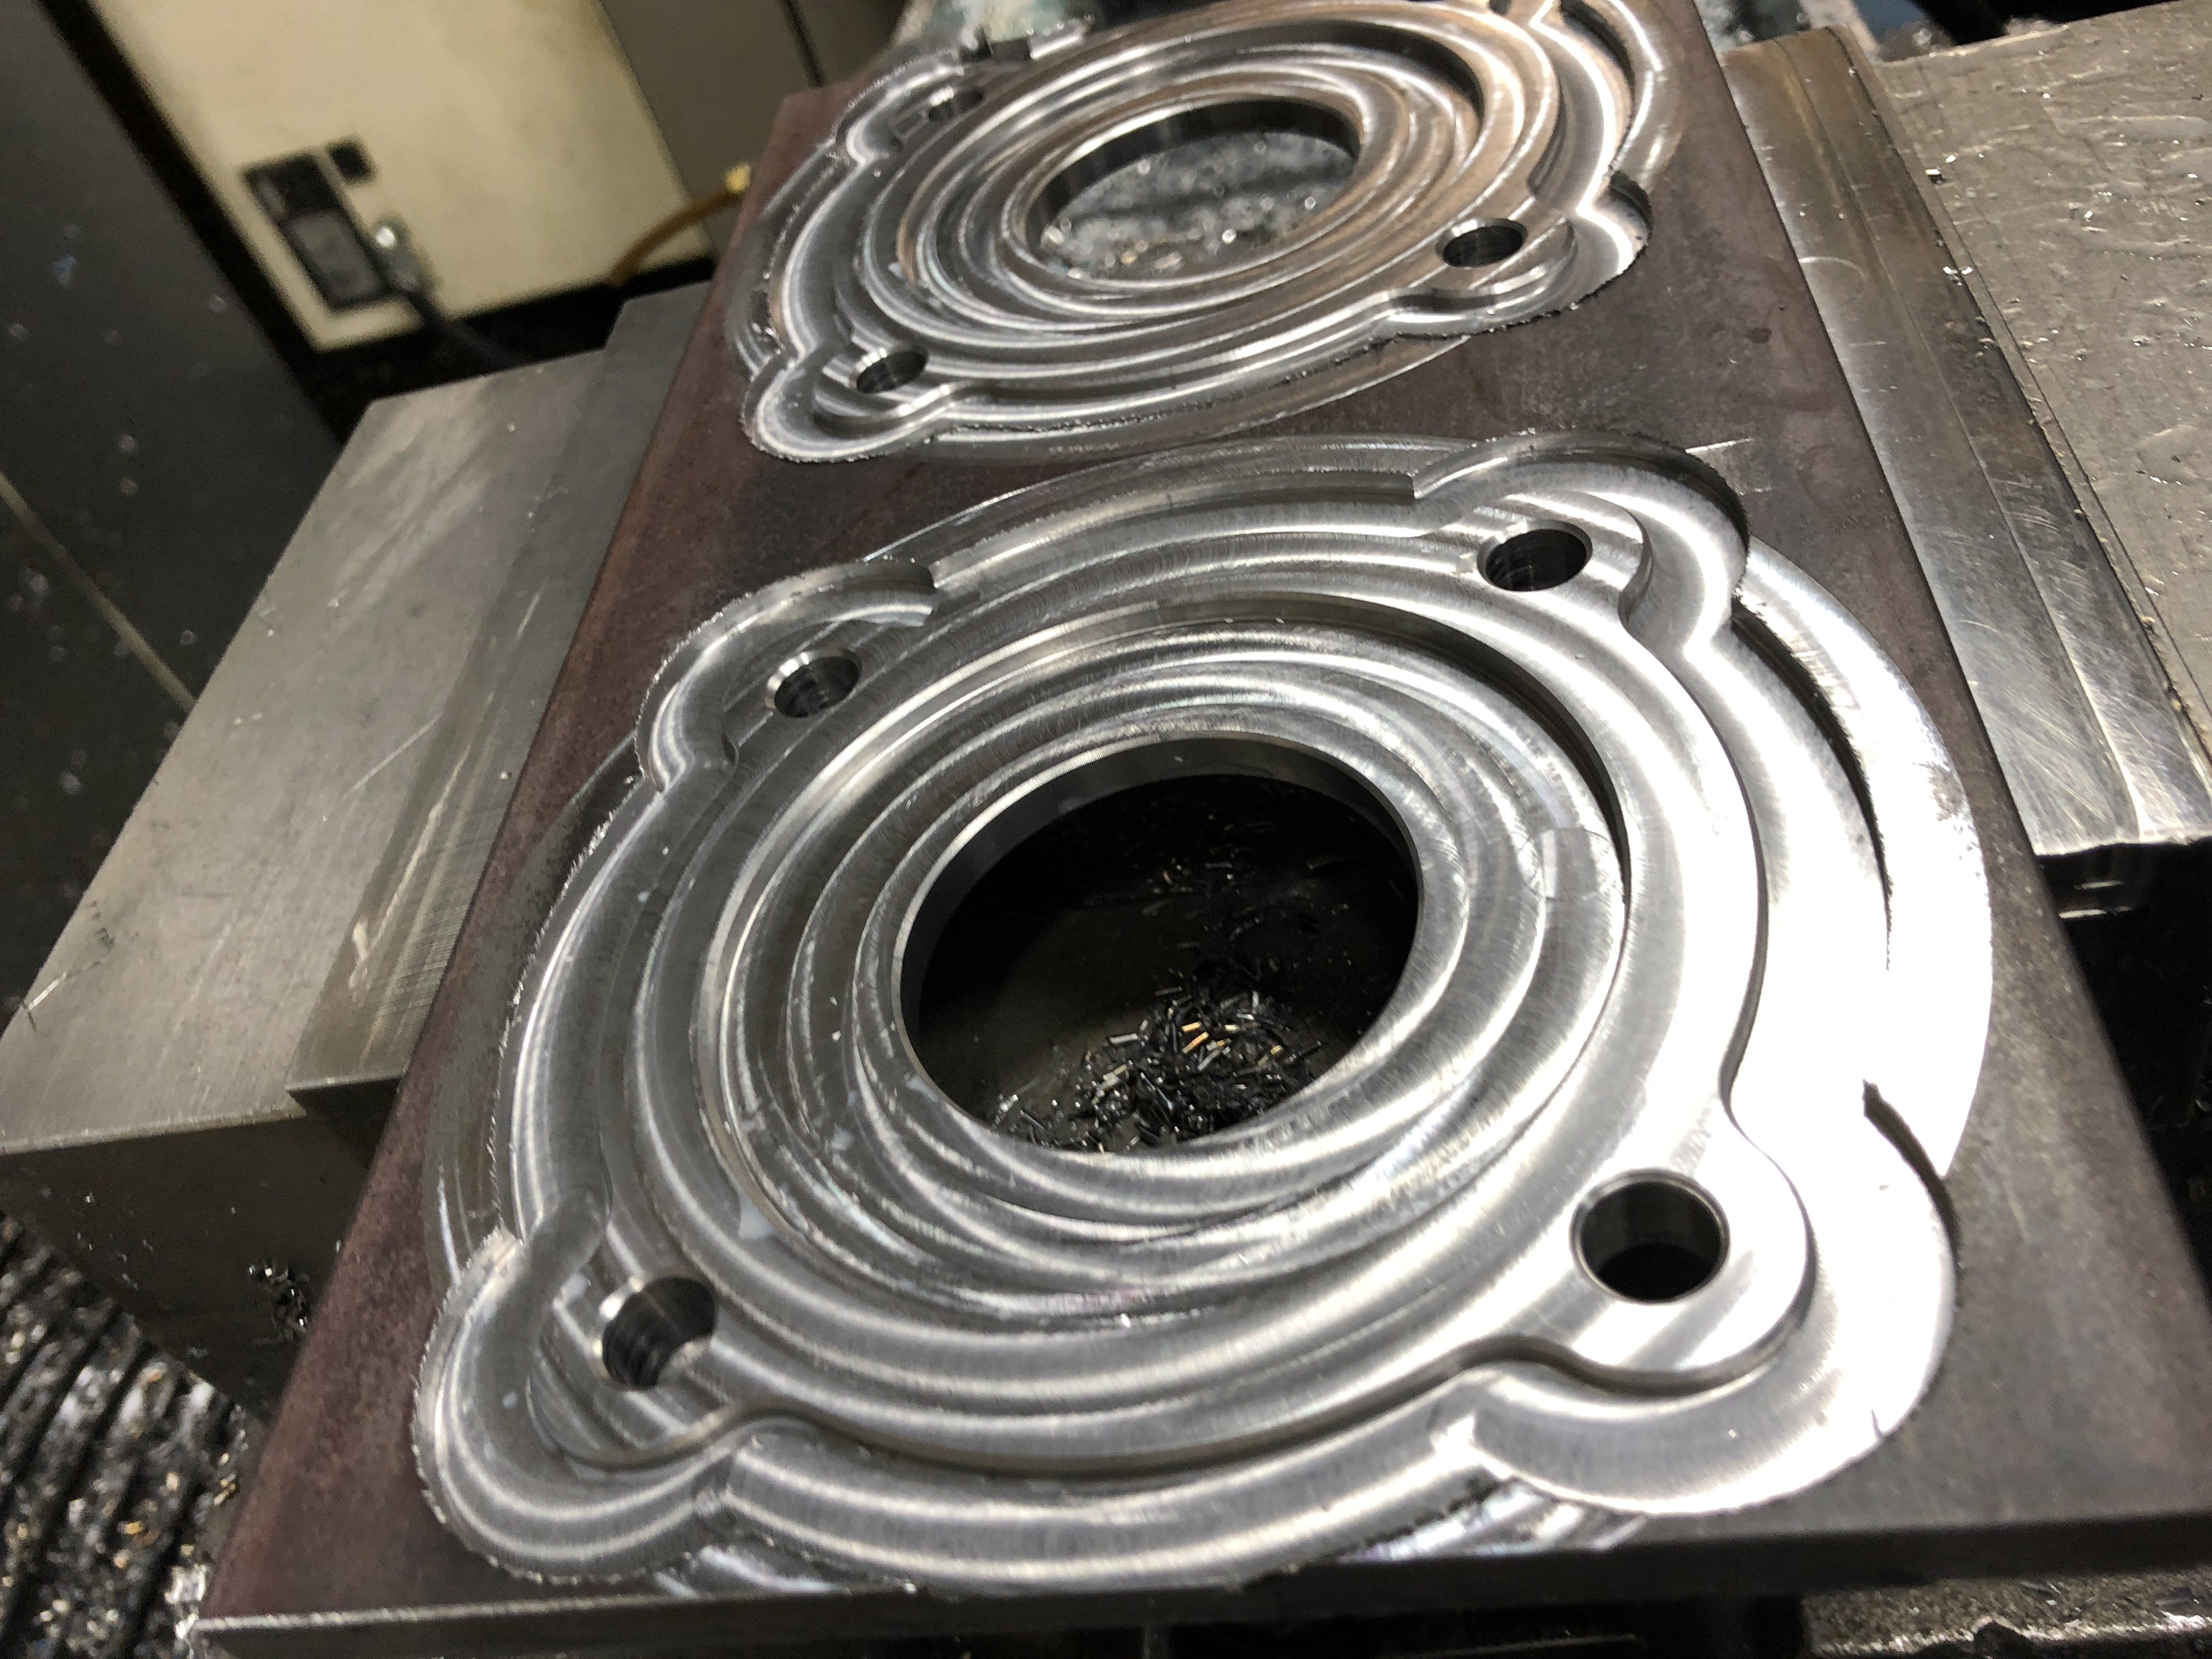
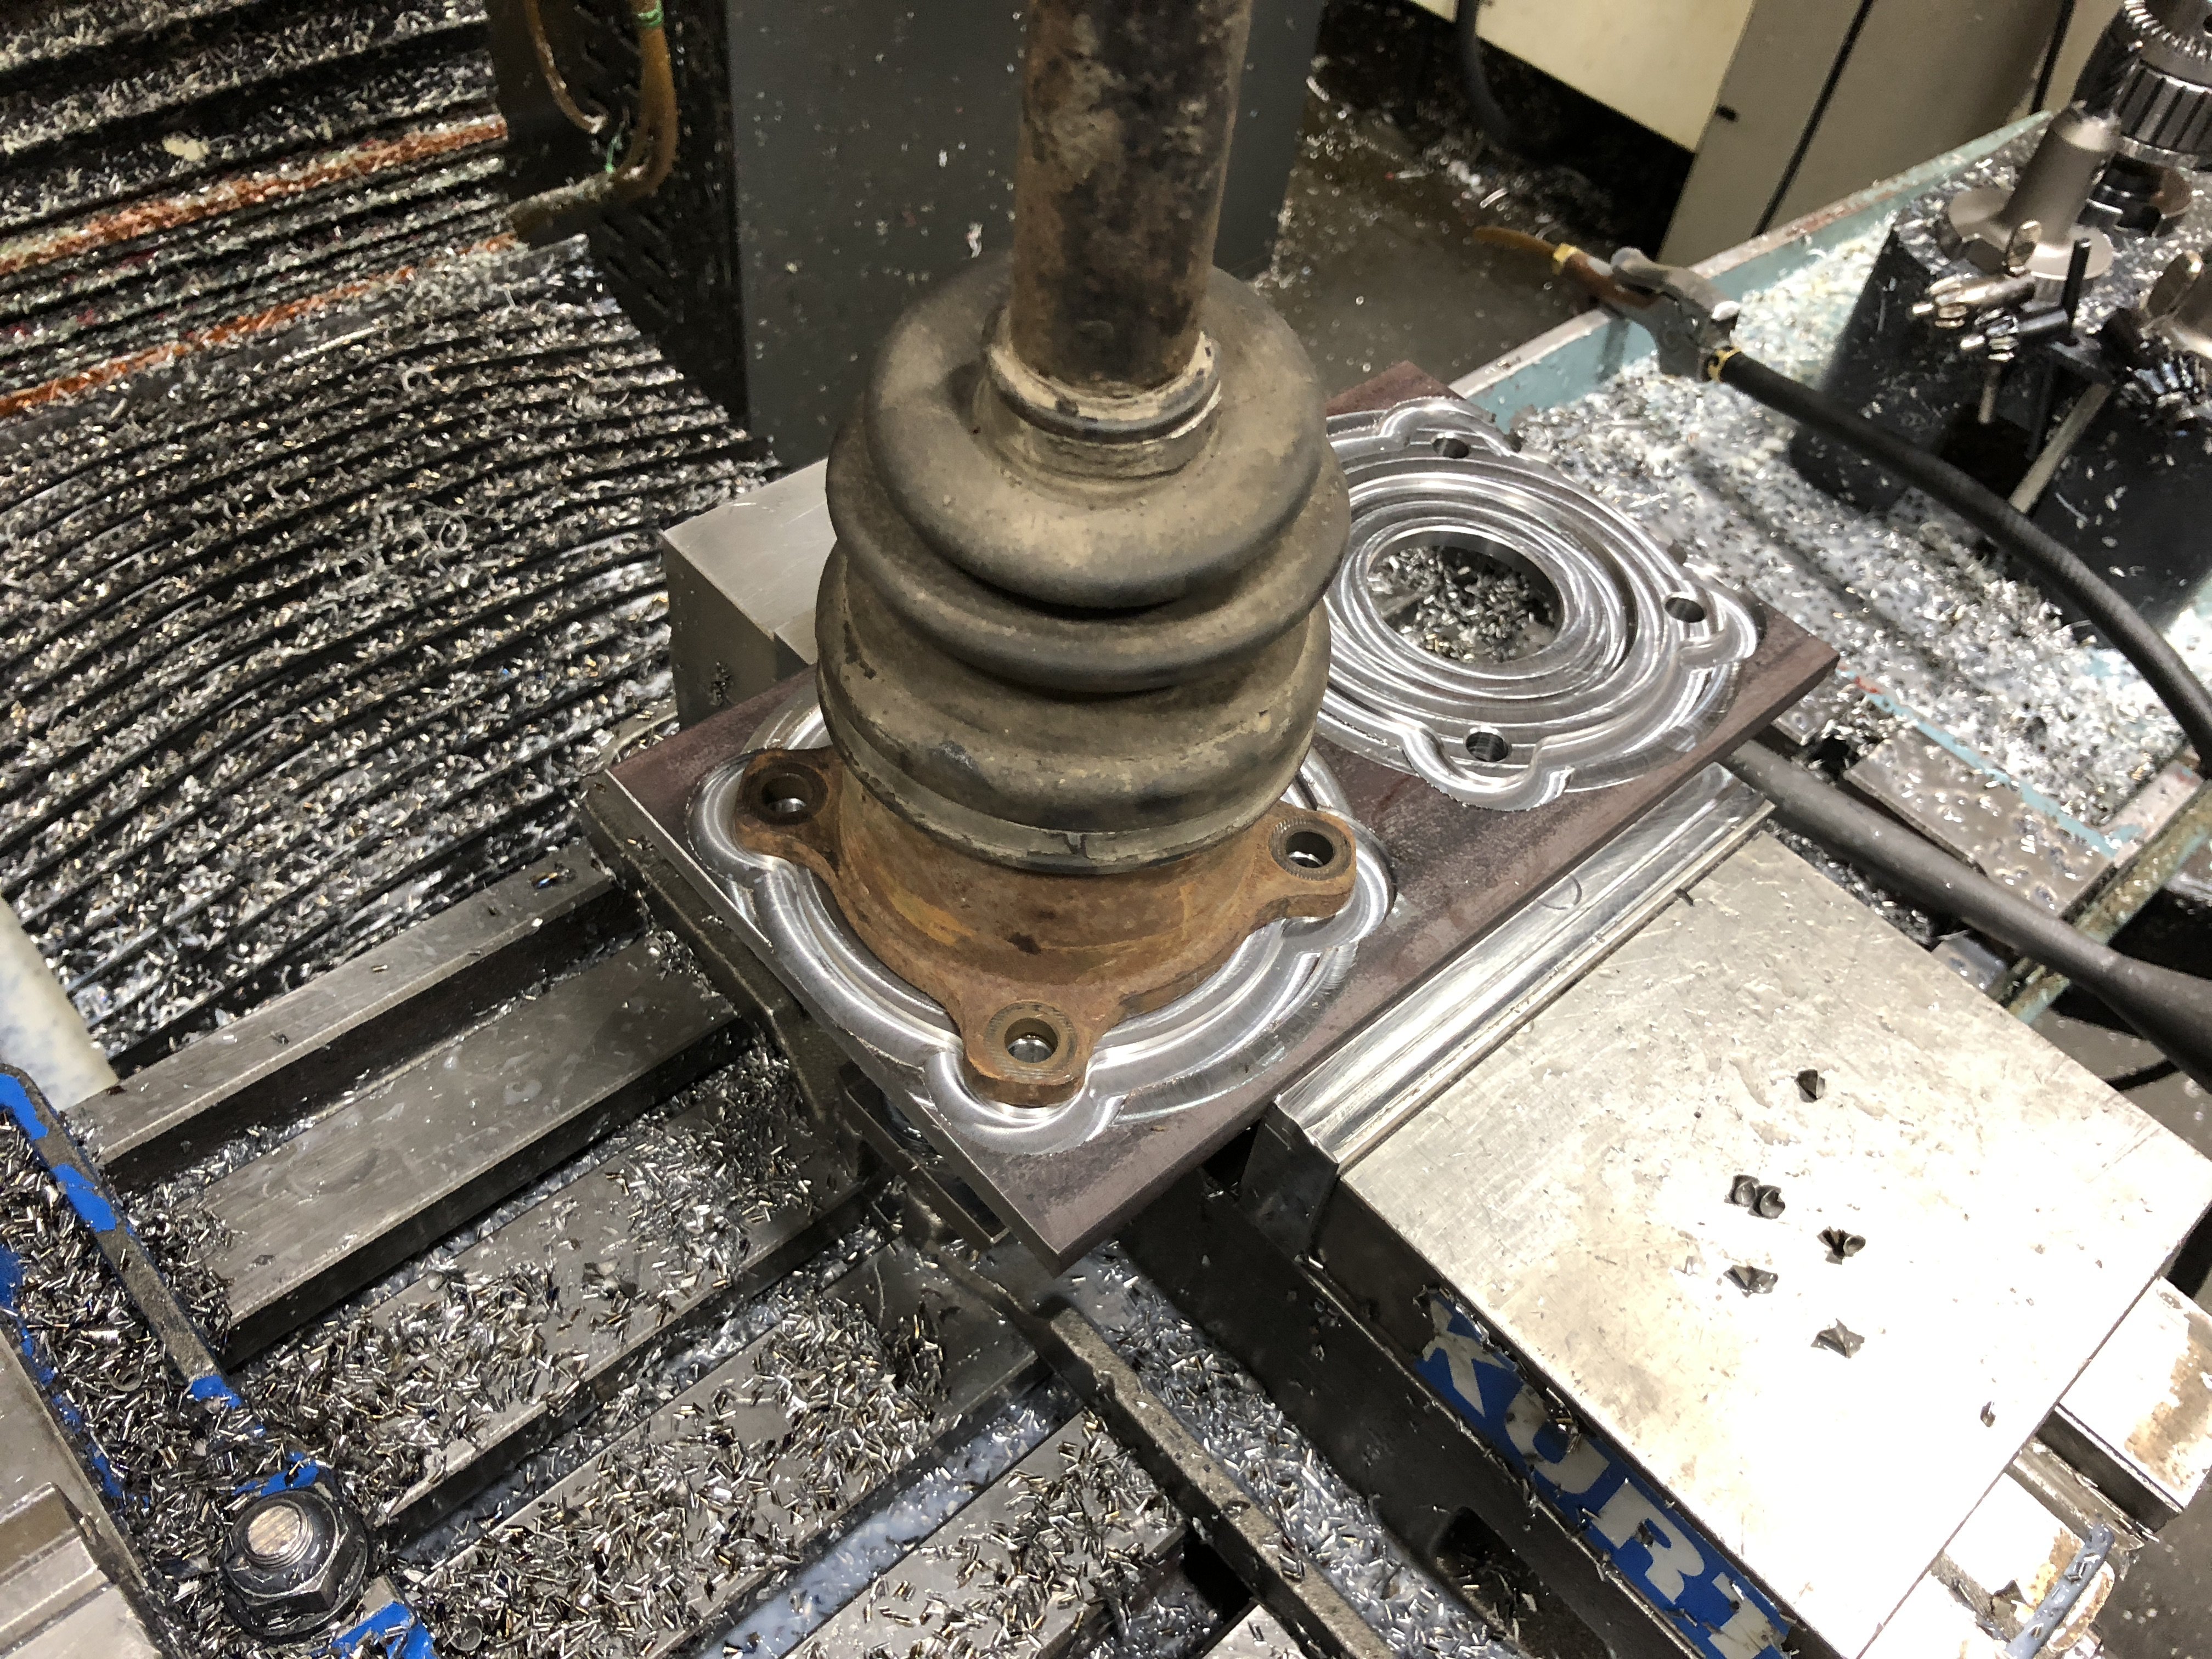
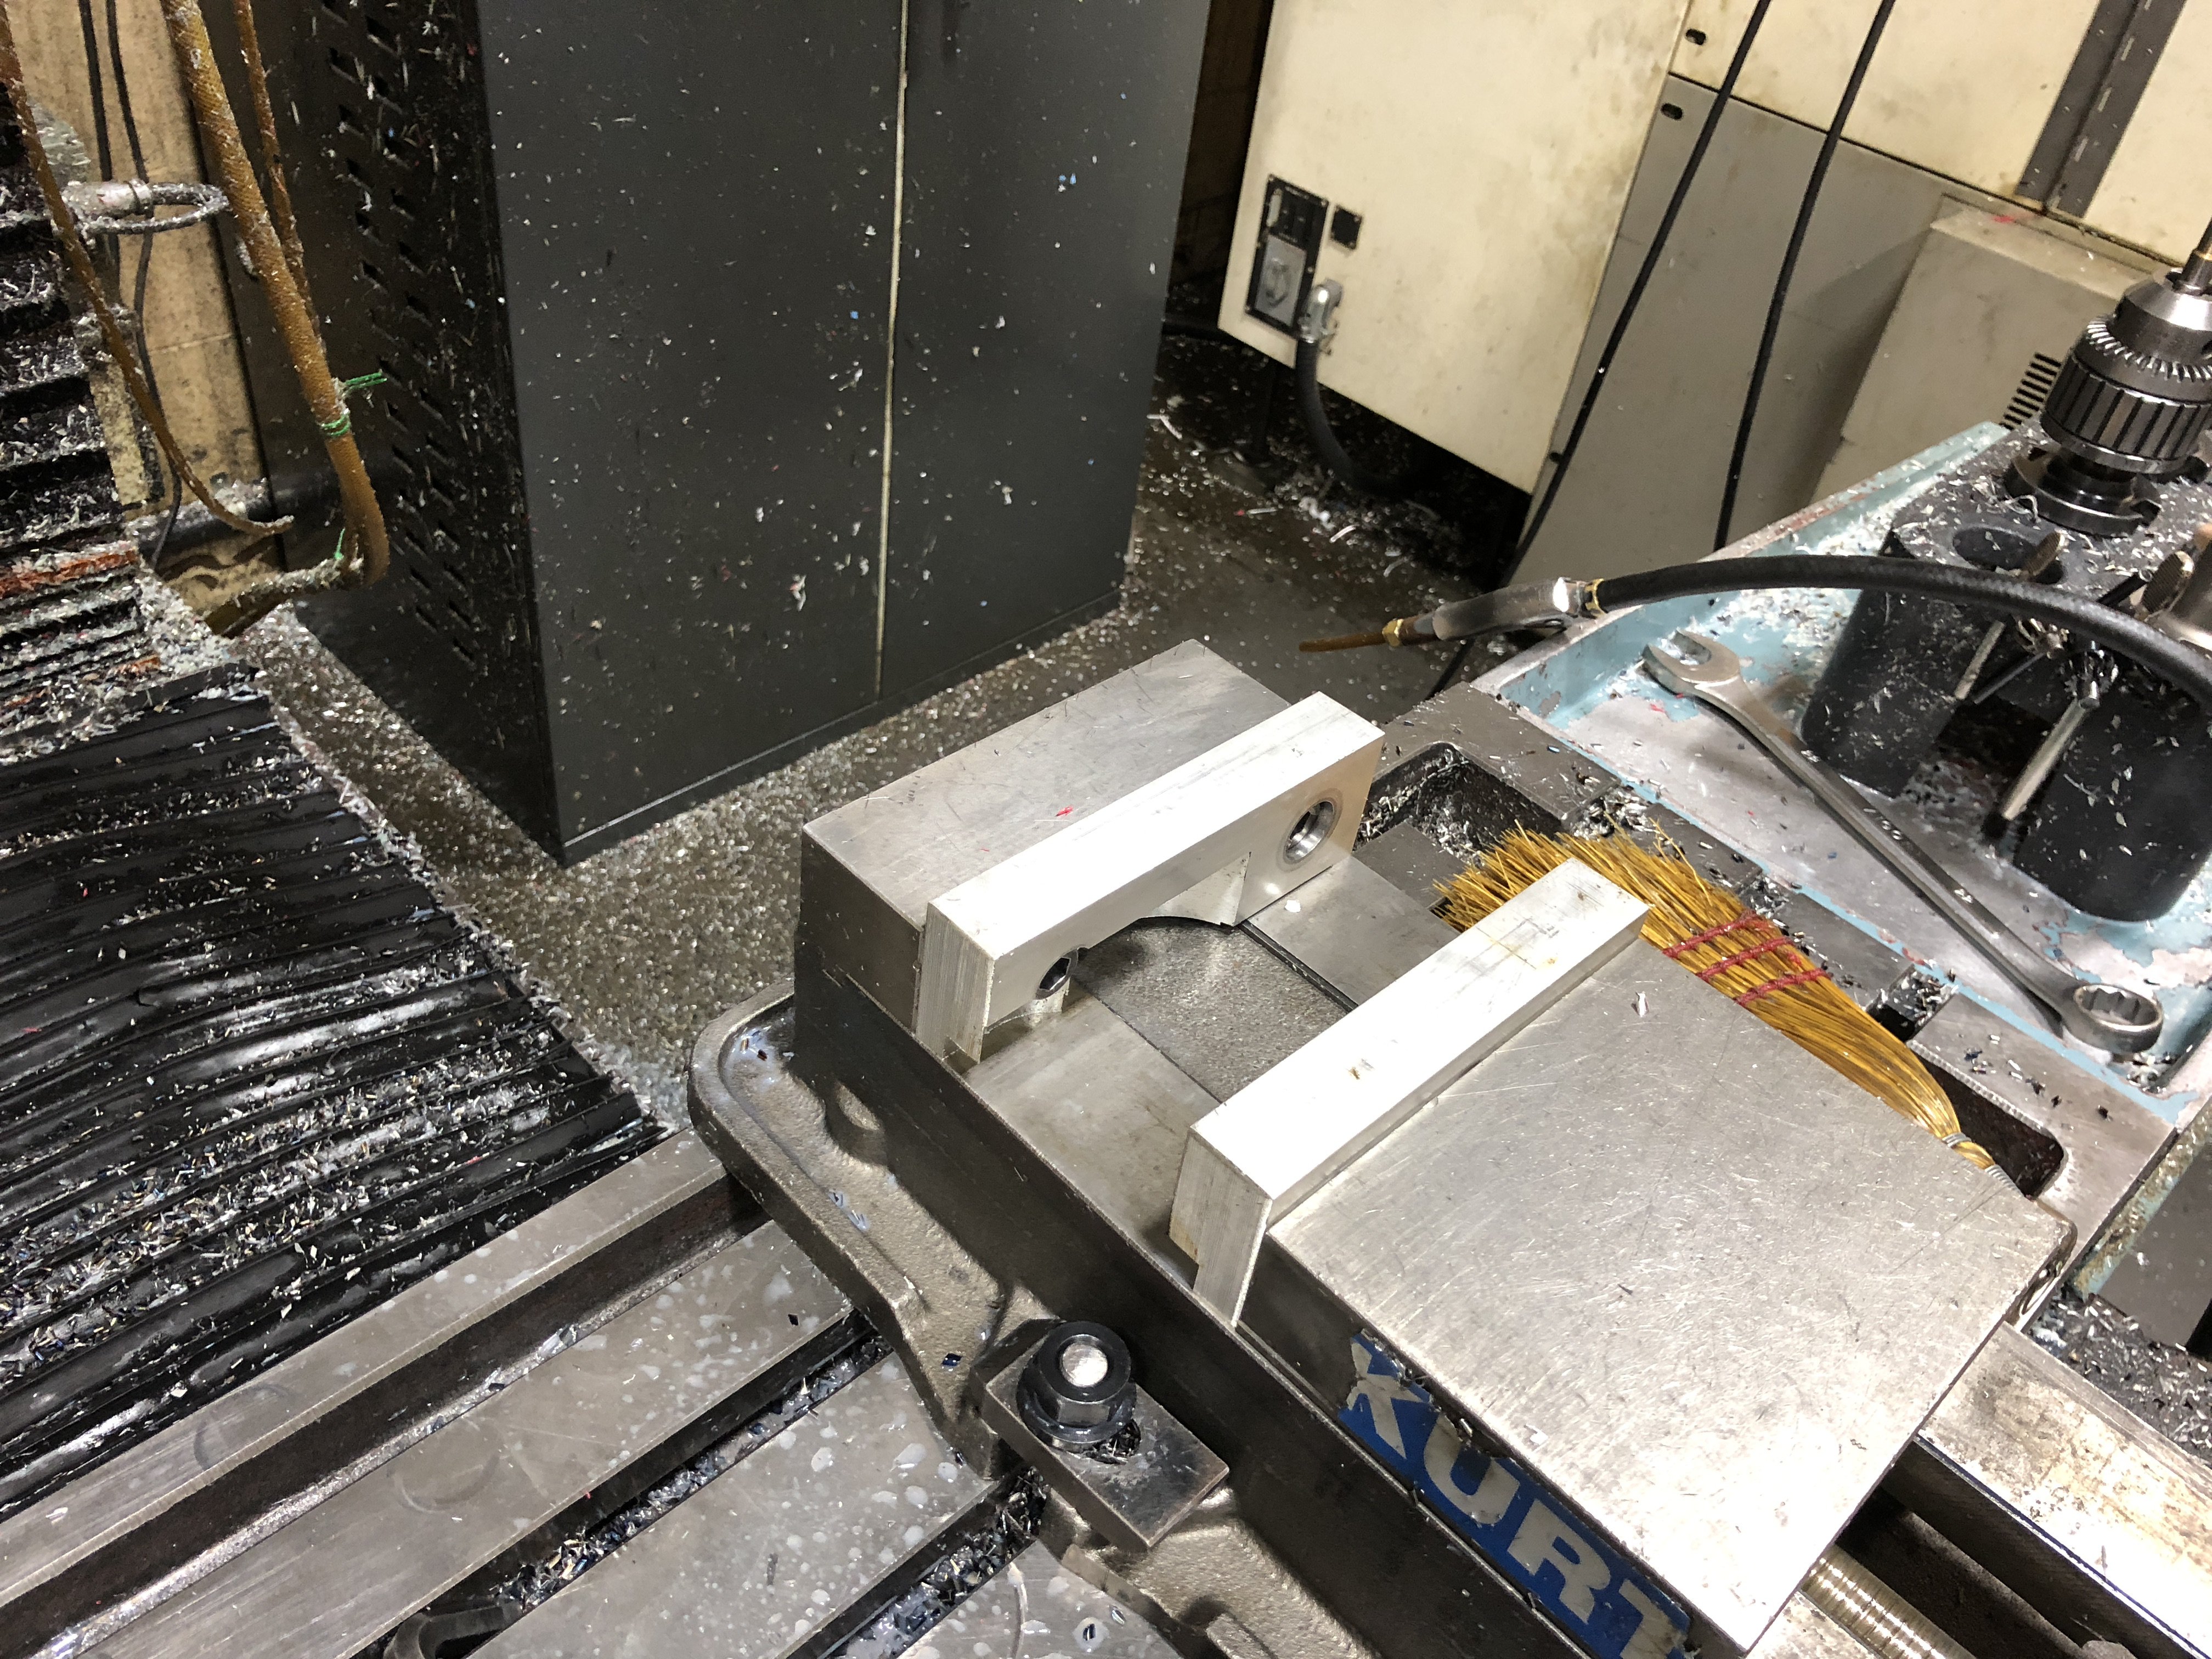
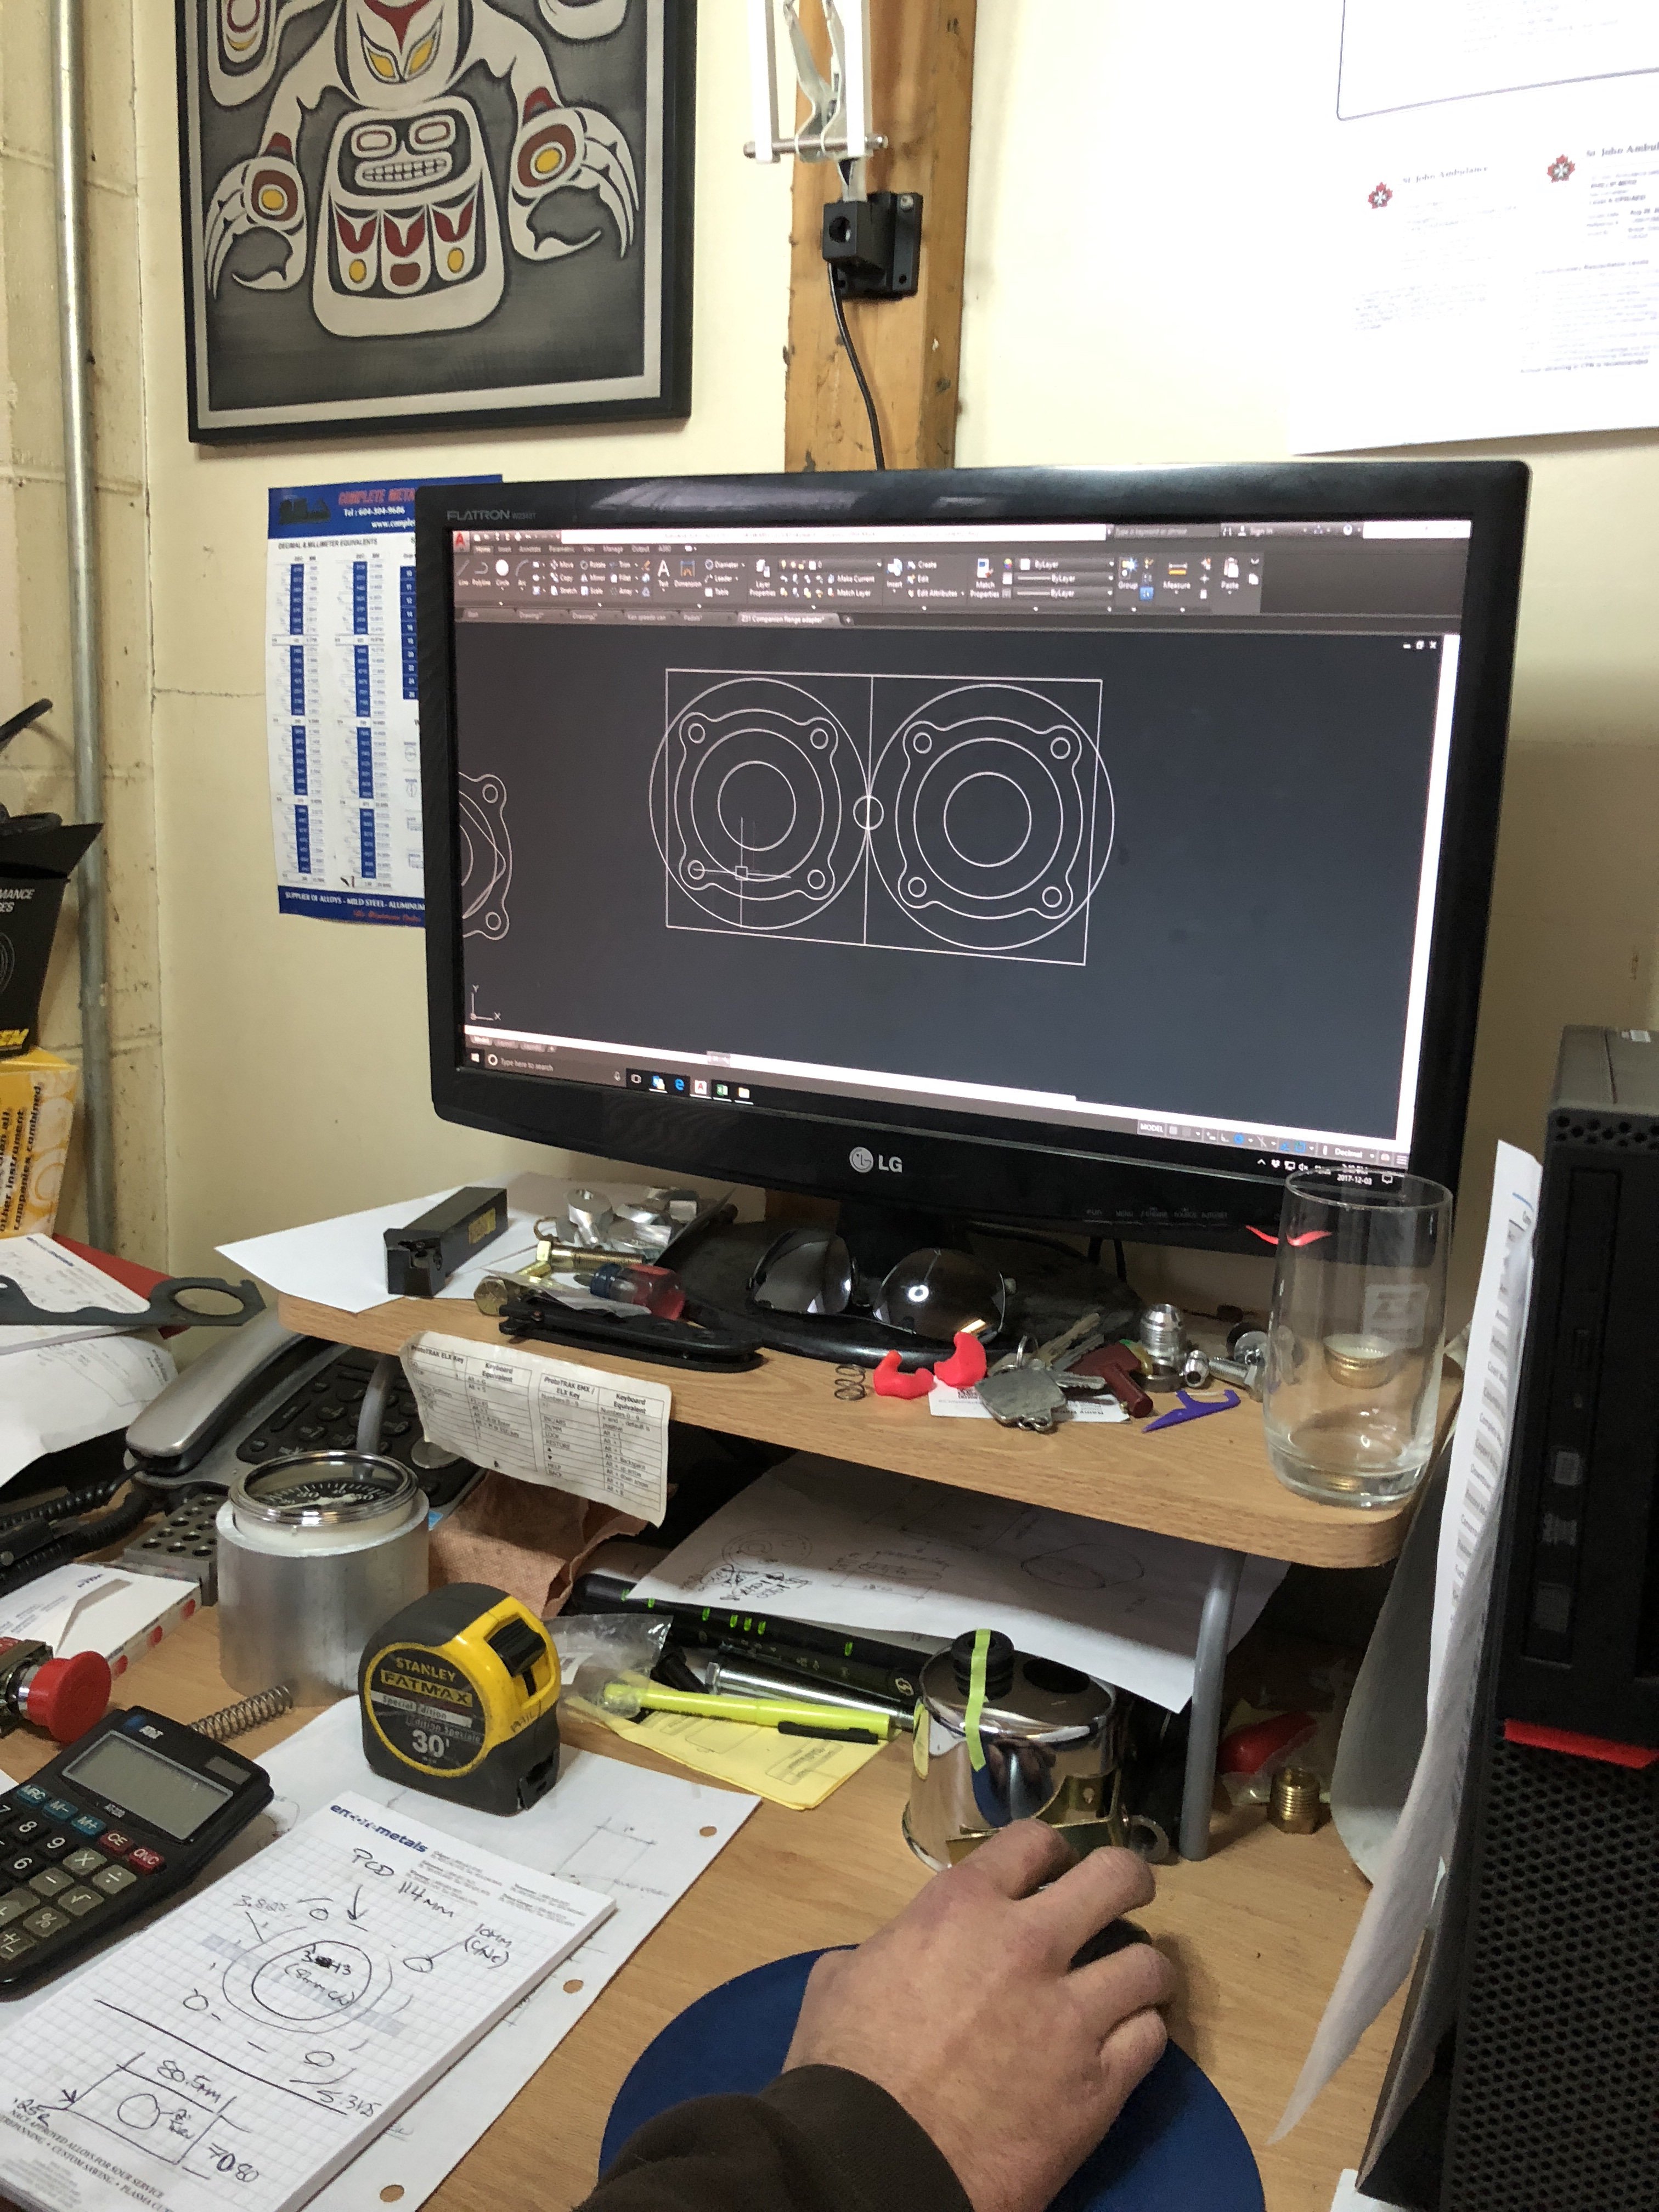
Hi guys, Just thought I'd finally post some of my findings here since this is ultimately the place where I learned everything there is to know about technical aspects of the Z-car. So i present, the making of a z31 adapter. I realize this has definitely been done before and I'm not claiming to be the originator, but I never saw any measurements, or calculations and started from scratch instead. The following may not flow very well as most of it is from the instruction guide I made, but I tried to quickly edit as best I could. Background So there’s been a lot of information going back and forth about whether Z31 turbo axles will fit in the S30 chassis. Companion flanges, cage flipping, and then even custom shorter axles to be swapped in…which work, which don’t? Do the axles bind? etc. I’m trying to dispel at least some of the rumors/hearsay. Here is what I’ve found on my early 260z (I haven’t measured on 240z, or 280z, but I have a suspicion that the pickup points and axle clearances are all the same). Stock Axles compared to Z31T I took a measurement of the length of the stock axles while on the car at ride height. I then compared that side by side to stock Z31T axles. It was quickly apparent that it was going to be very close. The driverside looked to have some room, but the passenger side was as long as the axle if not just slightly longer. Driverside: Passenger side (centering lip is very close...hard to tell from pic). The Adapter Requirements Once I saw these measurements, I knew that if Z31T axles were to work, the companion adapter needed to be as far out as possible. Hence we aimed to make the adapter so that it is flush with the stock outboard flange. Here's how it turned out: Test Fitting With the adapters welded up, we then threw them on the car to check fitment. The axles are actually at their tightest point in full droop. Many have stated that when the axles get parallel/straight, they are longest and can bind, thus changing spring rate, wearing diff bearings, etc. They absolutely are not tightest there. I took the springs out, fitted everything up and during testing binding occurred in the lowest 1-2” of travel. Moving the hub upwards resulted in more clearance. I believe this is due to 1 of 2 reasons The axle and control arm are not parallel. I think closer to full droop, the control arm is pulling the hub closer to the diff at a faster rate than axle is. (in picture, all lines are the same and the distance between the 2 line end points (simulating lower arm and axle) is kept the same. The dotted line is aprox where the strut might be. So at full droop, the strut pulls in faster and leaves more of the axle out to bind against the strut) When the axle is parallel, the cage ends are also square, but as they get more angular, the axle may actually get slightly longer. It’s the same reason when the box below couldn’t be removed between 2 fixed walls without it becoming longer first. Comparing the fit on both sides, we find the passenger side is the tighter fitting axle. With the OEMZ31T axles, technically the driverside would be ok without flipping the cage, but you may as well flip the cage since you’re having to do the passenger side anyways. The passenger side OEM axle binds up during the lower 2” of droop. It binds so much so that you can’t even get the axle in when the car is jacked up. Flipping the cage gave enough clearance to both get the axle in and have a little give. Once closer to ride height, the clearance increases further and even at full compression there is lots of clearance. ROCK AUTO axles: These axles use the tripod design of the 280zx Turbo axle I believe (or maybe NA 300zx as well, don’t quote me on this. All I know is its not the same design as the OEM Turbo Z31 axles. Because it’s a different design, there are actually no cages to flip, so nothing can be done to these axles to make them shorter. Thankfully they fit as is and are just that little bit shorter than the OEM axles. So, Don’t bother popping the grease cap, as you’ll just find nothing to flip. Cage Flipping Details The cage flipping saves about 3.5mm of clearance (a little over 1/8”) no more.See the space between the cage and the axle end. This is the total amount of clearance we gain. After the cage is flipped, the axle end becomes the longest point. 1) Put your axle in a vise. 2) Grab the cv end and raise and lower effectively hammering the cage into the grease cap. You don’t pry the cap out with tools, but rather use the internals of the axle to pop it out. Use care here, as the first one I did shot the cap off spraying grease all over my friend. Haha. 3) Slide the outer cv cage down as far as you can. Mine inverted the seal a bit and stayed down there. You want to have access to the cage and balls. 4) I taped up the CV to ensure that while I was wrestling to remove it, the balls wouldn’t go flying into the dirt and grime on my floor. In hindsight however, the balls are a fairly tight fit and won't come out without a little persuasion. I found that out when I ended up rebuilding the whole axle as I didn't like the consistency of the grease and realized I shouldn't have mixed so much redline synthetic grease with the stock stuff. Probably for the best. 5) Take off the C-clip 6) Slide the entire cage off the axle. It may be a little stuck, so do what you can to pop it off (small plastic mallet, etc). 7) Turn the cage assembly around, and reinstall…should look like picture on the right. (I also ground the axle down, but this is not needed and you risk ruining the hardened temper if you don’t do it slow). 😎 You may at this point repack the unit with grease (compatible) as best you can. I ended up grinding the end of the axle a little as I wasn't sure how much room I would need. Not necessary however and perhaps can risk ruining the surface hardening of the splines if you're not careful. Rockauto axles are a lot thinner too: Grinding Stub Axle For the low profile adapter to provide all the clearance we need, you actually need to grind the stock stub axle down a little. See the nub sticking out from the flange? It would dig into our grease cap if we didn’t grind it off, so grind it down till it’s flush with the flange (use a straightedge to check for high points). There should be plenty of the staked portion of the nut still to keep that nut tight. Flange Welding and Preparation We ran into an issue after welding up our first set of adapters; the square flange on the Datsun hub is actually not very concentric. That is, the square doesn’t run true to the center of the axle assembly. Therefore if you just slip the adapter onto the square flange as best you can and go from there you may end up with it rotating on a ‘wobble’. I think we had something like 0.040" of runout by centering the adapter on the square portion of the flange. So it takes a little time and thought to make the flange concentric with the rotational axis. A dial gauge is ideal, but you could get it pretty close if you're good with some calipers: The stock centering hole can be pretty rough so it's tough to get it dead nuts. Plus when you tack it can pull the flange to one side. I recommend to shim it with paper or even shim stock if you have it, prior to tacking. Also, if you tack with the 309, it has enough give that you can give it a few whacks with the hammer to shift it a few thou one way or another. We ended up making a few more sets and didn't like all the fiddling, so we made a cool jig that locates the flange on both the stock axle ring and the new flange ring. Plus it bolts down to keep it flat to avoid warping. I could probably rent this thing out to anyone doing the job provided the leave a deposit and pay for shipping and such: Welding The machinist friend who made these with me said if we are going to sell any of these things, people gotta Tig weld them. Whether or not that's essential, I don't know, but I'll take his advice. It at least assures the welder has some experience and will know how to handle welding to cast. (remember the stock companion flange is from a cast piece). He said to use 309 filler. After all is said and done, these axles can be used without worry. I'm not sure how deep the MM flanges are or any others for that matter, but I do know its a pretty tight fit even with grinding the stub and flipping the cage. Although more clearance is had when the car rests on it's weight, so success can vary. Here's a few more shots of when we made both the first set and a bigger batch. To machine the backside, we cut the profile into those blank set of aluminum jaws. Here's the test fit on the driverside with the cage flipped and the axle slightly ground down. You can see from the amount of clearance, I didn't need to grind the axle down: Here's additional shot of one customer who had old school guy MIG weld it. If you can mig like this, pre-heat and avoid cracks, keep the flange centered, and keep it flat (bolted down), then it would probably work too: Sorry this is such a jumble of info...hope some find it useful. Happy to answer any questions. Cheers, Mark
-
I make weld on adapters now that basically do not add any width to where the stock square companion flange sits. You even need to lightly grind the stub axle so it's flush with the companion flange. I ran both sides through their entire suspension travel. Contrary to popular belief, the axle is tightest and most likely to bind at full droop. Even with my adapters, both sides need the CV cages flipped to be safe. The adapters also work with the Rock auto reman z31 turbo axles, though they are not nearly as strong as the OE nissan ones. They in turn use the 280zx tripod style CV and there is no cage to be flipped. Luckily they are ever so slightly shorter and still work with the adapters. I'll try and get a for sale post or thread up one of these days. Can find me on DPAN. Mark
-
i have an extra bushing kit (poly).
-
Just picked up the impossible to find 11110-20P00 rear sump pan
mtnickel replied to pat1's topic in Nissan RB Forum
Since this time, Pat1 actually started making the pans for the conversion. Send him a message. not sure if he's still doing it, but check. Mark -
if you're willing to do a custom split pulse manifold and a high quality fast spooling turbo, you could do 400whp without much lag. Something like an efr7163 borg warner. Costs $$$ though.
-
Best to start a new thread for this as not to clutter up his build thread
-
5/8th bolt option for spindle pin replacement
mtnickel replied to hwvigo's topic in Brakes, Wheels, Suspension and Chassis
I ran mine for a few street seasons. No problems. I ran a nylon lock nut, and added a regular jam nut just to be safe. No problems. -
ya, without a functioning intercooler, you really shouldn't be running over 5-6psi like they came stock. even then, I'm not sure i'd be comfortable on a track day. Also, do you have alternator problems? was showing just barely 12v when shouldn't it be 13.5-14?
-
I know he broke his arm very recently and hasn't been able to do much work at all...perhaps a little preoccupied with some shows for his car too. I gather with the Arm broken, things have really backed up. But whether that's a justifiable reason or not is up for debate. They're one off parts and can't really be had elsewhere. Sort of like commissioning a shop to do some custom work, timelines can get pushed back. It's not something he has sitting on the shelf ready to ship. That said, lack of communication is a big no-no. I'd hope he would at least respond with updated timelines or some status on your order within a couple business days at most. He's not the type to "rip you off" though, just not super prompt with timing. Good luck, and if I see him around the local meets, I'll let him know.
-
I can see paying that amount for a COMPLETELY rust free Z. The amount of time and annoyance of rust repairs really adds up. Especially if you have to pay a professional to fix it. Plus cars that are in that condition body wise are usually pretty good for the rest of the car...often complete, unmolested, etc. Seems like a steal if it's as good as it looks in the pics. Take an awl (pointy screw driver) and probe for rust from underneath. Check seams where floor pans meet firewall, rails, doglegs, and the infamous battery area.
-
i'm pretty well versed in nistune tuning. The stock rb25 maps go way retarded up in the 96 range as a safety measure incase someone experiences boost spikes or tries to run too much boost. The stock ECU is also known to have a huge dead spot from 44-4800 where they pull timing near peak torque. Questions: 1) are you running stock injectors? 2) are you running stock MAF? 3) do you know what your peak "load" value is (like somewhere between 80 and 90?) 4) what have you done for knock sensor? did you stub it out with a resistor? The RB25 knock sensor used on the z32 ecu is too sensitive and leads to false readings and pulls lots of timing. 5) did you adjust the K-constant at all during first running. Ideally what you do is drive while datalogging and get the long-term fuel trims to be close to 0. 5b) are you using the Feature pack maps? if you send me your tune and any logs you have, i could have a look at any problems. email me for fastest response. it's my hybridz username @gmail.com
-
R200; What is the minimum backlash possible between Ring & Pinion
mtnickel replied to Rick Johnson's topic in Drivetrain
In actuality, the likelihood of a real and relevant response on this is not too bad on this forum. Lots of long standing and active members here. -
Silver 1977 Datsun 280Z Project
mtnickel replied to MRGierut's topic in S30 Series - 240z, 260z, 280z
Looks like you're making great progress! it's no small job removing the dash. Keep up the good work. -
R200; What is the minimum backlash possible between Ring & Pinion
mtnickel replied to Rick Johnson's topic in Drivetrain
Nice 7 year bump. Hopefully member still frequents. haha -
After having a brake line blow out near the back and 1 fuel line start leaking near the isolator when I was fiddling around, I'd say replace all the hardliners going back. Unless of course the car was in a really dry environment and doesn't have any other rust/corrosion, then they may be fine.
-
Ya. As per the videos again, the 2.5" they said was really really quiet. So a single 2.5" I can imagine would be really quiet (depending the design).
-
Good watch on exhaust size : power relationship. https://youtu.be/_PVXvHkr-Vs Makes me really rethink having just a SINGLE 2.25" axle back on my 300 odd HP subaru. But I too like it quiet. May have to look at trying the Dynomax VT as one member above mentioned. They are surely quiet, but can be a little "unnatural" sounding as the spring flapper opens and closes. Also a good watch on Cast vs short vs long tube headers: https://youtu.be/Y7_lSU3D0jw and while we're on the subject, this one on dented headers blew my mind. Don't be scared to take a mallet to anything https://youtu.be/azPKIjxmmdU
-
not sure about the RB20 trans, but the RB25 requires a Navara/D21/Nissan hardbody truck sender. Depending your ratio, you can swap the RB20 skyline gear onto it with a little fab work. Details are on this site. Good luck with the build! I love my RB-Z and will never let it go