JMortensen
-
Posts
13742 -
Joined
-
Last visited
-
Days Won
68
Content Type
Profiles
Forums
Blogs
Events
Gallery
Downloads
Store
Everything posted by JMortensen
-
I don't want to crap on anyone's products, but my take on this is that if you're going to redo the mounts and possibly fit a different differential, you might as well scrap the whole rear end and start over. Doing so gives the chance to rectify a bunch of stuff: 1. Center the wheel in the wheel well 2. SLA instead of struts 3. Big brakes 4. Get rid of the original Nissan rear suspension mounts and mustache bar 5. Use real uprights for a strong spindle mount, not referring to the OEM "uprights" hanging down in the back. I haven't yet seen anyone design a bolt in rear suspension that does all of these things the way that I would want them. TTT uses stock style rear control arms and struts. AZC makes aluminum versions of the stock stuff that has all the same problems as the stock stuff, and is more likely to break as we saw when CobraMatt broke his years back. Apex went with a weird combo of Z32 brakes IIRC and I don't remember what stubs and the front diff mount didn't look great IIRC. If'n I were doing this, I'd have a frame that bolted into the chassis where the front diff xmember, mustache bar, and uprights bolted in. It would be a full cradle that fit an 8.8 and would use a commonly available outer stub with a common size bolt pattern, either 5x5 or 5x4.5. Would be SLA, and would use 930 or 935 CVs. Would fit commonly available rotors, probably 12.2 x .81 and would fit GOOD brake calipers, probably radial mount. I wanted to do this when I had the diff biz, but ran out of money and had to shut it down.
-
Interesting, thanks for the link! Don't think I'd bother with my autoxer but I could see that having benefits for the drag guys.
-
I've been out of the diff biz for a while. What is the difference between the 8.8 and the Super 8.8? All I could see was a cast iron housing with different mounting points. Same gears, etc?
-
[good natured ribbing]Yeah, first got got in over his head, second was trying to keep up. BTW I'd post a video of a 280ZX spinning, but I can't find one. Hey! You're one of the 3 people racing a ZX! Do you have a video of a spin I could post? Sorry, had to. [/good natured ribbing] Seriously though, the Z rear suspension doesn't do anything weird as it goes through it's motion. Linear camber, no toe change. I've spun my Z a bunch of times. Not the fault of the suspension kinematics. ZX toes in on bump and out on droop and has lots of toe change and adding torque compresses the suspension as Cary said. I know I've said it before but when I was in auto shop in 10th grade the teacher was explaining STA and he actually took us out in the parking lot, got into an automatic ZX, stood on the brake and put it in reverse, gave it some gas, then put it in D, gave it gas, and the back end was hopping up and down like it had hydraulics and you could see the toe change. Lots of fast race cars with STA. Miata might have overtaken the 911 as "the most wins in racing history" by now just by virtue of sheer numbers, but 911 can't be denied as a successful platform by anyone with 2 brain cells to rub together. "Any suspension will work if you don't let it" is my takeaway.
-
What about S30 suspension makes you think it causes snap oversteer? Is it the linear camber curve, or the lack of dynamic toe change? Compare to STA with its toe out on droop, and you can see why STA has that reputation, especially with older 911s with the weight hanging off the back end...
-
There is a curve to the hatch in both directions. Good on you for fixing that thing. Pantera hatch is aerodynamically bad and would really hurt flow to the wing. Only thing they could have done worse would be a roof spoiler.
-
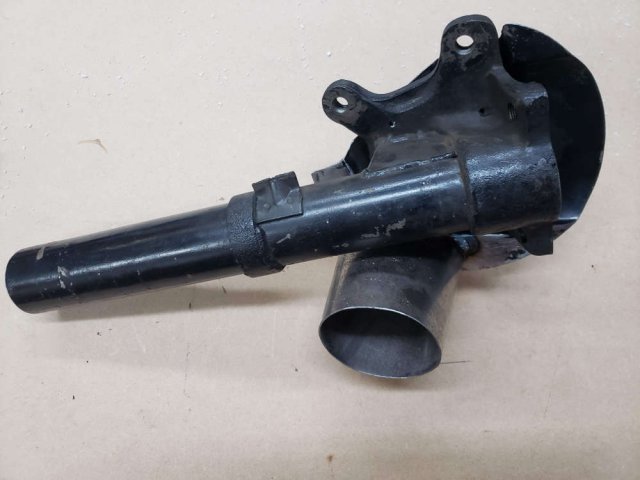
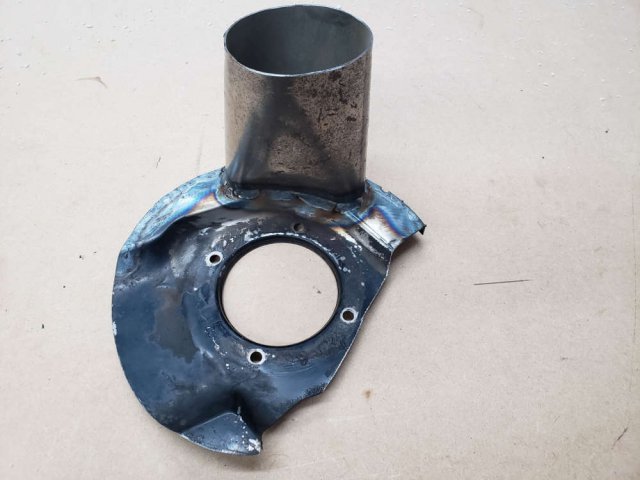
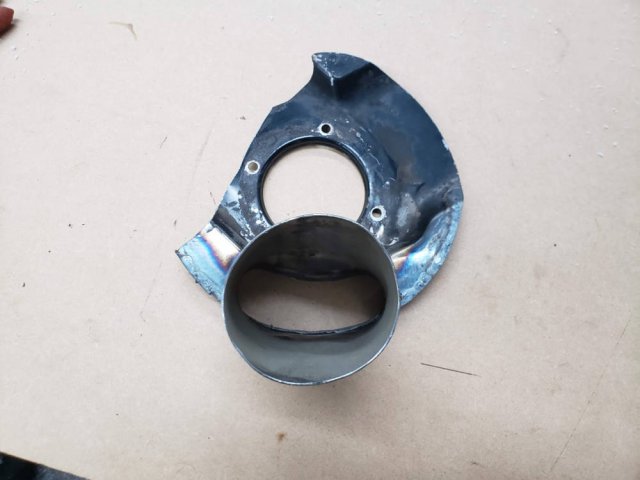
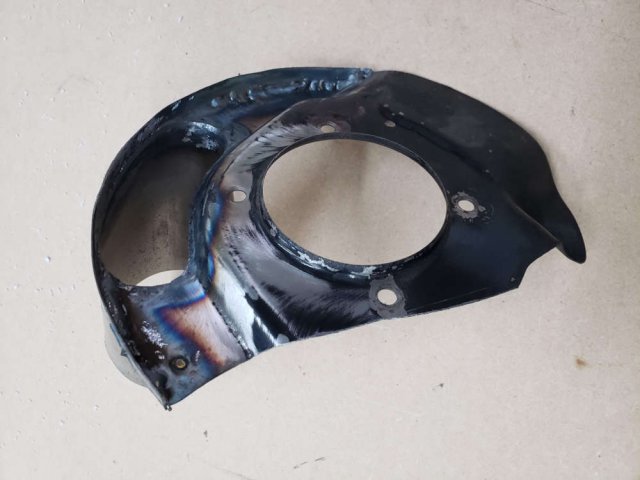
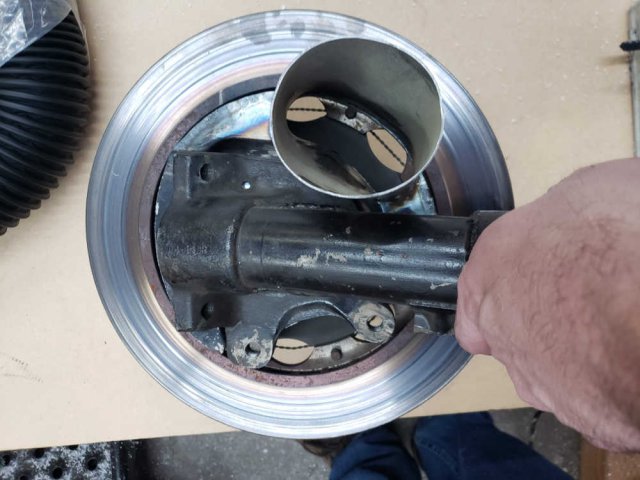
The plan was to do some track days this year, so I needed some brake ducts and an oil cooler. I sold/bartered a set of series 1 scooped backing plates I had for a set of normal ones. No need to cut up the rare stuff. Took the new backing plates, cut them to 8" diameter, took a 3" exhaust collector and modded it to fit the cut down backing plate. Welded, drilled holes in the duct hole and then used cut off wheel and die grinder to open the hole in the backing plate up. Also took a section of the rim of the stock backing plate and welded it on for stiffness and to close the gap between the backing plate and the rotor vents. Doesn't look all that wonderful but I think it's going to work well. 1 down, 1 to go, then can modify my front end for the scoops and hook up the tubing.

-
Just don't get super anal about your compression ratio with the old valves. My valves had been cut and the seats had sank into the head a bit. I gained a lot of compression by installing the new intake seats and those valves without the dish that I mentioned. I can't recall the numbers anymore, but the volume shrank quite a bit.
-
BTW I got nearly all of this from the book "How to Modify Your Nissan/Datsun OHC Engine": https://www.amazon.com/Modify-Your-Nissan-Datsun-Engine-ebook/dp/B0092WMDCK/ref=sr_1_1?dchild=1&keywords=how+to+modify+your+nissan+datsun+ohc+engine&qid=1586372446&sr=8-1
-
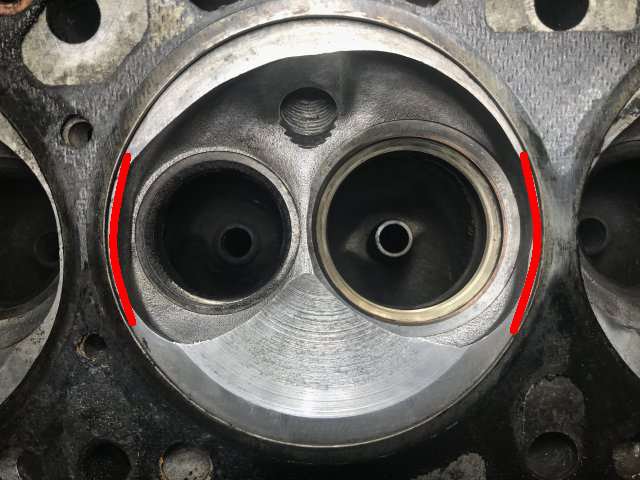
I would do all your chamber work before you have the valves installed. If memory serves the exhaust is the same size and the intake is a bit larger. What you don't want to do is nick the seat, so you should leave the old exhaust valve in while you're working. I already had larger valves in my head, so I left both in. If you're replacing both seats then I think you're safe to leave them out. They do get in the way. What I did was to take a head gasket, set it on the dowels in the head, then shifted it left and scratched the head on the right side of the chamber with a pick to show the fire ring line, then shifted right and marked the left. You don't want to remove metal under the fire ring on the gasket, so I probably stayed .010 or so away from the line. I did the same on the block. Notched the block to a little above the piston ring mark in the cylinder, then removed the metal in the head and block out to the line. This should improve airflow on the cylinder side of the valve. Also smoothed the rings around the valves, mine had some fairly rough areas in the triangle areas between the valves. It's been 20 years, but I don't recall having to pick an area of the chamber to remove metal from to even out the volumes. I think all of it came from the areas described above. If you took a measurement of the cc's before you unshrouded the valves, then you could figure out which cylinders to be more aggressive with. Seems to me I had more quench than you appear to. Is than an L24 gasket? If the cylinder ring were bigger the quench pad would look bigger. I made an exaggerated drawing of what I tried to accomplish on mine. I did all the spots you marked in green, but most of the effort on mine was put in where I marked in red.
-

Front strut replacement questions
JMortensen replied to Tarheelz's topic in Brakes, Wheels, Suspension and Chassis
Might want to read this before you install them: -
I cut the head just enough to make it flat, and replaced the valves with ones that didn't have any dish in the head. Stock gasket. It was just under 11, like 10.95:1 as I recall. I also ground out the extra spark plug threads, smoothed the chambers and cc's them, rounded the valve edge. It was pretty well optimized to not ping. The E31 has a better quench design than the E88 or N42, but not as good as the P heads. 2mm headgasket eliminates any benefit that you get from the better quench on the E31.
-
No change on cam recommendations. Again, that .490/280 cam worked really really well with SUs at 8.3:1 compression. It dwarfs all of those stock cams. If you look you'll probably see that I have hundreds of posts telling people to go bigger on the cam, no exaggeration. I am very biased, but it's because of my own experience. I've related this all before, but we're in quarantine, so what the hell... I built my L28 dished E31 combo and ran it, then added a small cam that my friend (a Nissan master tech and autocrosser) recommended. It was a high lift short duration cam, would make any of those stock cams look small. Aside from slightly changing the way it sounded at idle there was no noticeable change. Later I read online somewhere, probably on the old zhome.com mailing list, that people tended to use cams that are way too small. My friend had that .490/280 cam that he had accidentally ordered, and it was just sitting in his shop. He was afraid to install it. I bought it and he warned me how I was going to hate it, lose a bunch of bottom end, etc. but I went ahead and installed it anyway. It was probably worth 30 or 40hp, and there was no loss of bottom end at all, everywhere in the rpm range was so much better. I brought it by and let him drive it, and he immediately bought a .610/320 or some huge cam for his L18 with 44s in his race car. LOL. When I switched to the triples it was again probably 40 hp gain over the SUs, my wife was scared to drive it at first, but I really felt it could use more cam at that point. Then of course when I built the flat top bottom end it desperately needed more, but as I said, I gave up on it. 10:1 is pretty high compression for the crappy combustion chamber designs on the L heads. That's about what you get with an N42 and flat tops, and if you look, you'll see plenty of threads about pinging at that compression ratio with that combo. You can solve this with the cam, but it has to be big enough to compensate. That .540/310 cam would work great with triples and there are a lot of people running something around that size, so you don't have to take my speculation about it as your only guide. I don't know about SUs haven't tried them in a high compression build, but I suspect the same would be true. I think Greg Ira (gira) is selling a cam in about that same size range that was an old Don Potter grind. He would have more info on what to do with SUs if you're going that way, as he races EP and they are mandated. He is a member here, but I'm not sure how often he checks in anymore. You can also find him on FB.
-
Any stock cam is simply too small for a high compression NA build. WAY too small. WAAAAAAAAAY too small. Most people find the Schneider cams online. Their Stage 4 would be my minimum for a build with SUs, that's .490/290. I had a similar .490/280 regrind on my car with stock compression and SUs. Worked GREAT, but wasn't quite enough cam when I switched to 44s. Then I screwed up the crank (balancer came loose, broke the keyway, rounded the end of the crank) so I built a higher compression bottom end. Ended up 11:1 with E31. Pinged like a mofo, had to severely retard timing to prevent that and was way down on power. Was looking to upgrade the cam again, and then I gave up and went LS. There are a couple on the market from ISKY and Erson I believe that run about .540 lift and 310 duration, that would be the one to use for a hot street motor with triples based on my experience. In order to run a big enough cam to make it worth the effort to install it you will need springs and retainers and shorter valve stem seals. Despite not liking their cams, the Schneider springs and retainers work great, and you can use off the shelf Ford 2.9L valve stem seals and that will allow for ~.600 lift without any problems IIRC.
-
FWIW I had a weird combo of a 3/4" master and a hydraulic throwout and dual disk button clutch. There were no instructions on what size master worked and it wouldn't have been for a Datsun clutch pedal assembly anyway, but there were warnings on not overextending the pressure plate springs. I modded the pedal stop to allow it to engage much farther out, then moved it one turn at a time until the clutch just disengaged and then I think went another 1/2 turn past that. You could do something similar if you're worried about it.
-
Let's talk brake system design
JMortensen replied to 280Z-LS3's topic in Brakes, Wheels, Suspension and Chassis
If he's going dual master cylinder the weight transfer issue can be adjusted out with a bias adjuster, or at worst a master cylinder swap. -
Let's talk brake system design
JMortensen replied to 280Z-LS3's topic in Brakes, Wheels, Suspension and Chassis
Agree with Ironhead. If you're trying to figure out master cylinder sizes and that sort of thing, both Tilton and Wilwood can help with that. In the meantime you're asking an extremely open ended question: "I don't know what suspension I'm going to use, but what brakes are going to work with it?" is an impossible question. There are several spreadsheets that you can find online which will allow you to plug in a pedal pressure, rotor diameter, pad size, number of pistons, etc and figure out the resultant brake bias, but last time I looked, about 10 years ago, they were all wrong. Every one of them that I looked at. As to the single vs two piece rotor thing, a two piece rotor is more likely to have issues with pad knockback, although I'm currently having issues with that on one piece rotors. Haven't figured it out yet, my guess is that it's a result of axle shaft movement in the rear in my case. I have anti-knockback springs, but need to disassemble all of the calipers to install them, which I'm not looking forward to. -
Viscous has one really long shaft, so they look like CLSD to me.
-
60376016625__8A5176C5-A907-4BD8-8007-E13645C2780D.JPEG
JMortensen commented on Jboogsthethug's gallery image in Members Albums
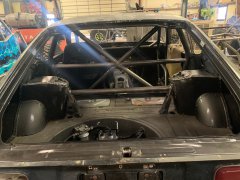 Did you sit in the car? I know that I couldn't fit in a Z with the shoulder bar straight as shown here, I'm 6' tall.
 -
Don't remember Ron's pic exactly, but that is definitely the same idea.
-
I believe Ron Tyler did this on his Z. There used to be pics here, but they're long gone I'm sure. What was done was to set the battery at frame level, cut the (rotten) battery tray and that part of the fenderwell out, then rebuild. The battery is already fairly well positioned in the car fore/aft and offsets some driver weight, but moving it down does have a little benefit. 10 ft reduction in stopping distance sounds optimistic to me, but I'm no engineer. In addition to moving weight in the car, reducing it also serves the same function. Fenderwells are gone in my car, and I have side pipes, so I had to put it into the cabin. I tried a 3 lb lithium battery, and was going to install behind the driver's seat but then realized that the cabling would add weight, so I stuck it on the trans tunnel. At 3 lb, wasn't so worried about the height of the weight, and it was still lower than the stock position. After I bricked 2 of them, went back to a PC680 and stuck that behind the pass seat and dealt with the extra 15 lbs of battery and cables.
-
set up wheels ( for track or general...)
JMortensen replied to nzarano's topic in Brakes, Wheels, Suspension and Chassis
The flip side of taking the wheels off is that you can get to the tie rods and whatever other adjustments you have a lot easier. When I have done string alignments getting at the adjusters is really difficult, and one time I tried putting the car up on a couple of piece of wood stacked up with greased floor tiles for slip plates. When I was making adjustments the car wanted to slide off of the plates. Only would have fallen 3", but still not a good feeling when you're laying on the shop floor with your head stuck under there. -
Cracked right in the corner as I recall.
-
I searched here and Google and couldn't find pics, but I have seen it several times. Just for fun I googled "240z cracked front differential crossmember" and that has been posted probably 10 or more times and didn't come up in the images either.
-
There have been multiple ITS cars over the years that have posted cracked uprights. Usually crack right up at the top.