NewZed
Members-
Posts
6700 -
Joined
-
Last visited
-
Days Won
72
Content Type
Profiles
Forums
Blogs
Events
Gallery
Downloads
Store
Everything posted by NewZed
-
There's a guy on the forum who helped develop an LSD that should work. Rockauto is a good place to get part numbers and parts. https://www.rockauto.com/en/catalog/nissan,1992,240sx,2.4l+l4,1209013,drivetrain,differential+pinion+bearing+/+race,2264 https://forums.hybridz.org/topic/127169-mfactory-r200-helical-lsd/#comments http://www.teammfactory.com/catalog/mfactory
-
Get the battery load tested. Sounds like it's dead, like unchangeable, won't hold a charge.
-
Aren't you guys getting a written receipt when you hand over your money? Most businesses have a simple written agreement that explains how they handle disputes and refunds. You can also dispute a charge on a credit card. I think that if you have a written agreement before you make the payment they will be much more likely to give a refund. If there's no agreement then you're stuck with the time limit on your card or Paypal. Credit cars bill monthly so anything with a six week lead time should not be paid for without a written agreement about timing and refunds. These guys are just taking advantage of people that don't know the ins and outs of buying expensive items. No offense intended. But this applies to more than just Whitehead. It sure does look like Whitehead has gone to the dark side though. And it seems to be working for them. They don't need a good reputation, just a flashy web site. People keep sending them money.
-
Measure the diameter of the shaft, go to the hardware store, and find a cap that fits and looks good. There are a variety, metal and plastic. https://www.superiorcomponents.com/fasteners/plastic-nut-caps#1 Or find a metal acorn nut and glue it on. https://en.wikipedia.org/wiki/Acorn_nut
-
If i were to hellcat swap a 280zx what rear end would i use?
NewZed replied to 79datsun280zx's topic in S130 Series - 280ZX
Same as any other powerful engine. -
1981 280zx wont start up like it use to (reliably)
NewZed replied to adsdsasdasdasda's topic in S130 Series - 280ZX
Break the ignition system down in to it individual parts and you might get better ideas. The "distributor" is more than just a device to move spark around to the plug wires. It creates a signal to trigger the ignition module. See "variable reluctor" That's what the magnet is for. If there's no signal, there will be no spark. If the ignition module gets the signal but does not make and break the coil circuit then there will be no spark. If the coil circuit is made and broken correctly by the ignition module and trigger system but there's a problem with the coil there will be no spark. As far as the alternator goes it doesn't really come in to play until the engine has started. If the engine cranks normally, at good speed, like it does in your videos, then the battery must have a good charge. The non-moving tach needle is a very important clue. You just have to use it. The tach needle moves when the coil discharges. If it doesn't move it's either broken or the coil is not discharging. In other words the tach needle is moved when spark happens. No needle movement means no spark. Just watch your videos and ask yourself what's going on. -
1981 280zx wont start up like it use to (reliably)
NewZed replied to adsdsasdasdasda's topic in S130 Series - 280ZX
I described all of that in my post. Good stuff in the link also. Common problem. Good luck. -
1981 280zx wont start up like it use to (reliably)
NewZed replied to adsdsasdasdasda's topic in S130 Series - 280ZX
In your videos the starter and battery sound fine. If you watch the tachometer needle it gives a pretty good clue that you're either losing power to the coil and distributor or the ignition module is going bad. The needle does not budge when the engine is not starting, it should be showing the engine's RPM while trying to start. You can test the first possibility, loss of power to the ignition system, by watching a meter attached to the positive lead of the coil with the key on and when you try to start. Voltage should be maintained above about 10 volts. If you don't have power there then focus on that. It would be worthwhile to clean the connections to the coil and ignition module and see if things improve. The old E12-80 and E12-92 modules are known to go bad eventually though. Wouldn't be a surprise if that was the problem, although they usually fail when they get hot. p.s. the magnet under the stator ring is known to break on those distributors also. That might cause a low trigger pulse to the module at starting RPM. That kind of fits your symptoms. It's not obvious, you have to remove the breaker plate and lift the stator ring to see it. Also, one reason the magnet breaks is because the shaft bushings on those distributors wear out allowing the 6 pointed reluctor wheel to contact the stator ring. Here is a good resource showing some of those things. The result of a worn out bushing is shown way down at the bottom. http://www.atlanticz.ca/zclub/techtips/distributorrebuild/index.html -
New owner, 74 260z -head gasket woes
NewZed replied to inis's topic in S30 Series - 240z, 260z, 280z
Good luck with wherever this is going. It's possible that the engine did spin, but if it did the chain tensioner has certainly popped out of its bore. You'll never get the head installed with the chain properly on the cam sprocket without pulling the front cover. Good luck. https://www.amazon.com/Rebuild-Your-Nissan-Datsun-Engine-ebook/dp/B006VUICHG -
New owner, 74 260z -head gasket woes
NewZed replied to inis's topic in S30 Series - 240z, 260z, 280z
Look down the hole at the front of the block. There's probably a pile of chain down there. Might as well pull the engine, buy the "Rebuild" book, and save yourself a lot of trouble and money. Good luck. -
New owner, 74 260z -head gasket woes
NewZed replied to inis's topic in S30 Series - 240z, 260z, 280z
Looks like you're not reading what people are writing. No offense. These aren't 60's era small block chevy engines. Overhead cam. You can't spin the engine with the head off, normally. -
New owner, 74 260z -head gasket woes
NewZed replied to inis's topic in S30 Series - 240z, 260z, 280z
Your description doesn't make sense. You said it's apart. Then you said that you can rotate the engine (probably meant can't). Then you said that you did something that could only be done with the head off. If the head is off you can't rotate the engine unless the front cover and timing chain are also off. If you're trying to spin the engine in the car with the head off but front cover on then you might have jammed the timing chain in to the gears. How about a picture of the engine in the car? That will tell something. -
You're welcome. I spent some time working on the opposite problem, the pump cutting off at low PRM when the engine was cold, and got familiar with the system. Don't mess around with the spring adjustment if you start thinking you need to adjust fuel-air ratios. There are better ways.
-
Yes, the contact in the AFM provides power to the fuel pump relay, which is right above the hood latch pull. The 78 engine would not affect the fuel pump control unless a 78 AFM was used that does not have the contact. Many 78 AFM's do have the contacts but they are not used in the 78 cars. But they will work in 76, I had one on mine. The black cover just pops off by hand, it might have a little sealant on it. It's the quickest way to see where you're at on the problem scale. Not uncommon for people to rewire things though. If there's a vacuum leak the AFM tends to run closer to closed and can cut fuel. People create new problems trying to solve others.
-
Take the black cover off of the side of the AFM and see if the fuel pump relay contact switch is opening when he AFM blade closes. That's what cuts power to the pump. It's shown in this link. You can bend the thick rod to adjust it. Move the counterweight and you'll see what is supposed to happen. http://www.atlanticz.ca/zclub/techtips/afm/index.html
-
Do you have a picture or a link to the bearing? Why would a manufacturer put teeth on a throwout bearing surface? Seems odd. https://www.rockauto.com/en/catalog/nissan,1994,300zx,3.0l+v6+turbocharged,1209787,transmission-manual,clutch+release+bearing,1968 https://www.rockauto.com/en/catalog/nissan,1976,280z,2.8l+l6,1209226,transmission-manual,clutch+release+bearing,1968
-
The car will roll and corner and brake and absorb bumps with the differential completely removed. This would require a hill or towing, of course. There is no functional connection between the differential and the wheel axles. You could install a Ford 9 inch or a long nose R200 or a short nose R200 or an R180 and it will have zero affect on the probability of a wheel falling off. The only connection between the wheel axles and the differential are the drive axles, aka half-shafts. There is no "mount" that would serve any purpose in connecting the differential and the wheel hubs. The cars have independent rear suspension. Thoughful_edit resurrected an old thread and made an absurd comment. Why are you trying to defend it? It makes no sense. The differential will have absolutely no affect on the probability of a wheel falling off and the car crashing in to a stone wall. Gibberish. The purpose of the forum is partly education in addition to entertainment. My original short comment was meant for education. I really did not expect such resistance to understanding how things work. As far as being "willfully obtuse", well-done on the grammar, but I think that you're projecting. It's actually a bit scary when somebody keeps repeating nonsense and seems to believe it.
-
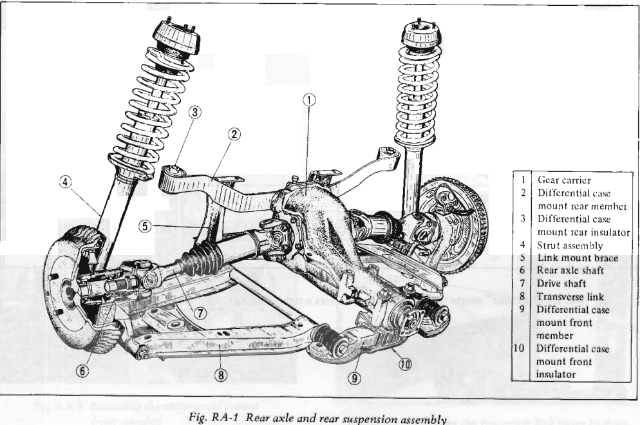
Defend this calZ. Good luck. Here's a drawing to assist in the discussion. #1 is commonly known as the "diff". #6 is the wheel, or hub, axle. #7 is commonly called the half-shaft. It connects the diff axle shaft to the hub axle. Where the wheel mounts should be obvious. Let's see where this "mount" would be installed.
-
Explain how a shortnose diff affects a wheel falling off differently than a longnose diff. For your own edification.
-
The diff has nothing to do with a wheel falling off. If you think it does you're confused. No offense.
-
You're confusing hub axles with diff axles.
-
Injectors not firing, no power. Bad ecu?
NewZed replied to Trystan_lake's topic in S130 Series - 280ZX
The last post was 6 1/2 years ago. Not clear who you're asking. The negative post of the coil is the one that is connected to the ECU. -
'78 280z 5 speed transmission rebuilt - still rattles
NewZed replied to alex44's topic in S30 Series - 240z, 260z, 280z
I didn't watch the video. Sound rarely comes through well on the old internet from the phone recordings. If it's that bad I'd take up the shop's offer to open it up again. That's not normal. The whirring noise is. Seems like you're sampling other people's transmission noises so the picture is more clear to you now. Maybe go to the shop with somebody who has a good one so the shop knows what a good one sounds like. Good luck. -
'78 280z 5 speed transmission rebuilt - still rattles
NewZed replied to alex44's topic in S30 Series - 240z, 260z, 280z
I think that what we're saying here is that they all do it. Another used one will to. And the 240SX 5 speed (AKA 71C) is essentially the same design as the 71B. Not sure but it probably does it too.


