NewZed
-
Posts
6700 -
Joined
-
Last visited
-
Days Won
72
Content Type
Profiles
Forums
Blogs
Events
Gallery
Downloads
Store
Everything posted by NewZed
-
V8? Dual.
-
What you did here does the same thing that the relay will do. Good luck.
-
Looks like it's in very good shape. I like the bumpers.
-
Do you have a camera? Pictures are always good. Not sure but I think that most people would put the 280Z parts on to the 280ZX engine. The intake and exhaust manifolds. Since the ZX is a different body style it wouldn't be a surprise if the throttle linkage didn't swap over right. You could use a cable linkage.
-
You probably want to see these mods. It's not a "survivor" 78 280Z. "Replaced" doesn't mean that he replaced with 280Z parts either. The headlights and bumper mods will change the outside appearance. The LED gauges and white faces will change the inside. The headers and converter delete will make it louder and it might be droney. People tend to overvalue their personal artistic interpretations.
-
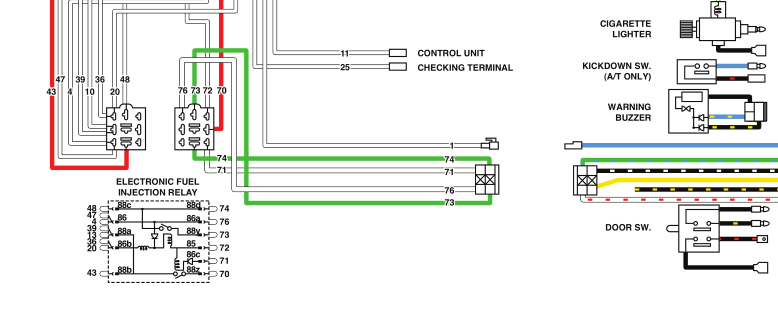
There's a whole thread over on another forum about mistakes we've found in the wiring diagrams. Looks you've ID'ed a new one. Use a meter though first and check continuity to the plug at the fuel injection relay to be sure. If you're not positive. Always possible that Nissan used two similar plugs, to different things. You might have the blue wire plug plugged in to something else.
-
Here's one that looks similar except it shows them as green. The other end would be at the fuel injection relay.

-
Have yo used a meter to see which are grounds and which have power? That's a lot easier than removing the dash. Details on the car would help. Does it run? Are there things that don't do what they're supposed to do?
-
Sounds like you might have a bad positive cable connection, either at the starter or at the battery. What you described is just the way that the car is supposed to be wired up. Connecting the truck battery did not "change" the wiring scheme. You connected the truck battery the way that the car's battery is supposed to be connected. I looked at your pictures again and the wiring is really messy. You have two red cables, and an extra black one for some reason. Can't tell what's connected to what either. Make sure that the wiring is correct. Your test with the truck battery indicates that you have the car wired up incorrectly, somehow.
-
Study how the (edit - oops) starter drive system works (Bendix doesn't explain it all). The starter solenoid drives the starter gear in to the flywheel ring gear then the starter motor relay is compressed after the gears mesh, at the end of the stroke. Your symptoms sound like the gear is getting jammed before the other end of the Bendix can reach the relay at the bottom of its travel. Basically, the flywheel gear and the starter gear must be misaligned. You might be able to loosen the bolts and give it a quick touch just to see if that changes anything. Or loosen the bolts and pull the starter outward to free up some play, then retighten. There's always play. If loosening the bolts helps, you can always create your own play with a file. On the other hand, if that works, you could just take it back and swap it for one with better QC. Or you could just do that from the start. If the old one worked the new one should too. Don't do their work for them.
-
Sorry, I wrote my post before my coffee kicked in. Of course there's a right and a left because the splined diff shafts, of unequal length, are attached to the CV axles. My mistake. I don't know the Quaife internals but if it's open through the middle, maybe you can push a rod all the way through from the other, to press the clip against. Stick the clip in cokced and use the rod as a backstop just to get it squared up. If you can get a rod in there, you could shove the clip all the way down to the groove and catch an edge in the groove. Then use the rod as a backstop and squeeze the clip in to the groove. Less stress on the clip, it doesn't have to get so small.
-
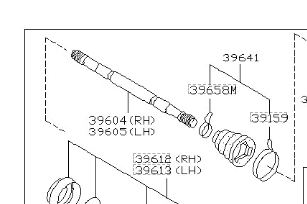
Found some numbers. Apparently they are different. jmortensen, in past posts, has recommended removing the struts and running the suspension through its full travel to be sure there's no binding. https://www.nissanpartsdeal.com/parts-list/1982-nissan-280zx/rear-drive-shaft.html?Diagram=396_002 You could swap the shafts...
-
Are you sure that they are of different lengths? The Z31's seem to be but this writeup suggests that the 280ZX's aren't. Nissan part numbers would tell a story but I can't find them. The aftermarket and reman companies are full of bad info. http://www.zhome.com/rnt/FordPower/HalfShaft.html zcarsource does not differentiate, and they are rebuilt Nissan parts. https://zcarsource.com/rebuilt-cv-half-shaft-for-the-1981-83-datsun-nissan-280zx-turbo Autozone does not either. Good luck. https://www.autozone.com/drivetrain/cv-axle/duralast-gold-cv-axle/346646_0_12552
-
Show us the picture. Count the spark plug wires.
-
Seems like math and calculations say to just buy another cheap car. Part out the dead one.
-
Why would the machine shop guy talk about the head when you showed him pictures of the block and cylinders? And don't you have a rag or a paper towel even? Why don't you clean things up so that you can see? Everything's covered in dirty oil. And you're talking about welding the tops of the sleeves now. That's a whole different thing. Anyway, good luck. There's probably a ton out there on the internet about rebuilding a 2001 Honda Civic Vtec engine, and that type of damage is probably common. I'd get on a Honda site if you want experienced advice. There is a proper procedure to follow for evaluating parts during a rebuild, and measurements to take to determine if they can be reconditioned.. Nothing that we've written here really helps you much. You can't just weld up a thin area like that without warpage. You'd be wasting time and money even if you could figure out how to separately weld the steel, then the aluminum. That divot in the aluminum, the second arrow, looks like an incomplete casting actually. Not caused by the HG blowing. Normal. Probably the same on hundreds of other blocks.
-
That tiny divot between the tops of the cylinder sleeves probably doesn't matter. The sleeves do the work. Look at how thin the material is between the sleeves and the cooling passages. Probably be more clear if you wipe the dirty oil off and put a flat edge on the sleeve ends. The opposing spot on the cylinder head is probably of more concern.
-
That makes sense. I see now that I didn't see the lip right in the picture. Good luck, should be better once you get the new parts in.
-
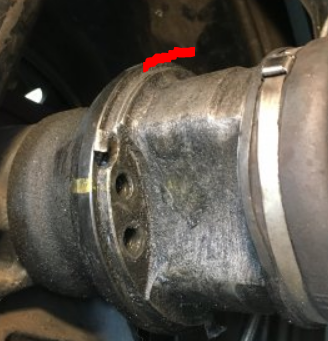
That's weird. Did they make a sucking noise then they came free? Like a vacuum seal? I notice a pretty deep lip on the adapters but it looks like the grease seal sits on top of the lip in your first picture. I wonder if whoever made the adapters intended for you to leave the flat grease seal plate off, or if they thought that the grease seal plate would fit inside the lip. You probably want to study how those parts fit together, your axle ends and adapter, and compare to how Nissan did it. Not sure it's the same. Maybe somebody has a picture of the stock setup bolted together. Thanks for updating, it's interesting.
-
The springs have probably been cut or it has aftermarket lowering springs. The spacer, #13, is just a rubber donut. You have to remove the strut and the springs to get to it. So, not so easy. But you could probably make a taller one or find something to stick in there. you can still buy them from Nissan if you want to see what it is before you dig in. It's small though. You can get about a quarter inch by putting body shims between the top of the strut and the body, on the three studs that bolt it in. I did that on one side of mine to level it out. That's a tiny lift though. Springs are probably the easiest way to raise it up. Take a look and see what you have first.
-
I think that you're on the "Reply" page, for threads. I'm talking about the Messages function. The envelope in the upper right corner.
-
Tried to paste an image in to a message and there's no option to upload from my computer. Only from attachments already pasted in to other messages. Doesn't make sense.
-
Just imagine that each bushing has a little bit of room to move. Just a hair. The tighter the metal is pressed in to the urethane the more vibration that will be transmitted. I used washers to add length to the center tube for my urethane bushings so that the urethane is not clamped tightly. AZC's bar might not need anything. I just remembered something that you might want to consider that might also be part of your noise problem. Driveline angles. Ron Tyler designed his first mount for a small block chevy application, so the diff nose is angled up a little bit if you use the hanging GM mount. With a snubber and the Nissan lower mount you maintain the original Nissan diff nose angle. But your V10 application might need some adjustment. Worth confirming and adjusting while you're working on it.
-
What part of Oregon are you in? I think that I have one. Might be able to get it to you.
-
I have my own RT style mount with the urethane GM mount, hanging the diff nose from above. No bottom mount at all, just the crossmember with no mount on it. It's quiet. I had urethane mustache bar mounts though and had to do some spacing with washers to keep the urethane from transmitting diff noise to the cabin. So take care to isolate the mustache bar mounts also if you want to make it quiet. The key to keeping it quiet is to allow just a small amount of play in the bushings. Don't clamp the urethane down tightly. With a stock rubber mount on the bottom you could leave a small air gap between the snubber and the diff to avoid noise transmission. You'd want a new rubber Nissan mount though to avoid thumping/clunking. The thump comes from the diff nose dropping down after lifting during acceleration. The T3 mount is kind of overkill with the wires because the Energy Suspension mount has interlocking metal inside to hold it together if the urethane fails. Thats why it works well alone on the top, it's not just hanging from urethane, there's metal in there. The metal is separated by urethane though so it doesn't transmit noise. http://www.energysuspension.com/products/Transmission-Mounts.html