Search the Community
Showing results for tags '280Z'.
-
Hi Guys, I'm still pretty new to the forum but I wanted to start contributing right away! I just bought a 1975 280z that had been sitting for over 10 years and was the victim of seized fuel injectors. There are a couple of options on how to handle the situation, one would be to replace the old injectors with new ones. Thats a solid choice but oem injectors will set you back $350+. Another option would be to buy refurbished injectors. Again, that's a fine option, but since fuel injectors are sealed units that cannot be opened, all you are really buying are old injectors that have been cleaned. Your next choice is to send the injectors off to a fuel injector cleaning service that specializes in cleaning electronic fuel injectors. If you choose that route I'd suggest www.witchhunter.com as they are a well known and good company. A full service cleaning is going to set you back about $180 but has the added benefit of having the injectors flow tested. Lastly, you have the option to clean them yourself. The process I came up with worked great for me and only cost about $20 and as such I will be discussing my method for the remainder of this article. Before we start, a disclaimer: *** The procedure Outlined below was developed by myself to clean my bosch L-jetronic fuel injectors. I am not a professional, nor do I claim to be. By performing any of the actions described in this article you risk damage to your fuel injectors that could render them inoperable. This process may be used on any injector however take special note of the correct voltage used to drive your specific fuel injectors.***** The Injector: How & Why Let's take a brief look at how the injector works and why it may end up seized shut. First things first, take a look at this cutaway view of an injector: (photo credit Gordon from witchhunter.com) The points we are most concerned with from this photo are numbered 4, 5, and 6. Number 4 is the coil. It is a coil of wire that wraps around the inside of the injector body. When current is sent through this coil, it creates and electromagnetic field, basically, it's an electromagnet. Number 5 is the pintle. Think of it as the rubber stopper that plugs the drain in your bathtub. It is a tiny piece of metal that for al intensive purposes "stops up" the fuel injector and keeps fuel from flowing through it. Numer 6 is the pintle seat. Think of this as the drain in your tub. It is the piece of metal with a hole in it that the pintle stops up. When the coil is energized, it becomes magnetized. This magnetic force pulls the pintle up away from the pintle seat allowing fuel to pass through the injector. When a car sits for a long time, the fuel in the injector degrades and separates releasing gums and varnish. As time passes and the fuel evaporates and degrades, whats's left is the gummy mess that clogs up the injector. When dry, it effectively "glues" the pintle the the pintle seat. Cleaning: Now that we know the basics of how an injector works and why they get clogged or seized, lets look at what we need to do to clean them. The basic strategy is the same whether clogged or seized but the approach is going to be a little bit different. The first thing we have to do is devise a way to pulse the injector out of the car. The next thing we will need to do will be to get the injector operable meaning we need to make sure the pintle is moving up off of its seat. This step won't be necessary if the injector is just clogged. Then we will want to do the actual cleaning, and finally we will replace the feed hoses and O-rings before reassembling the unit. Supplies Here is what you are going to need. 2 bottles of 91% isopropyl alcohol 1 small eye dropper 3 tupperware containers - 2 must be able to hold all 6 injectors and the cold start valve fully submersed in alcohol. The third needs to be slightly longer so that you can have good access to the injector while submerged. 2 lead wires with alligator clips electrical tape 6 to 8 D batteries Paper Towel (preferably shop towels) or a cloth Piece of cardboard or other suitable work surface Procedure: ​Now that you have all of your supplies it's time to get to work. Obviously the first thing you will need to do is remove the injectors from the motor. if you do not know how to do this I highly recommend you get yourself a factory service manual. There are also numerous how-to's online. Once you have everything together, find a comfortable place to work, I laid a piece of cardboard over the kitchen table and worked there but anywhere reasonable clean will do. Place all 7 injectors in one of the containers and fully submerse them in alcohol. Let them soak for about an hour, longer being better. Now take your other container and fill it with enough alcohol to submerse all 7 injectors (Don't forget your cold start valve!) and the other longer container with about 2 inches of alcohol. Place these to the side. the long one will be our working bath and the other one will be our clean bath for the injectors to continue to soak after we've worked on them. In order to clean the injectors, we must cycle them open and closed. To do this we will need to come up with a way to run a current through the injector. In our cars, the 12 volt current from the battery is routed through a dropping resistor that drops the voltage from 12v to 3.5v before it is passed through the fuel injector. So, ideally what we want is a 3.5v current that we can turn on and off to pass through the injectors. You could come with a whole bunch of different ways to do this depending on how fancy you wanted to get but my method is simple and easy and ver effective. If you did not know, a standard D battery output is 1.5v (actually AA, AAA, C, and D batteries all output 1.5v). By combining 2 D batteries in series ( + to -), the output voltage is bumped to 3v. This 3v current is very close to the 3.5v used in the vehicle so it will be perfect for replicating the pulse the injectors get in the car. So, what you will want to do is take two of your D batteries and tape them together so that the + side of one battery is touching the - side of the other. Now, grab your wires with the alligator clips and tape on end of one of the wires to the + one of your battery pack you just made. At this point you are ready to grab one of your injectors out of the alcohol bath and start disassembling and cleaning the exterior. Remove the bottom O-ring as well as the aluminum spacer on the main body. once the spacer is off you can remove the thin metal piece that sits right on top of it. Now you can work the thicker rubber O-ring off the main body of the injector and go to town cleaning. I used a toothbrush and some paper towel to get the outside decently clean. This isn't crucial but it will help to keep your cleaning bath free of contaminates. After you are happy with the cleanliness of the injector go ahead and attach the other end of the wire to one of the pins coming out of the injector plug. It doesn't matter which one since the magnetic field will be the same regardless of which direction the current is flowing. Go ahead and wrap the exposed metal of the alligator clip (if there is any) with some electrical tape to minimize the chances of the negative clip contacting it when she attach it. Speaking of the negative clip, go ahead and grab your other wire and attach one one to the other pin coming from the injector plug. What you should have now is as follows, -[ ]+-[ ]+ ----------Injector--------- in case mtg diagram doesn't make sense, you will have your two batteries taped together with one end of a wire taped to the positive side and the other end of that wire attached to one of the pins on the injector. From the other pin on the injector you should have another wire which is not currently attached to anything. Now if your car has been sitting for years, it is not uncommon for the injectors to be seized shut. If this is the case they will not open and will not spray any fuel. After all, that is the reason for this article. It is important that you remember that the injector is an electromagnet pulling the pintle off the seat with magnetic force. If the injector is seized then what that means, is that the magnetic force pulling up on the pintle is not great enough to overcome the force of the gunk holding the pintle down. So how can we free it up? First we need to see if that long soak in alcohol was enough to free it up. So go ahead and touch the free end of the cable coming off the injector to the negative end of your battery pack. It is good practice not to keep the current flowing throughout the injector for too long. If you hold it too long you can actually burn up the coil inside the injector and then you will have to replace it. Since we are only using 3V that isn't likely but better safe than sorry. If you are lucky, you will hear a click come from the injector meaning that the injector did actually open up. However, if you are like me, the injector will still be stuck. So what to do? Well, if you have ever taken physics then you may know what to do, but for those who haven't or are a bit rusty, heres a little physics lesson. Voltage is the potential difference across two points. Current is the rate at which the electric current flows. Resistance is the resistance to the flow of electricity. Voltage, current, and resistance are all directly related by the formula V = IR. V is voltage measured in volts, I is current measured in amps, and R is resistance measured in ohms. How does this apply to an injector? Well, the resistance of your injector is constant and does not change (unless you have a faulty injector that should be replaced) the variable that we can control here is the voltage that we send through the injector. By increasing the voltage, we are also increasing the current that the injector draws. That same formula above can be rewritten as I = V/R which mean that the current is equal to the voltage divided by the resistance. The resistance of an injector varies based on the application but lets assume here that our injectors resistance is 10 ohms. We just attempted to actuate the injector with a 3v pulse so let's calculate how much current that was. 3 volts divided by 10 ohms comes to 0.3 amps of current. Now, we know that 0.3 amps of current is not enough to break our injector free so how do we increase that? well, as we've learned we need to increase the voltage. to do this you need to simply tape one more battery in line with the other two making sure to put the + end of the battery to the - end of the other. this will increase the voltage by 1.5v for a total of 4.5v. This will bump our current to 0.45 amps. now try tapping the negative lead to the negative end of the battery and listen for a click. Tap it 5 or 10 times and if you still don't hear a click add another battery to the line and try again. Keep adding batteries one at the time until you get the injector to unstick. You can add up to 8 batteries in a row without risk of damaging the injector. The faster but less optimal way to do this would be to use a 12v car battery right from the get go to unstick the injector. this would be fine as long as you use short pulses of energy and do not hold leads on the battery for too long. At this point you should have gotten the injector to unstick and are ready to start cleaning it. If not, you will have to seek out another option for fixing your stuck injectors. The actual process of cleaning the injector is easier if you have a buddy to pulse the injector for you while you do the cleaning. So, assuming you do, have them start pulsing the injector while you force alcohol throughout he top with the eye dropper. do this for a few minutes and then do the same thing but this time forcing the alcohol though the nozzle end of the injector. During the process you should see dirty gunky fluid come out of the injector. repeat this until the fluid that comes out is clean and clear. Do note that it will only drip out and won't be any sort of stream of flowing. After you are done cleaning, place the injector in the clean alcohol bath until you are done with the remaining injectors. Repeat the above process for all 6 injectors including the cold start valve. The cold start valve was designed to run off of 7 to 12 volts so it may take a few batteries taped together before it will click open. Congratulations! You have successfully cleaned your injectors! Now we need to get the old hoses off and replace them as well as the O-rings. If your injectors are like mine, then you have hoses held on by small metal cups. I tried cutting the hose with a blade and pulling it off, but I could not for the life of me get the hoses off so I decided I would have to cut the metal cups. For this you'll ned a dremel and a razor blade along with a pair of pliers. This is the bit we will be grinding off. Before trying this, be sure to try and just pull off the hoses after you make a slit down the side with a blade. It may work for you and will save a big hassle! Hold the injector with the pliers and carefully start grinding away the metal cup. when you think you've ground off enough try and peel it away as best you can to expose the hose underneath. Now cut down the side of the hose to the base with the razor blade. Get your pliers and start pulling the hose off the injector. It will be really difficult but just keep twisting and pulling until you get it off. Once the hose is off, the cup will just slide right off. Replace the hoses with new fuel injection hose and clamps. Please be sure to use fuel injection hose and not normal fuel line. Now we can replace the O- rings and slide the thin metal piece and aluminum spacer back on. It helps to lube up the o-rings with a dab of motor oil! Now you are ready to reassemble everything and fire it up! If the motor has been sitting it would probably be a good idea to replace all the rubber fuel hose and clamps as well as the fuel filter and spark plugs! Thank you for checking out my writeup! I hope it helps you out!! -Blake
-
 So, as many of you can already assume, I'm Greg and I've owned a 1978 280z for a little over a month. Although my time with the car has been short, many plans are in place to replace and restore many parts. Currently, the plan is to do the notorious LS1 engine swap, lowered on Stance Coilovers, STR 514 wheels (17x9 square with a 3.5 inch machined lip), ZG Wide Flares, etc. but first, body work is the first priority on my list. From the day I first bought the car, little changes have been made to the car...
 -
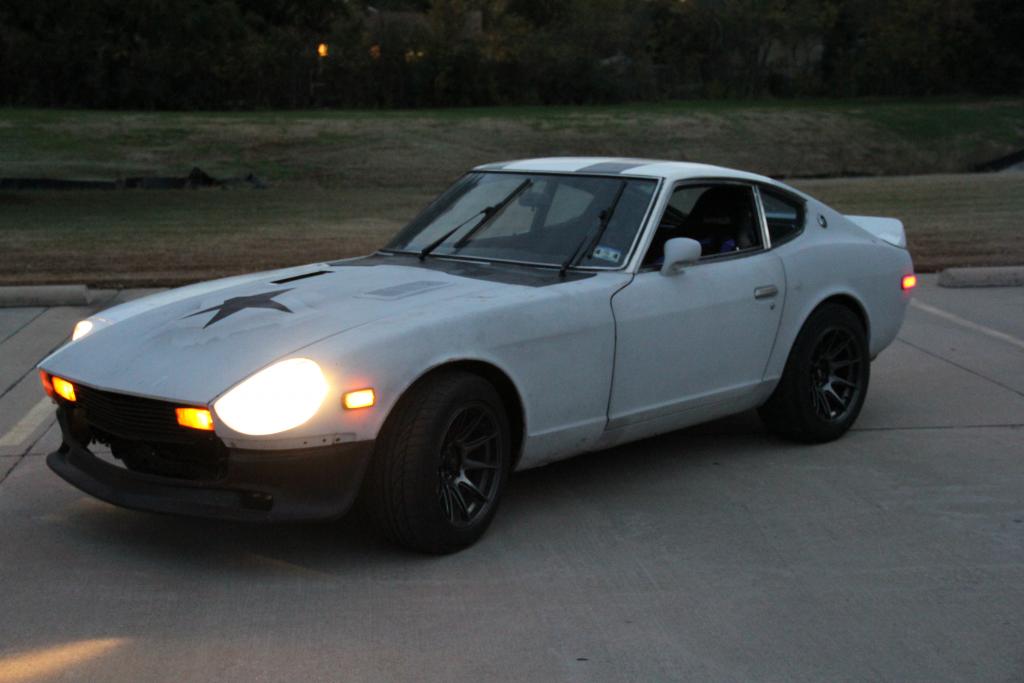
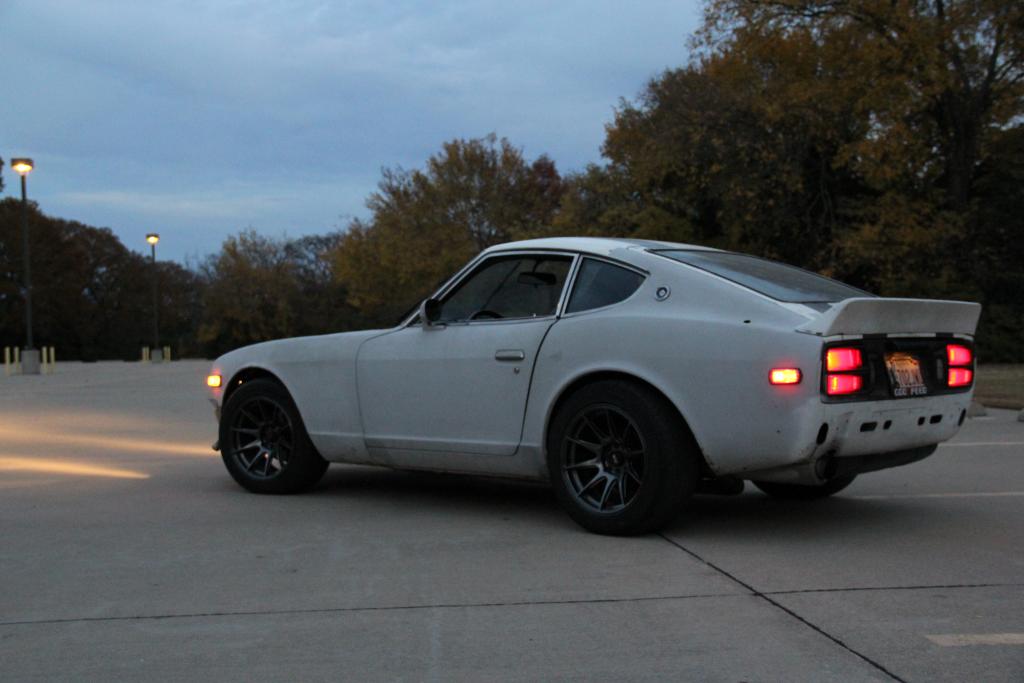
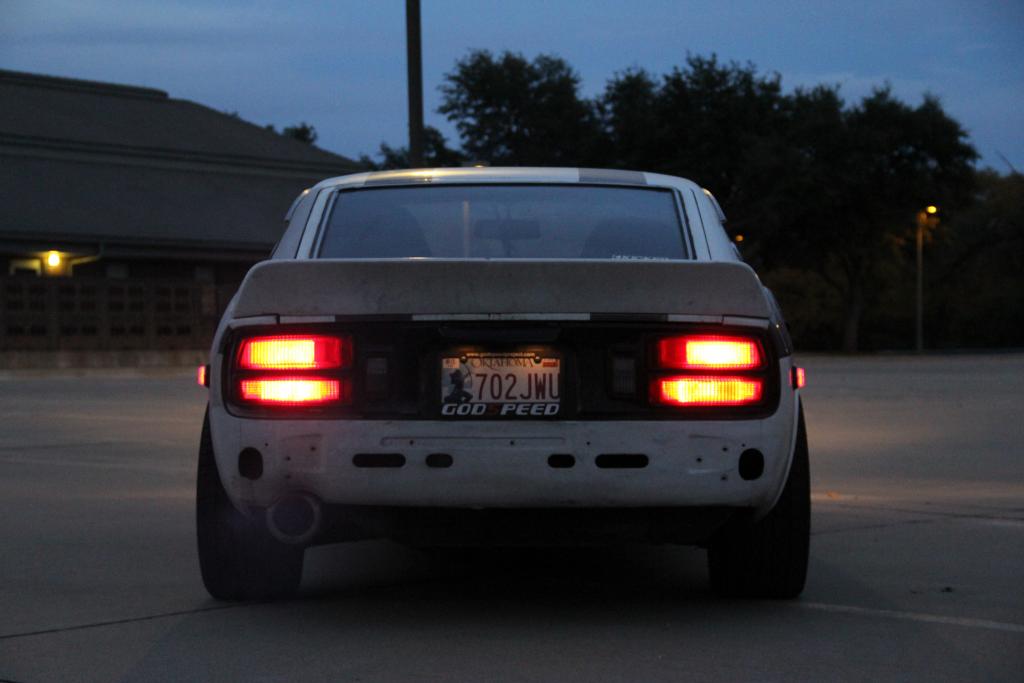
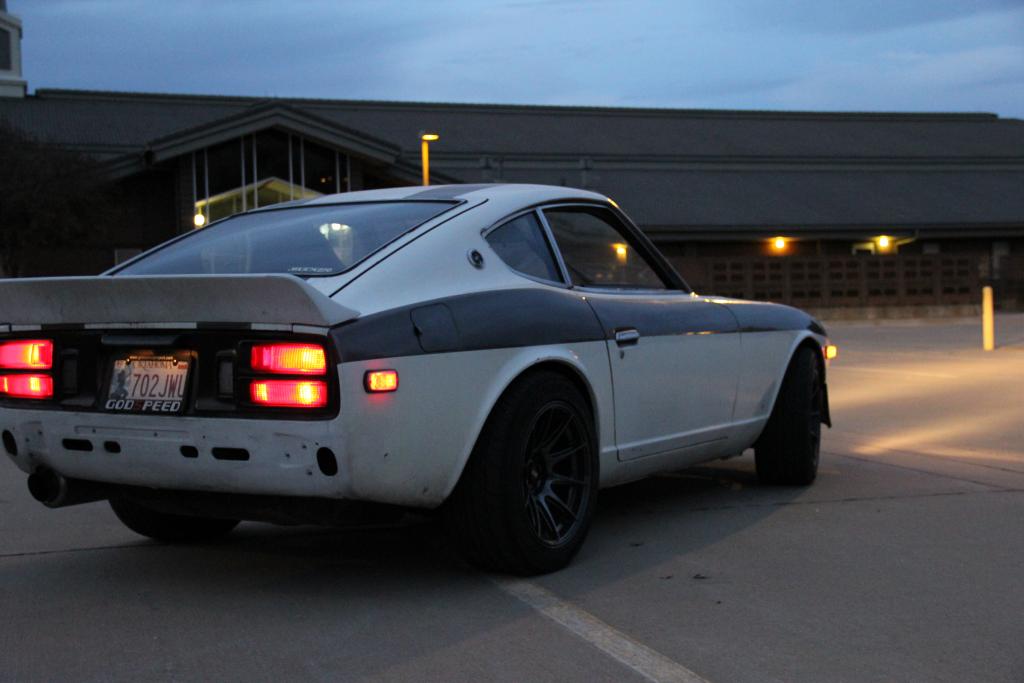
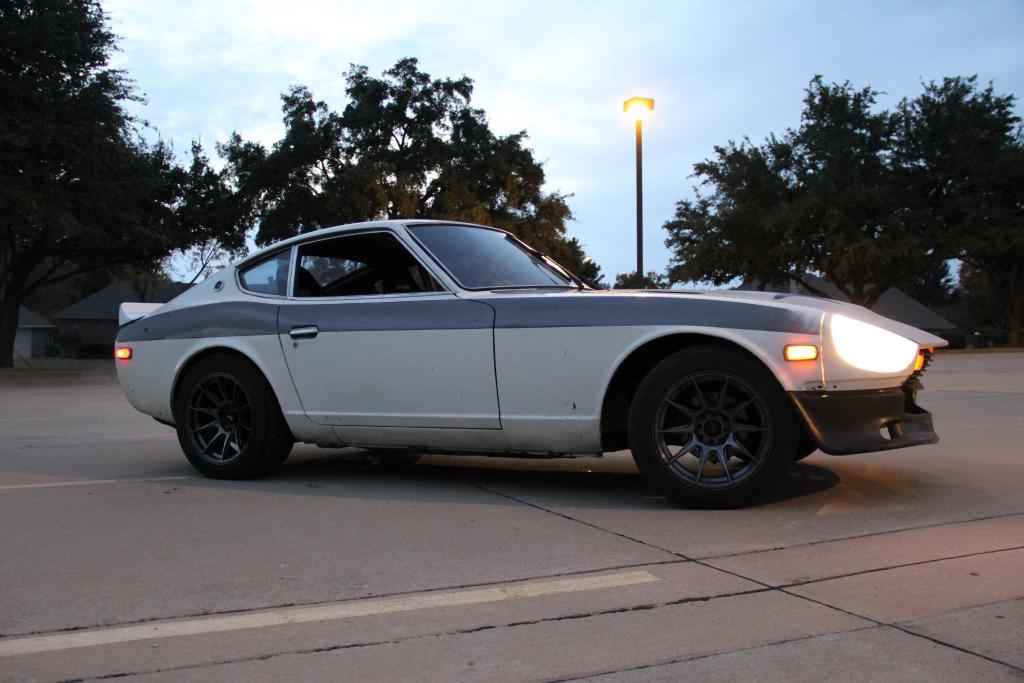
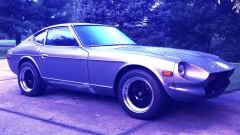
ok so ive had my z for a couple months now and i though id post some foward progress. i got it pretty much stock. not a whole lot done besides asthetics. i will slowly be going through it cleaning her up and making it run for autoX races eventually. well without further ado here it is.

-
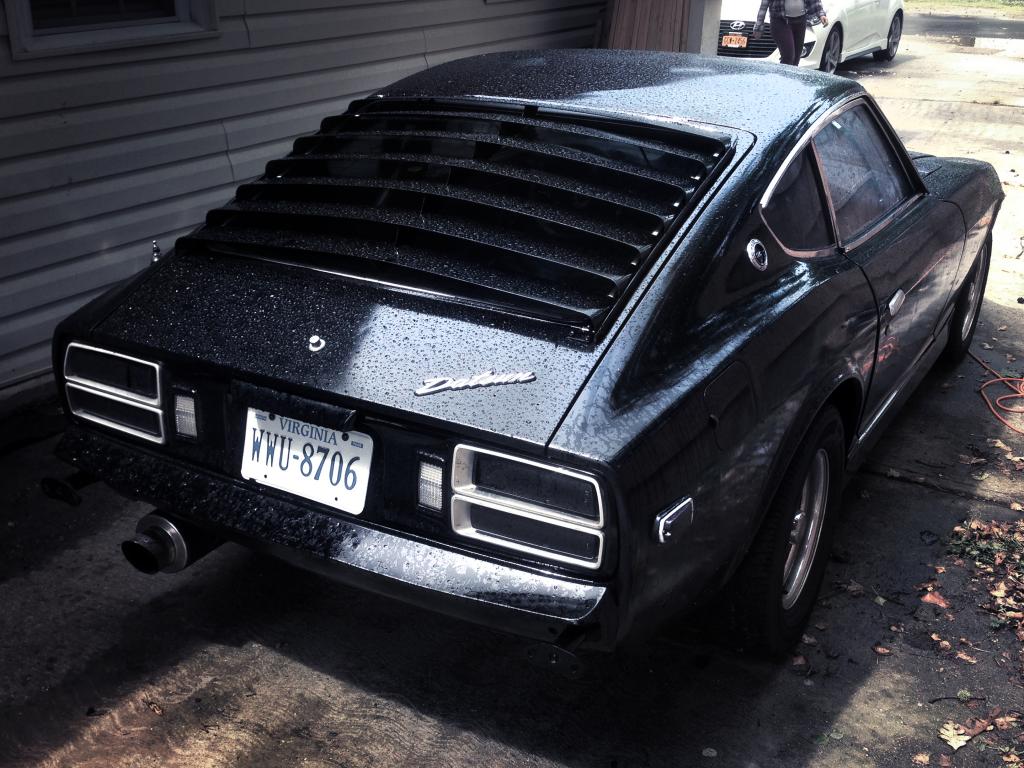
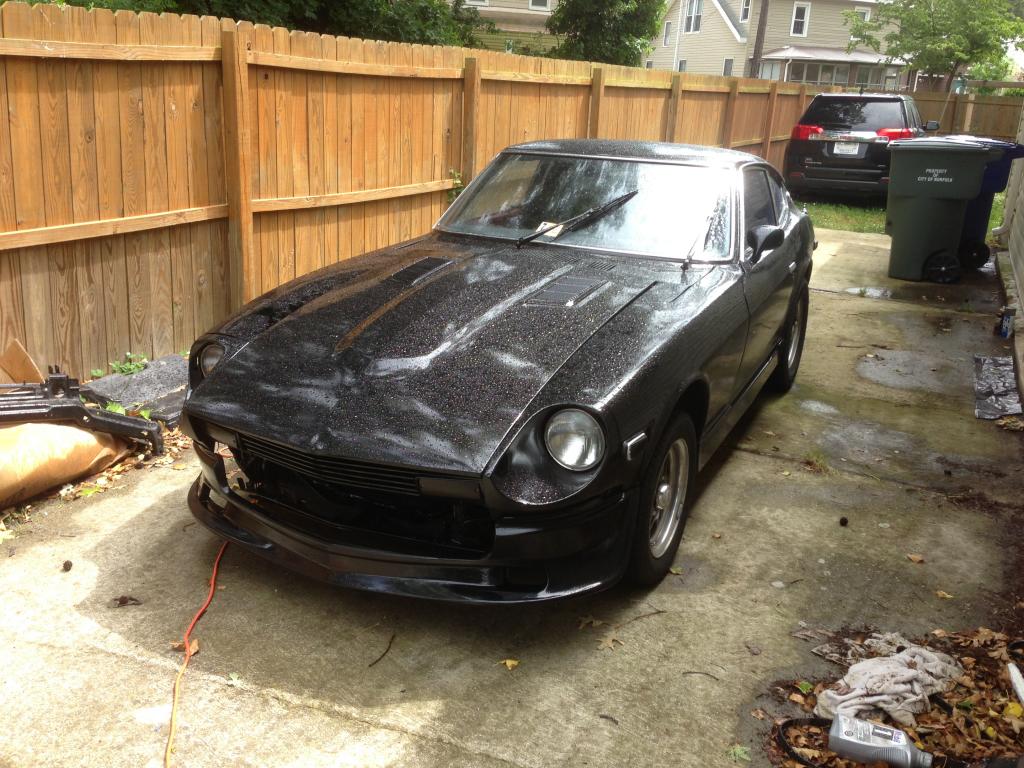
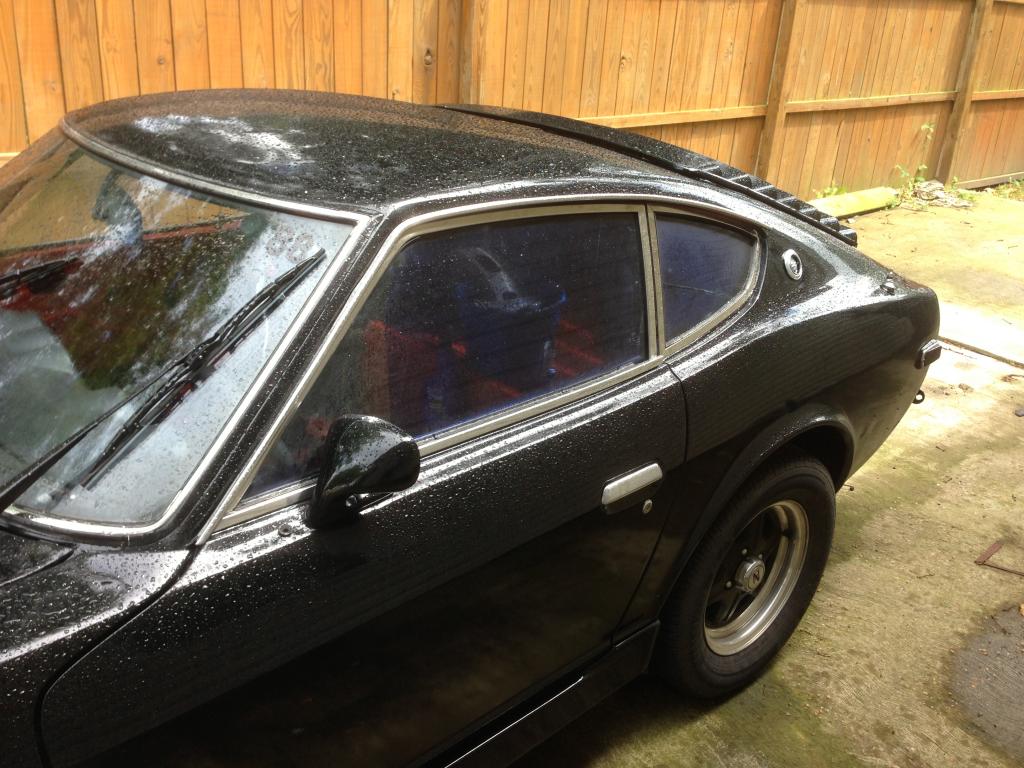
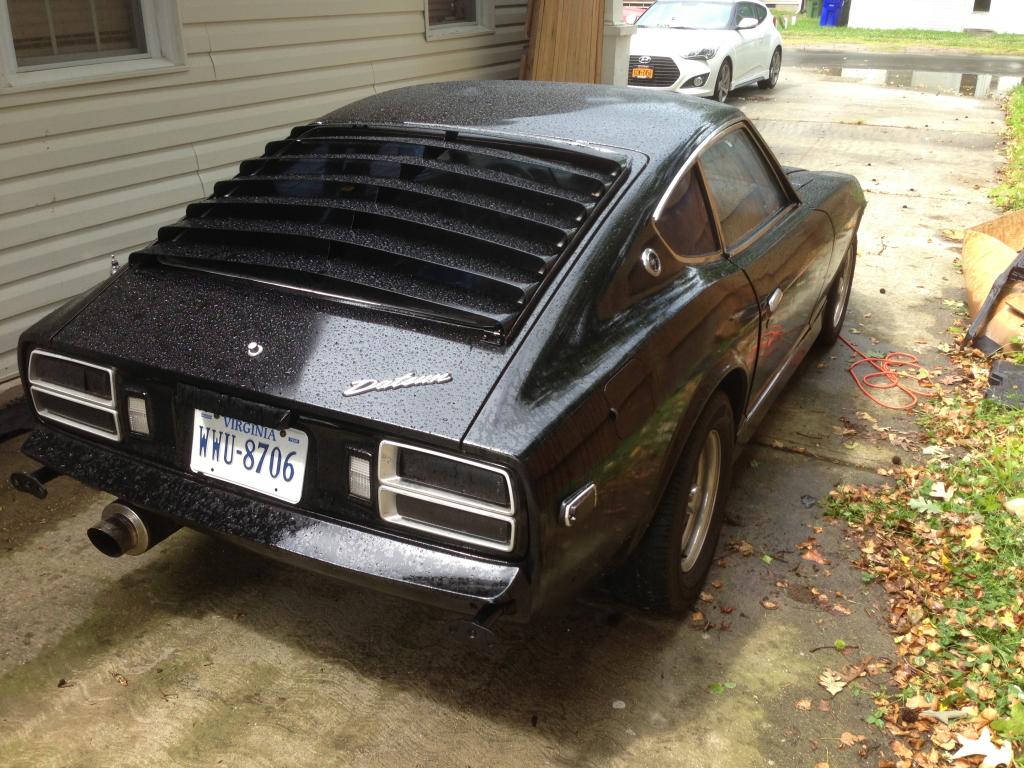
I searched and searched and searched endlessly to build a spreadsheet of what to buy before ever taking on this journey from the car to what I wanted in the drivetrain for approximately 2.5 years. Searching craigslist/copart/ebay endlessly until I ran across a deal in my budget for a $2k running driving Z car. This led me to Virginia and I bought this daily driver 1976 280Z with 168k miles and in fairly good shape. My uncle and I drove it home 300+ miles with dry rotted 10 year old tires and 40 year old bushings with a slight hint of white smoke under hard acceleration on the interstate! Then the build began"¦ This was in March of 2012 just after grabbing my BS in Civil Engineering from UT Knoxville in Dec of 2011. I didn't start buying until December of 2012 and I haven't stopped since haha[/font][/size] -First I had to figure out the dreaded fluid in the passenger floorboard...leaky heater control valve so I wound up using a Bronco heater valve 74628 (Advance Auto Parts), 2-90* hoses, spare pieces of 5/8" hose and some hose clamps to fix that right up. PITA to get to with stock heater core/ac junk in the way BTW. Future plans are JCI/Vintage Air! -Engine spec'd out to be cheaper for an LS1 pullout if I could find the right deal but after considering the fuel mileage gains and ease of finding another engine for less if it went south I went 5.3 all the way. Plus boost always sounds better for the future! I have a spreadsheet list for that too! -2002 5.3 from a Chevy Avalanche with 80k that ran good (or at least that's what the guy at the junkyard said!) -Drive by cable was my goal from the start to get a better "feel" for the car so I bought a new throttle body and used ls1 intake, fuel rails, oil pan/pickup tube, etc... But I kept the truck spacing on the accessories (cheaper). -Transmission, besides the car, this was the worst to find and ultimately I went with the TR6060 over the T56. -2011 Camaro SS TR6060 with 2k miles ($1600 with free head stud kit valued around $225) -TR6060 has more stock holding power than a T56, a trans cooling system, and supposedly shifts smoother -But the downsides are that it is more rare (1st in a LS-Z), fixed yoke rear, taller gears, & uses a remote shifter From then on out I used the "Documemtation" of how to swap an LS1 T56 combo into a Z car and along side other builds on HybridZ to get to where I'm at. From Cooling to the RT Diff Mount to the Fuel Cell Setup I've researched and stalked tons of pages to get where I'm at and asked a handful of questions. My hats off to the site and all who put their 2 cents in because it would've been harder without it for sure. If I can help anybody else that has questions just shoot me a message about the swap. HybridZ and LS1Tech are your best friends during this swap so use them! The 5.3 had no real issues as in tapping the alternator hole (I was scared to do this at first) or cutoff the protruding section from the side of the block but it cuts like butter with a saw. 11/32" Drill Bit & 10mm x 1.5 Tap. I did mine inside the car, so out or in it doesn't matter. My goal is to daily drive it to work to keep miles off my truck and to replace my burning passion for buying a new Vette since I bought a new '12 Duramax instead. So power upgrades are essential to fulfill my daily need for speed. Future dream plans are a turbo, beefed up rear, and A/C. But I'm not sure if they can all be satisfied together so we'll see or I may just go and build another with a 5.3/auto/turbo drag setup and leave the stick with a/c for autox/daily driving. Engine: -5.3L 2002 Chevrolet Avalanche 80k Miles -JCI Engine Mount Kit -MSD Plugs 32829 (Truck Coil Setup) -LS1 Stock Throttle Body -LS1 Intake 12560688 -LS1 Oil Pan 12558899 (Oil Filter: PF46E AC Delco / M1-107 Mobil) -LS1 3 Pin MAF Sensor -LS1 Stock 26 lb/hr Injectors -LS1 Alternator Bracket + ¾" spacers -Tap 10mm-1.5 (Hanson 8340) and 11/32" Drill Bit for Alt Hole in Block -Ribbed Pulley Advance Auto (P/N: 89015) -EGR Block off Plug Dorman 1-3/8" -Lokar LS1 Throttle Cable 36" -Custom Intake Throttle Cable Bracket -Custom Firewall Throttle Cable Bracket -4" to 3.5" Elbow to 3.5" Cone Air Filter -Dayco 5060548 Serpentine Belt for Alternator Only Setup -Truck Crank Pulley, Water Pump, Alternator, & Belt Tensioner -TunedbyFrost for 93 Octane (+25-28rwhp) & P1336 Code Removal -LS1 Drivers Side Clamshell Motor Mount (5.3 one won't work) -LS1 Dipstick 12551581 and Dipstick Tube 12551577 Transmission: -TR6060 2011 Camaro SS 2k Miles -Custom Transmission Rear Mount to Frame Rails -Royal Purple Synchromax Manual Trans Fluid (4 Quarts) 01512 -Perma-Cool Hose Barb Fittings 11/32" to 6AN (P/N: 15265) -2 "“ 6AN 90* Elbow Female to Male Swivel Fittings (Route Cooling Lines) -Custom Remote Shifter Mount and Linkage Rod (DO NOT BOLT TO TRANS TUNNEL) -Tremec Shifter TKO600 New Takeoff -Pro 5.0 Shifter Lever + 6 Speed Shifter Ball -GM 4l60e to 6AN Fittings (P/N: 12055) Choice Motorsports LLC (+ C Clips) -Stock Camaro SS Trans Mount -*Reverse Lockout is the same plug for LT1-T56/LS1-T56/LS3-TR6060 Clutch: -Monster Stage 2 "“ 12" LS1 Clutch Package with clutch alignment tool etc"¦ -Chromoly Billet 18lb Flywheel -Tilton 75-875U (7/8") -48" SS Braided 4AN Clutch Line (TOOOO Long "“ go 36") Tilton to TR6060 -Tick Performance TR6060 Clutch Speed Bleeder (Just Do It) -Welded on Male 4AN Steel Bung to Slave Cylinder Steel Line In Bellhousing -GM AC Delco TR6060 Pilot Bearing 12557583 (NOT a T56 Bearing) Driveline: -GTOPL-2 Aluminum Fixed Yoke Driveshaft Adapter (1350 Size U-Joint) -Slip Driveshaft (Oliver's Driveshaft in NC) 1350 to 1310 (23-9/16" Long) -R200 Neapco Adapter 2-2-899-1 with a 1310 Size U-Joint (M8-1.25x35mm) -RT Diff Mount from Techno Versions LLC and Modified Prothane Bushing -R200 3.54 (Stock) Open Differential (1 Tire Fire!) -Modern Motorsports 300ZX Turbo Half Shaft Adapters (New) -1986 300ZX Turbo (84-89) CV Axles (New) Flipped Cages to Shorten -75w90 Diff Fluid Lucas 2 Quarts (2.75 Pints = 1.375 Quarts to Full) -Differential Overflow Tank Exhaust: -JCI Headers Used (Non Ceramic Coated) #DAT-405 (Used) -Dual 2.5" to the Rear of Trans/Driveshaft then Y into 3" out the back -Borla Muffler 40359 Pro XS 3" In/Out (almost identical size to stock muffler) Suspension: -Full Removal of All Suspension Front/Rear and Sanded/Painted -Full Poly Bushing Master Kit (Red) 7.18102R Hyper Flex -Tokico 5 Way Adjustable Springs(Red)/Struts(White) Combo -10w-30 Fluid Refilled in Stock Strut Cartridges -Rear Spindle Pins/Bushings Replaced By Previous Owner Recently!!! -KYB Dust Boots (Plastic) with Bump Stop (Not Strapped on the Bottom) Wheels/Tires/Brakes: -XXR 531's in 16x8 with +0 Offset (Black/Polished Lip) -Falken 225/50/16 with no rubbing on stock/tokico suspension -Stock Brake Calipers Cleaned and Painted Hi-Temp Red -Speed Bleeders on All Corners -Hawk HP Plus HB169N.560 Front Pads -Stainless Steel Braided Brake Lines (All 4) -New Front Rotors -Rear Drums Already Had New Pads Cooling: -3 Row Aluminum Direct Fit Radiator with Drain Plug -"˜93 Taurus/Sable (91-95) 2 Speed 3.8L Fan with Connector Plug -Stock 5.3 Hose Modified to Fit Upper Hose -22478 Gates Hose from Oreilly's for Lower Radiator Hose -New Factory 186* Thermostat + Housing (Built Together) -¾" and 5/8" Heater Hose Lines and a ¾ to 5/8 adapter -JTR Hose Tee with 5/16" Steam Barb and Air Bleeder -Radiator Overflow Tank Gauges/Wiring: -ChevyThunder.com Stand Alone CPU/Harness for 5.3/LS1 w/ OBDII+CEL -Speedhut 4" GPS Speedo 160MPH w/ Blinkers+High Beam GR4-GPS-05T -Speedhut 4" 8k RPM Tach (See Group Buy on Speedhut"¦) GR4-TACH-02 -Glowshift 2-1/16" Oil/Water/Fuel Gauges 7 Color LED -JEG's Fuel Pressure Gauge (on fuel rail at firewall) -Oil Gauge Pressure Sending Unit behind intake on top of motor -Water Gauge Sending Unit on rear of passenger head at the battery -Autometer 2277 "“ 12m x 1.5 to 1/8" for Water Temp Sensor to LS Pass Head -Autometer 2268 "“ 16m x 1.5 to 1/8" for Oil Press Sending Unit Plug Top Block -Brass 1/8" NPT 45* Fitting for Oil Pressure Sending Unit Aftermarket -8 Guage Red Wire From Alternator to Battery -Stinger 4 Maxi Fuse Holder and Appropriate Fuses for Year Model Fuel System: -15 Gallon Universal Fuel Cell w/ Built-In Sending Unit (0-90 Ohm) -Fuel Cell Hanging Mounts and Padding + Other Mounts -Fuel Filler Neck Behind License Plate -Flip Down License Plate Bracket -Vented Gas Cap -Dual 10AN on the rear of the Cell (10 to 8 reducer) -8AN Pushlock Hose to the 100 Micron 8AN Fuel Filter -Walbro GSL392 (255) Fuel Pump -Corvette C5 FPR WIX 33737 -6AN WIX FPR Fittings 640860, 640850, 640940 (Russell Fittings) -6AN Pushlock Hose From Pump to FPR -6AN Pushlock Hose From FPR to Fuel Rails & FPR to Tank Return -Fuel Line Holder Clips with Rubber to Run Fuel Lines -LS1 Fuel Rail 3/8" Hardline to 6AN Push-On Fitting is RUS640850 -Stock LS1 Injectors 26 lb/hr -*6AN Size Fuel Line is good for up to 450HP -16' of 6AN and 3' of 8AN Push Lock Hose Recommended Tools: (besides the usual ones"¦I had to buy/borrow these) -Engine Hoist 1 Ton (Harbor Freight $105) -Load Leveler (Harbor Freight $20) -Torque Wrench (Mainly for Clutch Install) -Slide Hammer (Harbor Freight $15 for Stub Axle Removal) -Mig Welder (Lincoln Electric 140HD + Mig Gas $700 total) -Brake Line Wrench (Craftsman 10mm/12mm $10) -Spare Sets of Wrenches in Metric (Whole Car is 10/12/14mm"¦) Issues/Advice: -Crankshaft Relearn Procedure P1336 "“ It cannot be completed unless a factory setup is in place and I did not have this so I went ahead and had Frost tune that code out. The engine will try to run properly but won't let itself until this is done even though the crankshaft is mechanical. Other than that the engine ran flawlessly from ChevyThunder's harness. This procedure is popping up only if the computer and engine did not match from the factory and I did not get the CPU with the engine. Next time I will. -Do NOT cut anything off of the Datsun harness until the project is fully running and it all works, ask me how I know... I had to fight a couple of electrical gremlins that were working just fine before I took out the motor and they didn't once I was ready to drive"¦like brake lights and interior everything electrical, but the headlights, blinkers, stand alone engine and the gauges worked flawlessly. -I'd go 2-5/8" on the triple gauges. Mine look too small personally but they're fine and it's too late now -80 or 100 Micron Filter before the Walbro is mandatory but my 30 Micron did fine but supposedly too restrictive. -Upgrade the suspension/bushings like I did and redo all supporting components while they're easy to get to. -My clutch is actually for an LS1 T56 setup but works with what I have so there's my 2 cents"¦buy the trans first not the parts that go in it. They were having a new years sale and I just knew I'd be putting in a T56"¦ Push button momentary switch wired for the reverse lockout solenoid because my harness was made for a T56 and I am using a GPS speedo not the VSS. 3 amp fuse and a switch from RadioShack and it works good. Keeps me from going into reverse on a 6-5 downshift. It does literally take two hands to jam it in reverse without the solenoid activated and that will not mess it up because it's only a spring pushing back. More TR6060 downsides I'm coming aware of now that it's driveable, theres a slight clanging inside the trans when you let out of the clutch while it's in neutral. Apparently all 5th Gen Camaros have this from what I read even brand new ones with no miles on them (not just GM TR6060's either). It's a factory sound and slight vibration in the shifter (get a loud exhaust or a good stereo!). Another issue with buying a TR6060 are the batch of factory defective transmissions, which are serial numbers 0-25000 which have a weak main shaft that's not heat treated like the new ones and an issue about not having an output shaft bearing installed. This has been well known to modified 2010's and some 2011 cars that are manual that have broken with superchargers installed and even bone stock 436hp levels. I was unlucky and my serial is 24302... So since I'm going to only have low 300's for horsepower right now I'll be fine but in the future a main shaft upgrade will be necessary. Main shaft (stock) is good for up to 475hp from what I've read. Gearing is another aspect in transmissions that I was curious about as well... LS1 T56 - 2.66 , 1.78 , 1.3 , 1.0 , 0.74 , 0.50 (not GTO ratios) TR6060 - 3.01 , 2.07 , 1.43 , 1.0 , 0.84 , 0.57 Grand total costing me around $14k including the car. That includes a few screw ups, new GM 10.9 bolts everywhere, high end fluids/gaskets, and quality parts to make sure they will not fail during daily use. Most all the parts I bought were brand new unless it wasn't critical like the used headers. It took me approximately 1 year to do it all but could've been done in half the time if I dedicated more time to it. If I can figure out the picture situation I'll load some on here but until then all my pics are on Flickr via my signature below. Thanks Travis
-
Hi everyone, Just had my car quit on me. I looked underneath when it died and there was a wet spot under the fuel pump and I could smell the gas. It was giving me intermittent problems before but it seems it's finally bit the bullet. I've been doing a lot of searching to find a replacement pump but I'm having a hard time finding something saying "___ is a swap-in replacement." O'reilly and Autozone sell a couple models but one of the O'reilly pumps listed is a tank-mounted pump so naturally I'm a bit wary of trusting their system. I've also heard of people using the Walboro 255, but after looking at their website and checking around a bit, it seems that it might be too high of a pressure? I don't have a pressure gauge so I'm also wary of buying this, not to mention I've heard it takes some fab work to get it in. Any help is appreciated as always. - Pac Man
-
 Hey Guys! I am new here and I have a 1978 280Z. It has a blown head gasket which I am in the middle of replacing, that and the timing chain. After doing that I am thinking about swapping in a KA24DE. I can get an engine, harness, and ECU for about $300 at a local pick and pull. What I am wondering is weather I can put the KA24DE in the Datsun with the stock 4 speed manual transmission. I have read on this forum that the KA can fit in the 5 speed but is tilted the wrong way. I am guessing that the KA will also bolt right up to the 4 speed? I am pretty good at fab work and have my schools shop to work in. I can also get a 5 speed from a 280zx or from a 240sx on craigslist, although the 240sx trans would require a custom shortened driveshaft and I am trying to do this on the cheap (or maybe could I just move the engine and trans forward 2 inches?). My preferred method is sticking with the stock trans and bolting up the KA, could I do this and make a custom oil pan to accomadate for the odd angle? Or would I have to tilt the stock trans? Thanks, Cooper. Ps. The reason that I am doing this is because I would like the MPG and reliability of the KA.
 -
 So I figured I'd start a build thread for my Z. I am most definitely a newbie, so any and all tips, comments, and criticisms are very welcome. Here's a list of the cars I've owned. 89 240sx 91 240sx 90 240sx 90 300zx TT 97 A4 2.8 quattro 68 mustang fastback 74 MG midget So as far as my car history, I've had quite a few of running projects (minus the fastback). That being said... None have scared me quite as much as the 280z. The reason is I'd like to do the LS1/T56 combo in it. I'm in Texas and there is a shop in Fort Worth ( Larry's Speed and Custom) that will put the engine and tranny in and set up the AC and power steering for $5K. I will have to source and purchase the engine myself. It starts to hit the wallet pretty hard, all at once. I was also thinking of a 302, then finding someone to do the welding/fab work for me. I don't have the equipment and I would be afraid of ruining this car. Anyway... Here are some photos. Gotta love the two sided Paint. It's really rust free and fun to drive as it sits. Now I just need to figure out which engine I'm gonna do. soon I will have some webisodes on youtube of the build/ownership of the Z. If nothing else, I should have fun. Cheers.
-
I came into possession of an actual NOS Nissan OEM 280Z hood. It had sat in a storage shed in Pueblo, Colorado since 1986 and is still in the battleship gray primer with the Nissan part code and sticker on the underside. It does not appear to have ever been placed on a car. I'm considering putting it on my orange 240Z. I would paint the vents a satin black to match the front and rear spoiler on the car. My car is undergoing a turbo motor swap. With respect to this 280Z hood, I'm not sure if the vents are actually functional as I've never owned a 280Z. My other option is to try and fix my 240Z hood which just isn't working out. It's a bit rusty, has been worked on, and I think even with 20 hours of metal work will not be 1/2 the hood this OEM one is. I'm concerned about originality, but since I already swapped the motor, transmission, and differential - I kinda think that ship has sailed. Does any one have a picture of a 240Z (orange) with the 280Z hood for comparison? Any opinions: looks, functionality, etc.?
-
Looking for 280z seat rails/brackets so I can bolt in my new seats!!! Let me know if you have any!! Thanks!!!
-
I'm looking for some door panels for 280z Coupe 77-78. Currently have perfect condition door panels but don't fit the 77-78. Willing to trade or buy some. Let me know. Thanks
-
I've bought a number of vehicles in my time, but I'm looking for specific advice here. Here's what I have: 1. 72 240z 2. n42 l28 with SU carbs (x2) 3. 4speed transmissions (x2) It needs a radiator, all the hard lines, pedals, rear brakes, seats, and harnesses before it can move itself around. Because of that, I started looking for a parts donor for all the little stuff, to get the ball rolling. I happened to find a 280z with an l28et in it and a couple manual transmissions attached. It has side skirts and bumper covers, which kind of concern me, and the engine wiring is incomplete. None of that concerns me much, but my previous experience with early Nissan EFI does. I haven't seen a reliable, effective l28et using the stock engine management. Therefore, the plan for this car would be to plop one of my SU-fed l28's in it and put the l28et on a stand as the more serious build for my 240z. Here's the question of the day: Aside from the obvious doglegs, frame rails, battery tray, engine rotation, brake line condition, etc ... what dealbreakers should I look for tonight?
-
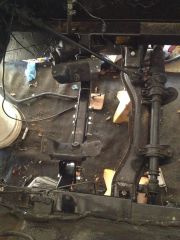
Put the trans and motor together before I clean them up a little
BubbaDog127 posted a gallery image in Members Albums
From the album: Cobra 5.0 280z
-
From the album: Cobra 5.0 280z
Brian Laine aka motormatch cradle kit for a small block ford -
From the album: Cobra 5.0 280z
Brian Laine aka motormatch cradle kit for a small block ford -
Inspired by the Head cooling on cylinder #5 thread (http://forums.hybridz.org/topic/59029-head-cooling-on-cylinder-5-solutions/), I decided to make my own diagrams of the cooling system for US Z/ZX L6 engines. I had to exaggerate and diminish a few proportions to maintain decent flow while using a flat layout. These charts are as accurate as far as my knowledge and research have shown so far. I will gladly accept any corrections and update accordingly. The year cutoffs are approximate and do not reflect all of the small month-to-month changes of course. On the ZX diagrams, some cars got the throttle body heaters while others didn't. I left them in both diagrams just to cover all the bases. I did spend a fair bit of time on these, so if they do happen to find their way elsewhere on the web, make sure at the very least to cite where they came from. Red = oil passages Blue = water passages and flow direction Yellow = direction of water flow in flexible hoses 1970-1974 240Z / 260Z 1975-1978 280Z 1979-1980 280ZX 1981-1983 280ZX
-
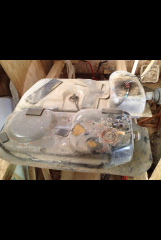
Side by side comparison of the Z tank (bottom) and the mustang tank (top)
BubbaDog127 posted a gallery image in Members Albums
From the album: Cobra 5.0 280z
1977 Z tank 1995 mustang cobra tank -
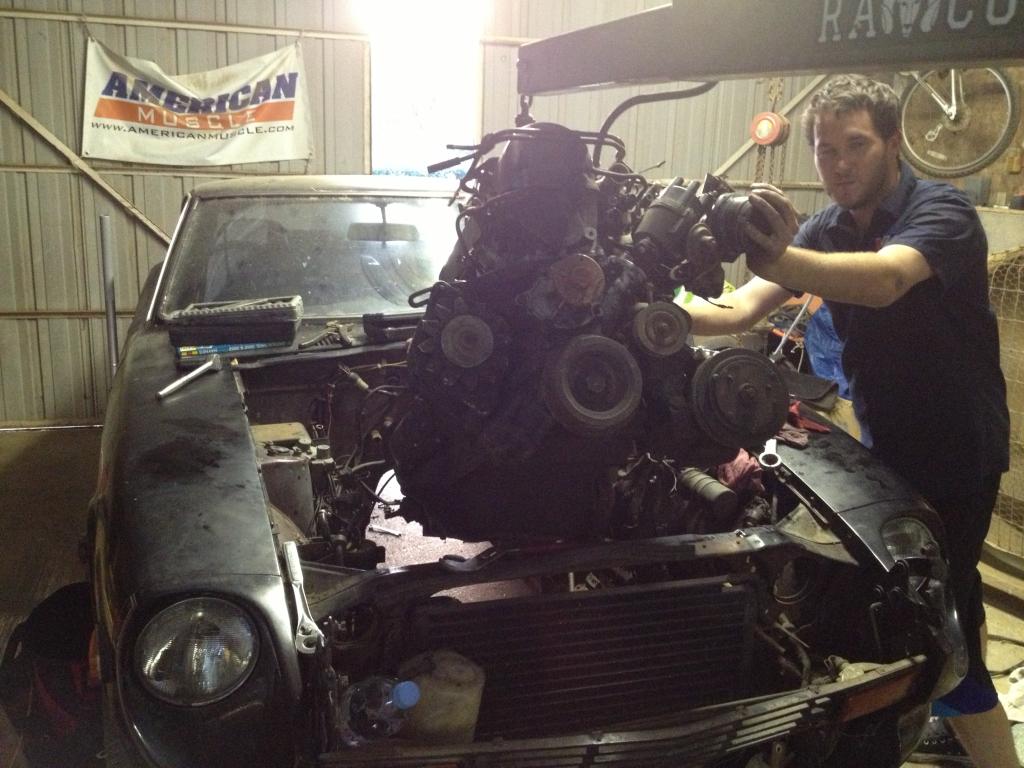
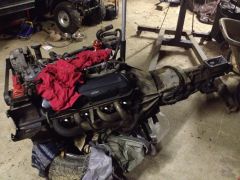
Hey guys! This is going to be my thread for my 5.0 swap in my 1977 280z. A little history....I picked up a 77 280z from a guy in Texas. Its not a bad car for the price. I had this crazy idea to drop a 5.0 in it, since I've got a 1995 mustang GT as a DD. I bought a 1995 GTS with a full Cobra motor in it from an auction website and parted out the rest of the car. My dad had a bunch of Z's back in the day, and I wanted to build something he would enjoy as much as I would. Please if you like any of this, let me know! I would love to keep posting some pics and hopefully get some help and help out some other guys in the same boat. Now...lets get started
-
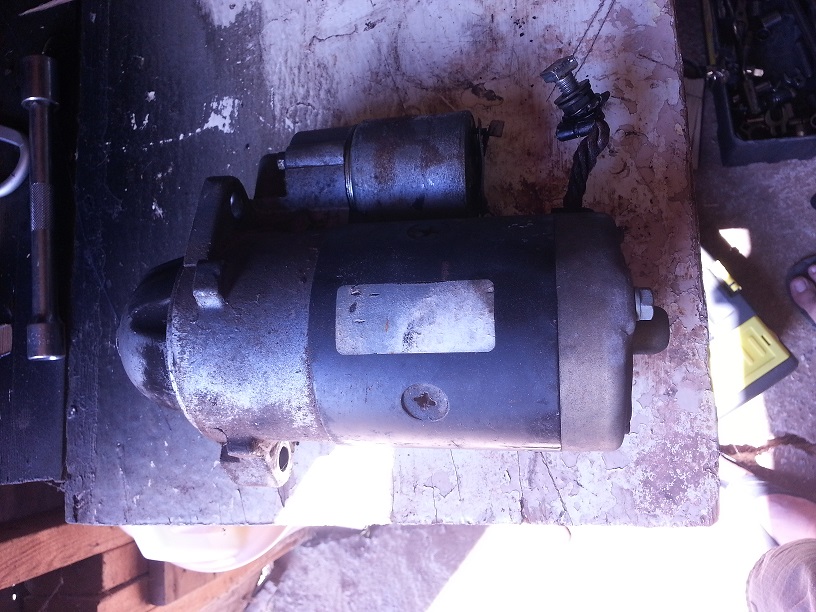
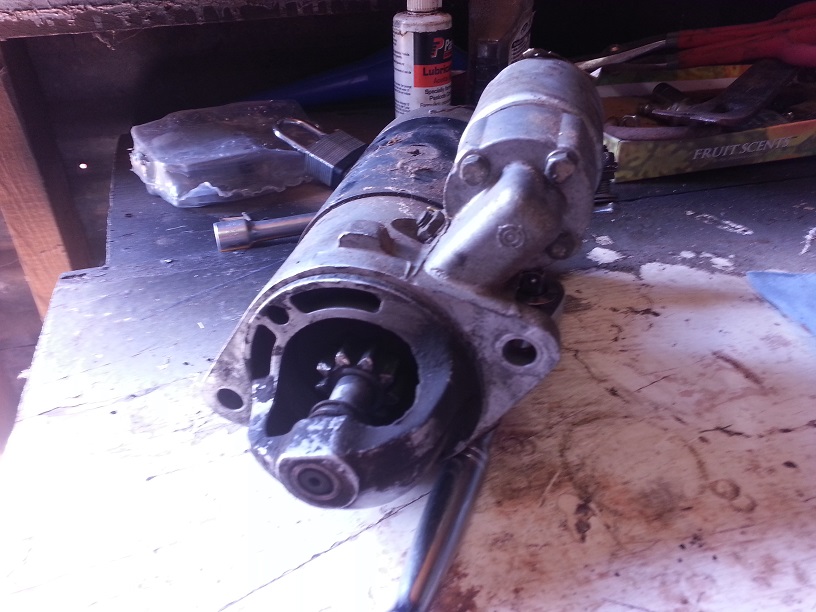
It came off a 78 280z 5-speed. I believe its a Hitachi direct drive type but there aren't any markings and the label has faded. The solenoid is trashed and new ones cost more than a complete reman starter. http://www.napaonline.com/Catalog/CatalogItemDetail.aspx/Starter-Remfd-Premium/_/R-REL444639_0226137554 I'm also inclined to purchase a gear reduction type, but I'd like to know if this is a good idea. All I've read is that the torque is higher and battery load less on the gear redux. Any other pros and cons for gear reduction vs direct drive? I appreciate you time!
-
I'm looking for one driver side window for a 77 or 78 280z. PM me for a number to text. Located in West Texas.
-
 I'm attempting to track down the current or previous owner of a 1977 280Z which is mentioned in this blog post: http://carticular.blogspot.com/2012/09/ebay-find-77-280z-ls1-swap.html The car was once for sale in Gretna, LA and listed on eBay in September 2012. Any help appreciated!
 -
I apologize, I'm sure this has been asked before, I did do a little searching but nothing specific came up with the terms I used. I took my car into my local mechanic this morning, and he said most likely I needed a head rebuild, and a clutch job, he quoted me at $1200 for the head rebuild, sounded a little pricey to me. does anybody know roundabouts what I should be spending at a shop to have my head rebuilt? I live in Long Beach, CA any shops that you could recommend would be appreciated as well. all cylinders are good except my 5th cylinder which is fouling the spark plug quite badly.
-
Hi everyone, I'm changing out the heater control valve in my car and possibly the heater core while I'm at it. I want to replace the hoses since there's a good chance that the current ones will crack or break when I remove them. I've been trying to source new ones and I can't seem to find the whole set anywhere. I was going to buy 2 of the 3 at Black Dragon but after checking their diagram and my car's setup, they seem to be different so I'm hesitant on buying from them. Not to mention a lot of them are fairly pricy... I'm not really looking to pay $70 for a few little hoses. Do I need the shaped hose? Or could I use some unshaped hose instead? And if I need the shaped hose, can someone point me to a place that sells them for a reasonable price? EDIT: For clarification, the hoses pictured here are the 3 I'm looking for: Thanks. - Brandon
-
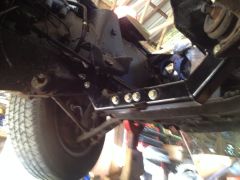
From the album: 280z After 5.3 TR6060 Install
This is around the final ride height with 1" tokico lowering springs/struts installed with 225/50/16 on 16x8 XXR 531's. TR6060 from '11 Camaro SS 2k Miles 5.3 from '02 Avalanche 80k Miles -
Hey all I have a 1978 280z I've been trying to diagnose a problem I've been having for the last month and a half or so. Lately the problem has escalated and is affecting drivability. Fuel cuts out a lot , like it's "falling on it's face" I know it's not an electrical problem, vacuum is good, haven't done a fuel pressure test, I replaced my inline and under the hood fuel filters no change, been running fuel system cleaner for the last 3 weeks, I was starting to get the idea that maybe the catalytic converter could be clogged, but I'm not sure. I definitely think that is the problem or it's a fuel delivery issue, and would like some help diagnosing the problem. car is still somewhat drivable under slow acceleration, it is my daily driver. it also idles fine and responds to throttle normally when in neutral. also passed smog about five months ago, all of the cylinders are running slightly lean except cylinder 5 which is burning oil (per spark plug inspection). I work m-f 9-5pm so it's difficult for me to take my car in to a mechanic, any ideas would be appreciated and yes I have been using the search function and trying many things before I finally decided to make this post. I may take a day off next week to take the car into datsun alley in signal hill by my house, but until then I'll be trying to get it up an running myself. Another things is that it idles slightly higher (~200 rpms) after being driven for around 20 minutes.
-
Hey, I'm new here and did a search but didn't find a real answer. What's the best place to buy repair/ patch panels and fenders. I live in the mid-west and have a 76' z with some rust. I know Black Dragon parts are foreign produced, MSA says on some of there parts that they are made in the USA and I really don't know anything about British Victoria parts. Are there other sources? Of the ones I mentioned does one provide a better fitting panel and fender than the others??? Any feedback and input would be appreciated, thanks in advance...