NewZed
-
Posts
6700 -
Joined
-
Last visited
-
Days Won
72
Content Type
Profiles
Forums
Blogs
Events
Gallery
Downloads
Store
Everything posted by NewZed
-
Nobody can give you measurements unless they know all of the numbers. And then they'd have to do the math. Too risky. I do notice though, that you've left out a critical number - actual wheel diameter. The rubber. You give rim dimensions, but if you run low profile tires, it's a whole different thing than "normal" profile. 17x9.5 isn't enough information. Ride height and shock travel are the two things to focus on. Set ride height, determine how much shock travel you want above and below that, and that will determine the distance from the hub to the top shaft mount (edit 5 11 - actually ride height determines spring perch, and travel above and below set point of shock shaft determines strut tube and spacer length). Might be worthwhile to mock everything up on the car and cut your way down to where you want to be. You could even cut the top off of the tube, leave it off. and use a spacer under the Koni to get shock travel right, then cut the section out to make the strut tube fit the Koni body. Lots of paths to get there but all fraught with peril. Full disclosure - I've never sectioned a strut.
-
So you have what the drag racers want, but would like a little more show when you go? Kind of funny. Doesn't suspension setup affect traction pretty dramatically? If you have adjustable shocks you could probably crank them up to max damping and get spin a little easier.
-
Did you do this...

-
Higher spring rate in front than rear?
NewZed replied to nusevad's topic in Brakes, Wheels, Suspension and Chassis
Here's what seems like a good example of a successful autocross setup - http://forums.hybridz.org/topic/122227-fs-datsun-240z-f-prepared-fp-125k-obo-texas/?do=findComment&comment=1143065 -
So what you really want to know is what 1978 280Z component has white/black stripe and black/yellow stripe wires, and connected to something under the driver side dash of the 1978 280Z. Have you measured resistance across the two wires? That would be a clue. The 78 wiring diagrams on the internet aren't really high enough quality to see wire labels. Too bad.
-
What year S30? What year and type of Z31 harness? Which harness did the plug you're looking at come from, S30 or Z31? Have you looked at any wiring diagrams at all or are you just connecting colored wires?
-
Too much information. Try to be more concise. You're following somebody's guide thread? Probably bumble zee's?
-
That's not what most people would consider an L28ET. The F54 block maybe, but the N47 head is a 77-79 NA head. The P79 head is an 80-83 NA head. With the unknown cam it sounds like you bought a cobbled together turbo setup. What other parts came with it? Engine management, turbo, exhaust system, etc.
-
Alternator issues, a little confused at what to do next.
NewZed replied to ferrariowner123's topic in Ignition and Electrical
You can feel right or be right. People waste tons of time trying to do the first. Like you're doing. If you get defensive and offend the people that offer direction, you'll end up handing the car over to somebody that makes you feel smart while you open your wallet so that they can fix it for you. How could you know that ignition timing is not advancing? You're passing along things that others told you. Let go of the attitude and try to learn something. -
Alternator issues, a little confused at what to do next.
NewZed replied to ferrariowner123's topic in Ignition and Electrical
Surface charge. Misread - I'm not a woman and my last name's not Read. You didn't say that you waited and tried without charging the battery, and it didn't work. You assumed it was the battery and put it on charger. Not the same thing, you may have been charging a charged battery. In each case, the car sat and cooled off while you were focused on the battery and charging system. Word people would call the battery numbers a "red herring". You're fixing things that don't need fixing, while the real problem might be heat-related. Maybe. Reproduce the problem, let it cool without doing anything, see what happens. If you've already done that, write better. Could also be that you have a battery drain, which kills the battery after it sits for a while. This sentence doesn't make sense, but might be a clue - "Drove it a couple of weeks later, same issue, not enough juice in the battery to keep in going." Did you drive it, then a couple of weeks later it wouldn't start? Or did you drive it a couple of weeks later, then it wouldn't start. Uhh, well, good luck. -
Alternator issues, a little confused at what to do next.
NewZed replied to ferrariowner123's topic in Ignition and Electrical
You're assuming that this - " no power, no advance on the timing, began to back fire, and then it dies on the side of the road" - is caused by a dead or dying battery. Those aren't symptoms of a weak battery. You've probably been focusing on the wrong parts. 13.8 volts at idle and mid 14's above idle are typical for these systems. The numbers you posted look okay. Look elsewhere for your problem source. -
I think that's actually your head light circuit. Lots of ways to short those. MSA has links. http://www.thezstore.com
-
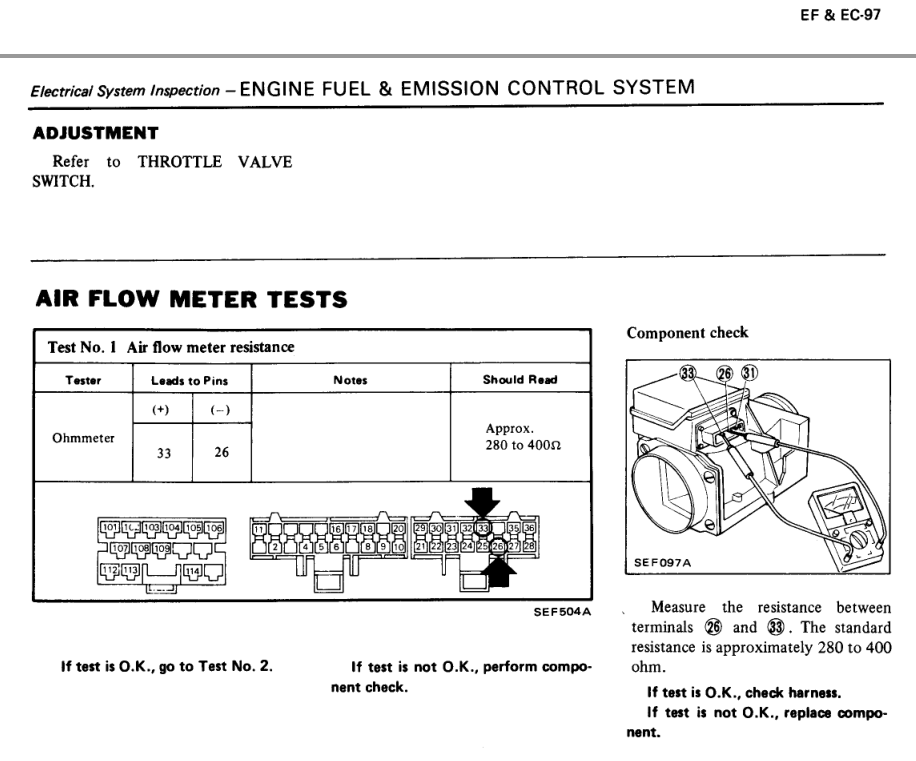
So the immediate question is, is 200 approximately 240. Might affect the way the engine runs but probably not your issue. The bigger thing though is, you really need to take all of the measurements, or as many as you can. The page number is at the top of the image I posted. You'll probably find some problems and know more when your done. Once you have the ECU connector and meter in your hands and the pages available, why not keep going? Test everything you can with the meter, just to be sure. http://www.nicoclub.com/FSM/280z/1982/1982%20280zx%20FSM/efec.pdf
-
You should test your wires before you connect them. Make sure they're the ones you want and also make sure that they're not connected to something they shouldn't be. For example, the blue wire branches off to the ignition module and Pin 1 of the old EFI harness. Connecting random wires based on color is risky. I think that the fuel pump relay is one of those things that can be done several different ways. But if you didn't devise a new way to power the pump relay, then the pump won't get power because the 76 AFM had a switch that powered the relay. Your 82 system doesn't have that. A methodical approach, with a meter, to each issue is the best way to go. You can burn up most of your work, or damage something, with one bad connection. You'll end up using the meter anyway just to figure out what you damaged by not using the meter.
-
I'm going to guess no AFM signal. It starts, sucks extra air, but the AFM isn't communicating with the computer so it leans out and dies. Have you checked the AFM to computer wires with a meter? Easy. Attached a sample from 1982. Can't remember what harness you have. If you didn't connect the blue wire in the engine bay to coil negative you won't have tach. That's how 1976 works. You have a blended system now.
-
S12W on 73' Z MM adapter plate issues
NewZed replied to New-to-240z's topic in Brakes, Wheels, Suspension and Chassis
Is your new spacer 17.09 mm thick? Seems like your grinding job should be fine. It's not a critical surface. You might get back to Joe though so that he can get the dimensions right for the next guy. -
Rebuilding a 78 280Z - need advice
NewZed replied to Casper0878's topic in S30 Series - 240z, 260z, 280z
You might be reading too much, and picking out the odd little bad things that have happened to people in the past. Planning for 400 ft-lbs of torque and wide tires, before you've even chosen an engine. The lowering springs thing is only an issue if you're unseating a spring during racing, or blasting over speed bumps. The breaking suspension parts is just the T/C rods, and there's a simple way to avoid it. The half-shafts are fine for most people, unless they're drag-racing. More good reading - http://forums.hybridz.org/forum/83-drivetrain/ http://forums.hybridz.org/forum/80-brakes-wheels-suspension-and-chassis/ Note though, that Hybridz is race-oriented so much of the advice is more than you really need if you're " Not gonna track my car, just drive around town maybe smashing on the gas every once in a while so I won't be cornering hard or anything like that. " You'd have much fun with just a well-tuned stock engine and chassis. And don't forget emissions testing. 78 is in the test-zone, I think. -
Looks like it might be 34 or 35 here - http://www.carpartsmanual.com/datsuns30/DatsunZIndex/PowerTrain/TransmissionGears/5Speed/tabid/1708/Default.aspx And, surprisingly, your local Nissan dealer may be able to get the parts. Or Courtesy. http://www.courtesyparts.com/block-anch-p-343450.html http://www.courtesyparts.com/block-thru-p-343449.html Or you can accept it as useful practice for future endeavors and cut your losses (edit - just meaning that the early 5 speeds may not be the best rebuild candidates, compared to the ZX boxes with better ratios). The fiber rings apparently are NLA. And the rebuild parts can be suspect, if they're not Nissan. Read this thread. It starts slow but there's a ton of good stuff in there - http://forums.hybridz.org/topic/110792-high-rpm-shifting-dynamics/
-
Higher spring rate in front than rear?
NewZed replied to nusevad's topic in Brakes, Wheels, Suspension and Chassis
The Nissan factory supplied higher in back. Probably depends on how you plan to drive the car. Good stuff from the internet - http://www.zcar.com/forum/10-70-83-tech-discussion-forum/100085-spring-rates-sudden-enlightenment.html -
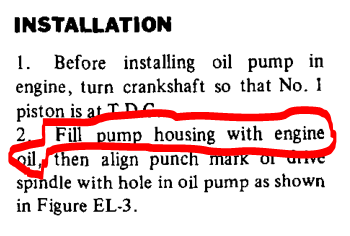
I didn't know what I was talking about above in #7, and mixed some weird stuff in that post. Made an edit. Here's a page that might be useful - http://www.carpartsmanual.com/datsuns30/DatsunZIndex/Engine240Z260Z/PistonCrankshaft/tabid/1564/Default.aspx You're really taking about oil pump drive gears, mounted on oil pump shafts (quills), that couple with distributor shafts. Not Distributor Shafts. That's where my brain got misdirected. Like here - http://www.carpartsmanual.com/datsuns30/DatsunZIndex/Engine240Z260Z/OilPump/tabid/1572/Default.aspx
-
It was a carb'ed engine with the EFI tank? That's interesting. Tony D has written about this in the past. Others, not many though, have had 1975 260Z's. Edit - here's a relatively recent post - http://forums.hybridz.org/topic/114087-vin-help-hls30-99336/ compared to this one - http://forums.hybridz.org/topic/11272-what-was-the-first-year-for-factory-fuel-injection/
-
I think that Nissan used the same shaft diameter for quite a while. 1995 VG30E Pathfinder and 1975 280Z L6 distributors for example. I've pondered hybridizing a distributor (converting it to a CAS/distributor) to use later engine management in the L6 (without having to use a ZX turbo CAS), and measured both. Looks pretty simple except for the mount. Anyway, the short answer to #2 might be that the gears should be fairly easily pressed off and on and swappable. Edit - Note - I was confusing my parts here. Gears versus distributor shafts... Didn't really know what I was talking about.
-
Looking at the pictures, that car looks complicated, even for a car guy. It's a carb'ed turbo engine, not EFI, which is a unique little world. The "280ZX" part is irrelevant. "Starts right up" doesn't mean driveable. If you want something that you can drive while you work on it, that might not be the one. It will take some work, and there aren't many people out there that know enough to help. For $3000 you should be able to find a fairly decent 240, 260 or 280Z that will start and drive. Maybe even tagged and ready to go. If you're planning an LS swap, why pay for an exotic engine?
-
What do you want to do with it, and what skills do you have? Worth is subjective. If you've been here for years, you know that no one is going to make the decision for you.
-
There's a note in Honsowetz's "How to Modify" book about potential damage when installing that type of pin. You have a dilemma. Install and hope or take apart and be sure. Note - I'm only relaying what I've read in the two books I referenced. Never built an engine but understand the concepts. Were it mine, I might throw some heat on the pistons to get some expansion, and dowse the pins in oil to see if I could get some oil in there. To be sure. If they loosen up the odds are better that expansion when running will allow lubrication. Hopefully one of the engine builders will have some more experienced comments.